Category CARPENTRY

Setting window and door trimmers

Before sheathing around windows and doors, the trimmers need to be set. Plumb a trimmer on either side of the window with a 2-ft. or 4-ft. level. The top or bottom of the trimmer may need to pull away from the king stud a bit for it to be plumb. Once the level bubble reads plumb, nail the trimmer in place with one 8d toenail on each side, top and bottom.

If the window is 4/0 wide, for example, measure over 4 ft. from the plumb trimmer and make a mark on both the header and rough sill. Pull the trimmer away from this king stud, set it on the 4-ft. marks, and toenail it to the header and to the rough sill with one 8d nail on each side—top and bottom. Measure from corner to corner and side to side to make sure the opening is square and parallel (see p. 87). Do the same for the other window openings.

Setting trimmers for a door takes a bit more time.

I use a 6-ft. level or a short level attached to a straightedge. Place the level against the wide side of a trimmer. A bubble centered in the tube of the level shows if the trimmer is plumb. If it is plumb, you can toenail it to the header and to the bottom plate—one 8d toenail on each side, top and bottom.

Setting window and door trimmers

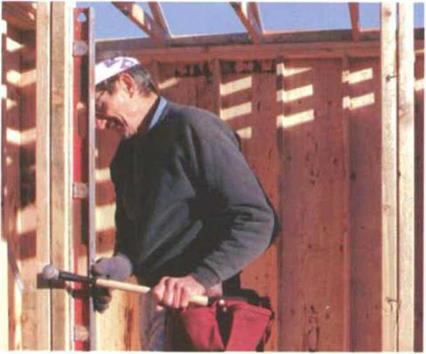
Hold the level on the 31/г-іп. face of the trimmer and use the hammer’s claws to lever the trimmer away from the king stud until the trimmer rests flush against the level. (Photos by Roe A. Osborn.)

If it is not plumb, pull one end out until it is plumb and then nail it in place.

The next step is to straighten the trimmer. Hold the level on the 31/г-іп. face of the trimmer and use the hammer’s claws to lever the trimmer away from the king stud until the trimmer rests flush with the edge of the level (see the left photo below). The 16d nail you drove in the center of the trimmer while framing temporarily holds it straight.

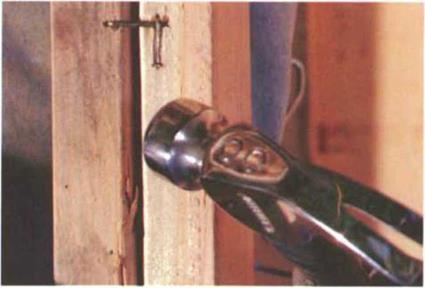
Once you have the trimmer straight, hold it straight by clipping it to the king stud with two 8d nails. Begin by driving an 8d nail partway into either the trimmer or king stud. Bend this nail back onto the other upright. Then drive and bend a second nail over the head of the first (see the right photo be­low). Install three clips per side. This method elimi­nates all shims and holds the trimmer true for the life of the building.

To set the second trimmer, measure over from the first. For a prehung door, the measurement is 13A in. more than actual size. The extra width is for a 3A-in. jamb on each side, and the added 1A in. gives you room for adjustment when setting the door frame in place. So for a 32-in.-wide prehung door, measure over 333A in. on both the header and bottom plate and toenail the second trimmer in place. Then straighten and clip it like the first.

Setting window and door trimmers

A simple clip made with two 8ds will hold the trimmer to the king stud.

Setting window and door trimmers

Extra studs can be added

Setting window and door trimmers


the openings out later with a reciprocat­ing saw. However, before sheathing around these openings, you’ll need to nail in the trimmers (see the sidebar on the facing page). Use scraps of sheath­ing to fill in any gaps around the windows and doors.

Moving a wall in

Moving a wall in

SHEATHING THE WALL

Anyone who has witnessed the damage caused by an earthquake or high wind knows the importance of properly in­stalled interior and exterior wall sheathing (shear walls). In the serious 1992 Northridge quake near Los Angeles, shear walls saved many buildings—and many lives.

Wall sheathing provides strong lateral (horizontal) and vertical strength. It helps hold buildings together. It also helps make a house windproof, which is espe­

cially important if you live where cold winds are a reality. The most common sheathing materials are exterior-grade plywood and OSB.

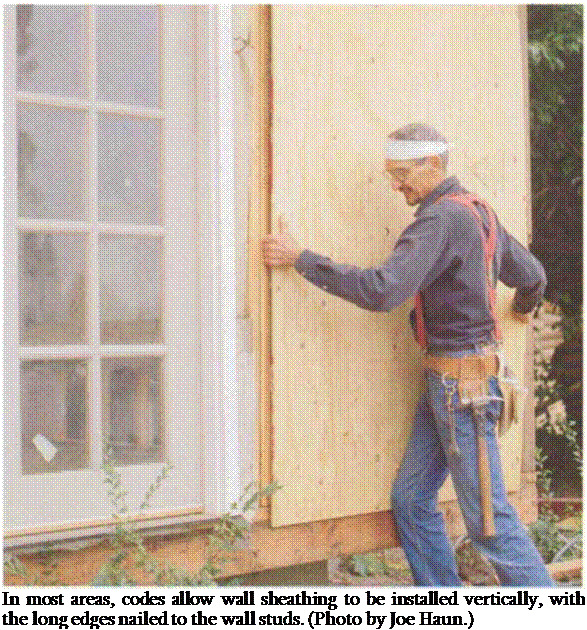
Most building codes allow wall sheath­ing to be installed vertically (see the photo on the facing page), with the long edges nailed to the wall studs. It’s okay to install panels horizontally, but be sure to nail in 2x blocking between the studs at the panel joints. The shear strength of a wall panel is weakened unless it is nailed to the wall on all four sides.

Подпись:Normally, shear panels aren’t the final, or finish, wall covering, so they don’t have to be installed perfectly. Once these rough panels are nailed in place and inspected by the building depart­ment, they’ll be covered with stucco, finish plywood panels, shingles, clap­boards, or even metal or vinyl siding. Before sheathing any wall, exterior or interior, check the plans to see what is required. Often, shear panels need to be longer than the standard 8 ft. so they can extend from the pressure-treated foundation sill, across the rim joist and wall studs, and nail into the plates at the top of the wall. This type of construction ties the entire frame together and gives the house added structural stability.

When sheathing the outside of a build­ing, begin at a corner. If the stud layout is correct, the edge of the first panel should fall on a stud 4 ft. from the cor­ner. Check to see that the corner is plumb. If the first panel is set straight and plumb, all those that follow will be easier to install.

Rough sheathing doesn’t have to be absolutely flush with the corner of the framing, and in fact may be set as much as 3/4 in. away from the corner, since it will be covered by housewrap, finish siding, and trim. But the sheathing does need to break on the center of a stud 4 ft. from the corner. If it doesn’t break on the center of a stud, you can rip the sheet to fit, move the wall stud, or put in an extra stud so there is proper back­ing for edge nailing the plywood.

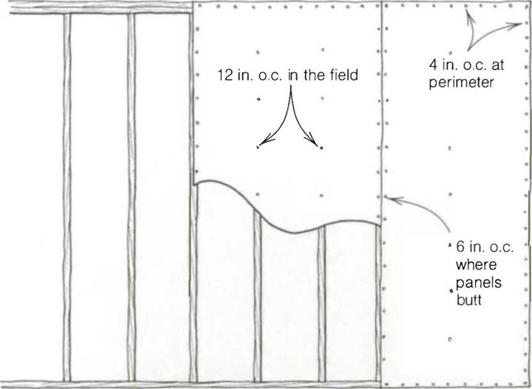
Remember the formula 4-6-12 when fastening sheathing, which is the typical nailing schedule using 8d nails (see the drawing on p. 131). Around door and window openings, nail only into the king studs and leave the trimmers free until it’s time to set the frames. It’s always a
good idea to check with your local build­ing department if you have questions about the nailing schedule.

If you are using a pneumatic nailer, set the air pressure so that nails are driven flush with the surface of the panel.

Nails driven too deep break the skin of the sheathing and weaken the shear strength of the panel. Many codes also require that you use full-headed nails rather than the clipped heads that are driven by many pneumatic nailers.

In humid climates, leave a Vs-in. gap between panels to allow for expansion. When you come to windows and doors, you can sheathe right over them and cut

Working safely on a ladder

Over the years I’ve learned the hard way to be extremely wary of ladders. While they are often in­dispensable, they need to be treated with the same respect accorded a powersaw. A fall from a ladder can seriously injure or kill you, and every carpenter (and many homeowners) can tell of injuries related to a ladder mishap. Here are a few safety tips to make working on a ladder safer.

• Buy a quality ladder. Check the ladder’s label for a rating of 1 A, which means that the ladder is a heavy – duty one.

• If working near or with electrical wiring, it’s a good idea to own a nonconductive ladder. Fiber­glass is a good choice, although these are typically heavy and expensive. (Aluminum and wet wood ladders can conduct electricity.)

• Don’t stand on the uppermost steps of a ladder; get a longer ladder instead.

• Don’t reach too far to the side of a ladder. You can lose your balance.

• Don’t leave tools sitting on top of an unattended ladder.

• When using a stepladder, unfold it all the way, lock its braces, and set it on a solid surface.

• When using an extension ladder, make sure its feet are firmly and securely planted on a solid surface.

Working safely on a ladder

Drive a 16d toenail through the top plate into the double top plate to close any gap between plates. (Photo by Roe A. Osborn.)


Working safely on a ladder

Place the push stick under the top plate against a stud, parallel with the wall. Bend it down as shown, and then pull it up in the middle. As the board straightens, it will push the wall laterally. When the bubble is centered in the vial on the plumbstick, the wall is plumb. (Photo by Roe A. Osborn.)


important to do them correctly. This is one of those times when utmost accu­racy is important. Straight, plumb walls leave behind a lasting story of your skills. No professional carpenter wants to leave a job with crooked walls that lean to one side. If you make sure walls are plumb and lined, all the following work by every trade will go easier, and the finished house will look better.

Plumbing is done first. You’ll need a plumbstick with a level (see p. 35) and a push stick. If you don’t use a plumbstick,
make doubly sure you use an accurate level. A push stick is used to push walls end for end during plumbing. To make a push stick for an 8-ft. wall, cut a 1×4 or a 1×6 about 116 in. long. Try to use stock without a lot of knots; otherwise, it may break.

You’ll need a partner to plumb the walls. Start with the exterior walls. One person holds the plumbstick in a corner. Adjust this wall by pushing it in or out until the bubble is centered in the level’s vial. A short wall can often be moved by giving

Working safely on a ladder

it a shove with your body, but if you need more force, place the push stick under the top plate against a stud and running diagonally down to the floor (see the photo on the facing page). Keep the stick as close to parallel with the wall as possible. Bend the stick down, holding the bottom end against the floor with one foot. Now pull the middle of the stick up. As the board straightens, the wall will move. When the bubble in the level centers, the wall is plumb.

Once the wall is plumb, finish nailing in the metal framing braces. If you aren’t using metal wall braces, nail in tempo­rary 2x studs to hold the wall plumb (see the drawing above). Place one end of the stud about б ft. up in a corner and nail it with two 16d nails. Once the wall is plumb, have a partner nail the stud at the bottom with two more 16d nails.

After plumbing all the walls and nailing in all the braces, it’s time to line, or straighten, the walls. Lining a wall is pretty simple. The bottom plate is

Подпись: To line a wall, sight down the length of the walls and trust that your eyes can see when the top plate is straight. (Photo by Roe A. Osborn.)

straight because it has been nailed to a chalkline, and the top plates should be close to straight if you used straight stock when plating.

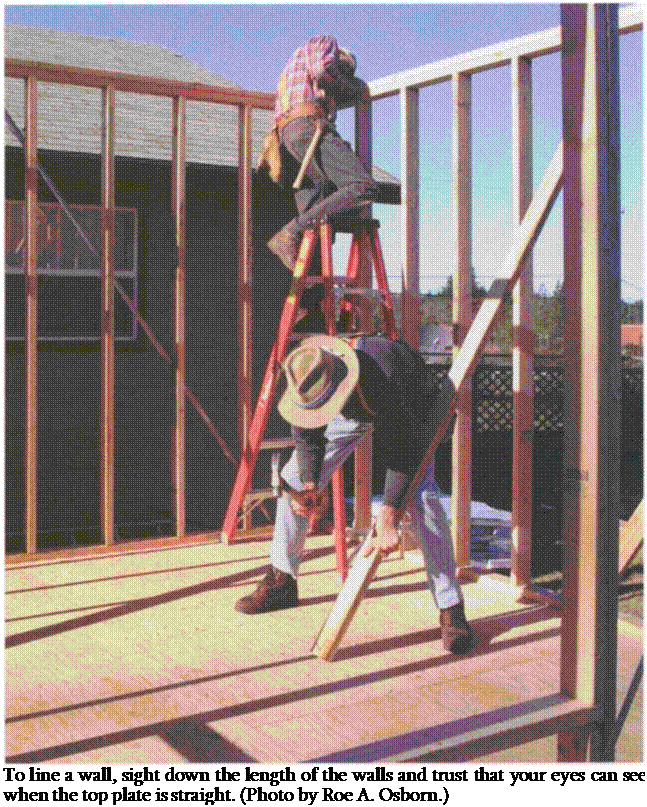
The easiest way to line a wall is to hop on a ladder in the corner and sight down the length of the walls (see the photo above). Trust your eye that you can see when the top plate is straight. Another method often used on long
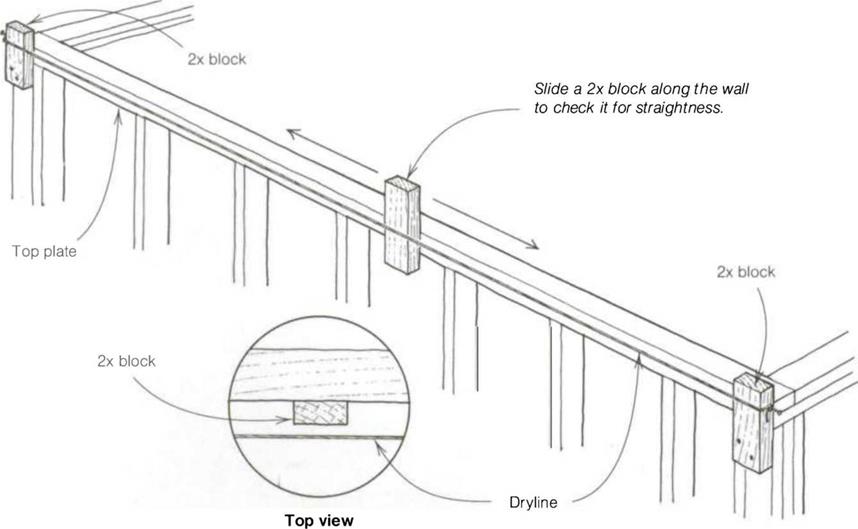
walls is to check the walls with a dryline (see the drawing on the facing page). Nail a scrap piece of 2x to the top plates at each corner and drive an 8d nail part­way into the outer ends of each block. Hook a dryline to one of the nails, pull it taut, and tie it around the nail in the other corner. Then take another scrap piece of 2x and slide it along the wall, checking for a consistent 1 Умп. space between the line and the wall.

Working safely on a ladder

Any wall that isn’t straight needs to be moved in or out. For either job, you’ll need a partner. If a wall needs to be moved out, nail a 2x stud (with two 16d nails) flat against the edge of a wall stud about three-fourths of the way up on the wall (see the photo on the facing page). Hook the daws of your hammer under the stud and pry until your part­ner says the wall is straight. Then nail the bottom end of the stud to the floor with two 16d nails to brace the wall (see the drawing on p. 125).

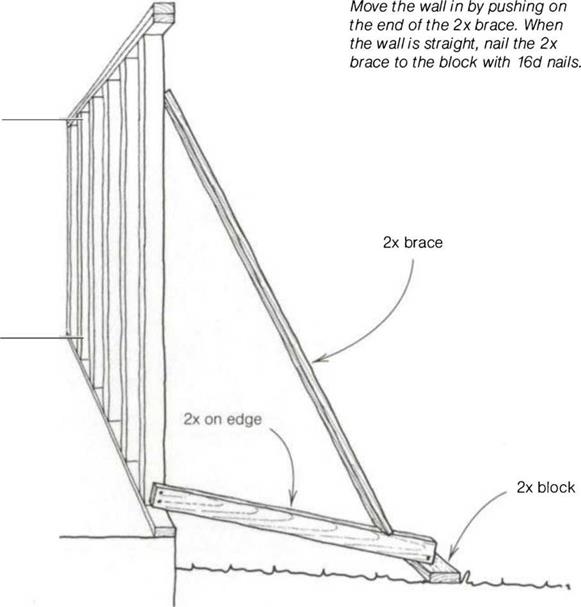
If the wall needs to be moved in, nail a 2x stud on edge to the bottom of a wall stud. Let it extend to the outside, sitting on hard ground or on a short (1 – ft.) 2x block resting on the ground. Nail a 2x stud in place about three-fourths of the
way up on the wall with the bottom end positioned on the horizontal 2x (see the drawing on p. 128). Now you can move the wall in the same way that was used to move the other wall out.

Don’t hesitate to use plenty of tempo­rary braces as you plumb and straighten walls. Extra braces at this point will guar­antee that the building will be held plumb and straight until the rest of the framing is completed. I have worked on buildings where a temporary brace was knocked loose and the wall moved out of plumb because there were no other braces. This can cause a lot of anguish and extra work if it isn’t discovered right away. It’s not easy to straighten a wall once joists and rafters are nailed into it.

Tying off double top plates

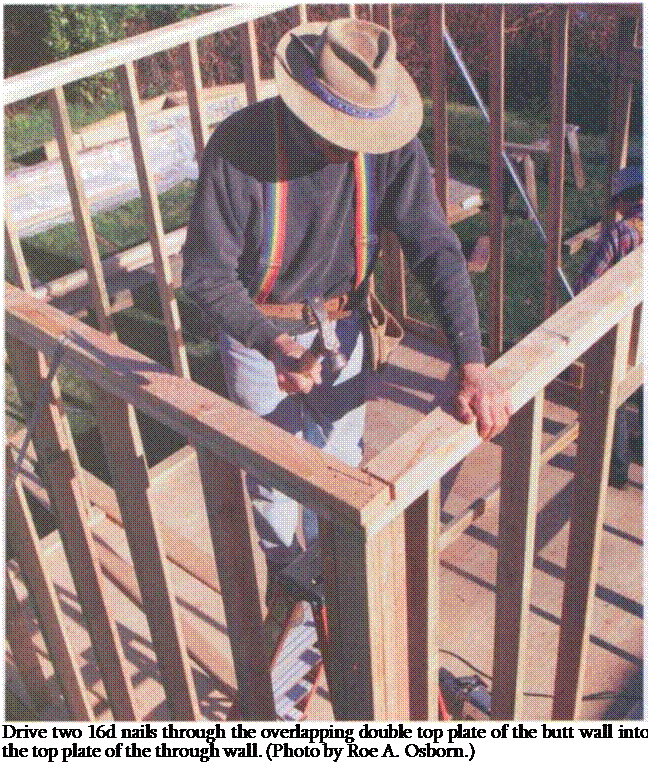
To tie the two double top plates together, nail the overlapping double top plate of the butt walls to the double top plates of the through walls with two 16d nails (see the photo on p. 122). Do this job accurately, and it will make it
easier to plumb and straighten the walls. When there are lots of wall plates to nail off, skilled carpenters usually hop right up on the walls to do the job. I have a gymnast daughter who once worked with me during summers. She was great at walking on plates. The plates were wider than her balance beam. But for inexperienced carpenters, it’s easier— and safer—to work from a ladder (to learn about working on a ladder safely, see the sidebar on p. 123).

The corner marks you drew on the plates earlier act as guides when nailing off the top plates. Make sure that the double top plate is on these lines and

Подпись: Drive two 16d nails through the overlapping double top plate of the butt wall into the top plate of the through wall. (Photo by Roe A. Osborn.)

that the top plates of both walls are touching, just as they were on the floor. If necessary, toenail a 1 6d nail into the top plate of the through wall up into the double top plate of the butt wall to draw everything together (see the photo on the facing page).

Plumbing and lining walls

A woman once called me after moving into a fairly new house, wondering why her pictures wouldn’t hang flat against the wall. She thought she was doing
something wrong. The real problem was that her wall was leaning in 1V2 in. from top to bottom! This kind of error is not acceptable. Take care not to make the same mistake. Once the walls are up and tied together, you need to plumb and line them.

Plumbing means making sure the walls are standing straight up and down. Lining means straightening the top plates from one end of a wall to the other. Neither job is difficult, but it’s

Raising the walls

Like barn raisings of old, it often takes a few warm bodies to raise a framed, unsheathed wall. For raising sheathed walls, it takes even more people or a wall jack. For your safety, don’t try either job solo. And, as always, start with a clear deck.

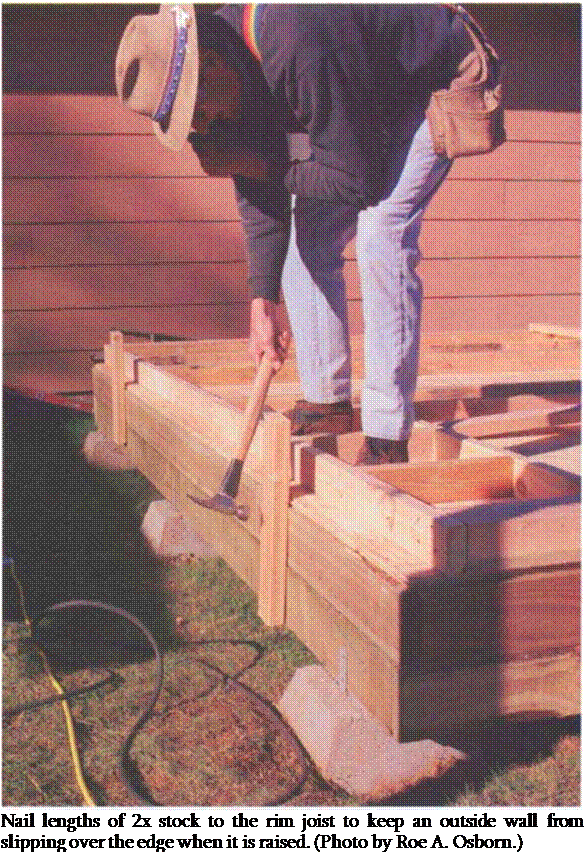
With the first wall assembled, align the bottom plate with the chalkline on the floor if it hasn’t already been toenailed in position. To keep the wall from slip­ping over the outside edge while it’s being raised, nail pieces of 2x stock to the rim joist so that they stick up above the floor a few inches to catch and hold the bottom plate (see the photo at right). On a slab, bolts hold the bottom plate in place; otherwise, the bottom plate is toenailed to the deck.

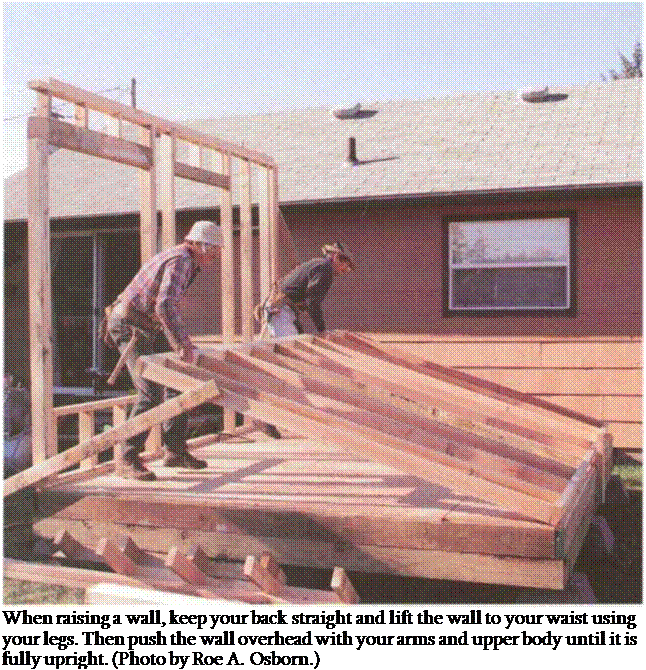
To lift up an unsheathed wall, stick the claws of your hammer into the double top plate, lever the wall up a bit, and kick a 2x block beneath a member. Keeping your back straight, lift the wall to your waist using your legs, then over­head with your arms and upper body (see the photo on p. 120). Then, by pushing on the studs, continue to raise the wall until it is fully upright. Losing a newly raised wall is a common fear of beginning carpenters, but once the wall is upright, it is easy to hold in this posi­tion unless a Wyoming wind is blowing.

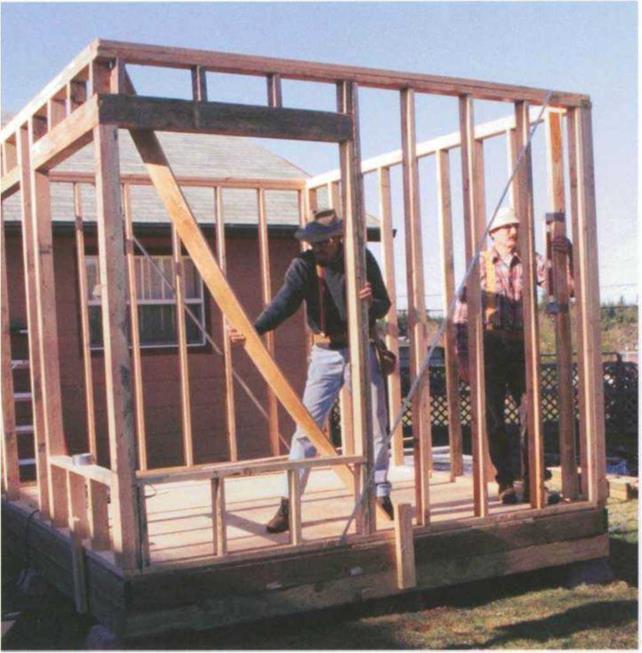
With the wall in position, nail a tempo­rary 2x brace to each end, extending diagonally from about б ft. up on the corner stud down to the rim joist (I like to attach the brace to the wall before I raise it). Drive a 16d nail in each end of the brace. On long walls, nail other braces in the middle. Make sure that temporary wall braces are secure, espe­cially if you have to leave them over-

Подпись: When raising a wall, keep your back straight and lift the wall to your waist using your legs. Then push the wall overhead with your arms and upper body until it is fully upright. (Photo by Roe A. Osborn.)

night. I’ve returned to a job site to find walls blown over because temporary braces weren’t securely nailed.

If the wall needs to be moved end for end or aligned with the chalkline, tap the bottom plate into place with a sledgehammer. Once the wall is where it belongs, nail it to the floor, using one 16d nail between every stud and beside every king stud. Once again, drive those nails close to the studs to leave room for plumbers and electricians to drill through without hitting a nail. Don’t nail in doorways because you’ll be cutting out the plate when you set the door frame later.

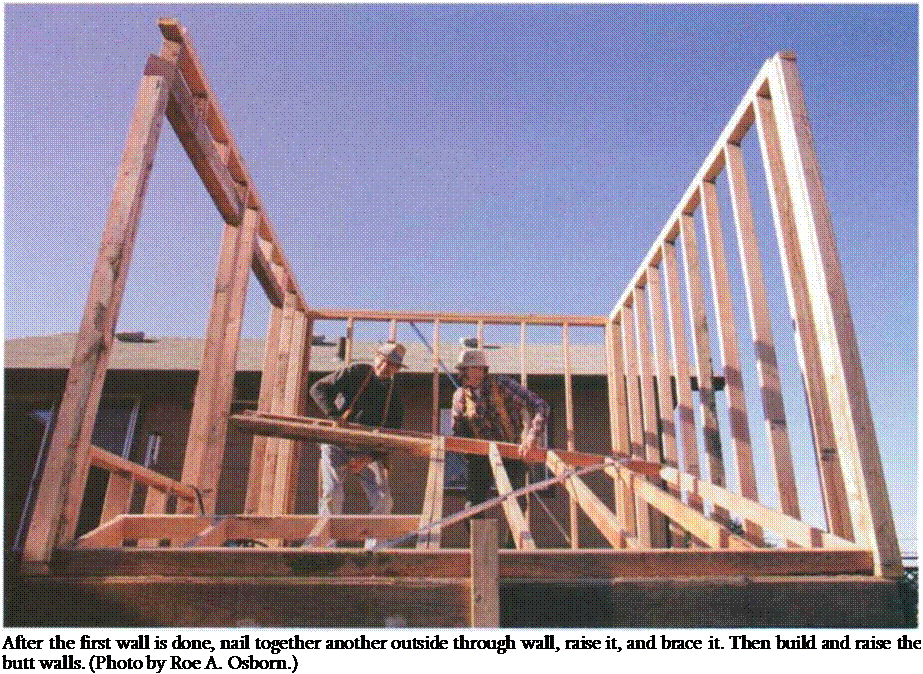
After the first wall is done, nail together another outside through wall, raise it, and brace it. Then build and raise the butt walls (see the photo on the facing page). Remember to cut the double top plate for a 2×4 wall about ЗУ2 in. longer at each end of the butt wall so it can lap over and tie into the through walls. Because of the top-plate overhang, the butt walls may have to be raised one end at a time. Pick up one end to clear the through wall and sort of roll the other end up into position. Remove the temporary brace on the through wall and pull the two walls together. Make sure that the plates of both walls are flat on the floor and not held up by debris,

Подпись: After the first wall is done, nail together another outside through wall, raise it, and brace it. Then build and raise the butt walls. (Photo by Roe A. Osborn.)

then nail the end stud of the butt wall into each corner or channel with three evenly spaced 16d nails, just as you did on the three-stud corners. After you’ve nailed together and raised the remaining walls, stand back and enjoy the impres­sive sight of a framed-in building.

Almost like magic, it’s starting to look like a house.

Double top plate

see carpenters raising the wall and then standing on ladders to nail on the dou­ble top plate, the job is much quicker and easier to do while the wall is still on the deck.

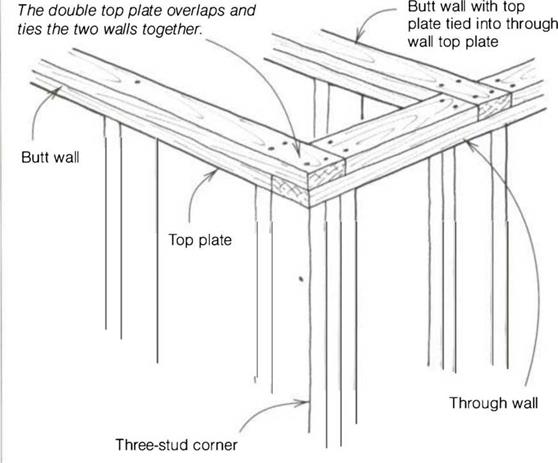
On butt walls, the double top plate laps over the top plate ЗУ2 in. (for a 2×4 wall) so that it can tie into a through wall.

On through walls, the double top plate cuts back from the end of the top plate ЗУ2 in. to leave room for the double top plate on the butt wall to lap over and tie the two walls together (see the drawing above). There is а ЗУ2-ІП. mark on the through walls left from when you located the corners with the corner­marking tool. Lay the double top plate on the wall with one end ЗУ2 in. from the end of the top plate. Go to the other end and cut the plate at the other ЗУ2-ІП. mark. At the channel marks, leave а ЗУ2-ІП. cutout so that an interior butt wall can lap over and tie in at this
point. Cut the double top plates a little short to leave а З3/д-іп. gap (more or less) rather than ЗУ2 in. This makes it easier for the double top plate of the butt wall to slip into the gap in the through wall. This is another one of those times when it’s okay not to be totally accurate.

To start nailing on the double top plates, drive two 16d nails into the end of each plate and then one more over every stud. Avoid driving nails between studs, because electricians and plumbers run their wires and pipes through holes drilled in these locations. Hitting a nail while drilling will not only dull the bit, but it can also give your arm a nasty twist and injure your wrist. Again, skilled carpenters understand what it takes to help other tradespeople do their work well and are mindful of other workers.

Bracing walls

Before being raised, walls need to be squared and braced, either by installing structural sheathing like plywood or OSB or by using wall braces. Due to changes in the building codes, buildings are built stronger than they used to be to resist lateral forces produced by earthquakes and high winds.

As a new carpenter, I used to cut 2x braces into walls. Each piece of 2x was cut on a 45° miter to fit between the studs. Check it out on your next old – house remodel job. One brace would often take me an hour or two to finish, especially when cutting with a handsaw. Once carpenters began framing walls flat on the floor, we learned to lay a 1×6 brace diagonally across the face of the studs. Then we learned to cut slots in the studs with a circular saw to let in the brace and allow it to nail in flush.

Finally, about 25 years ago, an easy-to – install, L-shaped metal angle brace was introduced. Lay it across the framed wall diagonally from the bottom plate to the double top plate and trace a pencil mark along one side. With a circular saw, cut a slot 1 in. deep along this line into the plates and studs. Slip one flange of the brace into the slot and nail it to the bot­tom plate with three 8d nails. Drive one more 8d nail through the brace and into the first stud. At the double top plate, start an 8d nail alongside the brace and bend it over to hold it in place as the wall is raised. You’ll nail the brace per­manently to the other studs and plates after the walls are plumbed.

Nowadays, the house frame is often held plumb by nailing on structural exte­rior sheathing, which eliminates the need for diagonal wall braces. Some builders like to square and sheathe walls while they are flat on the floor. I prefer sheathing walls after they are raised, especially if the house is one story. (A couple of sawhorses are all you need as scaffolding for a single-story house.) Sheathed walls are heavy and hard to raise by hand unless you use a wall jack, a device that hooks under a wall and slowly raises it upright (Qual-Craft Industries; see Sources on p. 198). Further, when building on a concrete slab, you often have pipes in exterior walls that make it impossible to sheathe some sections of a wall.

If you sheathe the walls before raising them, make sure the wall is flat on the floor and that the bottom plate is directly on the wall chalkline. Toenail this plate to the wood deck about every 48 in. or so with 16d nails to hold the plate in place as it is raised. Check the wall for square by measuring diagonally from corner to corner (see p. 87), remembering that the wall is square when the diagonals are equal.

The sheathing panels have to lap down at least 1 in. over a concrete slab. On a wooden floor, the panels have to lap down over the rim joist and 1 in. onto the foundation. So first determine how

Подпись:far the panels must extend below the bottom plate, and then hold your tape the proper distance below the bottom plate and measure up 8 ft. (the panel length) on the wall studs. After marking this height at both ends of the wall, snap a chalkline on the studs. Nail in a row of blocks between studs at this line to give backing for nailing panel ends (9-ft. and 10-ft. panels are available, which allow you to sheathe the entire wall without having a joint).

Building outside corners and channels

Building outside corners and channels

Building outside corners and channels

Three-stud channel


Building outside corners and channelsBuilding outside corners and channels

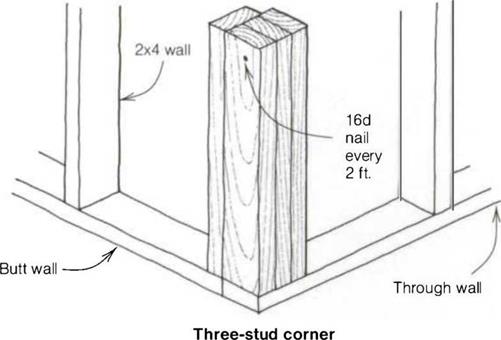
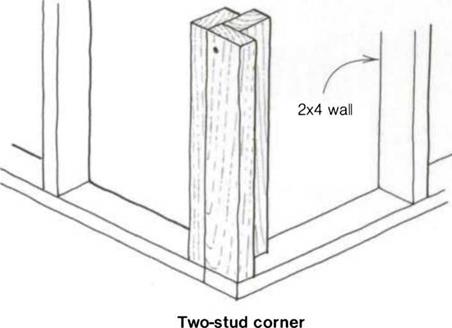
stud is nailed in flush with the end of the plate. The second stud is nailed in flat alongside the first so that when the intersecting wall is raised, it can be nailed into the flat stud.

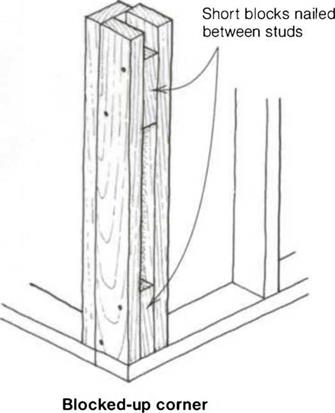
A blocked-up corner can be built by nail­ing three equally spaced blocks in place of the full-length center stud used in
the three-stud corner. Whichever type you choose, the corner should provide adequate nailing not only for the inter­secting wall but also for interior and exterior wall finishes and trim. I person­ally prefer the solid, three-stud corner or channel. I try to use two straight studs for the side pieces and a bowed or knotted stud for the center piece.

Building outside corners and channelsUse 1 6d nails to fasten the studs at the corner to the plate. Hold the nails apart, one high and one low, just as you nailed the rough sills to the bottom cripples, and take care that the sides of the stud are flush with the sides of the plate. After the wall has been raised, you’ll nail the intersecting wall to these studs.

At channels, a stud is nailed in flat between two regular studs (see the top right drawing on the facing page). Tie channel studs together by driving three 16d nails into each side, one 2 ft. up from the bottom, one in the center, and one 2 ft. down from the top. This solidly built channel will provide adequate backing for an interior partition wall.

Once the outside corners and channels are nailed together and to the top plate, continue to nail the studs into the top plate, on the layout marks, with two 16d nails each. This is repetitive work, but you still need to pay attention.

Watch the layout marks so that every­thing gets nailed in properly, and when you come to a door or window opening, be especially careful that you nail the king stud on the X beside the mark showing the header location. It’s easy to nail the king stud on the wrong side of the layout mark, so be watchful.

When all the wall, king, and top cripple studs are nailed to the top plate, pull up the bottom plate and begin nailing it in place. Afterward, drive three 16d nails into both sides of the corner studs, 24 in. o. c., just like you did on the channel.

Nailing off the double top plate

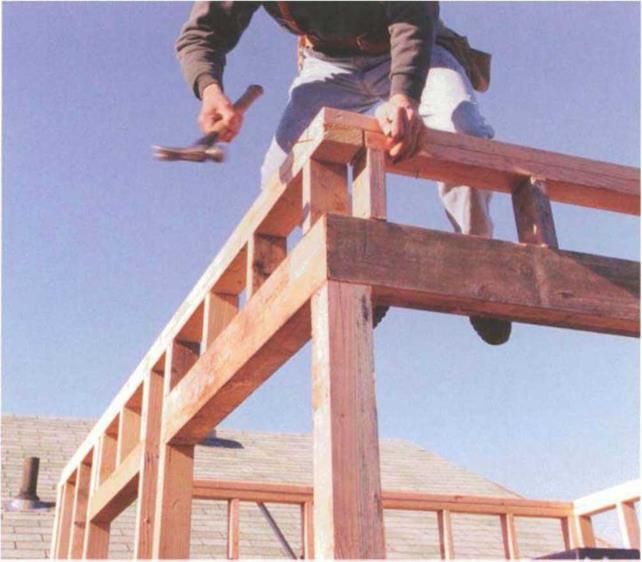
While the wall is still flat on the floor, cut and fasten the double top plate. Structurally, the top plate is an impor­tant piece of wood because it ties the entire frame together. Without it, a building under earthquake or high wind stress can easily come apart at the joints in the single top plate. Although I still

Assembling the walls

Once the door and window frames are assembled, you can start nailing walls together. Start by scattering enough 921/4-in. studs to frame one of the exte­rior through walls, which I always build and raise first. Later you’ll frame and raise the butt walls, which are generally shorter and rise up between the through walls. Scatter the studs on the floor per­pendicular to the plates, one stud per layout mark and three studs for each corner and channel.

As a beginning carpenter, one of my jobs was to set up and nail together all the corners and channels needed for an entire building. Some builders still do this, but I’ve found that it works better to build everything flat on the deck as you nail the wall together. Keep your eyes open for any studs that are badly bowed or twisted and put these aside to use for blocks and roof braces. A bowed stud can leave a bump in a wall once the drywall is nailed on. This can cause problems for finish carpenters who install cabinets, countertops, or

Подпись:interior trim. Framing carpenters need to think about the other tradespeople who will work behind them. Tilesetters like square rooms. Cabinetmakers and finish carpenters like plumb, straight walls. Always try to do work you would be proud to show to your mother or your children.

Now, using the claws of your hammer, pry apart the top and bottom wall plates that you temporarily nailed together. Be sure to bend or pull out the 8d nails used to tack the plates together so that you don’t get a puncture wound as you work. (Because carpenters can’t work long without getting their share of wounds and bruises, it’s a good idea to keep a first-aid kit on the job site and your tetanus immunization up to date.)

Move the top plate straight up to the upper ends of the studs, keeping the layout marks aligned. I’ve occasionally seen framers grab the plate, turn them­selves and it around, and place it in nailing position. Switching the stud layout end for end on the top plate makes for some interesting walls, as you can imagine.

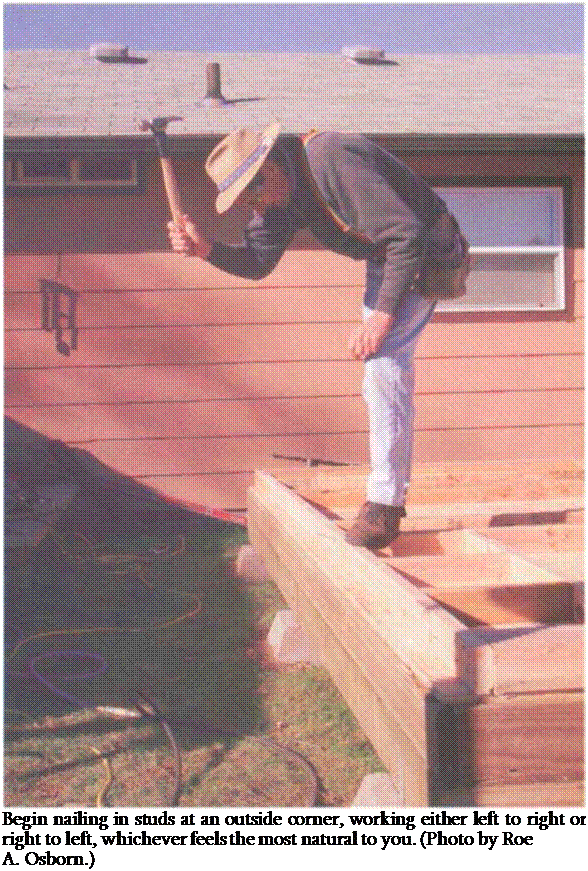
Begin nailing in studs at an outside cor­ner. You’ll find that consistently working either left to right or right to left has a natural feel to you, and over time you’ll develop a rhythm to nailing in studs that involves not only your arms and hands but also your entire body (see the photo at right). Even your feet can be trained to move studs into position for nailing. Framing can become like a dance, where every movement is coordinated and flows into the next. (I have had it hap­pen that my movements became so fluid that time seemed to stand still as I nailed down the plate line. Two of my children are professional dancers. They tell me the same thing often happens to them during a dance production.)

Corners and channels can be built in different ways, depending on the size of the wall and local preferences (see the drawing on p. 116). A three-stud corner is the most basic configuration. If you prefer, you can save wood by building either a two-stud corner or a blocked-up corner. With a two-stud corner, the first

FRAMING THE WALLS

Once the plates are marked up and detailed, you can begin to assemble the walls. When I first started framing walls, carpenters used to toenail a stud in each corner, string the top plate across from stud to stud, and then work off a ladder to nail in the remaining studs. Each wall took a long time to build because we had to nail in one stud, move the ladder, and nail in another. And the fact that we were working on ladders made the work unnecessarily dangerous. It wasn’t long before we learned to frame walls flat on the floor, then raise them into position.

If you’ve done a good job marking the plates, framing walls should be easy. Simply follow the marks, nailing in studs where needed. But first, clean the floor. There’s no need to have extra wood or tools around that might trip you up.

Подпись:
Nailing in cripples

Now the puzzle goes together. Begin by nailing on the top and bottom cripples over and under all rough openings. Cripples are nailed on each end of every header and rough sill and at every lay­out mark in between. When I set out cripples, I also like to scatter 921А-іп. king studs at both ends of each window and door along with their trimmers.

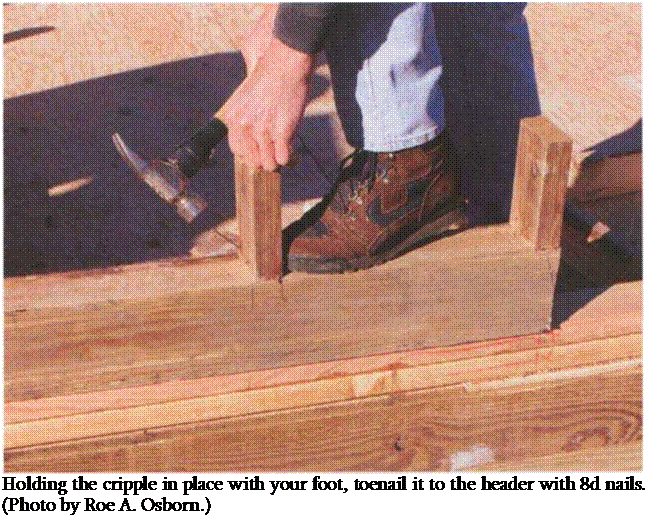
To nail a cripple in place on a header, back it with your foot before starting your first two 8d toenails (see the photo above). Make sure the 2x cripple is flush with the sides of the header, then drive the nails home through the cripple and into the header. This process will become easier as you become more skilled. At first you may find that your toenail angle is too high (in which case the nail won’t have enough holding power in the cripple) or too low (in
which case you’ll drive the 2×4 toward your foot). I’ve driven toenails through a cripple and into the sole of my shoe. It’s rather embarrassing to take a step drag­ging a cripple behind.

The nails should drive easily if you started them at the proper angle, at about 60°. After nailing off one side, toenail two more 8d nails into the other side, repeating the process until all the top cripples have been nailed to their headers.

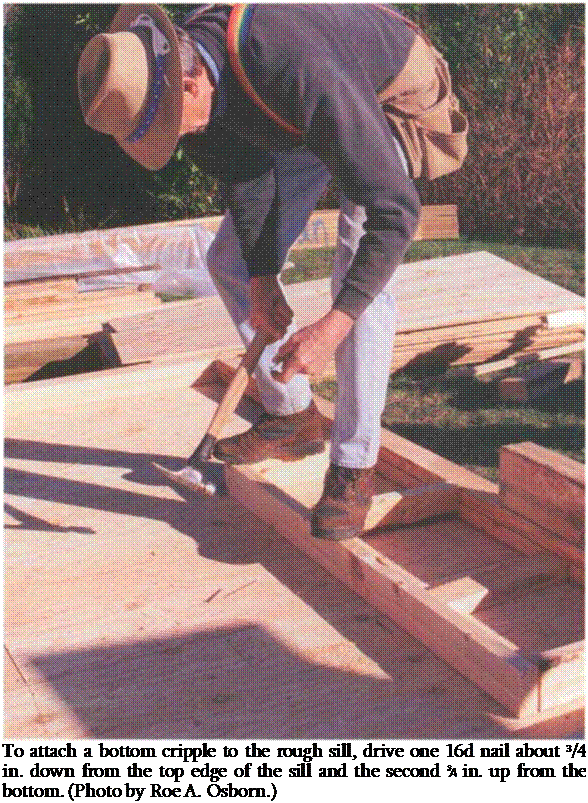
Attaching the bottom cripples to their rough sills is easier, because it involves no toenailing. Move the rough sill to the upper ends of the cripples placed against the plates (see the photo on p. 114). Nail a cripple at both ends of the sill and at every layout mark. Drive two 16d nails in each cripple about 3Л in. from either edge of the sill.

Подпись:Nailing king studs and trimmers

It’s best to nail king studs to the door and window headers and to the rough sills while nailing on the cripples. Assemble the studs in place, exactly as they go in the wall, but flat on the floor. First nail the king studs flush with the top of the upper cripples into the ends of the headers, driving three 16d nails through the king stud into small headers and four 16ds into larger headers.

For window openings, hold the end cripple on the rough sill flush with the bottom of the king stud and drive two 16d nails through the king stud into the end of the rough sill. Then insert a trim­mer under each end of each door and window header, driving just one 16d nail through the center of every trimmer into the king stud. You’ll drive in additional nails later as you prepare to set the door and window frames.

As you nail, keep all the members tight together. Take time to nail the frame together properly. Gaps left between cripples and headers, for example, can mean cracks in the drywall later on as lumber shrinks and the building settles. As you nail, keep both window and door assemblies square with themselves and with the building.

Cutting cripples and trimmers

Keep your mind focused when measur­ing and cutting cripples and trimmers.

A mistake here can cause you big headaches and lots of extra work later on. I recall cutting all the top window cripples 1 in. too long for the first floor of an apartment house we were build­ing. I didn’t catch the mistake until after the walls were framed and raised. Every window and door header had to be removed and the cripples shortened. Not a good way to start your week.

To make the job of cutting cripples and trimmers easier, I usually make a story pole. As the name suggests, this is a pole—actually a 2×4—that tells a story, and it’s used to mark multiple measure­ments or to transfer measurements from one place to another. A story pole can be used to show the locations of headers and sills or the lengths of cripples and trimmers (see the photo at right) or to locate the height of rows of siding (see Chapter 8).
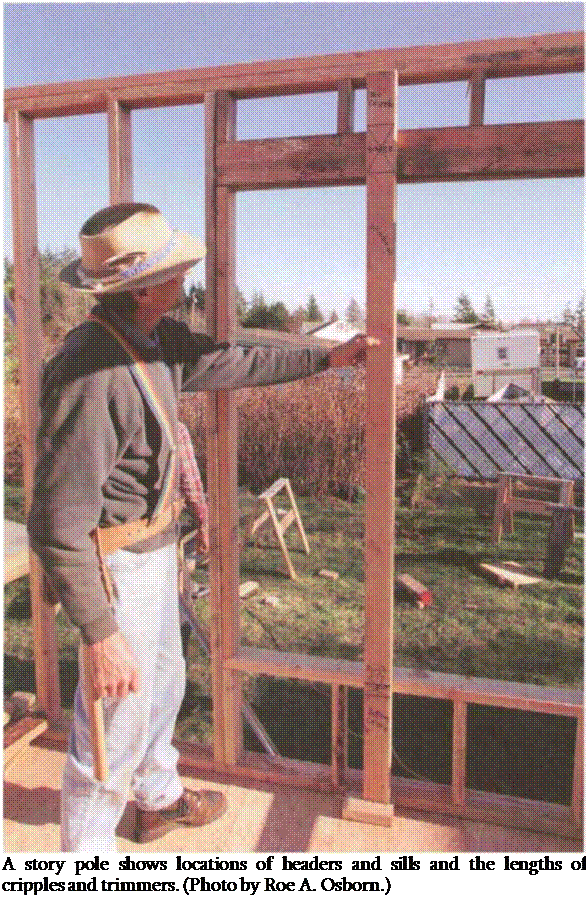
Подпись: A story pole shows locations of headers and sills and the lengths of cripples and trimmers. (Photo by Roe A. Osborn.) To make a story pole for а 9б3Л-іп. wall, take a 921/4-in.-long 2×4 and tack a short piece of 2×4 to one end to act as the bottom plate. Since the height of both the door and window headers from the floor is generally б ft. 10 in., measure up this distance from the bottom of the bottom plate and mark the location of the bottom of the headers. Then measure up from this mark another ЗУ2 in. for a 4×4 header and 5У2 in. for a 4×6 header. Measure up 1У2 in. for a single flat header, or 3 in. for a double flat header.

Cutting cripples and trimmers

Left over on the pole are the lengths of the top cripples: 6У4 in. for the 4×6 header, 8У1 in. for the 4×4 header,

ЮУ4 in. for the 2x flat header, and 83/4 in. for a double flat header. Cut enough top cripples to nail one on each end of every header and one every 1 б in. on center (o. c.) between.

To determine the length of the door trimmers, measure down from the bot­tom of the header to the top of the bottom plate. This distance is б ft.

8У2 in. To make the trimmers fit snug, add about У16 in. to this length, which you usually can do by leaving the line when you cut.

Window trimmers for aluminum – or vinyl-clad frames are the rough-opening size of the window. If you have a window that is 5/0 high, the trimmer will be 60 in. For wood-frame windows, add 3 in. to make room for the wood sill.

To find the lengths of the cripples under a 5/0 window, measure down 60 in. and make a mark. Measure down another 11/2 in. for a single 2x rough sill. The amount left over on the stud—19 in.—is the length of the bottom cripples.

MARKING THE PLATES

Once all the parts have been cut, you have to figure out where to nail them. When I first began as a carpenter, I used to plate, lay out, and build one wall at a time. Now I start by laying out (detailing) where every piece nails into every wall plate. I indicate on the plates the loca­tions of corners, doors, windows, and
every stud. It’s best to keep these detail marks on wall plates simple. Extra marks tend to be confusing.

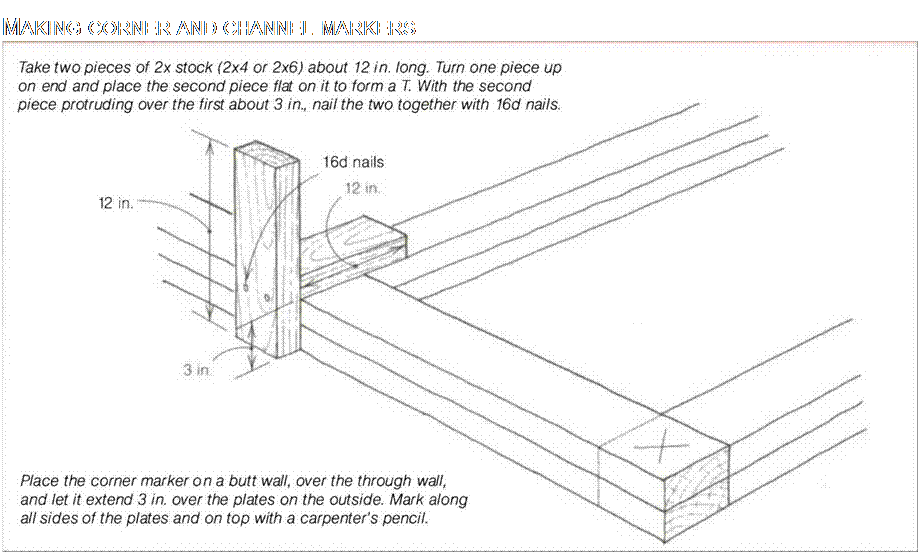
Start by marking the corners and chan­nels (the T-intersection where one wall meets another). Corners and chan­nels require extra studs so that walls can be properly nailed together once they are raised. These extra studs also provide backing so that the drywall can be nailed on the inside and siding on the outside. Mark the locations of these corners accurately on the plate so that raised walls will be nailed in the right place.
Подпись: MAKING CORNER AND CHANNEL MARKERS
A bit of sloppiness is allowed in frame carpentry. Wall plates, for example, can be Vs in. short or long without causing major problems. But inaccuracies tend to accumulate. A small mistake made several times can add up to a headache.
Подпись:So a skilled craftsperson is one who learns to work quickly and, most impor­tant, with precision.

One quick and accurate way to mark corners is with a corner marker (see the drawing on the facing page). Use the corner marker as shown in the drawing to scribe layout lines for corners and channels, which will show exactly where to nail in the extra studs needed at these points. It also marks where to cut the second plate (double top plate) that is nailed to the first top plate as the walls are being framed.

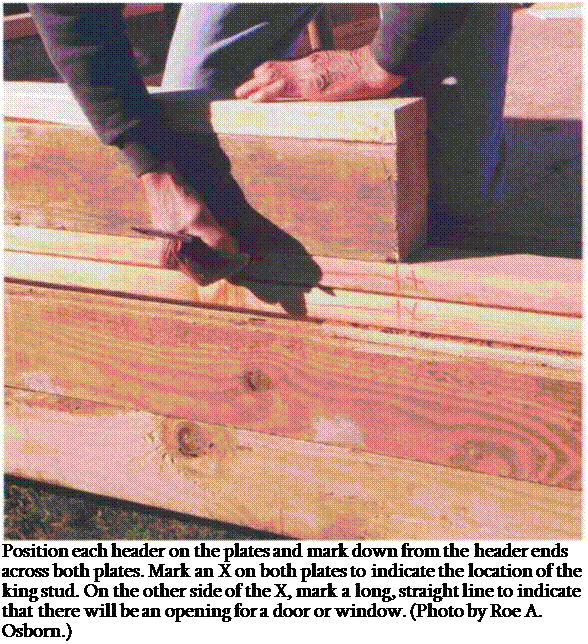
Now, following the plan, find the loca­tion of each window and door. Position each header on the plates and mark down from the header ends with a piece of blue or black keel across both plates. Next to this line, mark an X on both plates on the side away from the header to indicate the location of the king stud that nails alongside the header. On the other side of the line awayfrom the X, make a longer, straight line along both plates. This line indicates that there will be an opening for a door or window at this location (see the photo at right).

Wall studs are usually 1 б in. o. c. or 24 in. o. c., but you never know what to expect on a remodel job. I worked on an old house once in which the studs were about 5 in. o. c. Both the outside and inside were sheathed with 1x pine.

Good construction, but it would be rather expensive these days. At least it was no problem to hang a picture on the wall. [8]
from Pairis Enterprises (see Sources on p. 198). Laying out with this stick is cer­tainly faster than using the 6-ft. folding rule I started with as a beginner. Most metal tape measures are clearly marked on 16-in. and 24-in. centers and can also be used for layout.

Every carpenter needs to become famil­iar with specialty tools like the layout stick. I seldom use a tape measure to lay out studs or plates simply because it’s faster and just as accurate to use a lay­out stick.

Exterior walls often are sheathed with plywood or oriented strand board (OSB), materials that come in 4-ft. by 8-ft. sheets. So wall studs need to be spaced
Подпись: Use a layout stick to mark stud locations on wall plates. (Photo by Roe A.Osborn.)
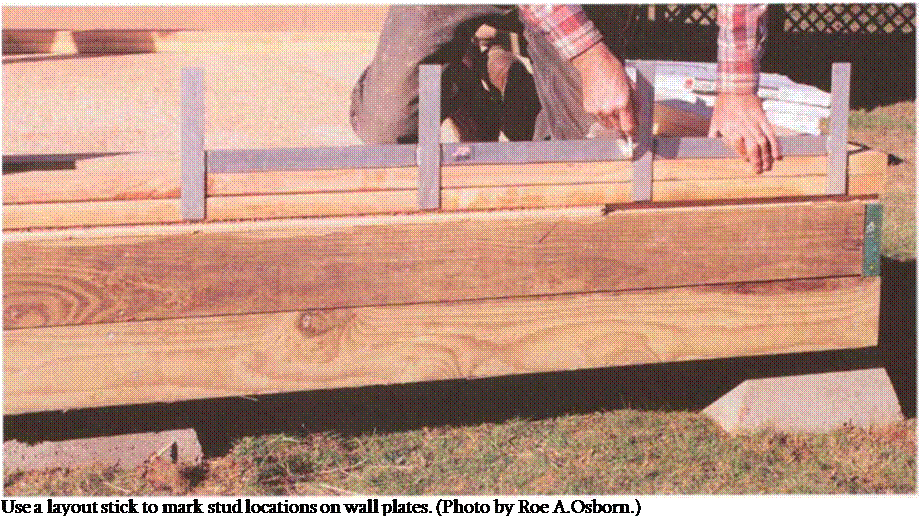
to fit the 4-ft. module of the sheathing. Otherwise, every piece of sheathing has to be cut to fit, a wasteful, time – consuming process. Start the stud layout at one end of the first exterior wall, being sure to detail stud layout on the same side of the plate as the door and window layout. If you are using a layout stick, set it with the legs down over both plates and scribe along both sides of the second, third, and fourth legs at the 16-in., 32-in., and 48-in. marks (as shown in the photo above). Then move the stick and scribe another set of studs until you come to the end of each wall.

If you’re using a tape measure, hook it over the end of the plate and pull it as far as it will extend, marking on every 16-in. or 24-in. layout mark. When you come to a window or door, transfer layout marks onto headers and rough sills to indicate where the cripples will be nailed.