Setting window and door trimmers
Before sheathing around windows and doors, the trimmers need to be set. Plumb a trimmer on either side of the window with a 2-ft. or 4-ft. level. The top or bottom of the trimmer may need to pull away from the king stud a bit for it to be plumb. Once the level bubble reads plumb, nail the trimmer in place with one 8d toenail on each side, top and bottom.
If the window is 4/0 wide, for example, measure over 4 ft. from the plumb trimmer and make a mark on both the header and rough sill. Pull the trimmer away from this king stud, set it on the 4-ft. marks, and toenail it to the header and to the rough sill with one 8d nail on each side—top and bottom. Measure from corner to corner and side to side to make sure the opening is square and parallel (see p. 87). Do the same for the other window openings.
Setting trimmers for a door takes a bit more time.
I use a 6-ft. level or a short level attached to a straightedge. Place the level against the wide side of a trimmer. A bubble centered in the tube of the level shows if the trimmer is plumb. If it is plumb, you can toenail it to the header and to the bottom plate—one 8d toenail on each side, top and bottom.
|
Hold the level on the 31/г-іп. face of the trimmer and use the hammer’s claws to lever the trimmer away from the king stud until the trimmer rests flush against the level. (Photos by Roe A. Osborn.) |
If it is not plumb, pull one end out until it is plumb and then nail it in place.
The next step is to straighten the trimmer. Hold the level on the 31/г-іп. face of the trimmer and use the hammer’s claws to lever the trimmer away from the king stud until the trimmer rests flush with the edge of the level (see the left photo below). The 16d nail you drove in the center of the trimmer while framing temporarily holds it straight.
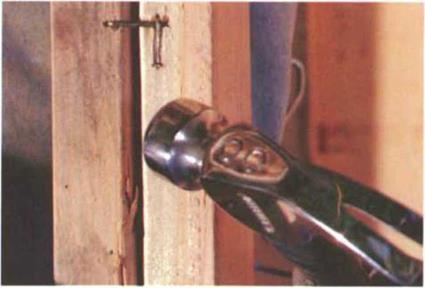
Once you have the trimmer straight, hold it straight by clipping it to the king stud with two 8d nails. Begin by driving an 8d nail partway into either the trimmer or king stud. Bend this nail back onto the other upright. Then drive and bend a second nail over the head of the first (see the right photo below). Install three clips per side. This method eliminates all shims and holds the trimmer true for the life of the building.
To set the second trimmer, measure over from the first. For a prehung door, the measurement is 13A in. more than actual size. The extra width is for a 3A-in. jamb on each side, and the added 1A in. gives you room for adjustment when setting the door frame in place. So for a 32-in.-wide prehung door, measure over 333A in. on both the header and bottom plate and toenail the second trimmer in place. Then straighten and clip it like the first.
|
A simple clip made with two 8ds will hold the trimmer to the king stud. |

|
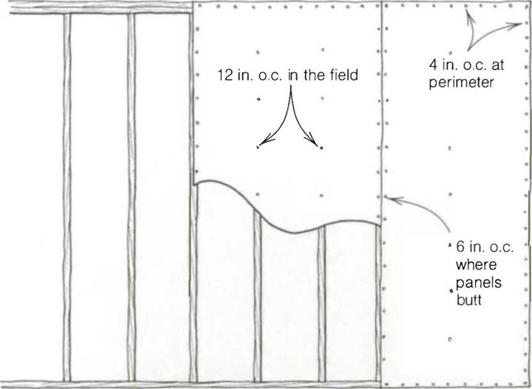
the openings out later with a reciprocating saw. However, before sheathing around these openings, you’ll need to nail in the trimmers (see the sidebar on the facing page). Use scraps of sheathing to fill in any gaps around the windows and doors.


Leave a reply