Posted by admin on 16/ 11/ 15
• Keep a first-aid kit on the job site at all times.
• Keep the sun off your body. It may be okay to wear tank tops, shorts, and sandals to the beach, but these are not okay to wear on a construction site day in and day out. You won’t stay cooler by letting the hot sun beat directly on you. Wear long-sleeve shirts, jeans, good shoes, and a wide-brim hat when the sun is shining. If you are especially sensitive to the sun, keep a bottle of sunblock handy. (If you aren’t convinced of the value of protecting yourself from the harsh sun, ask an old carpenter with skin cancer to find out what he thinks about it.)
• Don’t wear loose-fitting clothing or jewelry that can get caught in a power tool. If you have long hair, tie it up for the same reason.
• Drink lots of water. It’s easy for the body to become dehydrated on a hot day. Dehydration can lead to heat exhaustion, which can lead to accidents.
• Keep a hard hat handy. Many carpenters resist wearing hard hats, but when someone is working overhead, wearing a hard hat below is a good idea. You may have a hard head, but it won’t be hard enough to protect you from falling tools or lumber. [6] in a sock and carry them with you. If you wear prescription glasses, don’t think they protect your eyes. Standard prescription lenses are not rated to shield your eyes from flying objects. You need lenses that are made specifically for safety. I wear safety glasses with plastic prescription lenses and side protectors.
• Use ear protection whenever operating a loud power tool like a router or circular saw. Otherwise, make “huh?” part of your vocabulary. I keep a few sponge ear plugs in a 35-mm film canister and store them in my toolbucket so that I have them with me at all times.
• Wear knee pads to protect your knees—for example, when putting down roofing or nailing down flooring.
• Lungs need protection, too. A dust mask helps keep large particles out of your lungs. I use one when sanding or when working in an enclosed area with poor ventilation. With toxic materials, wear a respirator. I have often worn a respirator during remodeling jobs in which I’ve ripped out old plaster and insulation. When ripping out these materials, the dust particles may be small enough to penetrate a dust mask (and some older plaster may even contain asbestos).
• Protect your hands with gloves when necessary. Wear light rubber gloves when painting or staining to prevent harmful materials from entering your body through your pores. Use heavy work gloves to protect your hands from wood slivers when handling rough lumber.
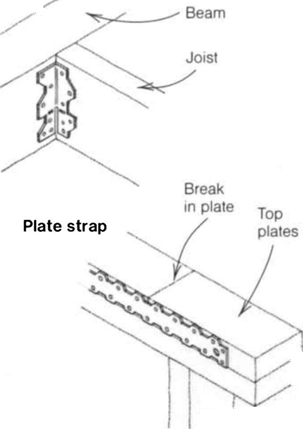
Flat plate straps are another type of anchor used to tie wooden members together. They are made from heavy – gauge metal, contain numerous fastener holes, and come in many different widths and lengths (up to 4 ft. long).
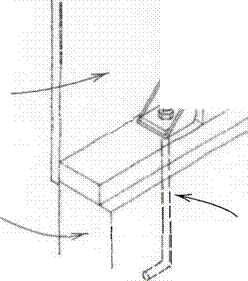
Hold-downs are heavy-gauge, L-shaped metal anchors that help prevent house uplift by connecting the building to the foundation. They often attach near the mudsill with an anchor bolt set in the concrete foundation and are bolted to posts in the wood frame.
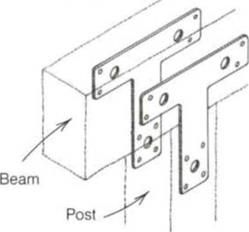
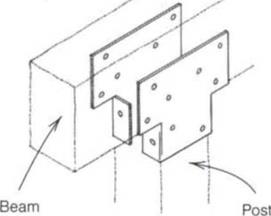
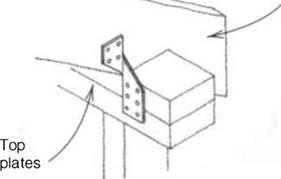
Post caps attach larger posts, like 4x4s, to beams or to concrete. L – or T-straps connect two members that meet in a right-angle or T configuration, such as when a beam rests on a post.
Posted by admin on 16/ 11/ 15
|
Carriage bolt

|
|
|
|
|

Stove bolt
|
|
|
|
|
|
|
|
|

Lag bolt
|
|
|
|
 |
    

Drywall screws love plywood—they zip through а 3/нп.-thick sheet in nothing flat—so they’re great for attaching sheathing or flooring. But drywall screws are somewhat brittle, so don’t use them in shear walls (which are built to resist the shear forces of earthquakes and high winds) without first getting approval from an engineer or your building department. Drywall screws can also break when being driven into thick stock or hardwoods. I have driven a 3-in. screw through 2×6 decking into a joist
only to hear a snap right before the screw sets. A new, hard-to-break line of interior and exterior drywall screws is now available from Faspac, Inc. (see Sources on p. 198). These screws have self-drilling tips that make them easy to use in thick wood or hardwood.
Deck screws are drywall-type screws that have been coated, galvanized, or made of stainless steel for corrosion resistance. Use these for exterior jobs such as attaching deck boards or fence slats.
Heavy-gauge lag screws (1Л in. dia. and up) are typically used to attach a 2x ledger (a horizontal wood member) to the house framing. They are usually driven into the wood with a wrench. Lag screws are smaller than lag bolts.
Bolts
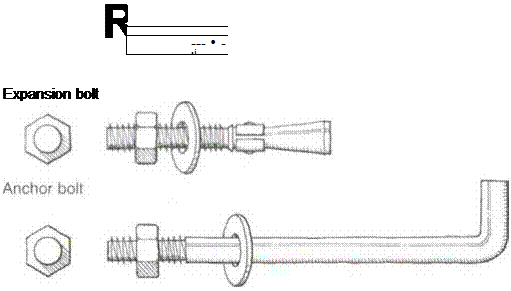
Bolts have many applications, from holding a house to the foundation to securing a deck to a wall to uniting a row of kitchen cabinets. When buying bolts, you have to specify the thickness and length you need (3/s in. thick by б in. long, for example). A carpenter often uses carriage, machine, stove, lag, expansion, and anchor bolts (see the drawing on the facing page).
Carriage bolts have round heads, sometimes with a screwdriver slot on top, and are fitted with a washer and nut on the threaded end. I like to use carriage bolts when building deck railings.
Machine bolts have square or hexagonal heads. When using machine bolts to join two pieces of wood, place a washer on both ends before tightening; otherwise, you could tear into the wood. Machine bolts are often used to connect beams in post-and-beam construction and to attach metal plates to the house framing to stabilize it in case of an earthquake or hurricane. Stove bolts are small machine bolts.
Lag bolts are similar to lag screws but go clear through the wood. Lag bolts can be used to fasten a deck ledger to a house (just make sure that you are attaching the ledger to good, solid wood). Because lag bolts are driven into wood like screws, you need to drill pilot holes about Vs in. smaller in diameter than the bolt (a 3/s-in. hole for а Уг-іп. bolt, for example).
Expansion bolts are fitted in holes drilled in existing concrete. They expand in the concrete to ensure a secure hold and are used to attach wood to a foundation or other concrete surface.
Anchor bolts are shaped like a J. They are normally embedded in a concrete foundation to secure wood sills to the foundation, which helps hold a house in place.
Framing anchors
There are a wide range of framing anchors (Simpson Strong-Tie Co. is a good source—see Sources on p. 198) that help increase the structural stability of a house (see the drawing on p. 80). Carpenters use joist hangers, right-angle and hurricane clips, plate straps, holddowns, post caps, and T-straps. Anchors are often required by local building codes, particularly in areas of seismic activity or high wind. In other cases, they just make framing faster, easier, and more efficient.
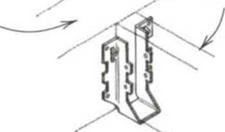
Joist hangers can be nailed to beams or rim joists to support joists for a floor or ceiling. These hangers come in various sizes to fit the joist size and are nailed into the beam through side flanges.
The joist is placed in the hanger and nailed in. A tool made by Ator Tool Works, called a Joister, holds the hanger in place so both your hands can be free for nailing.
Right-angle clips and hurricane clips are widely used to attach one wood member to another. A commonly used right-angle clip is 4У2 in. long with six nail holes in each side. A hurricane clip is a metal device that can be nailed to both rafter and wall plates to hold them securely together. Both types of clips help keep a house in place in earthquake and hurricane country.
|
|
|
|
|
|
|
|
|
|
|
|
|
|
|
|
|
|
|
|
|
|
|
|
|
|
|
|
|
T-strap
|
|
|
Metal post cap
|
|
Posted by admin on 16/ 11/ 15
Carpenters don’t just use wood, nails, and screws for building. Many other types of metal hardware go into a house as well, and knowing what to use and when to use it can be baffling. Fortunately, most of the time we use only a few varieties on a regular basis. Here’s an overview of the basic types of hardware used by carpenters.
Nails
Nails are the most common fasteners used by carpenters because they are inexpensive and quick and easy to use.
Nail sizes When choosing nails, you have to think about the size you need, whether it’s for interior or exterior use, and how many you’ll need.
Nail sizes are dictated by the pennyweight system (abbreviated with a "d"). In general, a nail with a lower penny designation will be shorter and will have a thinner shank than a nail with a higher penny designation. For instance, an 8d nail is thinner and shorter than a 16d nail.
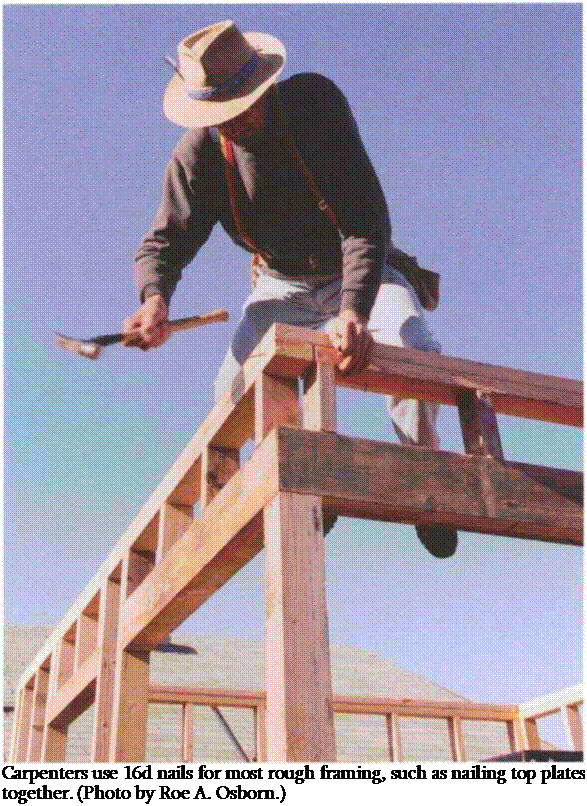
There’s no reason to drive larger nails than needed. I’ve seen carpenters nail doorjambs to studs with 8d nails when 6ds would have sufficed. If you are in doubt about the size nail needed, check with your building department. Many codes specify the minimum size nail needed for a particular job, how many to use, and where to drive them (this is typically called a nailing schedule).
Nails used inside the house aren’t exposed to the weather, so they usually don’t require coatings or treatment to withstand rusting. On the exterior, however, nails have to stand up to whatever Mother Nature throws at them. When nailing exterior siding, for instance, use nails that won’t rust and stain the wood, like hot-dipped galvanized (zinc-coated), stainless-steel, or aluminum nails. For holding power, choose ring-shank nails (nails with ridges) or screw nails.
Nails are purchased by the pound, so carpenters typically buy large quantities to save money. It’s cheaper to buy one 50-lb. box than it would be to buy five 10-lb. sacks. A typical 1,200-sq.-ft. wood-framed house can be nailed together with about 10,000 16d nails (200 lb.) and 5,000 8d nails (50 lb.).
Types of nails The type of nail you buy depends on the job at hand, and whether you’re framing or doing finish work. The nails a carpenter uses often are designated common, box, or finish.
Common and box nails are used mainly for framing. Box nails are thinner than common nails and are preferred for framing because they’re easier to drive. Many framers use what are called sinkers, which are nails coated with resin or vinyl. These nails drive easily and have good holding power.
The two most common framing nails are 8ds {2Vi in. long) and 16ds (ЗУ2 in. long). The 8ds are used to nail sheathing to floors or walls and cripple studs to headers, for example, while 16ds are used to nail together 2x stock, such as plates to studs.
Finish nails are used to nail trim boards like door casing and baseboard. These nails have small heads and can be driven below the surface of the wood with a nailset and the holes covered with putty. There are many different finish-nail sizes,
   the most common being 4d, 6d, and 8d. Brads are short (less than 1 in. long) finish nails. If nailing trim on the exterior, use aluminum, stainless-steel, or galvanized nails. the most common being 4d, 6d, and 8d. Brads are short (less than 1 in. long) finish nails. If nailing trim on the exterior, use aluminum, stainless-steel, or galvanized nails.
There are also a number of different specialty nails. Double-headed (or duplex) nails are used in concrete formwork and for temporary scaffolding. The top head remains above the surface, making the nail easy to pull out. Hanger nails are short, hardened nails used to attach metal framing anchors (such as joist hangers) to wood. Masonry nails are used for nailing into concrete.
There are even plastic nails that can be used with pneumatic nailers (Utility Composites; see Sources on p. 198). Plastic nails have good holding power, won’t rust, can be cut with a saw, and can even be sanded with a belt sander.
Screws
The advent of the cordless screw gun has made screws the fastener of choice for many carpenters. Screws are used for everything from fastening sheet goods to installing trim and hardware. As with nails, don’t use a larger-size screw than you need, and if the screw is installed outside, choose a type that will stand up to the weather.
Wood screws can be used for all sorts of home-building jobs. Stores stock many types of wood screws, such as slotted, Phillips head, and square drive (see the drawing above). Standard lengths range from 1/4 in. to б in., and common gauges are 8 through 14 (the lower the gauge number, the thinner the screw shank). Head shapes are flat, round, and oval, and some are designed to be driven below the surface of the wood (called countersink heads). Most screws are made of steel, but aluminum, brass, and stainless steel are available. A standard
wood screw often requires a pilot hole so you don’t split the wood as you drive the screw.
For better or worse, drywall screws have replaced wood screws on today’s building sites. Although they were originally designed just to attach drywall to wood or metal, carpenters discovered that they have other uses. They are used so often that, when people ask for screws on a job site, they are usually talking about drywall screws.
Drywall screws (sometimes called bugle – head screws) have a Phillips head, range from 3A in. to 3 in. long, and usually have a flat black finish. With their thin shanks, deep threads, and sharp points, they can often be driven without a pilot hole. Drywall screws hold well and usually won’t split the wood, and their bugle-shaped, flat head countersinks itself in drywall or soft wood.
Posted by admin on 16/ 11/ 15
might see on a Victorian-style house. Because I want the trim to look good,
I use hot-dipped galvanized, stainless – steel, or aluminum finish nails when installing exterior casing so that the nails won’t rust and stain the wood.
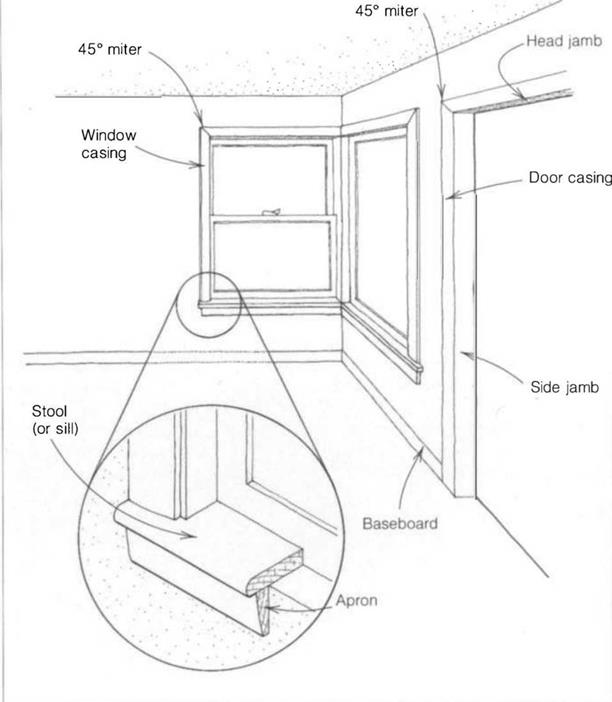
Interior casing goes around interior doors and windows and hides the gap between the drywall and doorjambs or window frame (see the drawing above). The joint where the side piece meets the casing at the top is usually a 45° miter.
Flat, rectangular casings that are wider and more affected by shrinking/swelling cycles are often cut square and butted together. Use finish nails to attach casing so they can be set below the surface and covered with wood putty.
The stool (sometimes called a sill) is the flat piece of trim installed at the bottom of a window (a perfect place to set flowers). Some windows have a stool built in as part of the frame, but more often than not the stool needs to be in-
stalled separately. A piece of trim called an apron covers the joint between the stool and the drywall below the window.
Baseboard runs horizontally and covers the joint between the wall and the floor. It is usually joined at outside corners with a 45° miter joint and is nailed to the wall with finish nails after the finish floor is installed. Interior corners can be joined with a 45° miter or with a coped joint (where one piece of trim is cut to match the profile of the mating piece).
Even though there are literally thousands of different styles of trim today, the ones used most often are still quite simple (some common profiles are shown in the drawing at right).
Posted by admin on 15/ 11/ 15
• Take a course in basic first aid.
• Watch out for your fellow worker. Be aware of who is nearby so you don’t hit someone with a piece of lumber or with your hammer.
• Try to have a good, positive attitude.
• Keep your work area clean. It’s easy to trip over scrap wood, lumber, tools, and trash.
• Pull or bend over nails that are sticking out of boards so nobody gets injured.
• Spread sand on ice in winter to provide traction.
• Don’t turn the radio up so loud that you can’t hear other workers. Concentration and communication on the job site are critical to avoiding accidents.
• Concentrate on the task at hand.
• Work at a steady, careful pace.
• Back injuries are very common on the job. To preserve your back, remember to lift with your legs, not with your back.
• Take care of your body by eating good food and exercising. And don’t forget to rest. Getting enough sleep is important to keeping your concentration and to avoiding fatigue.
• Take a break when you feel tired. Don’t overwork yourself. Exhaustion leads to carelessness.
• Don’t drink or take drugs while working. Operating power tools under the influence is as dangerous as driving under the influence.
• Watch where you walk, especially when working on scaffolds or on the frame of the house. Many injuries on the job are the result of falls.
• Follow your instinct. If something you are about to do feels unsafe, it probably is. Pay attention to the voice inside your head when it says, “Be careful.”
degree of skill. Still, installing a prehung door requires attention to detail, which is why I’ll discuss the process more in Chapter 8. I’ll also talk about how to install a lockset.
Exterior and interior trim
Trimming out a house is like adding the frosting to a birthday cake. Whether you are installing exterior or interior casing, sills, aprons, or baseboard, there’s a wide variety of styles and profiles from which to choose—from simple 1×4 trim to ornate crown moldings.
Clear stock is pricey, but it’s ideal for trim because it can be stained, left unfinished, or painted with little preparation. Finger-jointed stock (short pieces glued together) is less expensive than clear stock but needs to be painted to cover the joints (that’s why it’s called paint-grade trim). Knots aren’t an insurmountable problem as long as they are sound and won’t fall out, and trim can be preprimed so that the knots won’t bleed pitch through the paint.
Exterior casing around doors and windows not only serves a functional purpose but also adds beauty and character. Look at houses as you drive around your neighborhood and note all of the different kinds of trim. Check out the vertical boards nailed to the corners. See the casings that go around doors and windows. Fascia boards are nailed to rafter tails to give them a finished look. Frieze boards are nailed between rafters to seal them off. All of this exterior trim can be as simple as a plain 1×4 or as elaborate as the filigree that you
Posted by admin on 15/ 11/ 15
When ordering lumber or making plans for anything built with wood, it’s important to remember that the lumber designation (2×4, 4×4, 1×8, etc.) is not the actual lumber size. For instance, a 2×4 is not really 2 in. by 4 in., and a 1×8 is not really 1 in. by 8 in. (this is called the nominal dimension).
In general, rough lumber stock (2xs, 4xs, 6xs, etc.) is V2 in. under the nominal size (all lumber lengths are actual, however). For instance, a 2×4 is actually 11/2 in. thick and 31/г in. wide. For 1x stock, however,
the actual dimensions are a bit different. A 1×8, for example, is 3A in. thick (1A in. under the nominal size) and 71/2 in. wide (V2 in. under the nominal size).
Manufactured lumber can be designated by the actual dimensions. A 3/4-in.-thick 4×8 sheet of OSB is just that: 3A in. thick and 4 ft. wide by 8 ft. long. A 6×12 laminated beam, on the other hand, will usually measure 5Уг in. by 111/2 in. When buying these items, check their dimensions to see if they meet your actual needs.
|

Roof trusses, which are delivered to the site fully assembled, simplify roof construction. Notice the frieze blocks (on right) between these king-post trusses, which help tie the whole roof together. (Photo by Roe A. Osborn.)
|
|
the frame of a house has to be structurally strong, but it doesn’t have to be free of knots. Clear, knot-free lumber is desirable for finish work because it looks the best. Unfortunately, clear lumber has become increasingly expensive because of the depletion of our old – growth forests, so choosing finish lumber often involves sorting through stacks of boards.
In the western part of the country, construction-grade Douglas fir and hemlock are the preferred framing woods. In other parts of the country, selected species of pine or spruce are strong enough to support a house frame.
Clear-grade finish lumber in almost any species is available at a premium price. Popular species such as redwood, pine, and oak are available in more economical grades. I prefer the No. 2 stock over
clear grades. The cheaper grade may be harder to work, but knots add character and interest to a board.
I am a carpenter, so I love the feel of real wood. It’s sad that the old-growth trees are gone, because the new, fast-growing trees have little structural strength.
Many are cut into chips to make manufactured lumber.
Manufactured lumber
Manufactured lumber products are being used for sheathing, joists, and beams. Manufactured sheathing products include plywood, OSB, and medium-density fiberboard (MDF).
These sheet goods are available in various thicknesses, from 1A in. to 3A in. and thicker.
Plywood is made by gluing and pressing thin layers of veneer together. Construction-grade exterior plywood
 (CDX) is made from thin layers of fir or other common softwoods glued together with a waterproof glue so it can be used on the building exterior. (CDX) is made from thin layers of fir or other common softwoods glued together with a waterproof glue so it can be used on the building exterior.
OSB and MDF are made by compressing and gluing strands or particles of wood fiber to create panels. Structurally rated OSB is used for exterior sheathing, while MDF makes a good substrate for things like countertops and closet shelves. Be careful when working with MDF. The substance bonding the wood fibers may contain formaldehyde, and the dust from cutting it is fine, like flour. It’s a good idea to wear a respirator (which is much more effective than a dust mask) when cutting this material, unless you are working outside in a stiff wind.
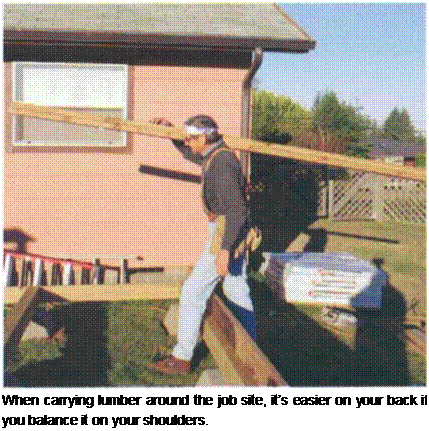
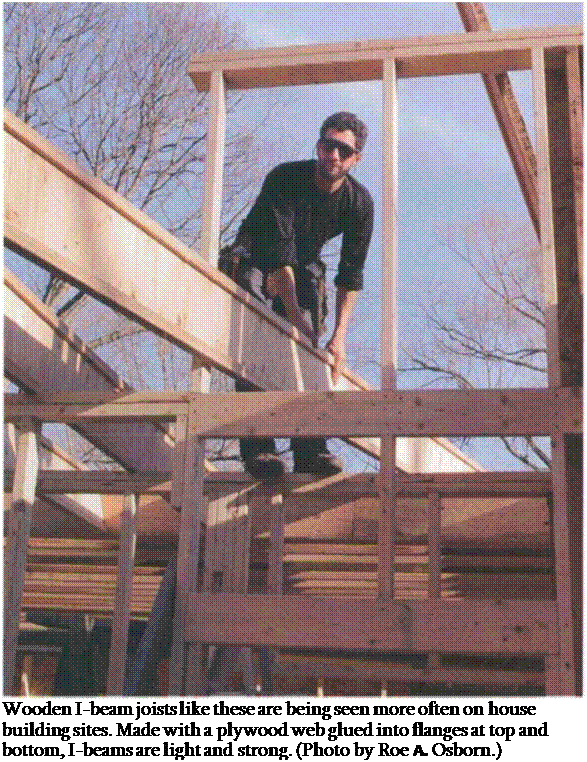
Becoming more common in house construction are wooden I-beam joists (see Sources on p. 198) made with a ply-
 wood strip (called a web) glued into flanges at top and bottom (see the photo on p. 67). These joists are lightweight and can span long distances, making it possible to create very large rooms. Also, they are always straight and don’t shrink as much as 2x joists, so floors tend to remain flat, level, and relatively squeak free. wood strip (called a web) glued into flanges at top and bottom (see the photo on p. 67). These joists are lightweight and can span long distances, making it possible to create very large rooms. Also, they are always straight and don’t shrink as much as 2x joists, so floors tend to remain flat, level, and relatively squeak free.
Engineered beams are typically made from laminated strips of lumber. These are available in several widths and depths and can span distances upwards of 60 ft. without support. A 31/2-in.-wide beam can be used as a header in a 2×4 wall. Engineered beams are stable, which means they won’t twist and split the way regular 2x or 4x lumber does.
Siding
A builder friend of mine here in wet, coastal Oregon was showing me a new house that was lap-sided with new – growth cedar clapboards. He told me that 25 years ago the old-growth cedar trees had 20 growth rings to the inch, while today the new-growth trees have around three rings to the inch. Almost every board on the house he showed me was cupped.
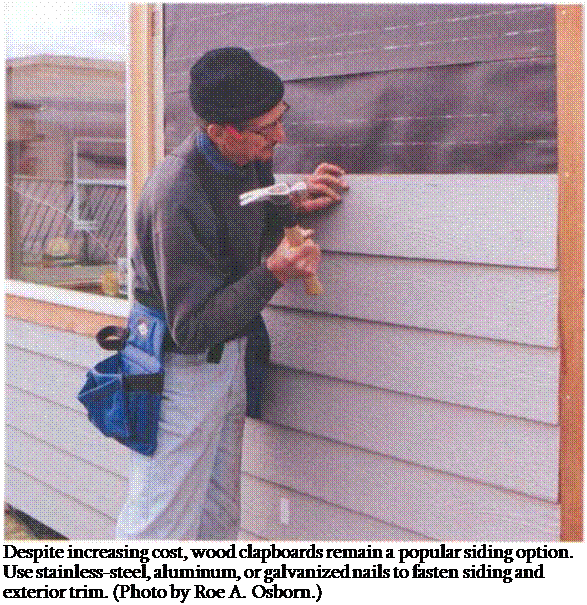
Quality wood siding that will stay flat on a building is expensive and hard to find. Because of this, wood clapboards —-though still popular—-face stiff competition from alternative siding products. Today, builders are siding houses with aluminum and vinyl, composite materials like plywood, boards made of pressed wood fibers (OSB), or even material with a cement-fiber content.
While some of these materials—like synthetic or natural stucco—are applied by specialty subcontractors, cutting and fitting siding is typically a job for a carpenter. Siding must protect the building from sun and rain and make the house look good, so I’ll devote more time to installing it later on in Chapter 8.
Windows, doors, and trim
When I was growing up, we forced strips of cloth around all the window sash with a kitchen knife when the weather got cold to plug the cracks around the loose-fitting windows. What a pleasure it is now to have tight-fitting, insulated windows and doors to keep out the cold.
When carpenters talk about windows and doors, you’ll hear them say "a three-oh by four-oh unit" (3/0 x 4/0). They are talking about a window that is 3 ft. wide by 4 ft. high. The width is given first and the height second. A 2/8 x 6/8 ("two-eight by six-eight") door is 32 in. wide by 80 in. high.
 Windows When I first started building, we had basically one choice for windows: wood framed. Although wood-framed windows are still around, other options are available now in a wide variety of styles. Windows When I first started building, we had basically one choice for windows: wood framed. Although wood-framed windows are still around, other options are available now in a wide variety of styles.
Vinyl – and aluminum-framed windows are sold everywhere. Vinyl frames cut down on condensation in cold or humid
climates. Both frames are basically maintenance free, requiring just an occasional washing. Aluminum-framed windows are less expensive than vinyl and come in different colors (most vinylframed windows are white).
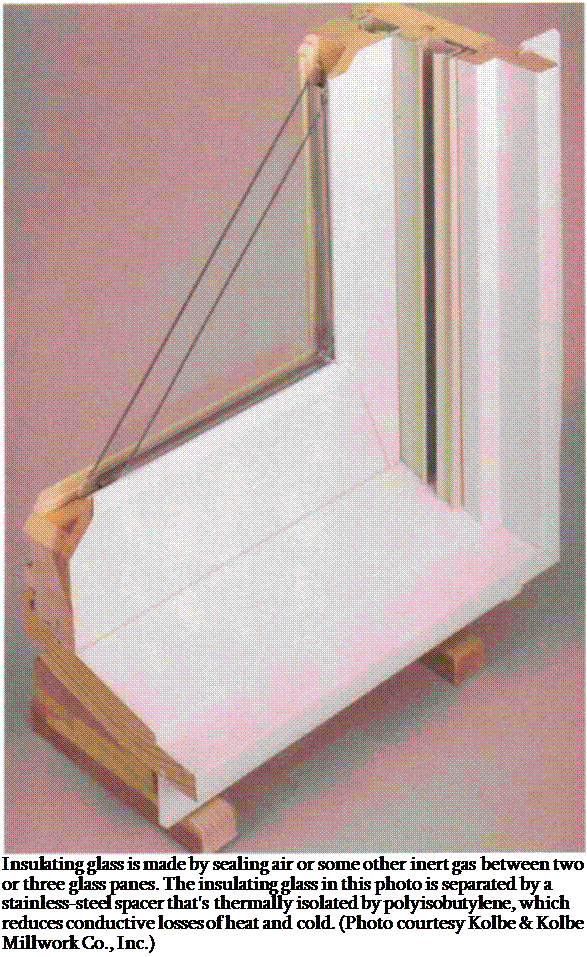
Windows with double glazing (called insulated glass) have two or three panes of glass with a sealed airspace between them (see the photo at left). The airspace keeps the window free from condensation and cuts down on heat loss in the winter, helping to keep the cold—and the noise—outside.
Among the dozens of window styles, the most commonly used are fixed, sliding, double hung, and single hung. A fixed window is just a frame with glass. Sliding windows have fixed glass on one side and a frame that slides back and forth on the other side. A double-hung unit has a bottom and top sash, both of which can be moved up or down.
A single-hung unit also has a bottom and top sash, but only the bottom sash can be opened.
Doors Doors have also changed a lot since I first started building. Now there are molded wood-product interior doors with a hollow core, genuine frame-and – panel interior and exterior doors, doors sheathed with metal or fiberglass over a wood frame and an energy-efficient foam core, and elaborate hardwood doors with etched glass, often with a solid core. Doors come in a wide range of prices and quality and are available either individually or as prehung units.
Prehung doors come already mounted in their jambs, have a threshold and weatherstripping (if it’s an exterior door), and often even have holes bored for the lockset and dead bolt. These units radically simplify door installation because you don’t have to make the jambs or mount the door on its hinges, a time – consuming process that takes a high
Posted by admin on 15/ 11/ 15
There’s more to carpentry than the ability to drive a nail with a hammer.
A big part of being a good carpenter is knowing not only the names of tools and how to use them but also the parts and materials that make up a house. Whether it’s a 6d finish nail or a frieze board, you need to know what your coworkers are talking about.
In this chapter, I’ll discuss briefly the parts of a typical house and how they go together. Then I’ll talk about the various materials (lumber, fasteners, hardware) that make up a house. Knowing the parts and how they go together will help you read plans and learn howto estimate and order the amount of materials needed.
THE HOUSE STRUCTURE
When I was a child, I thought that houses just were. They existed like the hills, the trees, and the wind. It was only when I saw houses actually being built that I realized they are put together board by board and nail by nail. The construction starts at ground level, with the foundation.
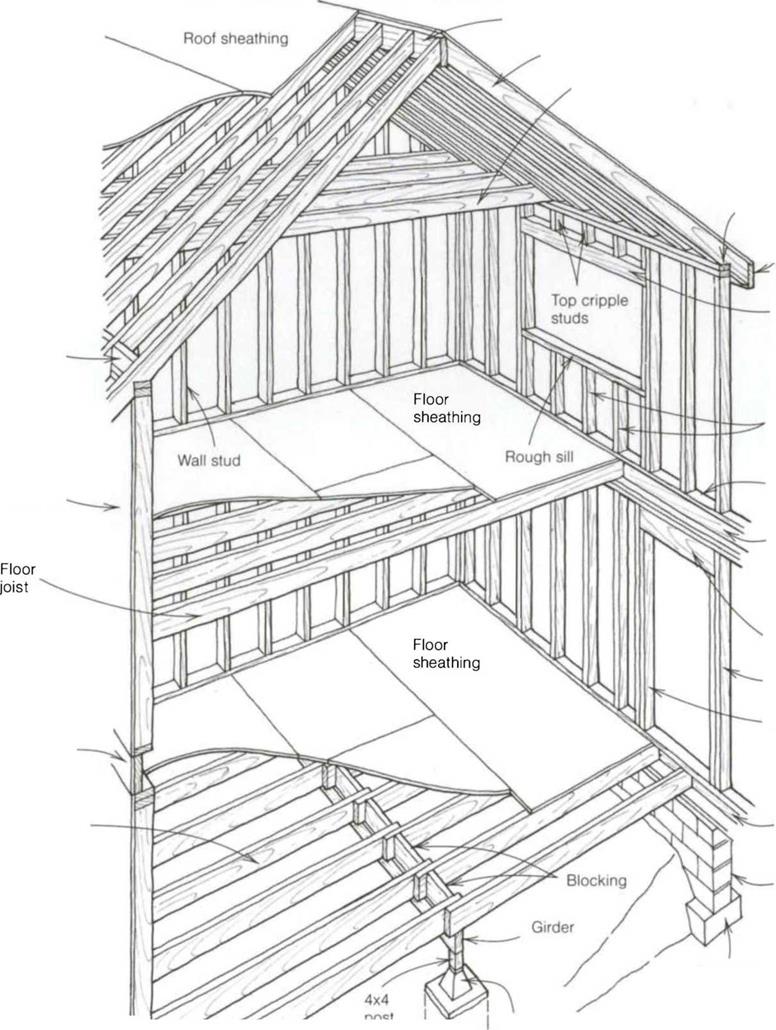
The foundation of a house can be a full concrete basement, concrete stemwalls (short walls) with a crawl space under the house (see the left photo on p. 66), a concrete slab, concrete piers on footings, or pressure-treated wood on solid ground. Local codes and soil conditions generally dictate the type of foundation that a house will have.
Pressure-treated mudsills installed on the top of foundation walls help tie the floor system to the foundation and support the floor joists. Pressure-treated wood is impregnated with a preservative that inhibits dry rot (a fungus that can destroy wood) and helps repel termites, which can otherwise make a meal of your house and cause a lot of damage.
Pressure-treated wood is usually easily identified by its greenish color, and, because of the chemicals used in it, you should handle it and cut it with care.
I wear gloves and a long-sleeve shirt when working with it to keep the chemicals off my body; I also wear a mask to help avoid breathing the dust.
Girders are often needed to support floor joists with long spans. The size of the girders will vary, depending on the load they carry. The house plans will indicate the size, based on local codes.
|
|
|
|
|
|
|
|
|
|
|
|
|
|
|
|
|
|
|
Door header
King stud Trimmer stud
|
|
|
|
|
|
|
|
|
|
|
|
|
|
|
|
|
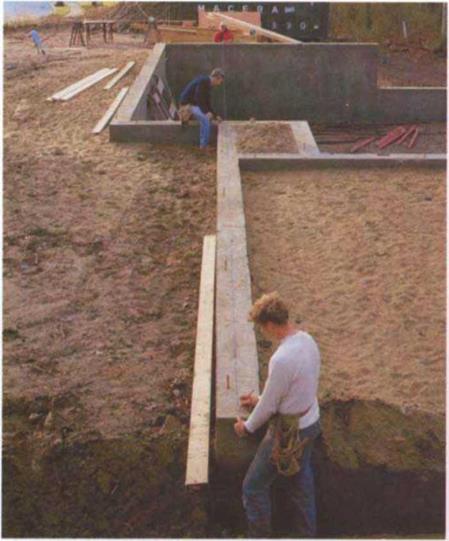
A house foundation can be a combination of full concrete basement and concrete stemwalls enclosing a crawl space, such as shown here, or just stemwalls with a crawl space, a concrete slab, or concrete piers on footings. (Photo by Roe A. Osborn.)
|
|
|
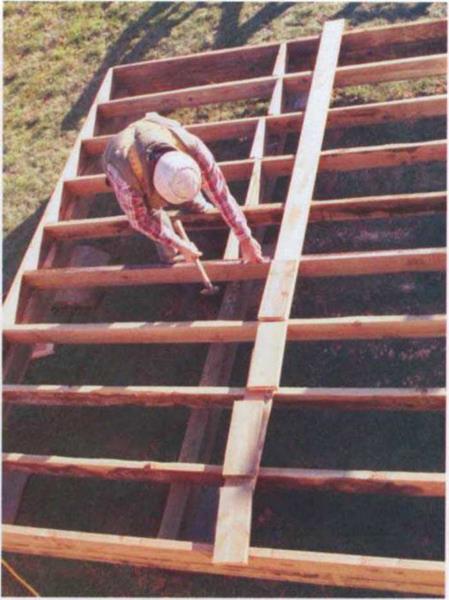
Floor joists form the platform, or floor, of the house and usually are spaced 16 in. or 24 in. on center.
|
|
Floor joists are placed horizontally over and perpendicular to the girders and form the platform, or floor, of a house (see the right photo above). Joists are usually spaced 16 in. or 24 in. on center (o. c.). Today, many builders use manufactured joists (such as Trus-Joists) rather than regular 2x lumber because these joists are straight, can span long distances, and don’t shrink much (see the photo on the facing page).
Floor sheathing—generally 4×8 sheets of 5/s-in. or 3A-in. tongue-and-groove plywood or oriented strand board (OSB)—comes next. To help eliminate floor squeaks, the sheathing should be glued to the joists with construction adhesive and then nailed in place.
Wall plates are the horizontal members that hold together the pieces in a wall. Each wall has three plates—one on the bottom and two on top (called a top plate and a double top plate, respectively). The plates are usually made from long, straight 2x stock. The width of the plate stock depends on the width of the walls. Exterior walls often are built with 2x6sto accommodate the extra insulation required by many building codes. Interior walls (both studs and plates) are typically built from 2x4s. If you are framing on a concrete slab, the bottom plate needs to be pressure-treated wood to resist rot and insect damage.
Studs are the vertical wall members nailed to the wall plates. Typical spacing is either 16 in. o. c. or 24 in. o. c. The
 studs are the same width as the plates. studs are the same width as the plates.
If you are building a house with 8-ft. ceilings, you can save time and avoid waste by purchasing studs precut to 921A in. This length, plus the three horizontal 2x plates—which are actually 11/2 in. thick (for more on lumber dimensions, see the sidebar on p. 68)—gives you a wall height of 963A in. After putting Уг-іп. drywall on the ceiling, you’ll have a ceiling height of roughly 8 ft.
Where there are openings in walls, whether for doors or windows, the load (or weight) from the upper stories or roof must be transferred around the opening and down to the foundation. Otherwise, the weight from above may not allow a door or window to open and close properly and could cause other, more serious, structural problems like a sagging roof. This load transfer is accomplished with a header and a pair of wall studs. A header is a horizontal member that is sized according to the width of the opening and the load bearing on it. For example, a garage-door header has to be much larger than a standard window header because the garage opening is larger.
Wall studs are nailed into the header on each end. The header is supported by a trimmer stud (the same width as the wall studs) placed underneath on both ends. A trimmer stud runs from the bottom plate to the header on a door and from the rough sill to the header on a window. The space between the header and the double top plate or the windowsill and the bottom plate is filled with cripple studs (also called jack studs).
After all the walls have been framed straight and plumb, the ceiling is covered with joists, just like the floor, and the roof is built. The traditional method of building a roof is to connect a series of rafters to a ridge beam that runs the length of the building. These days, how
ever, many houses are built with roof trusses delivered fully assembled to the job site. Trusses consist of a rafter chord, a joist chord, and posts and webbing between the chords to give them structural strength (see the photo on p. 69). Trusses are strong, make building a roof fast and easy, and are available just about everywhere in the country.
Once all the walls and roof have been framed, the house can be sheathed (though sometimes walls are sheathed

before being raised). Exterior walls are most often sheathed with 4×8 sheets of Уг-іп. plywood or OSB. Roofs are usually sheathed with Уг-іп. to 5/s-in. plywood or OSB (depending on the span between rafters).
Once the house has been sheathed and roofed, windows and doors are installed, the house is sided, and the interior is fin
ished and trimmed out. That’s the basics. I’ll explain the process in detail in Chapters 4 through 8.
LUMBER
Now that we’ve covered the basic parts of a house, let’s look at the specific materials that go into it. Lumber is graded for both strength and appearance. Construction-grade lumber used in
Posted by admin on 15/ 11/ 15
Any carpenter who builds something that will be exposed to view probably has some type of portable sander. I own three: a belt sander, a pad sander (see the photo on p. 57), and a random – orbit sander.
A belt sander is useful for heavy, rough jobs like sanding down a cutting board that needs to be refinished. It can remove a lot of stock rapidly, so use this tool with care. Common belt sizes range from 3 in. by 18 in. to 4 in. by 24 in.
(The small number refers to the width of the belt, while the large number indicates the length of the loop.)
My pad sander (also called a finish sander) has a base pad to which the sandpaper is attached and is powerful
enough to remove substantial stock when fitted with coarse-grit sandpaper. However, I use it mostly for finish work, including prepping trimwork for paint. I
Sanders create a lot of dust, so choose one with a dust bag and an efficient dust-collection system to help reduce the amount of sawdust that gets airborne. Whether your sander has a dust bag or not, it’s also a good idea to always wear a dust mask or respirator when using a sander to help keep fine dust from getting into your lungs.
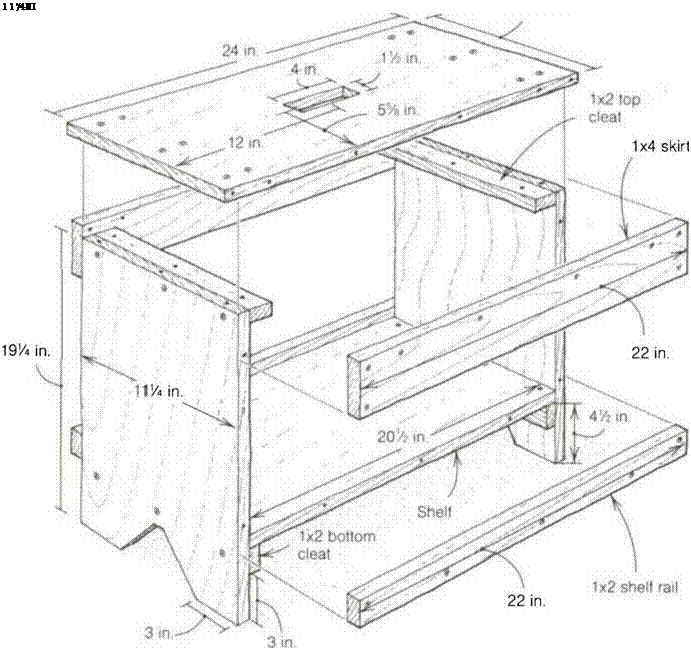
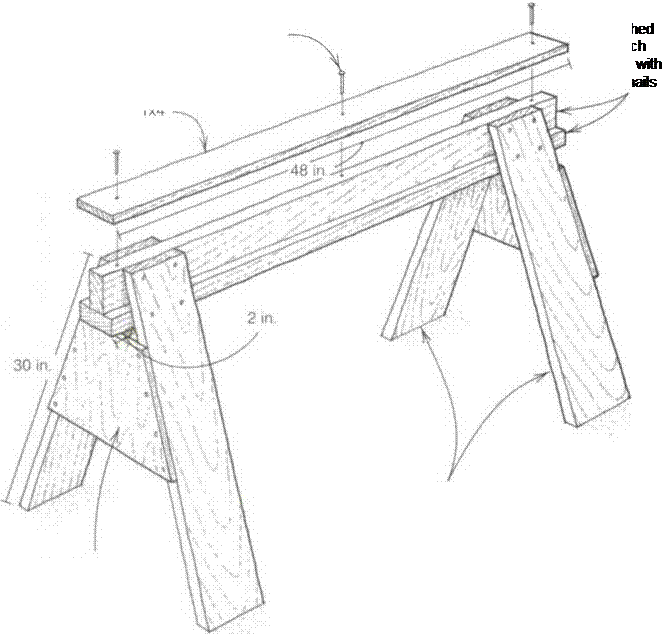
A workbench is a handy item to have on the job site. Here are plans and instructions for building a sturdy 2-ft.-long by 20-in.-high workbench that can be used to carry tools, to support wood that needs cutting, and even to stand on when working overhead.
CUTTING THE PARTS
Begin by cutting the top, the shelf, and the ends.
Lay the 8-ft. 1×12 on the floor over a piece of 2x so the cutoff end can fall free, then measure down 24 in. for the bench top. Using a square, mark a line
across the wood at this point. Cut just beside the mark so that the top will be a full 24 in. long. Carpenters sometimes call this “leaving the line.” Don’t worry if the cut isn’t quite perfect.
Now measure 201/2 in. down the 1×12 for the shelf and draw a cut line across it using the square. Make the cut, but remember to leave the line. Lay the shelf and top aside and cut the two end pieces to a length of 191/4 in. from the remaining 1×12.
Tools
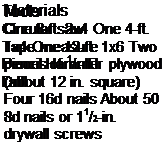
 Nail apron Hammer Tape measure Pencil Nail apron Hammer Tape measure Pencil
Small square Drill with 3A-in. spade bit, Уіб-іп. twist bit, and Phillips-head bit Reciprocating saw Circular saw
Materials
8-ft 1×12[5]
8-ft. 1×2*
4-ft. 1×4*
About 20, 1 Win.
drywall screws
About 40, 11/2-in.
drywall screws
Ten 6d box nails
80-grit sandpaper

|
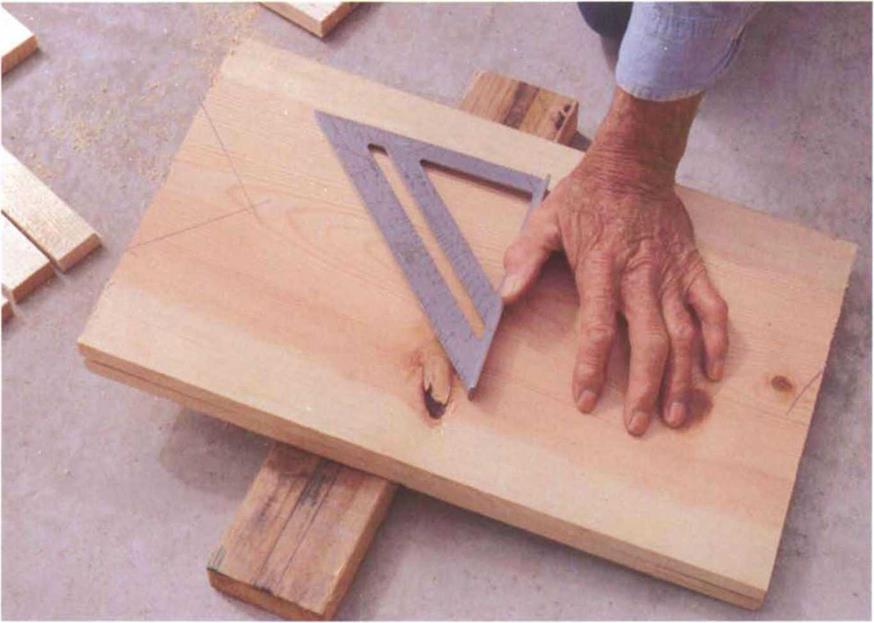
To lay out the feet, place one side on top of the other. Measure in 3 in. from each side and use a small square to mark a 45° line to the center.
|
|
Lay out the “feet” on the end pieces next. To make the feet identical on both end pieces, place one on top of the other. Measure in 3 in. from the end, hold the small square to this point, and mark a 45° line to the center, creating a V (see the photo above). The top of the V should be about 3 in. from the bottom of each piece. Cut out this V section.
Next, cut two 22-in. skirts from the 4-ft. 1×4. The skirts will help strengthen the bench top. Now grab the 8-ft. 1×2 and cut two 22-in. shelf rails and four 111/4-in. cleats.
ASSEMBLING THE WORKBENCH
Start the assembly by attaching the cleats to the end pieces. The top cleats help tie the ends and top together. The bottom cleats help support and tie the shelf to the end pieces.
Lay one of the end pieces on top of the other, but place them on some 2xs so you don’t drill into the floor. From the top, measure down 3/e in., draw a square line across, and drill three 3/ie-in. holes across the line, spaced evenly. From the bottom, measure up 33A in., draw a square line across, and drill three more holes.
Place a cleat on edge on the floor and place an end piece on the cleat flush with the top. Join the two with three 11/2-in. drywall screws. Drive the screws slowly and with care using a Phillips-head screwdriver. If you drive them too fast or too deep, you could strip the screws. If you make a mistake, drill another hole through the side and try again. Repeat for the other side.
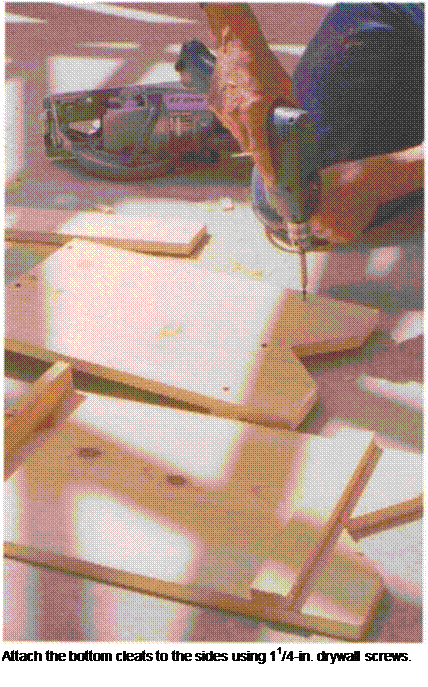
Now attach the bottom cleats. To help ensure that the cleats will be level and straight, use a square to draw a line across the side just on top of the V (3 in. from the bottom). The bottom of the cleat should sit flat on that line. Now drive three 11A-in. drywall screws through the holes in the side and into the cleat (see the left photo above). Repeat for the other side.

Next comes the top, which overhangs the end pieces 1 in. on both sides. On the underside of the top, draw a line 1 in. from each end to mark the outside edge of the end pieces. Hold an end piece to the 1-in. line. Drill three 3/ie-in. holes through the top and drive three 11А-іп. drywall screws or three 6d nails through the top and into each cleat. Repeat for the other side. Now stand the workbench up. Take a look to see if everything is in proportion.
Trust your eye; if it looks good, it is good.
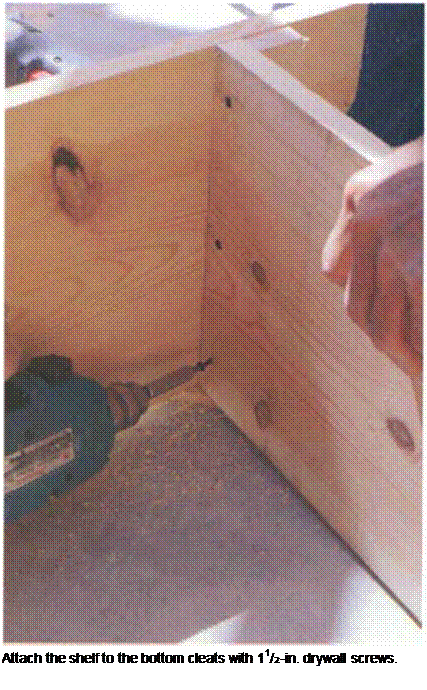
The shelf comes next. Measure in 3/s in. from one end of the shelf, draw a line across with the help of a square, and drill three 3/ie-in. holes along the line, one about 1 in. from each end and one in the center. Repeat on the other end. Set the shelf between the ends and rest it on the bottom cleats. Attach it to the cleats with three 1Уг-іп. drywall screws on each end (see the right photo on the facing page).
Next come the 1×4 skirts. Drill two 3/ie-in. holes 3/e in. from each end of a skirt. Then drill four 3/ie-in. holes along the length about 3/e in. from the edge. Repeat for the other skirt. Attach the skirts flush with the top of the bench using 1 Уг-іп. drywall screws.
Now grab a 1×2 shelf rail and drill one 3/ie-in. hole 3/e in. from each end and three more along the length 3/s in. from the edge. Repeat for the other rail. Attach the bottom of each rail flush to the bottom of the shelf using 1 Уг-іп. drywall screws.
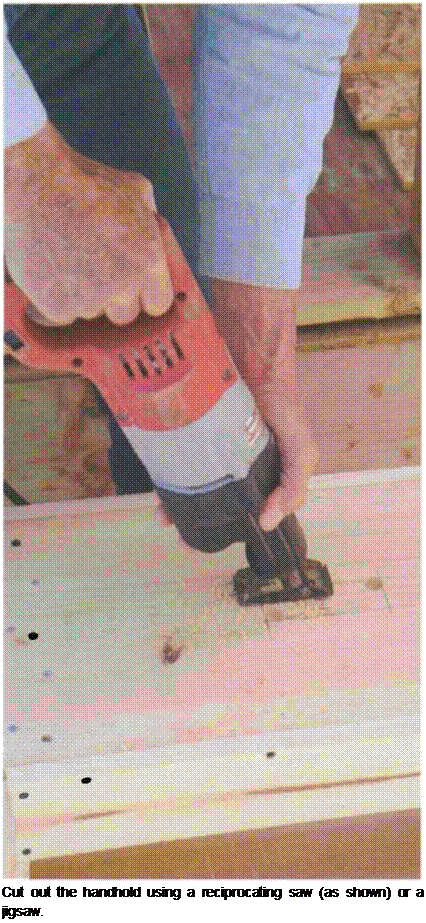 It’s nice to have a handhold in the top so that you can move the bench around. In the center of the top, lay out a handhold so that it’s 1 V2 in. wide and 4 in. long. Drill a 3A-in. hole in opposite corners using a spade bit. Use a reciprocating saw or jigsaw to cut out the wood between the holes (see the photo at right). Sand the edges of the hole with 80-grit sandpaper. Then round the corners of the top with sandpaper. Now you’re ready to go to work. It’s nice to have a handhold in the top so that you can move the bench around. In the center of the top, lay out a handhold so that it’s 1 V2 in. wide and 4 in. long. Drill a 3A-in. hole in opposite corners using a spade bit. Use a reciprocating saw or jigsaw to cut out the wood between the holes (see the photo at right). Sand the edges of the hole with 80-grit sandpaper. Then round the corners of the top with sandpaper. Now you’re ready to go to work.
| |


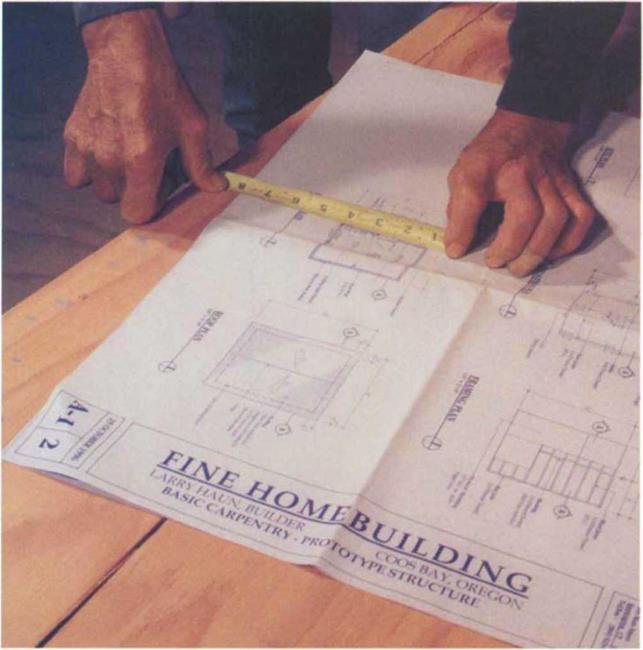
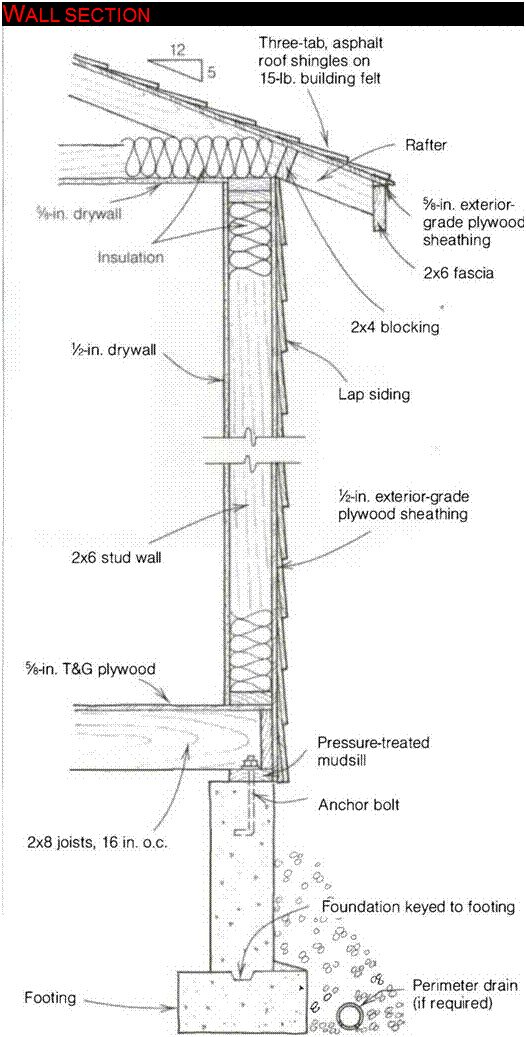 Section views give yet another perspective. Slice down through the house or part of the house, just as you would through an apple, remove one half, stand back, and look at the other to get a section view. Section views give carpenters a close look at the different elements that will be put in the floors, walls, and ceilings (see the drawing at right).




 (CDX) is made from thin layers of fir or other common softwoods glued together with a waterproof glue so it can be used on the building exterior.
 wood strip (called a web) glued into flanges at top and bottom (see the photo on p. 67). These joists are lightweight and can span long distances, making it possible to create very large rooms. Also, they are always straight and don’t shrink as much as 2x joists, so floors tend to remain flat, level, and relatively squeak free.
 Windows When I first started building, we had basically one choice for windows: wood framed. Although wood-framed windows are still around, other options are available now in a wide variety of styles.


 studs are the same width as the plates.
 Nail apron Hammer Tape measure Pencil


 It’s nice to have a handhold in the top so that you can move the bench around. In the center of the top, lay out a handhold so that it’s 1 V2 in. wide and 4 in. long. Drill a 3A-in. hole in opposite corners using a spade bit. Use a reciprocating saw or jigsaw to cut out the wood between the holes (see the photo at right). Sand the edges of the hole with 80-grit sandpaper. Then round the corners of the top with sandpaper. Now you’re ready to go to work.