Category CARPENTRY

Trimming rafter tails

Before the fascia can be nailed in place, the rafter tails must be marked and cut to length. The overhang can be easily measured out from the wall. If, for example, the overhang is 12 in. and the fascia stock is a 2x (1 Vi in. thick), mea­sure straight out from the building line

Trimming rafter tails

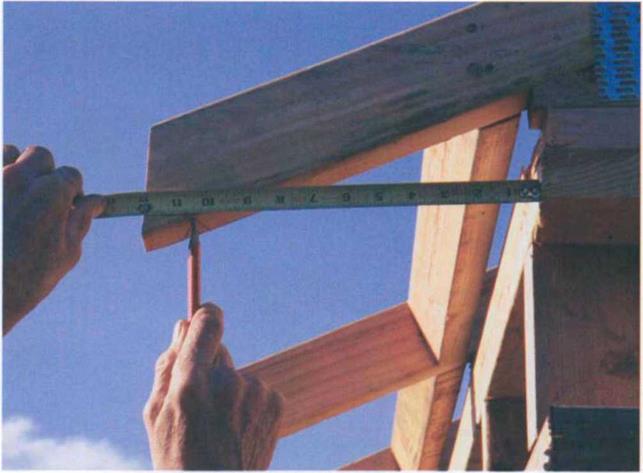
Measure straight out from the building on the gable-end rafters ЮУ2 in. and make a mark. This will be the cut line. (Photo by Roe A. Osborn.)


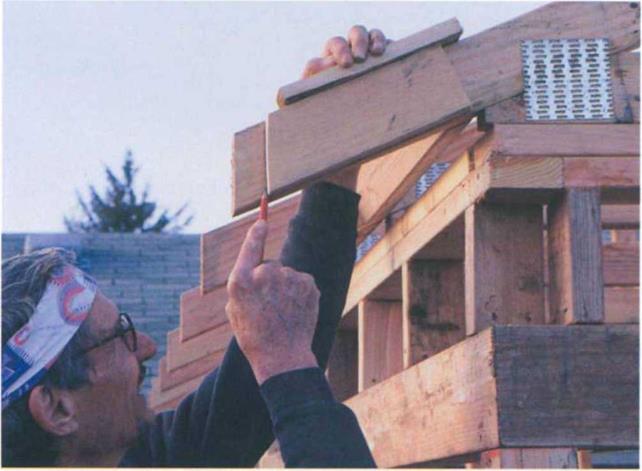
101/2 in. and mark this point on the bottom edge of the rafters at both ends of the building (see the photo on the facing page). Snap a chalkline across the rafters, including the barges, to connect the marks. Use the rafter-cutting tem­plate you made earlier to mark the plumb cut on the rafter tails (see the photo below).

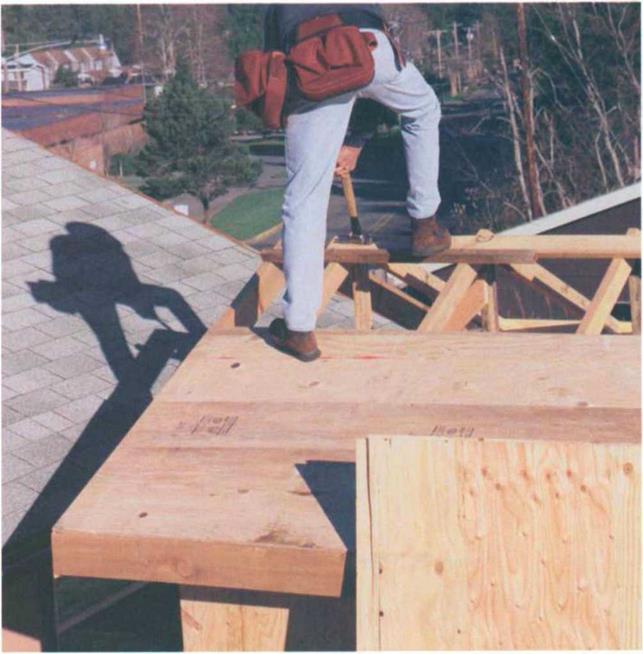
A professional carpenter can walk the plate and cut off the rafter tails. If this is too scary for you, then cut the tails from below while standing on a stable sur­face, such as a ladder or scaffold. Barge rafters are often mitered at a 45° angle along their plumb cut to receive the fas­cia. The mark on the barge rafters is the short point of this cut. This guarantees that the barge will be long enough to receive the fascia, which is nailed hori­zontally to the rafter tails.

Try to cut all trim material from the back side. Saw teeth tend to pick up wood grain and leave the upside of a board a bit shattered. This is finish work, so make every cut as clean as possible.

Also, try to use long, straight stock for the fascia, just as you did with the barge rafters. Start by making a square cut with a 45° miter to fit into the barge rafter. The other end of this first board is cut at 45° also, with the cut falling over a rafter tail so that the next piece can be securely nailed to it with an overlap.

Now, working with a partner, nail the fascia into the barge rafter with 16d galvanized nails (see the left photo on p. 152). Because this is exposed, use a finish hammer, try not to miss the nail, and leave a nice, tight miter joint. Hold the fascia down a bit as you nail it to the rafter tails so that the roof sheathing can extend out over it and be nailed flush with the outside of the fascia. To find

Trimming rafter tails

Place the fence of the rafter-cutting template on each rafter and scribe a plumb-cut line at the mark. (Photo by Roe A. Osborn.)


Trimming rafter tails

Drive two 16d hot-dipped galvanized nails through the barge rafter and into the fascia. Make sure the miter joint is tight because it will be seen. (Photo by Roe A. Osborn.)


Trimming rafter tails

Place a piece of scrap wood on the top edge of a rafter extending beyond the rafter tail. Put the fascia snug against this scrap and drive one 16d galvanized nail high and another low. (Photo by Roe A. Osborn.)


exactly how high to place the fascia on the rafter, first place a scrap of wood on the rafter’s top edge and extending beyond the end of the tail. Place the fascia snug against this scrap and nail it to the first rafter, driving the first nail high and the second nail as low as possi­ble (see the right photo above). Then continue nailing the fascia to the remaining rafters, being sure to join fas­cia boards together over rafter tails with a 45° lap joint.

Preparation for building a soffit

Building other types of simple soffits is covered in Chapter 8, but sometimes preparation for building soffits can be done as the fascia is installed. The first type of soffit needs a subfascia (see the top drawing on the facing page). Cut the rafter tails back an extra 1У2 in. Before nailing on the finish fascia, nail the subfascia to the rafter tails using the same stock as the rafters.

For the second type of soffit, cut a 3/4-in.-wide by V2-m.-deep groove into the back side of the fascia (before it is

installed) just below the rafter tails (see the bottom drawing at right). You can cut this groove with a table-saw – mounted dado blade or with a router.

Sheathing the roof

Years ago, when wood shingles were the norm, we used to sheathe roofs with 1×6 boards. Often, a roof was strip – sheathed (sometimes called skip – sheathed), where the builders left 4-in. or 5-in. gaps between each board to allow the wood shingles to breathe. If you live in an older house, look in the attic and you can often see this type of sheathing. But today, because composi­tion shingles are more common than wood shingles and need a solid base, most roofs are sheathed with plywood or oriented strand board (OSB).

Sheathing a roof is much like sheathing a floor. Begin by measuring up 48Уд in. from the fascia on each end and snap a control chalkline across the rafters. You can work off the straight fascia edge, but I find it easier to use a chalked con­trol line that’s right in front of me.

On steep roofs, you can usually sheathe the first row or two while standing on the joists. If using OSB sheathing, take care to put the slick side down. I have stepped out on a frosty roof in the early morning and started skiing (for other safety tips, see the sidebar on p. 1 54). That’s the way it is with the slick side of OSB.

Подпись: TWO WAYS TO FRAME A SOFFITПодпись: With subfasciaПодпись: Roof sheathingПодпись: Soffit joistПодпись: 2x nailerПодпись: Exterior wall Подпись: FasciaTrimming rafter tailsПодпись: ExteriorПодпись: wallПодпись: FasciaПодпись: Groove cut in fascia to hold soffit boardПодпись: RafterПодпись: Without subfasciaПодпись: Soffit board Roof sheathingTrimming rafter tailsThe first sheet is always a bit difficult to get squared away on the roof and nailed directly on the control line, mainly because you don’t have a good place to stand. As with floor and wall sheathing, make sure the edge of each sheet falls in the middle of a rafter. The ends can extend out over the barge rafter and be cut later.

Safety roles for sheathing a roof

• Roofs with pitches over б-іп-12 are too steep to stand on.

• When necessary, use approved safety lines to hold you when sheathing a roof.

• Don’t wear slick-soled shoes.

• Be extra careful when working near the edge of the building.

• Sweep sawdust off sheathing panels because the dust will make the panels slippery.

• Stay off plywood that has ice on it, and be espe­cially watchful early in the morning before the sun warms things up.

• When using sheathing that has one slick side, put the slick side down.

• Don’t carry sheets in a strong wind because they’ll act as a sail.

• On windy days, nail each sheet with enough nails to hold it securely until final nailing.

• Secure your tools so they won’t slide off the roof.

• Never throw scrap wood off the roof without checking to see that no one is below.

Because composition shingles need a solid base, most roofs today are sheathed with plywood or OSB. (Photo by Roe A. Osborn.)


Trimming rafter tails

Trimming rafter tails

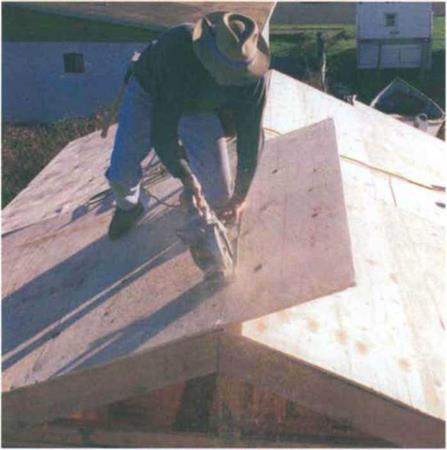
To cut the sheathing at the ridge on the roof, snap a chalkline along the ridge, set the saw to cut 3A in. deep, and make the cut. The sheathing doesn’t have to fit perfectly here because it will be covered by paper and shingles. (Photo by Roe A. Osborn.)


Trimming rafter tails

A last step in the roof-sheathing process is to trim the sheathing flush with the barge rafters at the gable ends. (Photo by Roe A. Osborn.)


A common nailing schedule for a roof is 6-6-12 (6 in. o. c. at the edges and joints and 12 in. o. c. in the field). When you nail sheathing on the gable end and overhang, take special care not to miss the rafters. Missed nails can be seen from below, and they don’t draw the sheathing tight against the rafters.

Once you have the first row of sheathing down, start sheathing the second row. If you are using Win. plywood or OSB and the rafters are 24 in. o. c., you have to place metal clips on the edge of the panel between each rafter. The clips link the two sheets together so that any load between the two rafters is carried by the two sheets. Just like on a subfloor, remember to stagger the vertical joints. And remember to work safely, especially on steep roofs, nailing up 2x cleats as you go up and/or using safety lines as necessary to keep from sliding off.

Once the last row of sheathing is in place, snap a chalkline along the ridge and cut, with your sawblade set about 3A in. deep (see the left photo above). Sheathing doesn’t have to fit perfectly at the ridge because it will be covered with roofing paper and shingles. In some regions, the sheathing is held back from the ridge from 1 Vi in. to 3 in. so that a ridge vent can be run the length of the building to ventilate the attic.

Once you have one side sheathed, move to the other side and work the same way. When the entire roof has been sheathed, trim the plywood flush along the gable ends (see the right photo above) and finish nailing. Not long after the roof has been sheathed, builders in wet areas like to cover it with felt roof­ing paper to protect the entire structure from the elements until the finished roof can be installed.

Installing gable-end studs

Gable-end studs come built into gable trusses, but they have to be cut and fitted on the job site when building a conventional roof so that exterior wall coverings can be nailed on. Often, a 14-in.-wide vent is placed in the gable ends. To accommodate this vent (or other opening), measure over half the distance of the rough opening from the center of the ridge board and mark this distance on a gable-end rafter. Measuring down from this point to the plate gives you the length of the longest gable-end stud.

Notches cut to receive 2x lookout


Gable-end

rafters


Ridge board


Barge

rafters


2×4 lookouts 32 in. o. c.


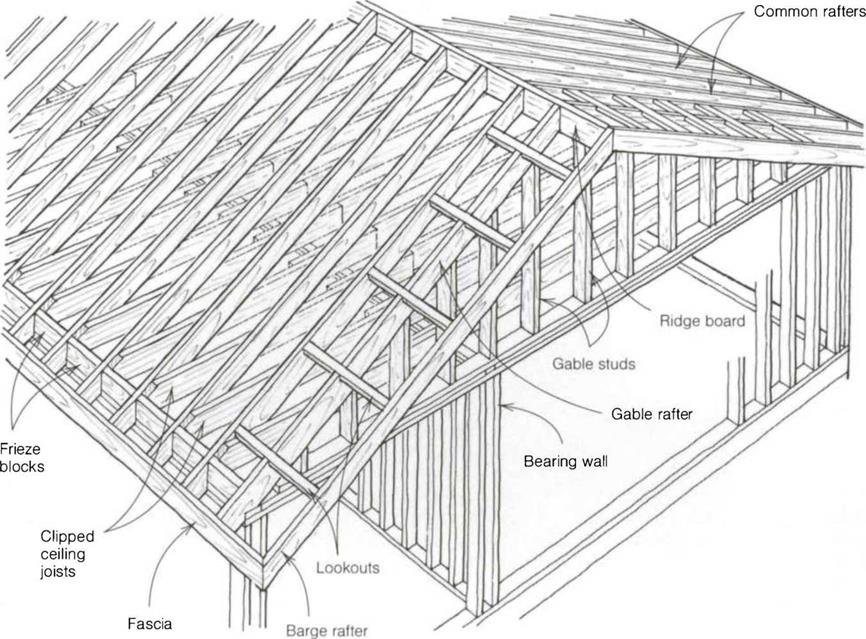
The 2×4 lookouts that support the barge boards are fitted into notches cut in the gable-end rafters. Make sure the gable-end rafters are straight. Then, using two 16d nails, fasten the lookouts into the notches. These notches can be cut into the end rafters before they are installed.


2×4

stud


Top plates


Installing gable-end studs

Rather than measuring the length of each individual gable-end stud, I use a little math to calculate the common difference in length of each successive stud. Divide the rise (4 in this case) by 3 and add the result and the rise together (44-3 = 1.33 + 4 = 5.33, or 53/s in.). So, for example, if the first gable-end stud is 47 in. long, the next one will be 415/s in. (47 – 53/s = 415/s). The next will be 36Va in. long and so on. The tops of these gable-end studs are cut at an 18° angle, the pitch of the roof (consult rafter tables for this angle).

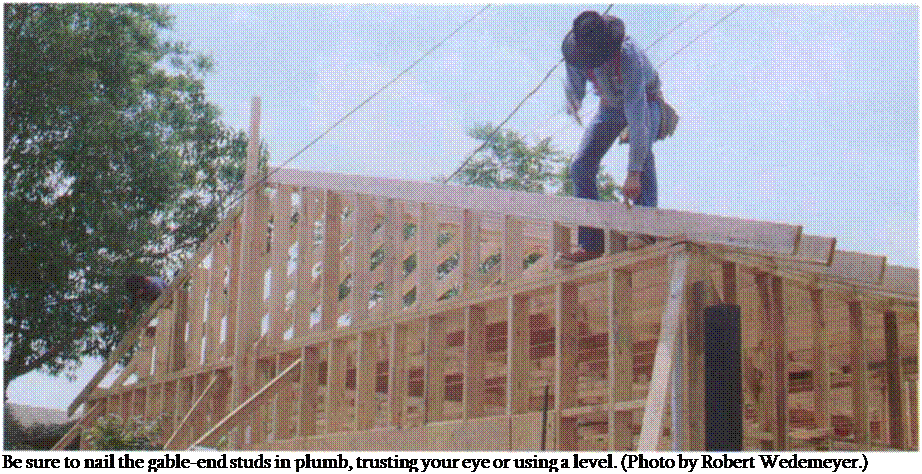
Nail the gable-end studs in plumb, trust­ing your eye or using a level (see the photo on the facing page). Be careful to
nail down through the rafter into the gable-end studs to keep from pushing the end rafter up. Don’t inadvertently put a crown in this straight rafter.

Finishing the overhang

There are many ways to finish an over­hang, from simple to ornate. Houses in the Southwest may have a stucco soffit. A Victorian beauty may be trimmed out with fancy gingerbread. But the trend in most areas of our country today is toward simplicity and economy.

The next step in finishing the overhang part of this big puzzle is to install the barge rafters. Lay the 2×4 lookouts into the notches cut in the gable-end rafters.

Nail them with two 16d nails into the first inboard rafter (see the drawing on p. 149). Sight down the end rafter to make sure it is straight, then nail the lookouts into the notches with two more 16d nails.

The gable-end rafter forms the upper part of the exterior wall and needs to be plumb and straight. I once got a callback on a house that had a badly bowed gable-end rafter that no one noticed until the shingles were on. While we were able to cut the nails that held the rafter to the roof sheathing with a reciprocating saw and correct the mis­take, it took time and money. Like most building mistakes, it was correctable, but it would have been far cheaper to make sure the rafter was straight in the first place.

Next, check the plans to determine the length of the overhang. If it’s 20 in. at the gable end, for example, subtract 1 Vi in. for the barge rafter and snap a chalkline at 18Vi in. across the lookouts and across the ridge board if it extends into the overhang. This will ensure a straight barge rafter. Cut the lookouts and ridge board with a circular saw.

Nail through the barge rafters into the ends of the lookouts with galvanized 16d nails. Because this framing will be exposed, make sure that the plumb cut at the ridge board fits tight and looks good.

Laying out the ridge board

Подпись: 2x10 ridge board

Rafters cover the joint between ridge sections

Ridge board ripped to width of barge rafter in overhang ‘

Подпись: Gable-end rafter 2×8 common rafter

Подпись:

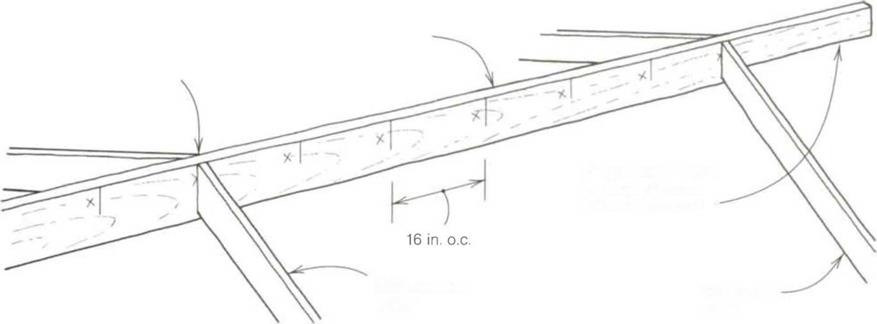
every 1 б о. c. or 24 in. о. с. If more than one board will be used to make up the ridge, cut the boards so that each joint falls in the center of a pair of rafters. Be sure to align the layout of the ridge board to that of the joists so that the rafters and joists tie together at the plate line. If both are spaced 16 in. o. c., every rafter will tie into a joist (see the draw­ing on p. 142). If the joists are 1 б in. o. c. and the rafters are 24 in. o. c., a rafter will tie into every fourth joist.

Some builders like to let the ridge board extend out into the overhang and catch the ends of the barge rafters (see the drawing on the facing page). If you do this, rip the overhang part of the ridge board down to the actual size of the rafters because this section of the roof is exposed. Determine this length by mea­suring the face of the ridge plumb cut. For example, a 2×6 cut on an angle will be more than SV2 in. along the length of the cut.

Now comes the fun part. Nailing the rafters in place to the ridge board and to the wall plates and joists quickly gives the building frame a finished look. On most buildings, there is no need to pre­set the ridge at a predetermined height. Ridges are sort of like shoes. They go where they go. Setting rafters in place easily determines ridge height.

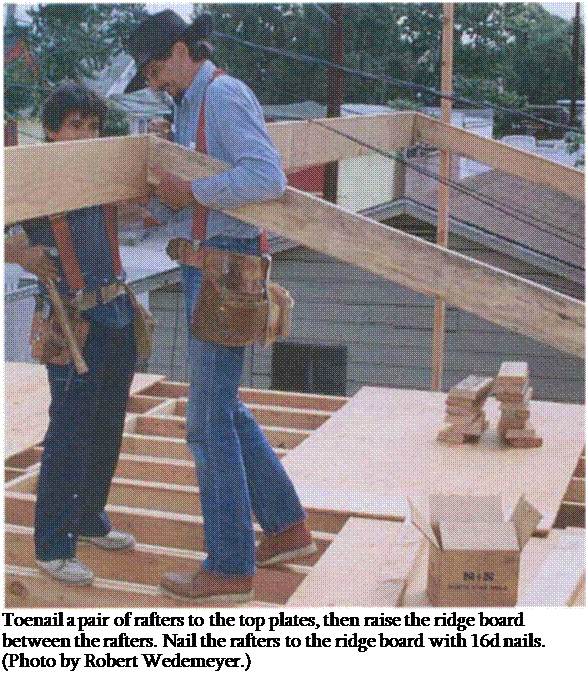
Begin by pulling up a straight, gable-end rafter. While one person holds the rafter at the ridge board, the other toenails the bottom end to the wall plate with 16d nails—one on each side of the rafter. Repeat this process with the opposing rafter. To hold them steady, tack a 1x brace from the rafters back to a joist.

Now move to the opposite end of the first ridge section and toenail another rafter pair in the same way. Next, pull the ridge board up between the two pairs of rafters (see the photo above).

Drive two 16d nails straight through the ridge into the end of the first rafter, then angle two more through the ridge into the opposing rafter. I try not to nail in the top of any rafter, which helps me avoid dulling my sawblade later when I cut sheathing on the roof.

At this point, nail a 2×4 leg under the ridge board to a wall plate at both ends. These legs need to be the same length.

If they aren’t, it may mean that the walls are slightly out of parallel. Pull the nails out of the rafter pair at the top plate on the high end of the ridge and slide the rafters out a bit until the ridge rests on the 2x leg.

Подпись: Be sure to nail the gable-end studs in plumb, trusting your eye or using a level. (Photo by Robert Wedemeyer.)
Plumbing the ridge

Just as you did on the truss roof, nail a long 2×4 on edge to the side of the building. Push the end rafters against the upright and install a 2×4 sway brace extending from the top plate to the ridge board at a 45° angle. Nail it between the layout lines at the ridge board so that it won’t be in the way of a rafter.

After the initial ridge section is in place, raise the remaining sections in the same way, installing the minimum number of rafter pairs and support legs to hold them in place. At the opposite end, raise another 2x against the building and mark the ridge for length, plumb with the end of the building. Unless the ridge board runs out into the overhang, make the cut and nail in the second pair of straight, gable-end rafters.

With the entire ridge board in place, nail in the rest of the rafters and complete the roof frame. Nail each rafter into the ridge board with two 16d nails, then nail
rafters to the ceiling joists with three 16d nails. The rafter should be toenailed to the wall with two 16d nails. Nail in several rafters on one side and then switch and do the same on the other side. Switch back and forth, or you may get too much weight on one side and cause the ridge board to bow.

Gable-roof theory

Gable-roof theory

It’s also easy to determine rafter length with a calculator that has a square-root function. Knowing that a2 + b2 = c2 is the key (this is the Pythagorean theorem, the formula for finding the lengths of the sides of a right triangle). If the roof pitch is 4 (a) in 12 (b), then a2 (16) + b2 (144) = 160; the square root of 160 is 12.65. The length of the rafter (hypotenuse) for a 4-in-12 pitch roof with 1 ft. of run is 12.65 in. (see the drawing on p. 144). If the rafter runs 7 ft., for example, multiply 12.65 by 7 to get 88.55 in., or 7.379 ft. Converting the decimal to fractions gives you a rafter length of 7 ft. 414 in.

Laying out and cutting rafters

To determine the number, length (includ­ing enough for the rafter tail), and size of the rafters, you’ll need to check the plans. If the rafters are spaced 16 in. o. c., divide the length of the building by four, multiply this figure by three, and add one more. Double the result to cover both sides of the roof.

If the rafters are spaced 24 in. o. c., the process is even easier. Just take the length of the building and add two.

These days, rafters tend to be made from 2x8s or larger so that they can be filled with adequate insulation to meet energy codes and to support heavy roof tiles or snow loads. Many of the roofs I cut and stacked years ago were made from 2x4s and 2x6s. Recently, I got a call from a family who lived in such a house. One night they heard a horrible sound above, like something breaking, and asked if I would please have a look-see.

I crawled up in the attic, and they were right: Two rafters were split, and others were sagging. They had changed the roof covering from composition shingles to concrete tiles without adding extra supports to the rafters. Wet snow loads can cause the same damage.

Many buildings also have barge rafters (two on each end), that form the over­hang on the gable ends. These rafters

Gable-roof theory
are trim pieces that hang away from the building and are clearly visible to anyone who looks up. As you go through the rafter stock, lay aside four clean, straight pieces so that your trim will look good. But check the plans. Barge rafters may be smaller than the regular rafters or made from cedar, redwood, spruce, or pine.

One of the fascinating aspects of build­ing a roof is that all the rafters can be laid out and cut on the ground. Then, as perfect as a picture puzzle, the parts fit together on the house frame to form the roof. It seems rather magical, but it’s not difficult to do. Start at the begin­ning, by laying out a pair of common rafters on your sawhorses. First, though, make a rafter template out of scrap 1x or plywood that is the same width as your rafter stock (see the sidebar on the facing page), so that you won’t continu­ally have to use your small rafter square to lay out the rafters. I use this template
to scribe the ridge cut (a plumb cut on the rafter stock that fits against the ridge board) and the bird’s mouth (the notch in the rafter that rests on the top wall plate).

To use the template, place it on rafter stock near one end and mark the plumb cut. Make sure the crown side is up. From the long point of this mark, mea­sure along the top of the stock and mark the length of the rafter. Then align the template’s registration mark with the rafter-length mark and scribe the bird’s mouth. That’s all there is to it. Be sure you have enough stock left over for the tail forming the overhang.

With the first rafter marked to length, make the ridge cut with your circular saw. Move to the other end of the stock and make the cuts for the bird’s mouth, overcutting just enough to remove the wedge. Use this rafter as a pattern to lay out and cut the second rafter.

Use a small rafter square to scribe the ridge plumb cut at one end of the 1×6 template, as shown in the drawing at right. Move down the template about 1 ft. and scribe the heel cut (a plumb cut) of the bird’s mouth. Extend this line across the top edge of the template. This will serve as your registration or guide mark when laying out the bird’s mouth on the rafter stock. Then mark the level seat cut on the bottom edge of the template, which will be 31/2 in. long for 2×4 walls and 51/г in. long for 2×6 walls.

Add a 1×2 fence, and the template is ready for use (see the drawing below).

Подпись: Ridge plumb-cut line Подпись: Heel plumb-cut line Подпись: Level seat-cut line Подпись:Подпись: Pivot pointGable-roof theoryThere is no need to lay out and cut rafter tails at this point. Instead, let the tails run long. Once the roof is built, a chalkline will be snapped across the rafters hanging outside the walls. The tails can then be cut in place, ready for fascia to be nailed to them.
Gable-roof theory

Gable-roof theoryBefore cutting up all the expensive rafter stock, it’s a simple matter to check to see that these first two rafters are cut properly. With a partner, pull up the two rafters, one on each side of the building. Hold them in place with the seat cuts snug at the plate lines. Place a short 2x ridge between the rafters at the peak, then check to see if all the cuts—both at the bird’s mouth and at the ridge board—fit perfectly. When you are satis­fied, use the first rafter as a pattern to lay out and cut the remaining rafters. Once the rafters are cut, carry them to the house and lean them against a wall, ridge end up. Rafter tails will be cut to length once the roof is built.
Like truss roofs, stick-built roofs have frieze blocks nailed between each rafter at the plate line that help stabilize the rafters. Cut the blocks slightly less than 141/2 in. long for rafters at 16 in. o. c. and slightly less than 221/г in. long for those nailed 24 in. o. c. If blocks are set on the wall, they may have to be cut 1 Vi in. shorter (13 in.) because of the ceiling joist nailed to the plate.

Laying out and installing the ridge board

Before tackling the ridge board and installing the rafters, take the time to build yourself a safe place to work. Nail plywood strips left over from the floor sheathing on top of the ceiling joists under the ridge line to make a catwalk that’s at least 2 ft. wide and that runs the full length of the building. There are times, especially when you have a high ridge or are working on a house without ceiling joists, that you will have to set up a scaffold. It’s best to use a solidly built metal scaffold (you can rent these) to guarantee your safety. Anytime you work high up, be safe. Risks are for trained Hollywood stunt men.

A secure catwalk gives you a place to lay out the ridge boards, which need to be as straight as possible. The ridge board must be wider than the rafter stock so that the angled plumb cut of the rafter bears fully across the face of the ridge board. So if the rafters are 2×6, use a 2×8 for the ridge board. Begin the ridge – board layout at one end, marking it

The parts of a gable roof

The parts of a gable roof

the span. When you know the pitch of a roof plus the true span (measure the span from outside wall to outside wall with a long tape) or the run, you can determine the length of the common rafters. To do this, try using a book of rafter tables (see Sources on p. 198) or a pocket calculator.

A 24-ft.-wide building has a span of 24 ft. To find the rafter length of a 4-in – 12 pitch roof for this building, open your rafter-table book to the 4-in-12 page and look under the common-rafter table
at 24 ft. to see that the rafter length is 12 ft. 73/д in. If the span is 24 ft. 8 in., look under 8 in the inches column and add on an extra 41A in. That is the total length of the common rafter. It’s really that simple, so don’t make it difficult for yourself. After a few minutes with a rafter book, you can figure the length of almost any rafter for any pitch and any span. Subtract from this figure half the thickness of the ridge board (3A in. for a 2x ridge) and leave enough extra wood to cover the length of the tails in the overhang.

Bracing trusses

Trusses usually come with detailed infor­mation on how to brace the specific type of truss you are installing. These instructions need to be followed care­fully to guarantee that the house will have a strong and stable roof in case of high wind, heavy snow, or earthquake. Don’t try to guess your way through truss bracing.

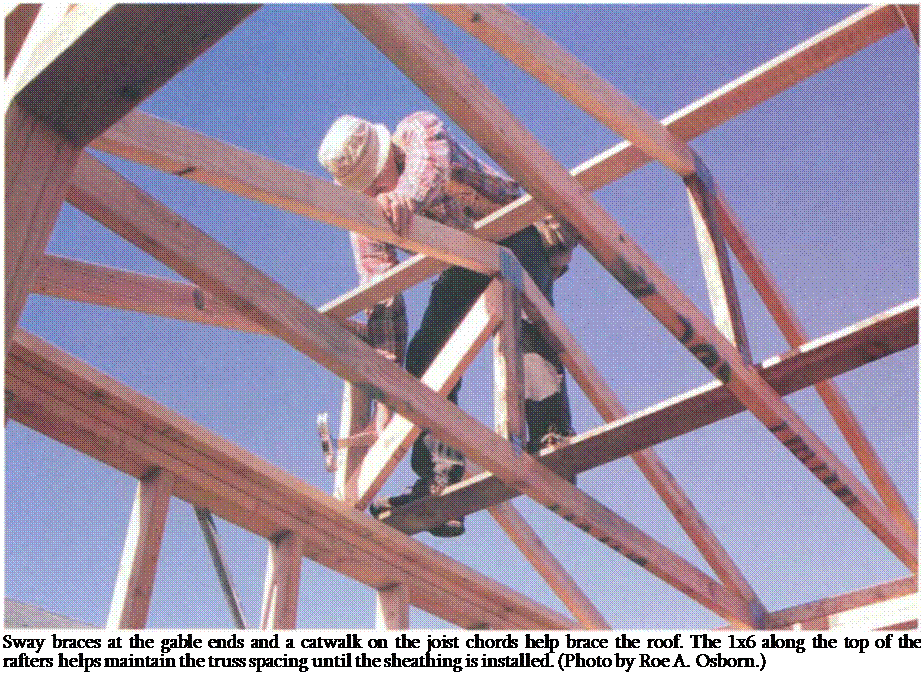
Having said that, most simple gable – truss roofs are quite easy to brace. Begin by temporarily nailing a long 1x across the rafter chords of each truss, near the ridge point. (I often nail this 1x on the underside of the rafter chord so I won’t have to remove it when sheathing the roof.) This 1x helps hold the trusses stable until you nail in the ridge blocks and other braces. Do the same with another 1x nailed permanently on top and near the center of the joist chords with two 8d nails into each joist. This 1x is the catwalk, like the one nailed to reg­ular joists, and helps hold the joist chords at 24 in. o. c. and keep the roof structure steady.

Once the catwalk is in place, it’s easy to walk along it and nail in the blocks at the ridge point unless the ridge is a tall one. On tall ridges, experienced carpen­ters walk the rafters to nail in the blocks, which is fairly easy to do with the 1 x nailed alongside the ridge. Hold a block in place between the rafters at the peak. Drive two 16d nails through the rafter into the block on one side and another 16d nail in from the other side.

To help hold a gable-roof structure plumb, you also need to install a sway brace at each end of the roof. A sway brace is a 2×4 nailed in at a 45° angle from the double exterior wall plate to a ridge block nailed in at the peak of the roof. Miter-cut the sway brace at one end, set it flat on the wall run­ning diagonally up to the top of the ridge, and mark it to length. Make the cut and nail the brace in place with three 16d nails at each end (see the photo on the facing page).

To further brace the roof and to tie it to the house frame, use hurricane clips where the joist chords meet the plates. These metal clips are not always required by code, but if you ever happen to get a serious wind, they help keep the roof attached to the house. Nail a clip on each truss with hanger nails.

STICK-BUILT ROOFS

Despite the increasingly widespread use of trusses, gable roofs are still being built stick by stick. Newcomers to the trade often think there is something magical and mysterious to cutting and building a roof and that the task is beyond their abilities. But if you can draw a right triangle, use a handheld calculator or read a book of rafter tables, use a small rafter square, and handle a circular saw, you can build a gable roof. Of course, other types of roofs are more complex and difficult to build than gable roofs, but understand­ing how a gable roof goes together is the first step in building these more complex roofs.

You don’t have to be a math genius to be a roof cutter, but the more you know about roof parts and how they go together, the easier it will be. A gable roof slopes in two directions, like two right triangles butted together (see the drawing on p. 142). It has a ridge board at the peak. Common rafters are nailed to the ridge board and slope down to the top plates of opposing outside walls. Here the rafters nail into the wall plates and ceiling joists, effectively form­ing a truss.

Many homeowners today seem to want more openness to their houses, with larger rooms and higher ceilings. As a remodeler, I have been asked to remove ceiling joists and change a flat ceiling to one that follows the roof pitch. This does give an open feeling, but at a cost. If you remove all the joists, the roof truss is compromised, and weight on the roof can bow exterior walls out and cause the roof to sag. In the absence of a structural ridge beam or collar ties (hori­zontal members that tie rafters together above the wall plate), a roof generally needs those ceiling joists.

Determining rafter length

To determine the length of the common rafters, you first need to know the pitch of the roof and the span and run of the rafters. Pitch is the amount of slope a roof has. To say a roof has a 4-in-12 pitch, for example, means that for every 12 in. a rafter runs horizontally, it rises vertically 4 in. (see the drawing on p. 143). A 12-in-12 pitch roof is fairly steep, rising at 45°, while roofs pitched at less than 3-in-12 are generally too shallow for asphalt shingles.

Span is the total distance a rafter travels horizontally (the width of the building from outside to outside). Run is one-half

Installing the gable-end truss

Two 16d toenails into top plate


Two 16d nails into frieze block


Gable-end truss


Joist chord


Frieze block


Metal gusset


Installing the gable-end truss

the pile, and with the ridge point behind them, walk along the plates to the other end of the house frame. There, they flip the truss over with the ridge pointed out lying flat across the walls. Subsequent trusses lie on top of the first about every 2 ft like fallen dominoes.

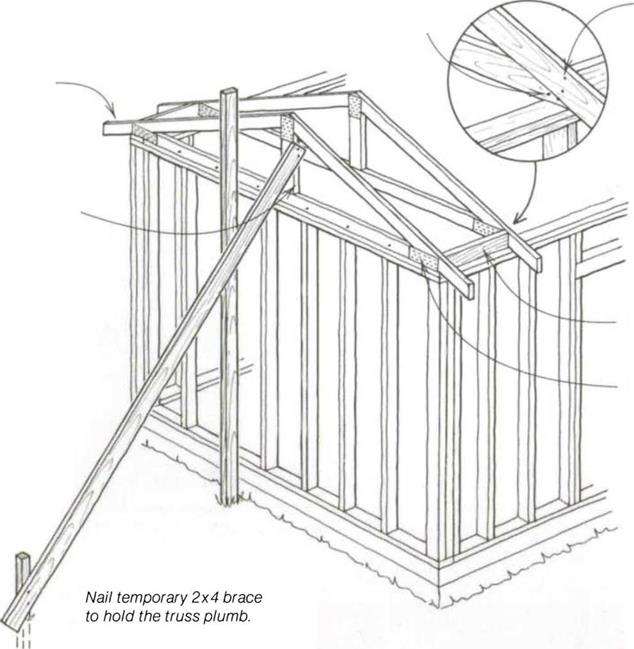
Before raising the first truss upright, nail a 2x on edge against the outside wall frame near the center of the building. The gable-end truss will be nailed to this 2x, which will help hold the truss plumb (see the drawing above). At this point, you can raise a gable-end truss upright
and move it out flush with the outside of the end wall. Make sure you have the proper roof overhang on each side of the building and toenail the truss down through the joist chord into the double top plate with 16d nails spaced 16 in. o. c. Drive a temporary nail through the rafter chord into the upright 2x brace to hold the truss plumb. Brace this truss with a long 2x reaching to the floor or to a good stake driven in the ground.

Now come the frieze blocks, which are the blocks between rafters. When a house is to be covered with stucco,

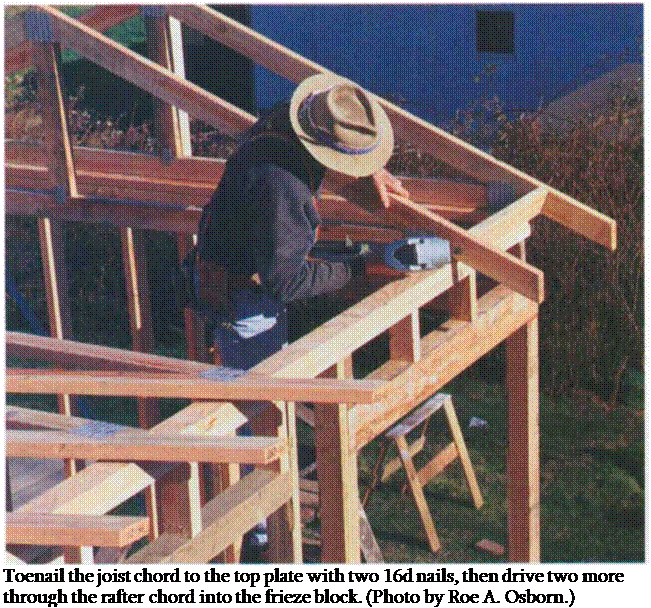
Подпись: Toenail the joist chord to the top plate with two 16d nails, then drive two more through the rafter chord into the frieze block. (Photo by Roe A. Osborn.)

blocks are often nailed vertically, directly on the top plate, flush with the outside. When the wall is covered with siding, blocks can be nailed just outside the wall and square with the truss, with the back side of the block touching the wall.

Frieze blocks serve as stops for the siding, eliminating the need to cut the siding around the rafters. If the rafter tails are to have a soffit (enclosed eaves and overhangs), nail the blocks directly over the walls. Remember, about every third block often contains a vent.

Nail the first frieze blocks into the gable truss at both outside walls with two 16d nails through the truss and into the block. Bring the next truss into position and set it with the rafter tails hanging over the same amount as the first.

It’s important that every truss overhangs the same amount so the rafter tails and ridge will be straight. Some carpenters go to great lengths—pulling lines, checking each rafter with a spacer—to ensure absolute straightness. I think it’s easier to set each truss close to right. When the entire roof structure is in place, snap a chalkline across the rafter tails and cut them to exact length. Now the fascia, which covers the ends of rafters and can be seen by the entire world, will be straight.

Toenail each truss to the top plate through the joist chord with two 16d nails on one side and one 16d nail on the other side. Then nail it to the frieze block (see the photo above). Once you set the second truss, measure to see if the block length is correct to give you

Подпись: Sway braces at the gable ends and a catwalk on the joist chords help brace the roof. The 1x6 along the top of the rafters helps maintain the truss spacing until the sheathing is installed. (Photo by Roe A. Osborn.)
24-in.-o. c. spacing. Keep checking this as you set subsequent trusses. When you reach the other end of the building, make sure the second gable-end truss is nailed flush with the outside wall just like the first.

TRUSS ROOFS

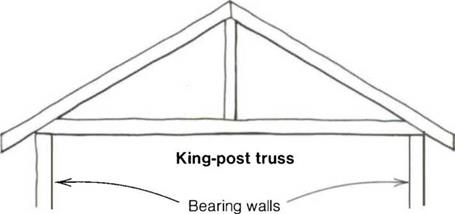
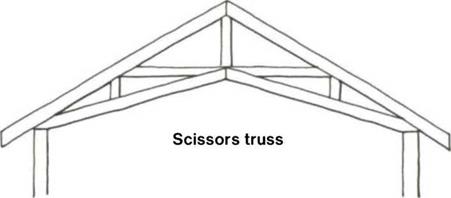
Truss roofs are engineered structures built in a factory. They combine the roof rafters (top chord) and ceiling joists (bot­tom chord) into one unit. Wooden braces, called web members, run between the chords, adding strength to the truss. Because of this, trusses can span long distances, bearing only on the outside walls. So rooms can be larger and door headers smaller than in a stick – built roof because they are not supporting ceiling joists or rafters.

Trusses can be built in many shapes and

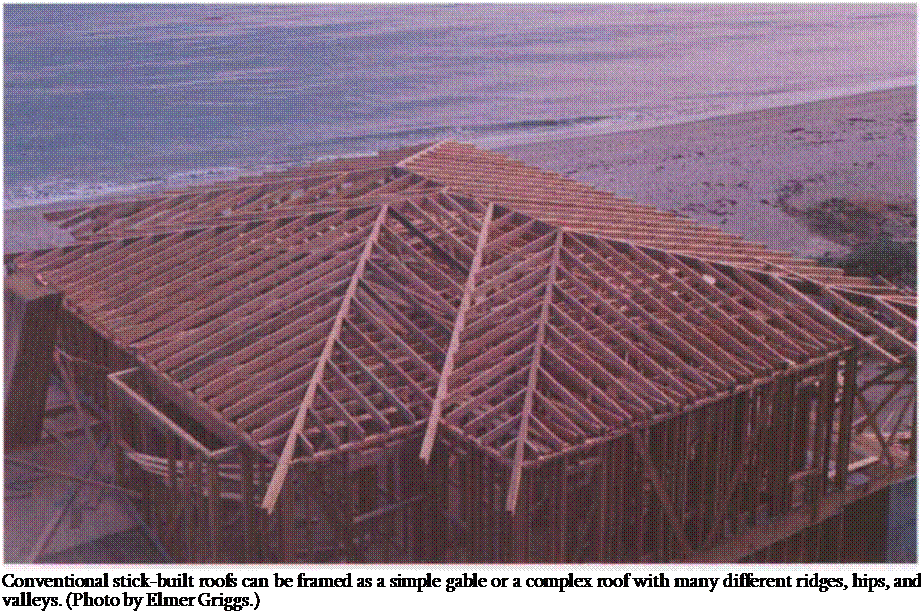
Подпись: Conventional stick-built roofs can be framed as a simple gable or a complex roof with many different ridges, hips, and valleys. (Photo by Elmer Griggs.)

designs to fit most any house (see the drawing on p. 136). In general, they require less lumber and labor to build than conventional stick-built roofs and can be installed quickly on the job site. This is especially important in areas where you want to seal off a house quickly from rain or snow.

Trusses also work well on remodel jobs. With proper planning, I have torn off an old, sagging roof and replaced it with new trusses in one day. Besides impress­ing the homeowners, I didn’t have to worry about rain coming down and soaking their dining-room table.

Trusses are carefully engineered, so cutting them in any way may fatally weaken their structural integrity. With

the exception of gable-end trusses, which have gable studs and are nailed in place directly over an end wall, trusses should not be cut without consulting the manufacturer or an engineer. Because of the web bracing in trusses, attics in most truss-roofed houses have limited storage space. Maybe this is one of the reasons public storage places have sprouted like weeds across our country.

Ordering and storing trusses

Give yourself some lead time when ordering trusses. A busy company may not be able to get to your order for a week or so. I like to deliver (or fax) the truss plans directly to the company rather than order trusses over the phone. This helps avoid costly mistakes.

Подпись: COMMON GABLE^TRUSS DESIGNSTRUSS ROOFSTRUSS ROOFSTRUSS ROOFSTrusses usually arrive on the job site banded in bundles of a dozen or more (see the top photo on the facing page). These can often be unloaded and set right up on the wall plates with a small crane or forklift If the walls are not yet framed and braced, be sure to stack the bundles on level ground. Trusses can withstand heavy vertical loads, but they break easily when bent too far horizon­tally. I recall working on a tract of houses where one set of trusses was left lying
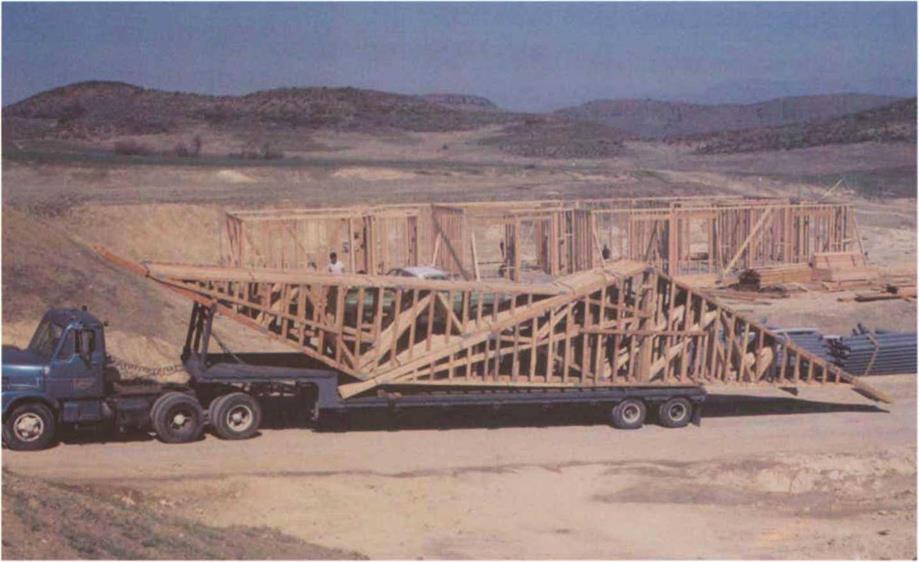
across a gully for a couple of weeks with the ridge section bending down. By the time they were ready to be installed, half of the gussets were pulled loose from the truss members. They were beyond repair and had to be reordered, holding up the framing on one house.

Installing trusses

Most trusses are installed 24 in. on center (o. c.), so you’ll need plenty of 22У2-ІП. spacer blocks to nail between the rafters at the plate line and ridge. No truss layout is required on top of the walls because frieze blocks keep the trusses properly spaced. If these blocks aren’t supplied by the truss company, they need to be cut about Vs in. shorter than the standard 221/нп. block to allow for the thickness of the metal gussets that join the wood members together. Have some long 1xs handy also, laid out 24 in. o. c. These nail near the ridge to hold the trusses steady and to keep them on layout. If the trusses are long, tall, or both, you will need some long 2xs to brace them as you pro­ceed. A strong gust of wind can topple unbraced trusses.

It is not easy to move a single truss from the ground up onto an 8-ft.-high wall, let alone a higher wall. To do so usually takes three people to keep the truss from bending and causing stress to the connectors, so it’s best to have the bun­dles set up on the walls when they are delivered. Lay the trusses flat on the walls with the ridge points sticking out over the end wall or stand them upright in the same location. Be careful when cutting the metal band that holds the bundles together. Under tension, a band can move quickly once it is cut and is sharp enough to slice a hand.

Individual trusses can now be laid flat across the walls in preparation for being nailed upright (see the bottom photo on the facing page). Experienced carpenters pull the first truss (a gable-end truss) off

TRUSS ROOFS

In most cases, roof trusses arrive in bundles of a dozen or more, which can often be unloaded and set right up on the wall plates with a small crane or forklift. However, if the trusses are stored, be sure to stack them on level ground. (Photo by Elmer Griggs.)

TRUSS ROOFS

In preparation for being nailed upright, individual trusses can be laid flat across the wall. The first truss has the ridge pointed outward, and subsequent trusses lay on top of the first about every 2 ft. like fallen dominoes. (Photo by Roe A. Osborn.)

ROOFS

I was in an office-supply house recently when a customer brought in a type­writer for repair. Folks were joking with him, wondering what he was doing with a typewriter in this time of computers. These days, in the world of roof trusses, cutting and building simple gable roofs on site has almost gone the way of the typewriter. Nevertheless, I still love the challenge of cutting and building (we call it stacking here on the West Coast) conventional stick-built roofs, whether the roof is a simple gable or a complex one with many different ridges, hips, and valleys coming together from every direction.

Now, of course, even the most compli­cated roof can usually be made by a truss company and shipped to the site ready to install. Trusses are labor-saving devices, and when you raise a truss in place, you are installing a ceiling joist and a roof rafter at the same time. Another nice part about working with trusses is that they are made from light­weight, kiln-dried lumber, so they’re lighter, easier to handle, and friendlier to the back. But be careful of the metal plates or gussets that hold trusses together. These are very sharp.

The main challenge in building most truss roofs is working high off the ground. An experienced carpenter can work off the ground like a space walker, often standing on a wall plate that is only ЗУ2 in. wide. Most of us can also learn how to do this, but as a beginner, go slow, take your time, and be careful. With practice, it becomes easier. If being up high on a wall is scary, work off a ladder or a scaffold and follow the safety guidelines on p. 123.

Where I live on the Oregon coast, simple gable roofs are found on about 70% of the houses, including mine. Other roofs aren’t quite so simple, but like learning to walk, learning to build a simple gable roof is the first step toward building those more complicated ones. What fol­lows are guidelines for building a simple gable roof, both with trusses and with conventional framing.

CEILING JOISTS FOR A GABLE ROOF

The saying, "They don’t build them like they used to," is often true when it comes to ceiling joists. And it’s just as well. I have remodeled many an old house that had ceiling joists that were sagging from the weight of time and heavy plaster. If you live in an old house,
look at your ceilings—especially in large rooms—-and check to see if they sag in the center.

Once the walls have been plumbed and lined, ceiling joists can be nailed to the tops of the walls in preparation for installing roof rafters (see the drawing on p. 132). In factory-built roof trusses, joists are part of the truss (see Chapter б for more information on roof trusses). Joists nail to the top plates of the walls and help tie the house frame together. Roof rafters nail into both the plates and the joists, forming a truss that helps keep the roof from sagging under heavy loads like wet snow.

CEILING JOISTS FOR A GABLE ROOF

Laying out joists

Lay out the walls for joists just like you laid out the rim joists for the floor (for more on this, see Chapter 4). Hook a long tape on the end of an outside wall and mark 1 б in. o. c. (or 24 in. o. c.) the length of the building. Just like the floor joists, make an X beside the mark to show where the joist will nail.

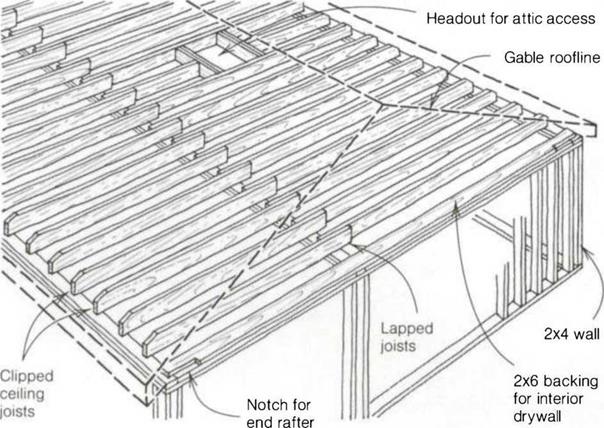
Joists tie into the roof rafters and some­times need to be trimmed a bit to follow the slope of the roof. If you are using 2×8 joists and 2×6 rafters, for example, the joist ends need to be clipped, as shown in the drawing above. Otherwise, they’ll stick up above the slope of the roof. Remember to mark and cut your ceiling joists with their crown up.

Use a 2×6 for the first ceiling joist, laying it flat on the end wall. If the end wall is built of 2x4s, cut notches 1V2 in. wide and 20 in. long in the ends of the 2×6
and nail it flush to the outside. As shown in the drawing above, the notches leave room for the first set of rafters to be nailed to the plates. If the end wall is of 2×6 construction, nail a 2×4 flat onto the plate, ЗУ2 in. in from the outside. This leaves room for 2×4 gable studs to be nailed under the rafter. The part of the flat 2x that hangs over the inside edge of the plate provides backing for ceiling drywall.

Installing joists

With the crown side up, start nailing the joists on edge at each layout mark with a 16d toenail in each side. Where joists lap over an interior bearing wall, nail them together with two 16d nails and toenail them to the wall with one 16d nail on each side. A joist that passes over any other wall is secured to the plate with a 16d nail on each side. This helps hold the building plumb and strengthens the entire structure.

Catwalks are seldom required by code. They are usually a 1×4 or 1×6 nailed flat to the ceiling joists in the middle of the span (see the photo on p. 140). They help keep joists upright, free from twists, and properly spaced and also make it safer to walk when stacking roof rafters. Mark a layout at either 16 in. o. c. or 24 in. o. c. on the catwalk before securing it with two 8d nails per joist.

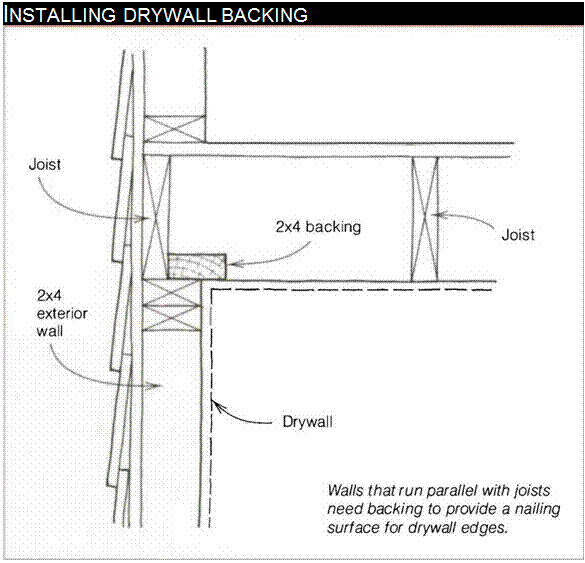
When joisting for a second floor or any ceiling that will be covered with drywall, backing has to be nailed on all walls that run parallel to the joists. Usually this can be accomplished by nailing a 2×6 flat on the top plate of a 2×4 wall and letting 1 in. hang over on both sides. Or you can nail a 2×4 on top of the plate (see the drawing at right). This is a good place to use up shorter pieces of 2x stock, crooked studs, badly crowned joists, and lumber with large knots. Nail the backing down every 16 in. with 16d nails directly over the wall studs.

Framing headouts in ceilings

A joist or two will have to be cut to allow access to the attic. Most codes require this access to be at least 30 in. by 30 in. I like to put these access holes in an out-of-the way place, like in the ceiling of a closet.

Once the ceiling is joisted, lay out the location of the access hole right on the joists, allowing an extra 3 in. to leave room for the 2x header joists (see the drawing at right). Support the joists that will be cut by nailing a flat 2x across sev­eral joists, then make the cuts in the ceiling joists and nail in the headers. Cut 141/2-in. blocks to nail to the header between the joists to help support the cut joist.

Подпись: INSTALLING DRYWALL BACKING Подпись: FRAMING AN ATTIC ACCESSCEILING JOISTS FOR A GABLE ROOFOnce the walls and ceiling joists are in, you’re ready to turn your attention to the roof.