Category CARPENTRY

Installing baseboard

Baseboard hides the joint between the drywall and the floor, so most finish floors are installed before the baseboard. On carpeted floors, baseboard can be installed ahead of time, but hold it up about У2 in. so the carpet can tuck underneath.

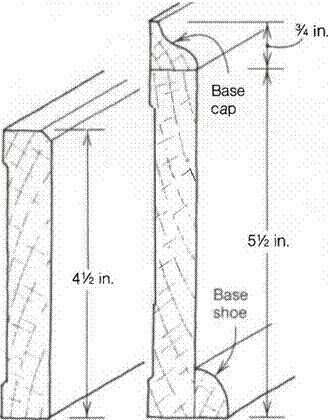
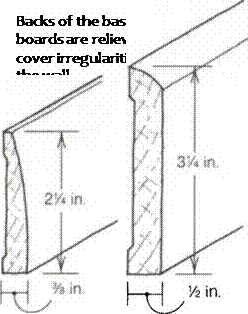
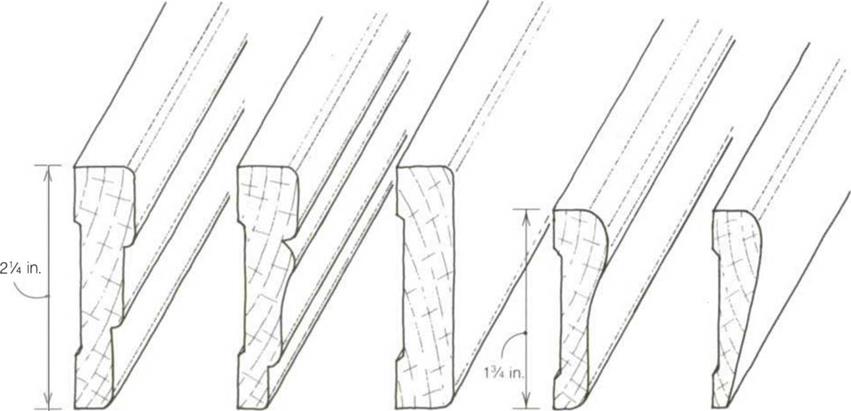
Baseboard comes in many different styles, ranging from simple flat stock of various widths to milled trim to built-up baseboards composed of two or more pieces (see the drawing above). It’s best to buy long lengths so there will be fewer joints. Start installation on long
walls first, opposite the door, cutting a piece square on each end to fit from wall to wall. Work from this piece toward the door, making the final cut a square one against the casing. Thin, modern trim can be nailed with 6d finish nails directly into the bottom plate about every 1 б in. Wider, thicker trim needs further nailing into studs to draw it tightly against the wall. Mark the loca­tion of these studs before nailing.

Unfortunately, walls and floors are seldom totally straight and level. While simple baseboards are thin and bend easily to conform to irregularities, heavier moldings will need to be scribed and planed to fit the wall and floor contours. The use of base caps and base shoes is another solution to this problem. They can be flexed to fittightly against the wall and floor surface without scribing. When the baseboard will be
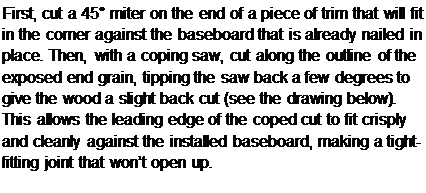
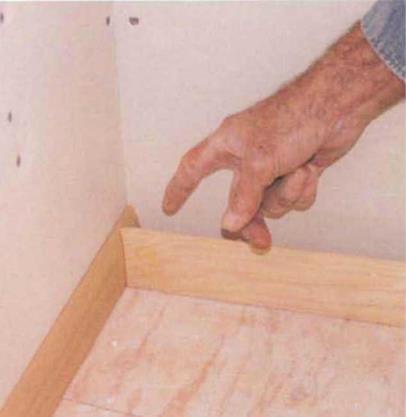
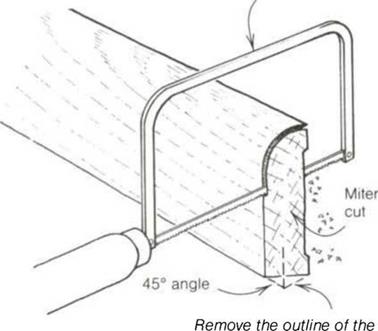
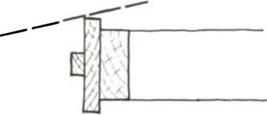
Подпись: Nowadays, baseboards are usually fitted together at outside corners by using regular 45° miter cuts on each piece. And many carpenters do inside corners the same way. But traditionally, inside corners have been joined, particularly with detailed baseboards, with what is called a coped joint (see the photo below). While these joints may look tricky, they aren’t hard to do. In fact, I find cutting these joints to be kind of fun. Подпись: First, cut a 45° miter on the end of a piece of trim that will fit in the corner against the baseboard that is already nailed in place. Then, with a coping saw, cut along the outline of the exposed end grain, tipping the saw back a few degrees to give the wood a slight back cut (see the drawing below). This allows the leading edge of the coped cut to fit crisply and cleanly against the installed baseboard, making a tight-fitting joint that won’t open up.

Coping Joints

Installing baseboardThis joint is also useful for other situations where different types of trim, such as a chair rail, meet at a corner.

Cutting a coped joint

Coping saw

Installing baseboard

miter with the coping saw. Back-cut slightly.

Coping trim at inside corners creates a tight-fitting joint.

painted, builders often fill the gap between the baseboard and the wall with paintable latex caulk. [11]

Some painting needs to be done, cabi­nets set, closets finished, and electrical, plumbing, and heating work completed, but the end is in sight. You can start thinking about moving in, baking bread in your oven, and planting some roses outside.

[1] often use my combination square to mark stock for ripping. To make a 2У2-ІП. rip cut, for example, set the head at 2У2 in. on the blade. Now set the square on the stock, and you can quickly mark a cut line 2У2 in. from the edge. Place a pencil at the blade end and pull the square down the stock to mark the cut line.

[2] also use dryline to check and straighten framing. Stretched from one end of a wall to the other along the top plate, for example, a dryline can quickly indicate where the wall might need to be straightened.

[3] use spade bits or Forstner bits for drilling large-diameter (3/s in. to 2 in.) holes. Sharp spade bits cut right through wood but leave a fairly rough hole, while Forstner bits leave holes with flat

[4] love my random-orbit sander. It’s small enough to be held with one hand. It has a circular base pad that moves in both circular and back-and-forth motions, which enables it to remove stock quickly yet not leave swirl marks. It is easy to use and is quite powerful for its size.

[5]You can also use 3/4-in. plywood.

[6] Eyes are fragile. Always protect them with safety glasses or goggles when using a power tool or when nailing. Buy a pair that feels comfortable. And so you won’t forget them at home, stuff your safety glasses

Start the nail at a 60° angle, about 3A in. from the end of the board.

[8] find the easiest way to mark the loca­tion of wall studs is to use a metal layout stick. The layout stick is made up of four short bars that are 1 Уг in. wide, or the depth of a stud, and spaced 1 б in. (or 24 in.) o. c. These short bars are welded to another bar that’s 49X2 in. long. Forty years ago we made them from 1×2 pine, but now they are available commercially

[9] often support stringers by nailing a 11/2-in.-wide, 18-in.-long metal strap (see Sources on p. 1 98) along the back edge of the stringer on the top end.

I bend this strap around the stringer so the upper end can be nailed to the header joist of the landing, supporting it. On interior stairs, this strap will be hidden by a riser board. Blocks nailed between the stringers help stabilize them. Nail the first block through the side of the first stringer, flush with the top. Pull it up to the line on the header joist and nail it to the header. Then nail the strap to the header joist. Finish by

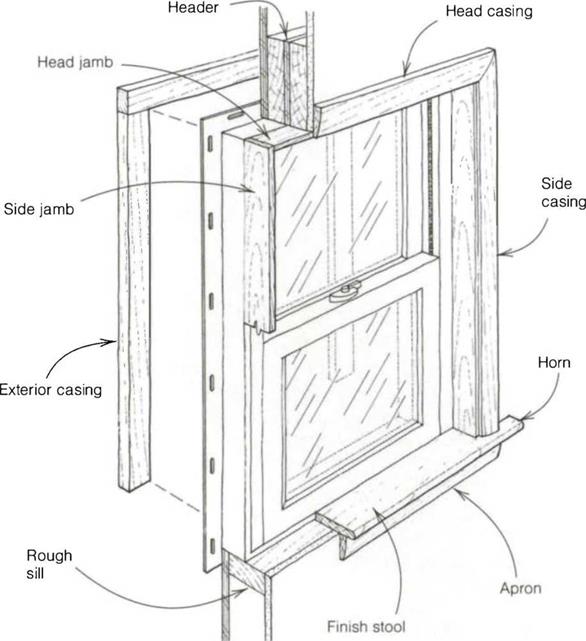
[10] usually install the stool first. I like to use thicker material for this piece of trim (like 4/4 or 5/4 stock). Oak, pine, or spruce make beautiful stools that can be stained or finished clear, or you can use paint-grade pine or even medium – density fiberboard (MDF). The overall length of the stool is equal to the width of the window opening plus the length of the horns (ears that extend out beyond the casing). The length of these

[11] have a lightweight chopsaw that I use to cut baseboard. I carry it from room to room, set it on the floor, and cut base­boards to length on the spot.
Installing casing

Casing hides the joint between the dry – wall and door jamb or window surround It comes in many styles, from 1 x square – edged stock in varying widths to milled casings (see the drawing above). When casing doors, I buy 14-ft. lengths to cut down on waste. Sometimes door casing is available in 7-ft. piecesthat have a 45° miter already cut on one end. Like exterior casings, doors and windows can be either picture-framed (with 45° miters at the corners) or wider trim can

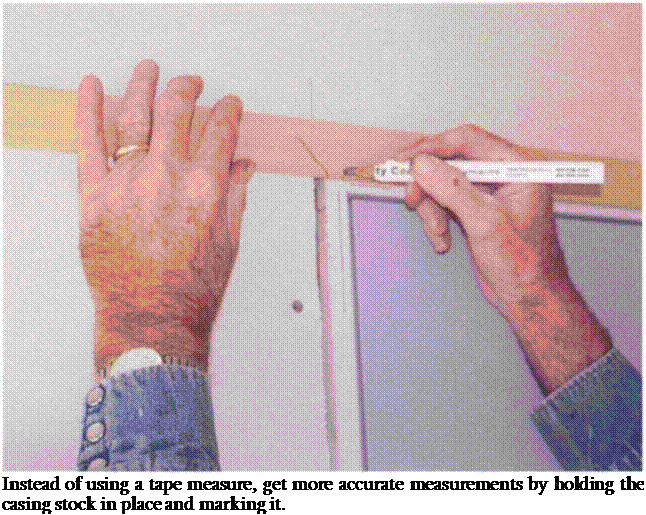
Подпись: Instead of using a tape measure, get more accurate measurements by holding the casing stock in place and marking it.

be butt jointed. I generally nail casing back from the edge of the jamb about 3/i6 in. to leave a reveal.

Reveals make life easier for a carpenter. When wood pieces are nailed flush, they absorb moisture or dry out, moving back and forth in the process, so that flush pieces seldom stay flush. Carpenters learned long ago to step casings back from the door edge 3/ie in. or so. This creates an attractive shadow line and makes it hard to see variations.

Install the side casings first. The short point of the miter should stop 3/ie in. past the top of the inside edge of the head door jamb or window surround. Rather than use a tape measure, hold and mark the casing stock in place (see the photo above). Mark the 3/ie-in. reveal from the inside edge of the jamb in several places and nail the casing into the wall and the jamb with a pair of 6d
finish nails about every 1 б in. Don’t drive these nails home like a 16d framing nail, but letthem stick up (proud) slightly above the face of the wood, setting them later with a nailset so they can be hidden with putty in preparation for painting. Or you can use an air nailer that drives and sets finish nails. If you are using hardwood casing, you may have to predrill to avoid splits.

Once the side pieces are in place, it’s easy to find the length of the top piece. Cut a miter on one end of the top piece and match it to the miters on the side pieces to see if the cut is accurate. Then hold it in place to mark the location of the second miter. Before nailing it in place, a dab of glue in the joints will make for a long-lasting miter joint.

A window apron, usually made from casing material, is nailed under the stool to hide the joint between drywall and sill. Measure across the window casing

Installing casing
Installing casing

from outside to outside to get the length of the apron. There are several ways to finish off the end of aprons.

You can cut them square or give them a 15° back cut and nail them directly below the windowsill.

INTERIOR TRIM

Once the drywall is up and the painters have sealed and finished the walls, the task of installing interior trim, window surrounds, casing, baseboard, and aprons can be started. Years ago we used to trim with wide baseboards, fancy casings, and elaborate crown moldings. While big-budget houses still often have these material – and labor-intensive trim details, the trend for more modest houses has been toward simpler and less expensive trim styles.

Trimming windows

Unlike wood-framed windows, most vinyl-clad and aluminum-framed units don’t come with wood stools (often called sills) or wood jambs. Some people put in a wood stool and let drywall cover the wood trimmers and header. I like to make wood surrounds, or jambs, and

INTERIOR TRIM

case them with trim. I think the wood gives a home a bit more warmth and style, and it’s not hard to do. [10]

horns depends on the width of the side casings, plus the amount the horns extend beyond the casings, usually about Уд in. (see the drawing above).

As a general rule, stools are wide enough to protrude about 1 У2 in. beyond the wall plane. But this can vary, and the window stool I have by my writing desk sticks out beyond the wall ЗУ2 in. and is wide enough to hold an open book. Many folks like an even wider stool in the kitchen to set flower pots in the sun.

INTERIOR TRIM
After cutting the stool to length and laying out and cutting the horns, test fit it against the window. You want to make sure that the edge fits tightly against the window and that the horns fit tightly against the drywall; sometimes it takes some work with a block plane to get everything right. Although this is simple trim, every piece of trim in a house needs to fit just right to account for irregularities in the walls, floors, and ceilings.

Windows can often be ordered with jambs for specific wall thicknesses (for example, 2×4 or 2×6 construction), but sometimes you’ll need to cut and add jambs on the job. First, measure in from the face of the wall surface to the win­dow frame in several places around the window. If these measurements are close, you can rip stock to this uniform width. I generally use a table saw and clean up the cut with a block plane. If the measurements vary widely, cut to
length a head piece that is wider than the wall thickness, then hold it in place at the top of the window and scribe a cutline by running a pencil along the drywall. Repeat the procedure with the side jambs. Jambs can stick out past the drywall about 1/ie in. to make a tight joint with the casing. Once properly fitted, nail the jamb head and sides to the rough header and trimmers with 6d finish nails.

EXTERIOR BEVEL SIDING

Unlike framing, where you can leave a small gap now and then, siding needs to fit properly everywhere. If the horizontal boards are running out of level or don’t fit well at the corners, doors, and win­dows, it’s noticeable from the next county. Not only do gaps in siding look bad, but they also might allow water and cold air to enter the building.

While there are many different types of siding styles and materials available, in this section I’ll talk about how to apply bevel (or clapboard) siding. Years ago, clear redwood, cedar, and spruce siding were widely available. These were easy to work, free of knots, looked good, and stayed flat. Unfortunately, such quality siding isn’t readily available these days. Most of what we have to work with comes from second-, third-, or fourth – growth trees, often curls in the sun, and is spendy(aswe say in Oregon). Because of this, many builders use a wood or cement-base composite siding made of OSB. This manufactured siding is preprimed and 7/ie in. thick with no taper. It ranges from б in. to 12 in. wide and is available in lengths of 16 ft. and longer. If using composite siding, read and follow the manufacturer’s recom­mendations for specific application instructions.

Siding should be nailed into studs when­ever possible, rather than relying on Уг-іп. plywood or OSB sheathing to hold the nail. So the first thing to do is mark stud locations on the housewrap. The best way to do this is to mark the stud layout at the top and bottom of the wall, then snap vertical chalklines at these marks.

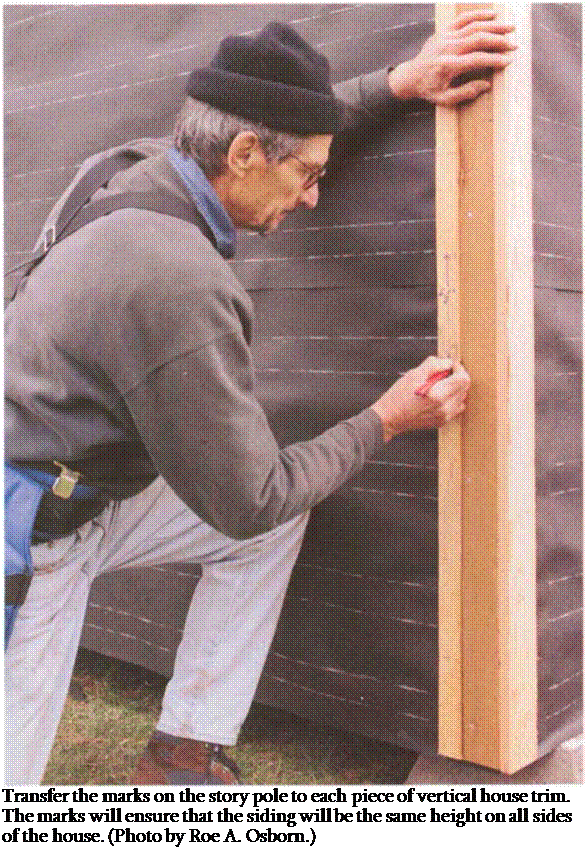
Подпись: Transfer the marks on the story pole to each piece of vertical house trim. The marks will ensure that the siding will be the same height on all sides of the house. (Photo by Roe A. Osborn.)

Laying out siding

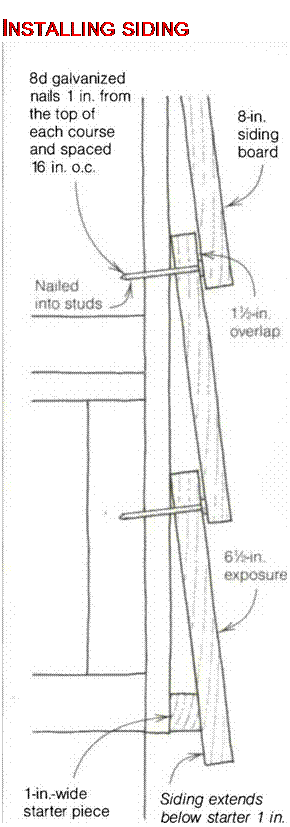
To ensure that each course (or row) of siding is the same height, make a story pole from a straight length of 1×2. Cut it to the same length as the corner trim that runs from the frieze blocks to У2 in. down onto the foundation. If you’re using 8-in.-wide lap siding, for example, each successive course of siding will overlap the previous course by at least
1У2 in., leaving а 6У2-ІП. exposure. This ensures that moisture won’t wick up behind the siding. So on the story pole, measure up 6У2 in. and mark across the 1×2. Then make a mark at every 6У2-ІП. point from there at 13 in., 1 9У2 in.,

26 in., and so on. These marks indicate the bottom of every course.

There is another consideration when lay­ing out siding. Frequently you can adjust the courses a bit so that the bottom of one course of siding fits directly on top of the window. Another course can be adjusted so that it lines up with the bottom of the window. This looks better to the eye and reduces the amount of cutting you have to do. So instead of a 1 У2-ІП. lap, you may need to lap a few of the bottom courses 1% in. Then you may need to change the lap to 13/s in. to come even with the top of the window. The story pole is a handy place to mark these adjustments. Make course changes gradually. The eyes rarely notice а У4-ІП. change in exposure from one course to the next.

With the layout on the story pole com­plete, transfer the marks on it to each piece of vertical house trim. Take it to the corner, hold it flush with the bottom of the trim, and transfer the marks (see the photo at left). Do the same at the side trim around doors and windows.

Installing siding

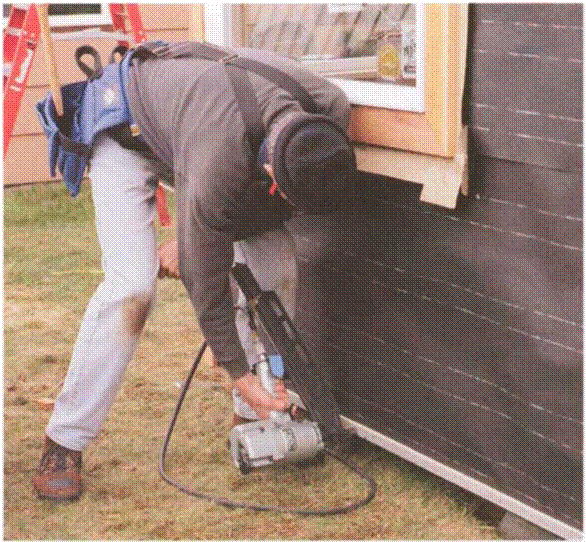
Composite siding has a single row of nails driven about 1 in. from the top, hidden by the second row. Other types of lap siding nail near the bottom of the course, about 1 in. from the butt. You have to be careful when using a pneu­matic nailer for this job. If the pressure is too high, the nail could be driven too deep, breaking the surface of the siding, compromising the nail’s holding power and leaving a place where water can enter. When installing siding with a hammer, use hot-dipped galva­nized nails or stainless-steel, ring-

Подпись: INSTALLING SIDING

EXTERIOR BEVEL SIDING

nail flush with the bottom sill plate and tip the first course of siding out so that it will match successive rows (see the drawing at left). Rip these strips from siding boards. They don’t have to be ripped perfectly because they will be hidden by the first course of siding. It’s a good idea to keep a paint bucket handy and cover all raw edges to protect them from moisture.

shanked nails. Other, thinner types of beveled wood siding can be nailed on with 4d or 5d nails.

Regardless of whether you use an air nailer or a hammer, the first step is the same. Install 7/iб-іn.-thick by 1-in.-wide strips along the bottom of the walls (see the photo above). These starter pieces

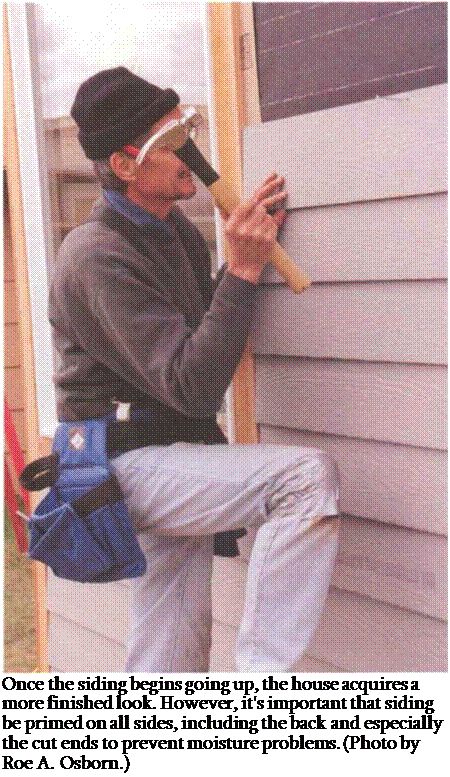
Actually cutting and nailing up the sid­ing is a process I always find exciting. The house is finally being closed in against the weather and begins to take on a finished look (see the left photo on p. 190). Composite-siding manufactur­ers recommend that both ends of the siding be held back 3/ie in. from the trim to allow for expansion and waterproof-

Подпись: Once the siding begins going up, the house acquires a more finished look. However, it's important that siding be primed on all sides, including the back and especially the cut ends to prevent moisture problems. (Photo by Roe A. Osborn.) EXTERIOR BEVEL SIDING

ing. This is a big gap for finish work, but it leaves enough room for a good bead of caulk to help keep water out.

A smooth bead of paintable, latex – silicone caulk will be hard to notice once it is painted.

In my experience, the expansion and contraction of composite siding in most parts of the country is minimal. You may be able to put a bead of caulk under­neath the siding and fit it tight to the
trim, which is what I sometimes do when installing wood bevel siding. In cases like this, take time to talk to builders and carpenters in your area and see whatthey recommend for the par­ticular type of siding that you are using.

Start on a side of the building where you can begin with full-length pieces. As a general rule (and this applies to studs, rafters, headers, siding, or any work that a carpenter does), always start with the

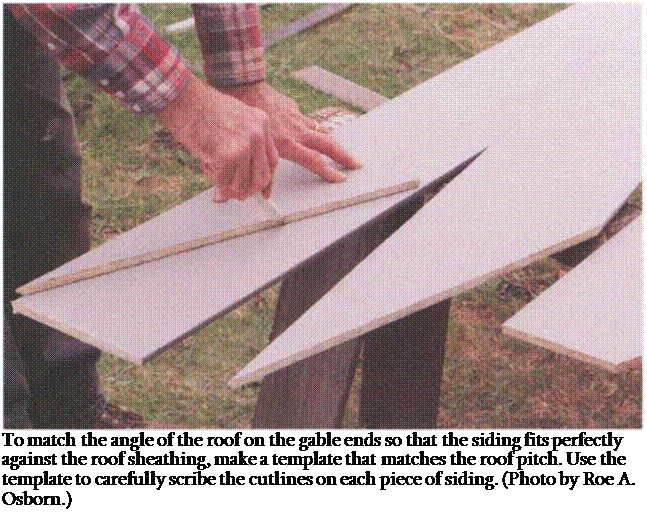
Подпись: To match the angle of the roof on the gable ends so that the siding fits perfectly against the roof sheathing, make a template that matches the roof pitch. Use the template to carefully scribe the cutlines on each piece of siding. (Photo by Roe A. Osborn.)

longest pieces first, because the cutoff ends can normally be used elsewhere.

If you cut the short pieces first, you may not have enough long stock left to complete the job. Remember to cut the siding so that the ends fall over studs for secure nailing.

Because these cuts need to be made accurately and cleanly, this is a good place to use a sliding compound miter saw. If you use a circular saw, cut from the back side to prevent tearout on the front side. Use a small rafter square as a guide for your circular saw to help make a square and accurate cut.

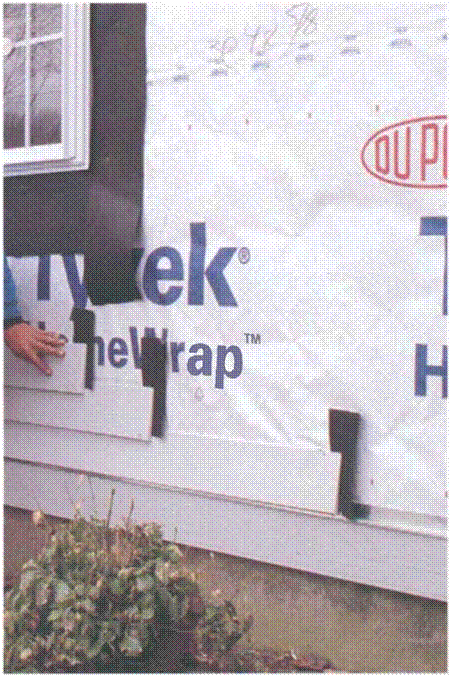
On sections longer than 16 ft., snap horizontal chalklines to keep the courses straight. While composite siding is quite uniform, wood siding can have crowns and twists that can be straightened by nailing them to a chalkline. In areas that get a lot of wind and rain, many builders
cut 4-in. by 12-in. strips of felt paper and slip one behind every joint where two pieces of siding abut (see the right photo on the facing page).

Cutting siding to fit the gable ends is a bit more difficult than sidewalls, because the cuts are no longer square. To mark these cuts, which are the same pitch as the roof, make a simple pattern from a piece of siding that’s cut to the roof pitch (see the photo above). Use a small trim sawfor making these cuts and clean them up with a block plane.

Working up the gable end, measure down 11/2 in. (the amount composite sid­ing laps) from the top of the last installed board at each end. A measure­ment with the tape held along these marks will give you the long point of the next board. An easier way to do this is to mark the lap on each board before it is nailed in place. Lay the next board on

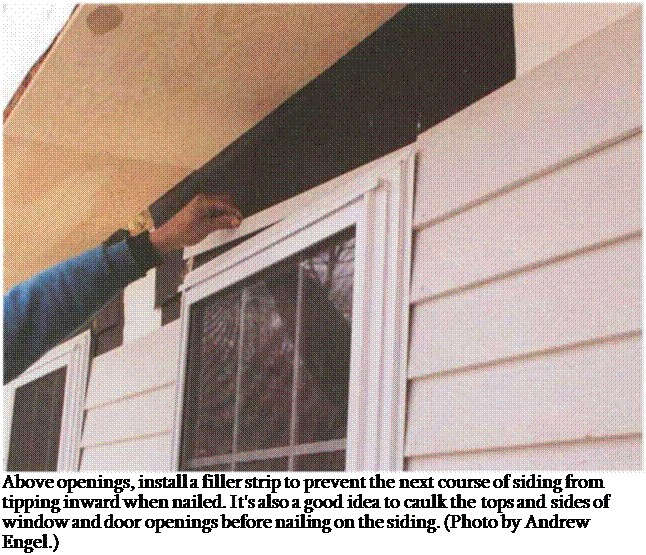
Подпись: Above openings, install a filler strip to prevent the next course of siding from tipping inward when nailed. It's also a good idea to caulk the tops and sides of window and door openings before nailing on the siding. (Photo by Andrew Engel.)

these lines and mark it to length, which eliminates the need to drag out your measuring tape. Nowyou can place the template on these points, scribe cut marks on the siding, make the cuts, and nail the piece in place. If you can’t get a perfect fit between siding and roof or eave soffit, you can cover this gap later with trim, which can be as simple as a 1×2 or 1×3 nailed on top of the siding.

Cutting around doors, windows, and gable-end vents needs to be done neatly and carefully. At the top of openings, install a filler strip to tip the lap siding out (see the photo above). And remem­ber to caulk joints around window and door openings. Caulk, unlike diamonds, is not forever, but it does help repel water. Caulk carefully at the tops and sides of windows and doors before nail­ing on siding.

TWO WAYS TO FRAME A SOFFIT

TWO WAYS TO FRAME A SOFFITTWO WAYS TO FRAME A SOFFIT

plywood, or siding boards to the width of the overhang and nail it to the look­outs running up the gable end. Fit the stock tight to the barge rafter, but don’t worry if it fits loosely against the wall, because this joint can be covered by sid­ing and trim. Use 6d galvanized nails or screws, because they won’t go through the sleepers and into the roof covering.

Installing exterior trim

Trim makes a house look neat and invit­ing. It helps give a house its distinctive look. Use good, straight, kiln-dried stock and install it with care so that it will last a long time with little maintenance.

This book deals with just a few of the basic trim options. To begin, I often use 1x cedar or pine for corner boards,

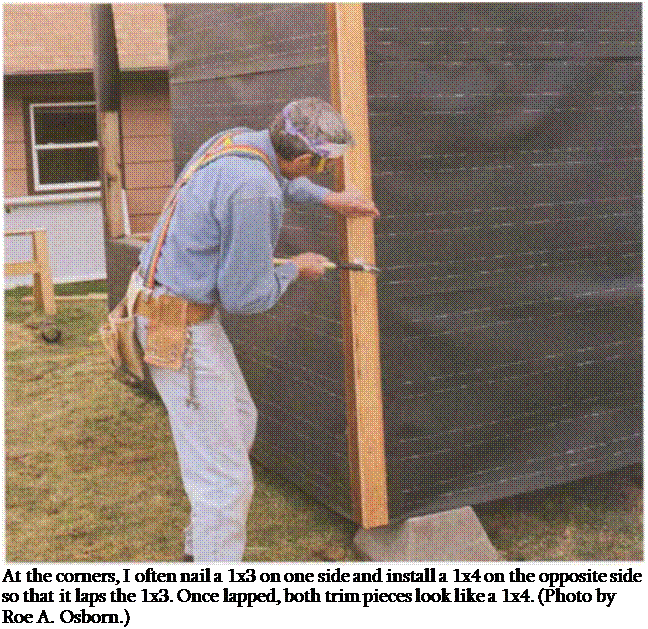
Подпись: At the corners, I often nail a 1x3 on one side and install a 1x4 on the opposite side so that it laps the 1x3. Once lapped, both trim pieces look like a 1x4. (Photo by Roe A. Osborn.)
around windows, and where the siding meets the frieze blocks. But thicker stock is available for trim. It’s common to see four-quarter (true 1 in.) material, five – quarter (1 Ул in.), or even 2x (1У2 in.) trim. Most types of siding—particularly lap siding (clapboards)—fit better against thicker trim stock. The thicker stock stands out farther from the build­ing and hides the ends of the siding.

Houses seem to look better with corner boards, which define the house’s out­lines and are easy to install. Starting at a gable-end corner, use a small rafter square to scribe the roof pitch (4-in-12, for example) on one end of a corner board and make the cut. Place this piece against the building, flush with the wall edge and butted up to the roof sheath­ing or soffit (see the photo above).

Corner boards extend down onto the foundation, V2 in. or so below the rim joist or sill plate. So mark at this point and cut the corner board to length.

Nail it flush with the corner of the building—or even У16 in. proud—with 8d hot-dipped galvanized nails. Other options for fastening exterior trim include noncorrosive aluminum nails, stainless-steel nails, or galvanized dry- wall screws. Try nailing a few scrap 1x cleats up the opposing wall to butt the corner board to, because the actual corner, once it is wrapped with building paper, is often hard to locate precisely.

Pull the cleats off and you’re ready to start on the other side of the corner. This piece runs from beneath the end rafter, soffit, or frieze block to the same dis­tance below the sill, and laps over the

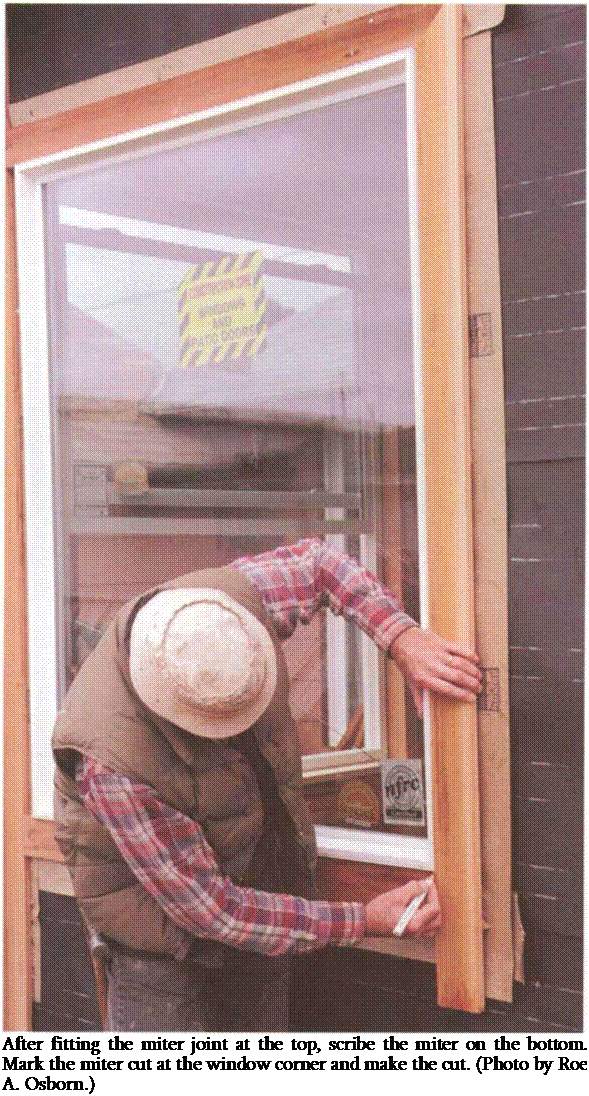
Подпись: After fitting the miter joint at the top, scribe the miter on the bottom. Mark the miter cut at the window corner and make the cut. (Photo by Roe A. Osborn.) first corner board. To make the corner symmetrical, be sure to rip the thickness of the trim stock off the first board before nailing it into place. If you’re using 31/2-in.-wide by %-in.-thick stock, for example, rip 3Л in. off the first piece of trim (or 11Л in. off 4-in. by 1 Win. stock). When the second piece of trim is nailed over it at the corner, both pieces will be the same width. After marking it and cutting it to length, nail it to the wall and to the other corner board.
Some carpenters connect this joint with waterproof glue. Take care driving nails into the edge of the first board so that it doesn’t split out; angling the nails in toward the corner can help. Trim out the remaining outside corners the same way.

Inside corners trim out a bit differently.

I often use a piece of 2×2 (1У2 in. by 1У2 in.) and nail it directly into the corner from the rafter down, overlapping the foundation by У2 in. The siding can butt directly to this board from either direc­tion, leaving a bit of corner trim showing.

If the windows and doors aren’t already cased, now is the time. Clad windows often are trimmed picture-frame style (with mitered corners) using a type of trim known as brickmold. The trim boards are nailed snugly against the win­dow frame to cover the flange. Framing a window is pretty straightforward: Cut one 45° miter on a piece of trim, place it in position, mark it for length, and then cut a 45° miter at the other end. I find it easier to hold a board up to the window and measure it in place rather than using a tape measure (see the photo at left). Repeat this process all the way around, nailing the trim in place with 8d galvanized finish nails staggered and spaced 16 in. o. c. Finish the process by nailing through the miters to close them up and hold them in place.

If the trim is to be painted, prime or paint the end grain of these miter joints to keep water from soaking into the trim. You can also put a bit of caulk or waterproof glue, such as Gorilla Glue (see Sources on p. 198) at this point before nailing the joint together.

Nailing trim over flanges can be a prob­lem. The thickness of the flange can cause the trim to tip and open up the miter joint. Try slipping thin strips of wood behind the trim to bring the nail­ing surface up level with the flange. All of these tasks take time, but this is trim that will be seen by everyone. Taking the time to do it right shows you care about your work.

It’s a good idea to install either wood drip edge or aluminum flashing at the top of horizontal trim (for example, at the top of a window). Both are quick and easy to install and help divert water away from the wood underneath. A kerf, or groove, cut in the underside of wood sills and drip edge helps prevent water from creeping back into the wall.

If using a wider casing, try butting the joints instead of mitering. Wood has a tendency to move as it dries out and the house settles, which makes miter joints open up. Let the top and bottom pieces run past the opening and the side pieces butt up to them. I sometimes run a 1 Уг-іп.-thick piece at the top and bottom and 5/4 (1 ’A in. thick) stock between. This creates a reveal, which, unlike a flush surface, can dry out and move and still look good.

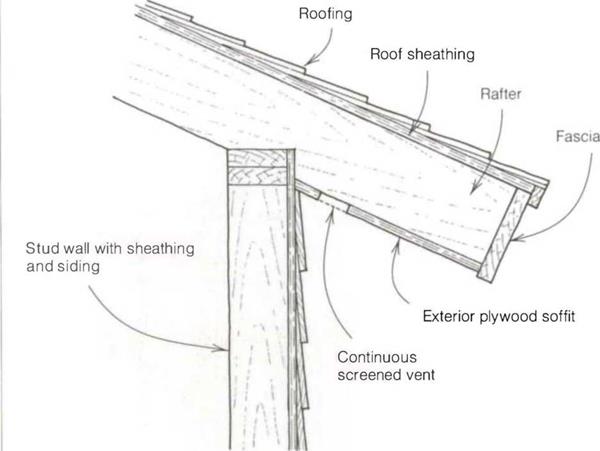
Eave with soffit

Eave with soffit

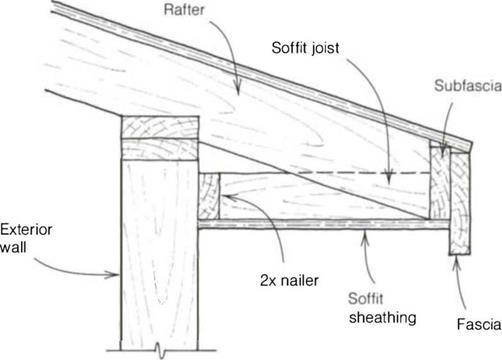
The drawing above shows an easy soffit to build. It has rafter tails cut square, and once the fascia is nailed to the tails, the rafters can be sheathed with exterior plywood, 1 x cedar or pine, or even cov­ered with stucco. A common way to cover this soffit is to take a long board, butt it against the fascia, and nail it to the rafter tails with 8d galvanized nails or drywall screws. Break all joints over a rafter tail so the ends can be nailed into it. Then install a strip of continuous screened vent (the vent has a lip that fits under wood and is easy to install). Next, nail in a second board to fill the gap between the vent and the wall.

If you cut the rafter tails plumb, you can build a level soffit (see the drawing on p. 184). To prepare for this soffit, install a subfascia or cut a 3/4-in. groove in the fascia during framing. Next, level over from the bottom of the subfascia or top
of the groove to the wall and make a mark on each end of the building. Connect these two marks with a chalk­line and nail 2x stock flat against the wall along the line with a 16d nail into each stud. If you plan on installing a continuous vent—or if the distance between the wall 2x and the subfascia or groove is more than 1 б in.—nail short joists between these two points every 16 in. or 24 in. Now you can cover the soffit as described previously.

There are many ways to close in the ends of a soffit. One way is to let the wall covering extend over it. The over­hang at the gable end of the building, running from the eave to the ridge, can be covered much the same way, espe­cially if the barge rafter is supported by 2x lookouts. Nail in a few more flat 2xs, one at the fascia and another at the ridge. Now you can cut soffit stock,

Cross-sighting a door jamb

Cross-sighting ensures that a door fits accurately in its frame because the jambs are parallel to each other. You can cross-sight with strings, pulling two from corner to corner diagonally across the frame. If the strings just touch in the middle, the jamb sides are parallel. A faster way to do this is by eye­balling. Stand beside the wall about 3 ft. from the frame and sight along the side jambs to see if they line up with each other from top to bottom (see the drawing below).

When a house frame has been well plumbed and lined, jambs cross-sight easily. If the jambs aren’t parallel, place a 2x block against the bottom plate near the frame and hammer it until the wall moves enough so that both jamb sides line up. Then drive a 16d toenail into the bottom plate to hold it in place. If the jambs are terribly out of parallel, check to see what the problem is—the wall might be badly out of plumb and need correction.

Cross-sighting a door jambCross-sighting a door jambCross-sighting a door jambCross-sighting a door jamb

Installing door hardware

Most prehung doors and their jambs are predrilled and premortised to accept the door lockset and dead bolt. Even then, you might need to whittle and adjust to install the lockset accurately. Although every lockset comes with installation instructions, here are the basic steps that I follow.

If the door is predrilled, insert the spring – bolt latch into its hole and mark around the outside of the face plate. I do this with a utility knife or sharp pencil to get a close fit. Remove the latch and care­fully mortise with a sharp chisel to a depth equal to the thickness of the face­plate (about Ve in.). Then reinsert the latch into the hole, fit the faceplate into the mortise, and screw it flush with the door edge. If the door edge is pre­
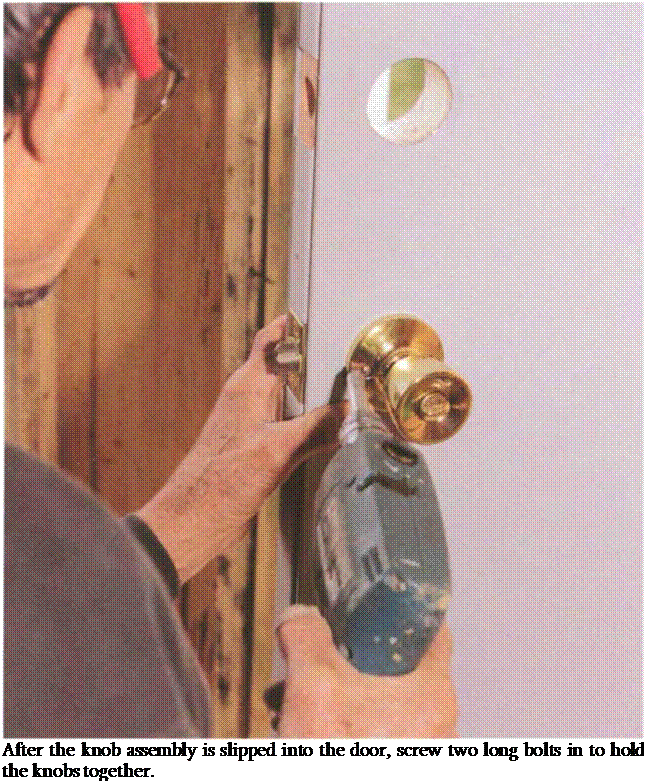
mortised, chisel out the corners so they are square before installing the latch. The knob assembly slips through the spring-bolt latch, and two longer bolts hold the knobs together (see the photo on the facing page).

Next install the strike plate. If it’s pre­mortised, fit it in place just like the latch. It’s best to predrill the screw holes here so you don’t split the jamb. If the jamb isn’t premortised, place the strike plate over the hole and trace around it as you did for the latch bolt, then carefully mortise within the traced lines to a depth of about!/?6 in.—the thickness of the strike plate.

Подпись: After the knob assembly is slipped into the door, screw two long bolts in to hold the knobs together.
It’s often hard to get the strike plate to set correctly. When things are right, the door shuts and locks and is held firmly against the door stop or weatherstrip­ping. Many strike plates have a lip that protrudes down into the jamb hole. So if the door rattles back and forth, you can bend this lip outward a bit until the latch fits firmly against it. If the latch won’t quite drop into the strike hole, try using a flat file to remove a bit of the metal along the front edge of the metal plate.

If this doesn’t work, the strike plate itself may have to be moved. Measure in on the door edge (door-stop side) to the flat side of the latch. On the jamb, place the tape measure against the stop and transfer the measurement taken above to locate the front inside of the strike plate. If the strike plate is remounted, the extra holes will have to be filled so that they can be sanded and painted.

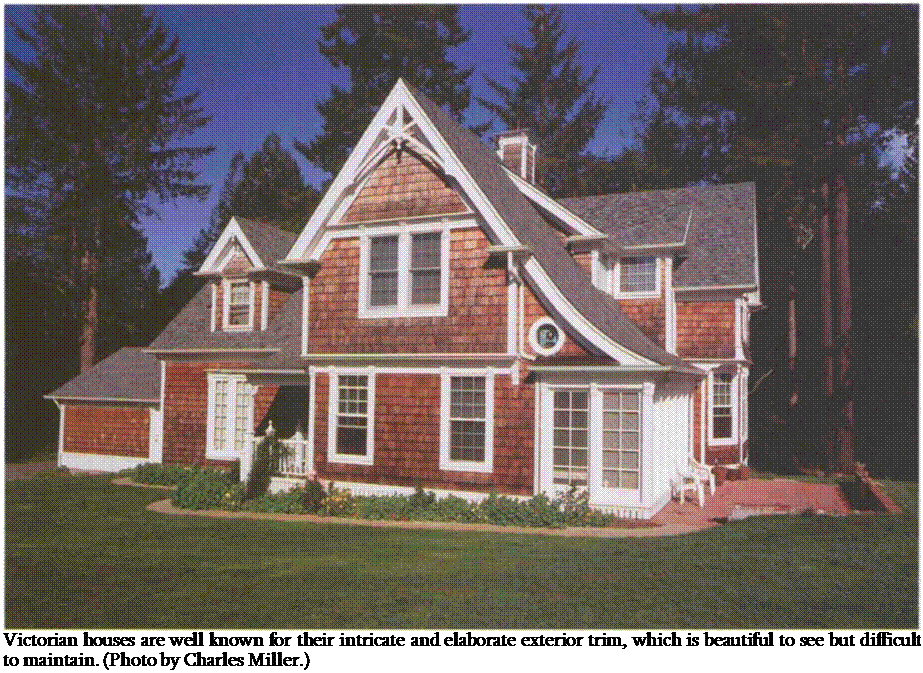
Подпись: Victorian houses are well known for their intricate and elaborate exterior trim, which is beautiful to see but difficult to maintain. (Photo by Charles Miller.)
EXTERIOR TRIM

I live near several Victorian houses, which are notable for their intricate and extensive exterior trim. While I admire the craftsmanship on these houses, I’m always thankful that I’m not the one responsible for their upkeep.

In this section, I’ll talk about cutting and installing basic exterior trim. While it may not be as ornate as the trim on a Victorian beauty, it’s far less time – consuming to install and maintain, which is an important consideration in our fast-paced world. There are many ways to trim a house, and a house that

looks quite ordinary can suddenly take on a whole new character just by using another style of trim.

Building soffits

Soffits are used to cover exposed rafter tails and roof overhangs. West of the Mississippi, the tendency is to leave the eaves open with rafters exposed. In the East, houses often have a soffit that fills the gap between the fascia and the wall. Many of these soffits are quite elaborate and ornate, but the trend in house building is toward simplicity. Elaborate soffits require a lot of material, special moldings, and considerable labor and cost to build.

Shimming

Shims are time-consuming to use and tend to fall out as wood shrinks. You can eliminate shims if you use the clipping technique to hold trimmers secure­ly in place (see p. 130). Clipping will also allow you to nail the jamb directly to the trimmer.

For many years, trim carpenters have been using drywall screws in place of shims. Screws work as adjustable shims. They can be driven into the bot­tom plate, for example, to hold baseboard plumb and square. You can also use screws to help level, plumb, and square cabinets as you install them.

On the rare occasion when I need a shim (as when I want to pry two boards apart), I can quickly make one by ripping a slice off the edge of a 2x.

If you set the trimmers plumb so that the rough opening is 1A in. larger than the door-frame assembly, you should have enough room to move and adjust the frame slightly. If the trimmers weren’t set plumb, you have to plumb and shim every jamb, making sure they are straight and true.

The door has to be open when nails are driven through the jambs. Usually I nail or screw the hinge side of the jamb to the trimmer stud first with an 8d nail or screw gun, sinking the fasteners behind the weatherstrip near the hinges (see the photo on the facing page). Later, these holes can be filled and painted. Nailing through the exterior casing (just like with wood windows) further stabi­lizes the door frame.

There will be about a Win. gap on the lock side of the door between the fram­ing and the jamb, so this side needs to be shimmed to keep it straight and in place for the life of the house. I carry З-in. by З-in. blocks of Win., 3/i6-in., or Win. plywood to use for shims. If you use shingles for shims, be sure to push them in from both sides so you have a level bed to nail the jamb against (for more on shimming, see the sidebar above). The thin plywood blocks seem more solid to me, and I place them about 6 in. from the top and bottom, as well as one above and one below the door latch. These too can be secured with nails or screws hidden behind the weatherstripping.

Keep closing the door to make sure the Vs-in. gap is maintained between the jamb and the door. Once the frame is nailed securely in place, check once again to make sure that the door opens and closes with ease.

While much the same process is used to set interior prehung doors, they don’t have a sill, which makes them floppy and harder to handle. Again, I like to set the hinge side first, hard against the trimmer. Jambs should be flush with the drywall on each side of the opening, because any irregularity here makes it harder to install door casing.

Nail these jambs off by driving five sets of 6d finish nails toward the edges of the jambs, one close to the top, one close to the bottom, and three sets spaced evenly between. I also replace one screw from each hinge going into the jamb with a longer 2-in. screw so that the trimmer supports the door and not just the jamb. End by cross-sighting the jambs to ensure that they are parallel (for more on cross-sighting, see the side – bar on p. 180).

Trick of the trade

When doing finish work (particularly when remodel­ing an older structure), carpenters often run up against crooked floors, walls, and ceilings. I’ve found that when things are out of plumb or level, it’s best to build parallel to that. The eye can see two lines that go away from each other much easier than it can see plumb or level. So, for example, if a win­dow opening is out of plumb and can’t be fixed, and if surrounding trim is parallel to the out-of-plumb
opening, go ahead and set the window slightly out of plumb too. This way the side of the window will at least run parallel with the opening and be pleasing to the eye. This is particularly true when placing a new window next to an existing window or door that isn’t exactly plumb. If the new window is perfectly plumb and level and the old one isn’t, then both of them will read as crooked.

Window flashing details

Trick of the trade

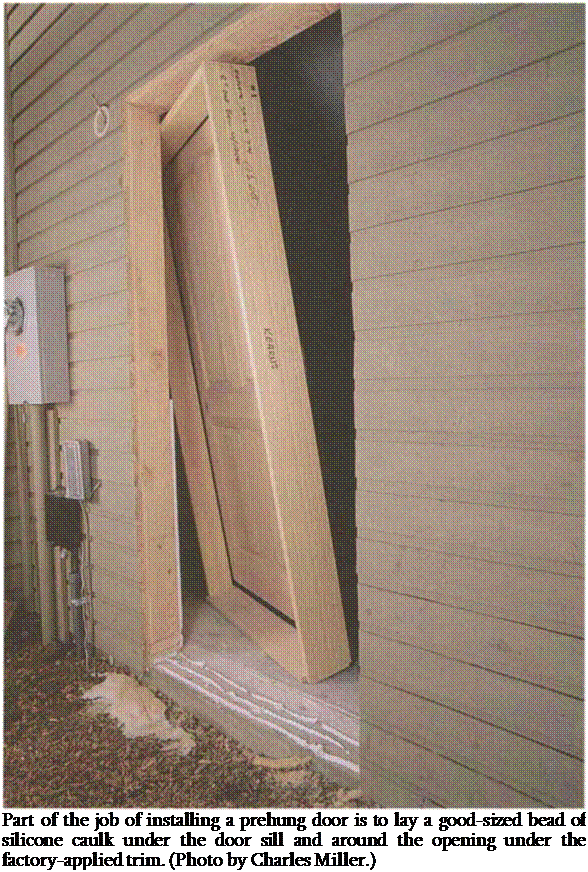
Подпись: Part of the job of installing a prehung door is to lay a good-sized bead of silicone caulk under the door sill and around the opening under the factory-applied trim. (Photo by Charles Miller.)

dow, move inside and seal the gap between the window frame and the wood framing with nonexpanding foam. Don’t use expanding foam, which can bow trimmers and frames out of shape. Then open and close the window a few times to make sure it works with ease.

Setting exterior and interior doors

We’ve all lived in houses that have doors that stick, locks that are misaligned, and hinges that creak. After years of use, doors and windows that open and close with ease indicate that the folks who built the house knew and cared about what they were doing.

The majority of doors used these days are prehung and are installed much the same way as windows (see the sidebar on p. 178). Both doors and windows can be ordered with jambs wide enough for 2×4 or 2×6 walls (see the photo at right) and are usually available with factory – applied trim. Begin installing one of these units by stapling strips of felt paper around the opening. Then apply a good-sized bead of silicone caulk under the door sill and around the opening under the factory-applied trim.

An easy place for rot to develop is under the door sill, so take extra precautions to seal this area. I get several calls a year from people who want their rotted sill or floor replaced. Lay down a couple of layers of felt paper, lapping them up the trimmers and down over the outside edge. Do the same with some 10-in. metal flashing, cutting it into place with tin snips.

With the door placed in its opening, check to see if the sill is resting flat on the floor. If the floor isn’t level, the low jamb side will have to be shimmed so that the door won’t hit the head jamb when closed. I like to cut a long, thin shim under the sill so it will have good bearing.

Take time to ensure that the door will open and close with ease. On prehung doors, there should be about a Vs-in. gap between the door and the jamb head and sides. On exterior doors, the weatherstrip should seal at the bottom without binding.

1. Check to see that the floor is level and the trim­mers are plumb.

2. Apply felt paper and caulk to exterior doors to prevent leaks.

3. Set the door frame in the opening. If the floor isn’t level, pick up a jamb leg so that the door won’t stick on the jamb head when closed.

4. Check to see that door jamb edges are flush with the face of the drywall.

5. Check that there is about a Vs-in. gap between the jambs and the door and that the door opens and closes freely.

6. Nail the hinge side first, directly to the plumb trimmer.

7. Nail the lock side to the trimmer; shim where necessary.

8. Nail through the door casings into the exte­rior wall.

9. Cross-sight so that jamb sides are parallel.

Trick of the trade

If you have a pneumatic nailer, fasten the jamb to the trimmer stud with 8d nails. Sinking the fasteners behind the weatherstrip helps to hide the nail holes.


FINISH DETAILS

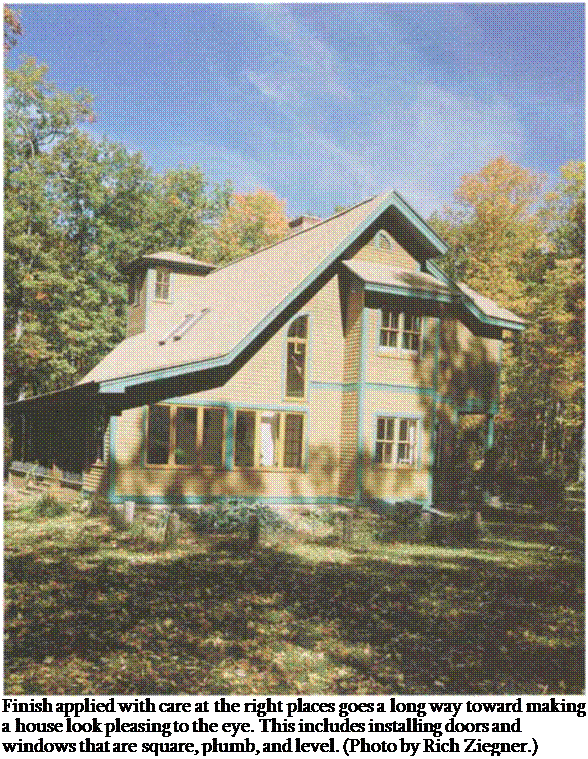
Подпись: Finish applied with care at the right places goes a long way toward making a house look pleasing to the eye. This includes installing doors and windows that are square, plumb, and level. (Photo by Rich Ziegner.)

Once there is a completed house shell, it’s time to turn attention to the finishing details. Of course, much of this work—installing plumbing, heating, and electrical systems, roofing, and drywall, for example—is outside the scope of this book. But there is still plenty of carpen­try work to do. In frame carpentry, it often doesn’t matter if there are small gaps left here and there as the house is built. These gaps will all be covered "in the finish," as we say. What matters is that the house frame is square, level, straight, and plumb.

But more is needed when you start doing the finish work. I think it helps to approach finish carpentry with a differ­ent mindset than with frame carpentry. The work you do as a finish carpenter will be seen daily for the life of a build­ing. Setting windows and hanging doors, adding exterior trim and siding, and trimming the interior all need to be done with care and precision.

WINDOWS AND DOORS

A finish carpenter’s job is to make his work look pleasing to the eye. With practice, you can learn to split a pencil line with a sawcut—back cutting when necessary—so that exposed joints fit tightly. Doors and windows need to be set square, plumb, and level in their rough openings so that they work prop-

Подпись:erly and don’t allow moisture or air to penetrate the building envelope. Let’s start with windows.

Setting windows

The majority of windows used today are aluminum or vinyl clad, and most have flanges that nail to the exterior wall and holdthe frame in the opening. Wood windows with prefit casings are almost as easy to install.

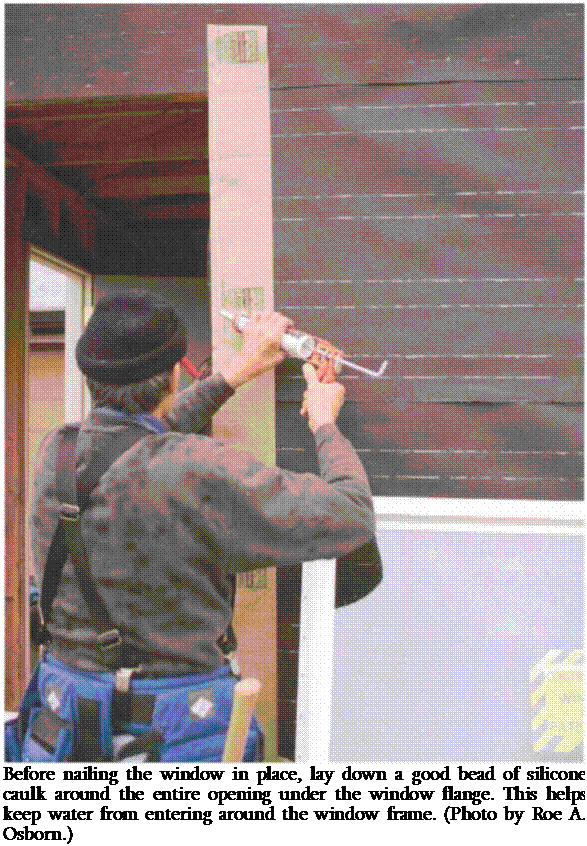
Before fitting windows in place, do everything you canto prevent leakage and water damage. On the West Coast, we staple б-in.-wide strips of felt or building paper over the housewrap around the window. These act as one line of defense against moisture. In wetter parts of the country, these strips are added over the flange, after the window is installed (see the drawing on p. 176). Cut strips of 1 5-lb. felt paper about 1 ft. longer than the height and width of the window. Staple one strip at the bottom of the rough opening and one strip along each side, lapping them over the bottom piece. Staple the top piece on after the window is set.

Next, lay down a good bead of caulk on the felt paper (see the photo at right), under where the window flange will be nailed. Squeeze out an extra-heavy bead at the top of the window to bed that flange in waterproof caulking. Even though this can be messy and take time, it’s worth the extra effort because water leaking around the windows of a completed house can cause serious damage over time.

Temporarily lay a piece of Win. plywood on the sill to bring the top of the win­dow up to the correct height, then set the window in the rough opening with the aid of a helper (see the photo on p. 174). While one person holds the frame in place, the partner goes inside to check that the frame is centered in
the opening, the sill is level, and the jambs are plumb. There should be about Win. clearance between the window and the rough framing all around. This gap will be covered later by window jambs or drywall. When windows are being set close together, make sure that they are level in their opening and with each other. Often, top and bottom trim runs straight across from window to

1. Check the rough opening for square, plumb, and level.

2. Apply felt paper and caulk to seal the window opening against air and leaks.

3. Use a story pole to mark and maintain uniform height of every window frame in the house.

4. Set the window frame in the opening and check the head for height and level and the side for plumb.

5. Check the window-frame diagonals for square before final attachment.

6. Nail or screw the window securely in place.

7. Open and close the window to see that it works with ease.

FINISH DETAILS

If the framing is correct, a window should fit easily in its rough opening. (Photo by Roe A. Osborn.)


FINISH DETAILS

After nailing the window in place, run another bead of caulk at the top of the flange, then staple the last strip of felt paper. (Photo by Roe A. Osborn.)


window, so any misalignments show up like weeds among the flowers in a garden.

In Chapter 5, I mentioned how I nail wall sheathing into the king studs with no nails in the trimmers so that when the windows are being set, it’s easy to adjust the trimmers to fit the frame if neces­sary. When setting wooden windows, pull the trimmers tight against the win­dow frame on both sides. Frames nailed directly to the jambs make for good, solid construction and eliminate the need for shims.

Most windows that have nailing flanges can be held in place at each corner with 1-in. roofing nails, 8d nails, or drywall screws. But larger windows need more support. Drive another couple of nails into the flange between each corner. When setting wood windows, drive 6d nails through the jamb into the trimmer,
or drive 8d to 16d galvanized finish nails through the casings into the exterior wall frame. These nails are usually set below the surface with a nailset, and the holes are filled before painting. More and more carpenters are now securing windows with screws using a cordless screwdriver.

On the inside, wood windows need to be held straight and tight against the jamb with finish nails. Long wood win­dows will need to have the head jamb nailed to the header and the sill blocked level at the bottom.

With the window in place, run another bead of caulk along the flange at the top before stapling on the last strip of felt paper (see the photo above). If there is housewrap, make a slit in the house – wrap, across the top and above the window, then tuck this last piece of felt into the slit. To further air-seal the win-