Category RENOVATION 3

Rejuvenating

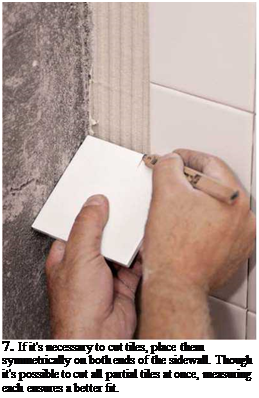
Подпись: 7. If it's necessary to cut tiles, place them symmetrically on both ends of the sidewall. Though it's possible to cut all partial tiles at once, measuring each ensures a better fit. Подпись: earlier. (This is also a good time to draw plumbed lines at either end of the back wall, indicating where cut tiles begin.) Next, use your story pole on the sidewalls, to see if it's necessary to cut tiles for them and, if so, where to place those tiles. In most layouts, a full column of tiles is placed along the outside edges of sidewalls because they are visually conspicuous; cut tiles are consigned to the corners. But if the back will have no cut tiles, consider putting full tiles in the inside corner of each sidewall. Also draw plumb lines to indicate the outside edges of sidewall tiles. Finally, you may want to draw additional layout lines to subdivide the back wall and anticipate tile cuts around the soap dishes, the tub spouts, the shower mixing valves, and so on. As with floor-tile installations, pros often begin setting tub surrounds in the middle of a tile field, where control lines intersect, setting a quadrant of full tiles at a time, then going back later—often, the next day—to cut and set partial tiles and trim pieces. It's also advisable to leave plastic tile spacers in place till the thinset cures. After pulling out the spacers with needle-nose pliers, you're ready to grout. Grout Joints and Caulking

If your grout is moldy, use a soft-bristle plastic brush to scrub the joints either with household cleaner, a weak bleach solution, or a tile-specific cleaner like Homax® Grout and Tile Cleaner. Wear rubber gloves and goggles, and always brush such solutions away from your face. If the mold returns, try installing a ventilator fan to reduce the moisture in the room. If the grout is intact but dingy, scrub, rinse, and allow it to dry before applying a grout colorant, which will both color and seal the grout. Follow the manufacturer’s instructions.

However, if tiles are loose; if surfaces flex; or if you see water damage around fixtures, at the base of a tub or shower, or along the backsplash of a counter, the substrate has probably deteriorated and should be replaced. In other words, you’ll need to tear out tiles and substrate.

There’s an interim condition, often caused by applying grout that was too thin or by over-sponging it, in which tile is intact but grout is worn or crumbling. In that case, use a grout saw to cut out the old grout, taking care not mar the tile edges. As you’ll realize quickly, this is a tedious job. Vacuum out the debris, scrub the joints with a cleaning solution, rinse well, and then use a grout float to apply polymer – modified grout, which will adhere better. It’s possible to regrout only part of a sur­face, but matching old and new grout color can be difficult, so it’s better to regrout the entire surface. Wait 72 hours, before sealing the grout joints.

Removing hardened caulk along the tub can be a chore. Chiseling it out is per­ilous because tub enamel and tile chip easily. Fortunately, acetone dissolves caulk. To use the acetone, cut cotton clothesline to the length of the caulk seam, wet the clothesline with acetone, and place it next to the caulking before covering both with duct tape. Left overnight, the acetone will soften the caulk. Caution: Acetone is volatile and thus flammable, and nasty to handle and breathe. Don’t use acetone around pilot lights, open flames, and the like. Wear rubber gloves and a respirator mask with cartridges.

Подпись: g TILESSupportin

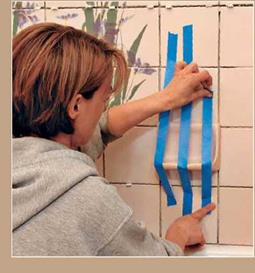
image831It’s smart to tape specialty tile pieces in place until their thinset has hardened. That’s especially true for heavy pieces, such as the soap niche shown, and for pieces with a relatively small bonding surface, such as bullnose edge trim. Caveat: Wait until the field tiles have bonded securely before taping to them.

Getting Grout Right


Rejuvenating

In about 15 minutes, when the grout has begun to set, wipe the tile with a clean, damp sponge. Rinse and wring the sponge often. To avoid pulling grout out of joints, sweep the sponge diagonally across tile joints, using a sponge with tight pores.


image832

Laying Out a Tub Back Wall

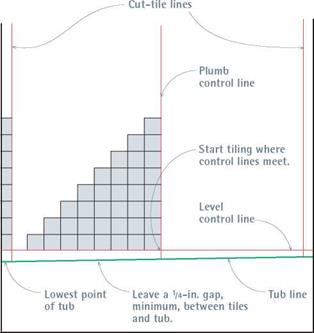
image823Almost all tubs slope slightly, so use a spirit level to locate the lowest point. From that lowest point, measure up the height of one tile, plus ‘I in., and mark the wall. Draw a level control line through that mark, as shown in the illustration at right, and extend that level line to all three tub walls. Use a story pole to see if you’ll need to cut tiles. If so, lay out tiles so cuts are symmetrical on both ends of the back wall. Draw a plumb line on each end of the wall to indicate where the cut tiles will begin. Finally, through a tile joint along the level control line, draw a plumb control line that roughly bisects the backwall. Start tiling where control lines meet.

TILING A TUB SURROUND

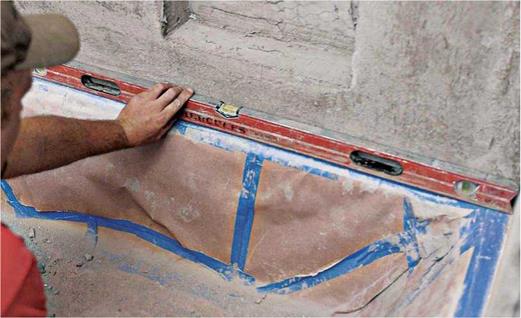
1. After checking tub walls for plumb, use a spirit level to check whether the tub is level along all three sides. If the tub slopes, note the lowest point.


image824

image825image826

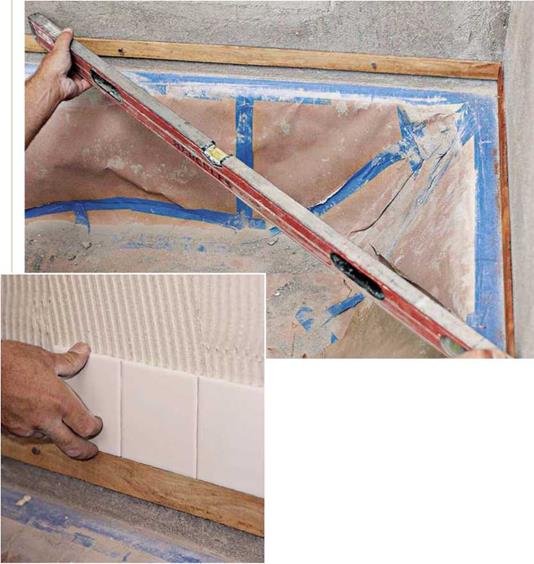
3. The first course of full, uncut tiles should rest on the wooden strips. After you’ve installed tiles on all three walls and the setting-bed has hardened, remove the wood strips and install cut tiles below.

(Steps continue on next page.)
2. At the lowest point of the tub shoulder, measure up one tiling unit (tile width plus one grout-joint width) and mark that onto the wall. Through that mark, draw a level line that extends to all three walls of the surround. Next, nail narrow wooden strips to the underside of that line, as shown.

About the same time you’re sponge-wiping the tile, use a margin trowel or a utility knife to remove grout from the expansion joints and from the ‘/.-in. gap where tile meets the tub. Allow a day for the grout to cure; then seal these gaps with an acrylic or silicone caulk. Tile suppliers sell caulk that’s either sandless or sanded, and color matched to your grout.

image827llll

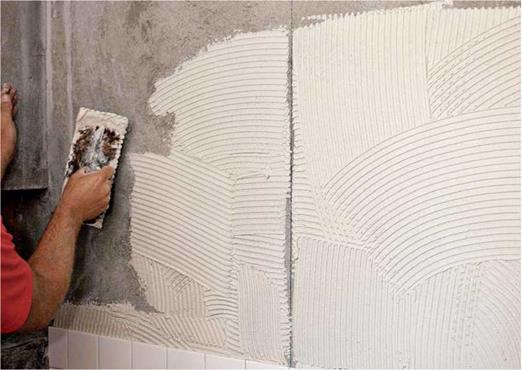
4. typically, tilesetters mark a vertical line to bisect the long, sidewall of a tub. As you trowel on thinset, try not to obscure the line with adhesive. Although this pro is setting a whole wall without interruption, most mortals should set tile a half or quarter wall at a time.

5.

image829
image828

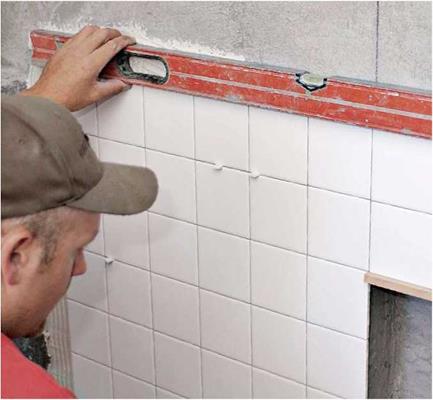
Periodically check to see if tile courses are level, inserting plastic shims as needed. Leave them in place until the thinset cures. Note: Because walls aren’t perfectly regular, you’ll often need to use spacers as well as shims. Spacers are uniformly thick; shims are tapered.

MOSAIC TILE   After you’ve set paper-backed sheets of mosaic tile in adhesive, the paper will start to soften, allowing you to reposition the tiles slightly. To move a row of tiles, place the straight edge of a trowel against them, as shown, and tap the trowel lightly with a hammer handle.   Countertop Front and Back Edges   Use a grout float to seat mosaic tile in the thinset adhesive. Be sure to don knee pads that are comfortable enough to wear all the time.   Flash the front edge of a counter, as shown, to prevent the exposed edges of the plywood from wicking moisture from the thinset adhesives and then swelling. Because the back edges of the countertops are also vulnerable to water damage, caulk and flash them, too.   through those marks, perpendicular to the con­trol line, to the back of the counter. L-SHAPED COUNTER On an L-shaped counter you have, in effect, two counters at right angles to each other, so you will need two control lines, perpendicular to each other, running along the front edge of each section. Any other layout considerations are subordinate to these two control lines, for they determine how the two oncoming tile fields will align.   STRAIGHT COUNTER, WITH SINK To tile a straight counter with a sink, the layout is much the same as a counter without a sink, except that here, your main concern is making symmetrical tile cuts (if necessary) on either side of the sink. If you need to cut tiles, move the story pole side to side until the tile joints are equidistant on each side of the sink’s rough open­ing. Then transfer those two marks to the control line. Finally, use a framing square to run lines &nbsp

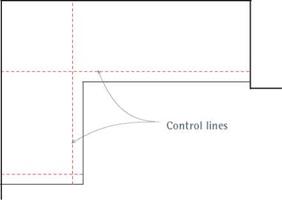
Use your framing square and a straightedge to establish control lines and to keep the tiles aligned once you’ve turned the corner. After set­ting V-cap trim tiles, start tiling where the two control lines intersect. As with straight counters, put full tiles along the front of the counters and work back, relegating cut tiles to the very back, to be covered by the backsplash. If you use the same tile for the backsplash, continue the tile joints up the wall so that the backsplash and counter joints line up.

Tub Surround

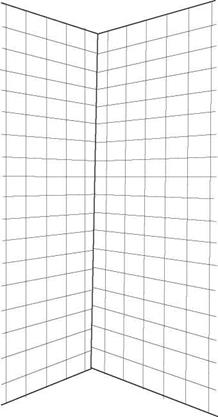
Never assume tub walls are plumb. Always check them with a 4-ft. level. If walls aren’t plumb with­in % in. in 8 ft., correct them with a mortar bed or reframe them. Otherwise, tile joints from adja­cent walls won’t align. Moreover, never assume that a corner is a good place to start tiling, for it may not be plumb. Instead, establish level and plumb control lines on each wall to guide your layout.

Most tilesetters start by laying out the longest wall, which we’ll call the back wall. Use your 4-ft. level to determine if the tub is level on all three sides of the surround. If tub shoulders are level, you can start measuring tile courses up from the tub; but in renovation, tub shoulders are rarely level. More likely, the tub will slope. So, from the lowest point of the tub shoulder, measure up one tiling unit and mark it onto a wall. (A tiling unit is a tile width plus one grout joint.) Through that mark, draw a horizontal control line, and extend that line to all three walls of the surround.

Now locate a vertical control line, roughly centered along the back wall. Holding your story pole horizontally, determine whether you need to cut tiles and, if so, where to place them. In most cases, back walls look best if there are symmetri­cal (equally wide) vertical columns of cut tiles at each end. That decided, chose the joint mark on your story pole closest to the middle of the wall, and run a plumbed line up, bisecting the back wall and the horizontal control line you drew

STRAIGHT COUNTER, NO SINK

The simplest surface to lay out is a straight counter with no sink because it has only one con­trol line. Begin by using a framing square and a story pole to survey the countertop.

“Counter Layout,” on p. 398, assumes that the counter edges are finished with V-cap trim, a

image816Подпись: COUNTER WITH SINK OR COOKTOPПодпись:image817

I Counter Layout

A straight counter needs only one layout control line to indicate the first tile joint back from the edge.

common choice, and tile joints are Vs in. wide. Place several V-caps along the counter edge; then measure back from the edge & in. from each cap to mark the middle of the first grout joint. Snap a chalkline through these marks to establish a con­trol line. Because the front edge is the counter’s focal point, you’ll place full field tiles next to the row of V-caps.

Using your story pole, measure the length of the counter to see if you must cut tiles. If one end of the counter abuts a wall and the other is open, plan a row of full tiles along the open end, thus consigning cut tiles to the wall end where they’ll be less conspicuous. If both ends of the counter are open, and you see that you’ll need to cut tiles, move the story pole so that cut tiles will be the same dimension on both ends. That decided, mark positions for the tile units along the control line.

Last, measure to the back of the counter to determine whether the final row of tiles will need cutting. You can precut tiles; but on a counter so simple, you can just measure and cut partial tiles individually after all the full tiles are set, likely giving you more accurate measurements anyway.

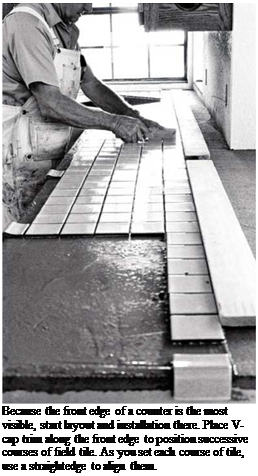
Подпись: FROM THE ARCHIVESПодпись: Because the front edge of a counter is the most visible, start layout and installation there. Place V-cap trim along the front edge to position successive courses of field tile. As you set each course of tile, use a straightedge to align them. If a sink or a cooktop in the counter interrupts the layout and requires tile cutting, mark secondary control lines on either side to indicate where full tiles resume.

L-SHAPED COUNTER

image819

An L-shaped counter will have two major control lines, running perpendicular to each other. Add lines as needed to indicate sink placement, open counter edges, and so on.

Thinset Adhesive

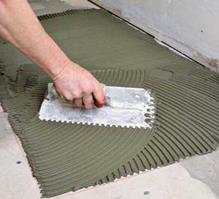
Once you’ve snapped layout lines and vacu­umed the setting bed one last time, use the straight edge of a notched trowel to spread thinset adhesive. Then, using the notched edge of the trowel, comb ridges into the adhesive.

As you apply and comb adhesive, try to stop just short of the layout lines, so you don’t bury them under adhesive.

image812

‘ Л

2.

Installing a Floor

Using a framing square and a tape measure, check to be sure the room’s corners are square and parallel. Make a quick sketch of the room, showing which way corners diverge. Or sketch this directly onto the setting bed.

FLOOR LAYOUT

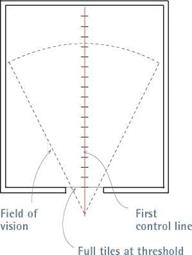
Floor layout begins by identifying the focal point of the room, and snapping two chalklines (con­trol lines) onto the setting bed, perpendicular to each other. In the photos on these two pages, the doorway is the focal point of the room. Thus, the first control line will run through the middle of that doorway and continue across the room till it hits the opposite wall at roughly a right angle.

Full tiles look best in a doorway. So the installers butted uncut tiles against the threshold and continued the course until it met a sidewall near the doorway. The installers then shifted the course slightly till an uncut tile butted into the sidewall, as well. They noted the tile joint closest to the middle of the doorway and marked it on the subfloor. Then they moved to the wall oppo­site the doorway, measured out from the same

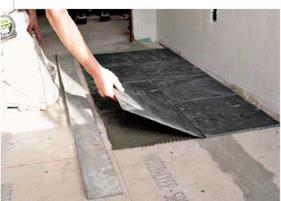
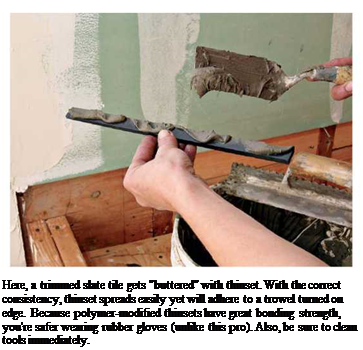
In theory, you can start setting tiles any­where, but it’s usually best to start where the control lines meet and work out toward the walls. That way, you know that tile joints in the middle of the room—which are the most visible-will line up. Set several tiles; then pull up one and examine its back, which should be uniformly covered with adhesive. If it isn’t, you may have applied too thin a layer of thinset, or used a notched trowel with teeth that are too small, or mixed the thinset too thin. If you are using large, handmade tiles like Mexican pavers, they are often irregular, so you may need to "butter" additional adhesive onto their back surfaces before setting. For buttering, use the straight edge of a trowel.

Conversely, if adhesive oozes up between tiles, the notched trowel’s teeth are probably too large; try one with smaller teeth. Use a mar­gin trowel to remove excess thinset between the tiles before it hardens. Left in place, the thinset between tiles would prevent grout from filling the joints and bonding properly.

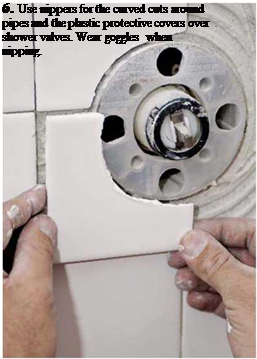
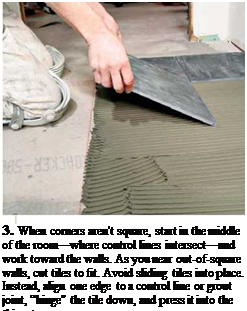
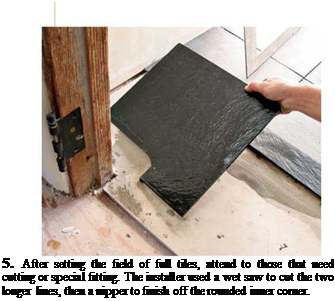
Подпись: 3. When corners aren't square, start in the middle of the room—where control lines intersect—and work toward the walls. As you near out-of-square walls, cut tiles to fit. Avoid sliding tiles into place. Instead, align one edge to a control line or grout joint, “hinge" the tile down, and press it into the thinset. image814Подпись: 5. After setting the field of full tiles, attend to those that need cutting or special fitting. The installer used a wet saw to cut the two longer lines, then a nipper to finish off the rounded inner corner. Подпись: PRO"ГIP Thinset adhesive should be moist enough to stick to the tile, but not so wet that it slides off a trowel. If thinset skins over while you're setting tile, recomb it with a notched trowel. But if it gets stiff in the pan or it doesn't stick readily to the tiles, discard it and mix a fresh batch. Likewise, if you move a tile after the adhesive has started to set, scrape the thinset off the back of the tile and the setting bed, and apply fresh mortar to both surfaces. llll

4. As tile fills each quadrant, have a straightedge nearby to see if tiles edges line up, especially if thinset has obscured the chalklines. Note: Chalklines indicate the middle of the tile joints. An experienced installer uses both the chalkline and a straightedge to align tiles—whichever gives the better-looking result.

sidewall, and made a second mark that repre­sented an extension of that middle tile joint. They lightly snapped a chalkline (as shown in photo 1) through the two marks to create a first control line. But they snapped the line lightly because they knew they might need to move it a bit before settling on its final location, as explained next.

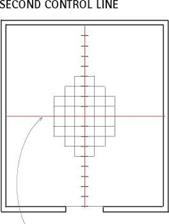
Before photo 2 was taken, the installers used a framing square to mark a second control line perpendicular the first, thus dividing the bath­room roughly into quadrants. They wanted full tiles against the threshold, so they placed one end of the story pole there and measured away from it to find a tile-joint mark close to the midpoint of the first control line.

The rest of such a layout is mostly fine-tuning, with an eye to the four time-tested tips of tiling, as outlined earlier: using full tiles at focal points, cutting as few tiles as possible, making layouts as symmetrical as possible, and avoiding tiles less than half size. For this, a story pole is essential.

SETTING THE TILES

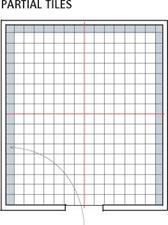
Set full tiles before partial tiles. To get a rhythm going, most tilesetters first set all the full tiles, and then attend to partial tiles, which take time to cut and set. However, you may want to make complex cuts beforehand, for example, where tiles meet obstacles in the middle of the field, such as a toilet closet flange. By cutting these tiles first, you can set them quickly and install other full tiles around them. Give the adhesive a day to harden, and you’re ready to grout the surface.

Note: This description is much condensed. If

you’re a perfectionist, you’ll fuss with the spacing between tiles or between tile sheets, and continue making little adjustments till the job is done.

Be sure to stand back from time to time for an overview of the layout.

Countertops

The front edge of a counter is almost always the focal point. Thus the primary control line runs parallel to the front of the counter, and all other layout lines are secondary to it. If the counter will be subject to moisture, install a membrane before installing a setting bed.

ESTIMATING TILE

If you’re installing a popular tile that a local sup­plier has in stock, wait till you’ve installed the set­ting bed before estimating tiles. If you order too many, most local suppliers will take back extras, as long as they aren’t damaged or returned too long after purchase. Ordering tiles is not compli­cated unless surfaces to be tiled have a lot of jogs, recesses, odd angles, and obstacles. Using a tape measure and a pad of graph paper, calculate the square footage of the surface to be tiled and add 8 percent to 10 percent for waste, damage, and future repairs.

Handmade or exotic tiles are another story.
Because they’re expensive and must be ordered

I Tiling a Floor_________________________________________

Tile layouts impose a grid that’s basically square in a room that often isn’t. Start by recording the room’s dimensions, use a framing square to see which corners are square, and note any obstacles to be tiled around.

FIRST CONTROL LINE

image806


Second Start tiling where Cut and install

control line control lines meet. partial tiles last.


image807image808

If the doorway is the focal center of the room, use a story pole to find the tile-joint mark closest to the middle of the doorway. Ideally, the first control line will run through that mark, and there will be full tiles along the threshold.

The second control line is perpendicular to the first, intersecting it roughly midway along its length. Although you can start setting tiles anywhere, it’s best to start where control lines meet in the highly visible middle of the room.

Place angle-cut and partial tiles away from the room’s focal center. Because cutting tiles takes longer than installing full tiles, most installers cut tiles after the field of full tiles is in place.

Подпись: PROnP Once you've established a room's two main (perpendicular) control lines, snap as many secondary layout lines as you like. Many tilesetters also snap lines around the perimeter of the room to indicate where cut tiles begin; they set all the full tiles within the lines first, then set cut tiles at the base of walls, cabinets, and fixtures. Подпись: 1111

well in advance, suppliers rarely accept returns. To save money, try to draw layouts that are accu­rate to an inch so you can count individual tiles. But you should still order extra tiles—say, 5 per­cent above your tile count—which is preferable to waiting 2 months for the next tile shipment from Italy. Besides, tile colors can vary greatly between batches. Your detailed drawings will also help you accurately frame out the area to be tiled.

Finally, when ordering tile, calculate the num­ber of trim pieces separately from your calcula­tions for field tiles. For each distinct piece of tile trim (such as surface cove, V-cap trim) add 15 percent to the lineal feet of trim indicated by the layout. Order at least two specialty trim pieces for any one-of-a-kind piece (such as radius-bullnose down angle). This is also the time to order compatible adhesives and color-matched grout and caulk.

TILE LAYOUT

Most tiles are square or rectangular. So the most common floor-layout dilemma is in imposing a grid that’s basically square onto a room that isn’t. Laying out walls and countertops is much the same, except that wall layouts are more affected by plumb. Wherever they occur, though, layout lines have the same purpose: They keep tile joints straight. When setting tile, it’s easy to obsess about individual tiles and spacers, getting lost in close-up details. Thus layout lines help you keep the big picture in view and so keep tile joints from straying.

FOUR TIME-TESTED TIPS OF TILING

Though the following rules make sense most of the time, bend them when you must.

Use full tiles at focal centers. A focal center is any area that the eye is drawn to: the front edge

I Tiles at the Sink


DON’T DO THIS! DO THIS!

image809

both sides


Symmetrical layouts look better. When a layout results in unequal tile widths along the sides of a kitchen sink—a very noticeable spot—either shift the layout or move the sink to create equal tile widths on both sides.


of a counter; a room’s entryway; or a center of activity such as a sink, large window, or hearth. Common sense says full tiles look better than cut tiles, so put full tiles in conspicuous areas. Con­versely, put cut tiles where they’ll be least noticed.

Cut as few tiles as possible. Cut tiles are extra work, and they don’t look as good as whole tiles. To avoid cutting tiles, you might be able to shift the layout a little to the right or left or slightly vary the width of tile joints.

Make layouts as symmetric as possible. This rule is both an extension and, occasionally, a contradiction of the two above. Imagine a kitchen-sink counter: The sink is certainly a focal center but may be smack dab in the middle of a tile field. There’s often no way to avoid cutting tiles around the perimeter of a sink. In that case, try to shift the layout (or the sink) so that you can cut tiles an even amount on both sides of the sink. The result will look much better than almost-full tiles on one side and narrow tiles on the other.

This is also a good rule for small counters, which you can see from side to side without turn­ing your head. If you must cut tiles, split the dif­ference at each end.

Don’t use tile pieces half size or smaller.

They’ll look terrible. It’s better to adjust the width of tile joints. Or shift the layout so that you have large cut tiles on both ends rather than a row of narrow ones on one end alone.


ESTIMATING TILE

A story pole (also called a jury stick) is like an oversize yardstick but is divided into units that represent the average width of one tile plus one grout joint. Story poles give you a quick read on the number of full-size tiles you’ll need to get from point A to point B. For these homemade measuring devices, any straight board will do.


image810

FLOOR LAYOUT


ODD OR PROBLEMATIC SETTING BEDS

The beds described next may require special techniques and materials.

Plastic laminate countertops are acceptable setting beds if they’re solidly attached. Scuff the surface with 80-grit sandpaper, wipe with a rag dampened with solvent to remove grit and grease, and fill any voids. Then use an epoxy­based thinset to bond the tiles. Alternatively, you can cover the old laminate with!4-in. backer board, adhering it with an application of epoxy thinset, and 1-in. corrosion-resistant screws spaced every 6 in. around the perimeter of the countertop and every 8 in. in the field. Sink screw heads flush, vacuum the backer board, and then use latex or epoxy thinset adhesive to bond tiles. Note: The recommended 1-inch screw assumes the combined thickness of the countertop materi­als is at least 1 ‘/ in.

Tiling over existing tile is a reasonable alterna­tive to ripping it out, as long as the old tile isn’t cracked and is well adhered and the substrate is solid. Scuff the tile with a carbide-grit sandpaper. Vacuum the surface well, and wipe with a damp rag. Because tile surfaces are not perfectly regu­lar and grout joints are recessed, first use a flat trowel to spread a layer of epoxy thinset to build up grout joints and level the surface. Wait a day. Then use a notched trowel to apply a setting bed of epoxy thinset.

Two caveats: Because of the risk of leaks, don’t tile over tiled shower-stall floors. Rather, tear out the old floor, replace the shower-pan membrane, and tile atop a newly floated mortar bed. Second,

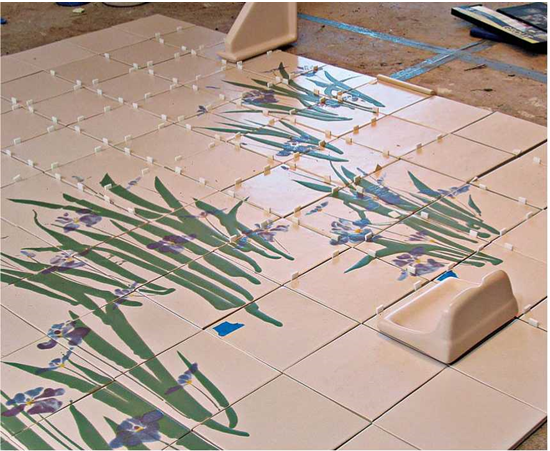
image805 Подпись: To avoid cutting handmade tiles on the tub sidewall, the installer laid out tiles on the floor, using plastic spacers to simulate grout joints. She then floated the walls to the exact dimensions of the tile assembly. (Vacuum floors well before laying tile on them because dust can compromise a setting bond.)

don’t install tiles 2-in.-sq. or smaller over existing tile because they will telegraph the old surface’s irregularities. Instead, use large tiles.

Resilient flooring is acceptable if there’s a sin­gle, uncushioned layer that’s well adhered to a stable subfloor. Cushioned or multilayered floor­ing will flex too much to be a stable base for tile so, to be sure, use a utility knife with a hooked blade to cut out a cross-section of flooring in an inconspicuous spot.

Painted walls are okay as long as the paint is well attached and the wall doesn’t flex. Drill a small exploratory hole to determine the composi­tion and thickness of the wall. If it’s drywall less than 58 in. thick, install a layer of 54-in. or 58-in. drywall over it. If the wall is traditional plaster (hard to drill through), it’s probably fine. Prep painted walls by sanding them with 100-grit sandpaper, and wipe with a damp rag. Use a latex thinset adhesive.

Other situations.

► Papered walls? Strip ’em! Vinyl wall coverings are supposedly tenacious enough to support tile, but it’s risky.

► Veneer paneling? Not recommended. Typically 54-in.- to 58-in.-thick, it will flex, cracking grout joints, and eventually dislodging tiles.

Tile Estimation and Layout

At this point we’ll assume that the substructure is sturdy and stable and the setting bed is in place. Careful layout is the key to a good-looking job, so don’t begrudge the time it takes. The right layout will align tile joints correctly, create a pleasant symmetry, allow you to cut tiles to size before­hand and—most important—enable you to set tile accurately and quickly while the clock is tick­ing for that fast-drying adhesive.

Getting Ready to Tile

If the substructure beneath the tile isn’t sturdy and stable, the job won’t last. Likewise, if walls aren’t plumb or floors aren’t level, tiles may adhere, but they may not look good. Start by assessing the existing surfaces. And that will inform your next steps, which can range from merely sanding finish surfaces to tearing out and reframing with studs and joists. The condition of existing floors, walls, and counters will also determine which setting bed you choose—and whether you should tile at all.

ASSESSING AREAS TO BE TILED

To check whether floors or countertops are level, use a long spirit level or a shorter level atop a perfectly straight board. Take several readings and use a pencil to mark individual high spots and dips. If variations from level exceed ‘A in. in 10 ft., floating a mortar bed or pouring SLC may be your best bet for establishing a flat setting bed. If the surface irregularities are less than that or the substrate just needs stiffening, adding a single layer of backer board may be all you need.

If room corners aren’t square or facing walls aren’t parallel, you may need to angle-cut floor tiles around the room’s perimeter. This is not ideal, especially in narrow alcoves or hallways, but baseboard trim will partially cover those angled cuts. Similarly, at the back of counters, blacksplashes will cover angle-cut tiles.

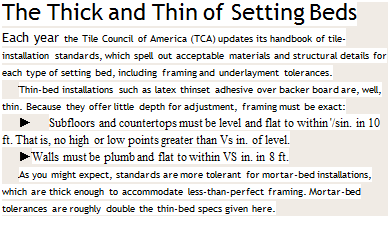
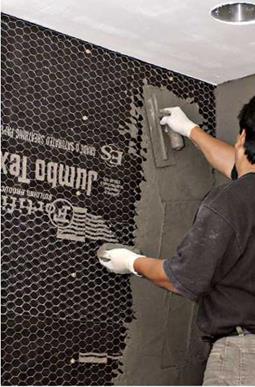
Подпись:Подпись: Weather-resistant barriers and flashing designed for exteriors often double as waterproof membranes indoors, beneath tile. After all, a shower's just indoor rain. Though sold primarily as stucco paper, Fortifiber's Super Jumbo Tex 60 Minute will also keep shower substrates dry even if you take hour-long showers. Polyken Foilastic, a peel-and-stick flashing, does a good job of sealing shampoo niches, pipe cutouts, and troublesome joints around kitchen counters (see the drawing on p. 399). ■ ill Подпись: The Thick and Thin of Setting Beds Each year the Tile Council of America (TCA) updates its handbook of tile-installation standards, which spell out acceptable materials and structural details for each type of setting bed, including framing and underlayment tolerances. Thin-bed installations such as latex thinset adhesive over backer board are, well, thin. Because they offer little depth for adjustment, framing must be exact: ► Subfloors and countertops must be level and flat to within '/sin. in 10 ft. That is, no high or low points greater than Vs in. of level. ► Walls must be plumb and flat to within VS in. in 8 ft. As you might expect, standards are more tolerant for mortar-bed installations, which are thick enough to accommodate less-than-perfect framing. Mortar-bed tolerances are roughly double the thin-bed specs given here.

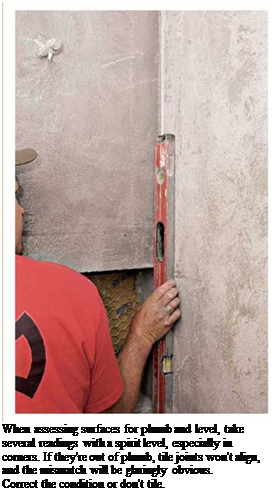
To check walls for plumb, use a long spirit level or a plumb bob; a taut string is also handy to detect high and low spots. Begin by surveying the entire wall. Unless the tiled corners are plumb, you’ll have tapering cuts or mismatched grout lines where the planes converge, especially noticeable on out­side corners. To correct out-of-plumb walls, your choices are floating a mortar bed, reframing the walls, or not tiling. Note: A wall that’s plumb in the corner may have a twisted stud elsewhere that throws another section out of plumb.

Finally, survey surfaces for water damage, deflection, and other factors that could affect a tile job. Examine the bases of bathroom and kitchen fixtures for discoloration, delamination, and springiness, especially under toilets and tubs. Crumbling grout atop a tub often means that water has gotten behind the tile. Open kitchen and bath cabinets and examine the undersides of sinks and countertops. If you see discoloration, probe it with an awl to determine whether mate­rials are solid. Particleboard countertops often deteriorate from sink leaks and dishwasher steam. If there’s extensive rot or subfloor delami­nation, replace failed sections, as described in Chapter 8. To test for deflection, thump walls

with your fist, or jump on the floors. If you see or feel movement, there may be structural deterio­ration or, more likely, the substructure may be undersize for the span.

PREPPING THE ROOM

Tiling will go faster and look better if you first remove fixtures and other obstructions so that you can lay a continuous field of tile. This is a good time to upgrade or replace electrical boxes, install thresholds, and cut a little off the door bottoms so they don’t scrape when tiling raises the floor level. For information on disconnecting and installing plumbing fixtures, see Chapter 12.

Removing the toilet lets you reinstall it on top of the new tile. Some people mistakenly leave the toilet in place and so need to make a lot of unsightly tile cuts around its base, which can also be troublesome to caulk and maintain.

Begin by turning off the shutoff valve to stop incoming water, disconnect the supply line, flush the toilet and remove the remaining water, and disconnect the anchor bolts holding the base to the floor.

Because toilets are heavy, find someone to help you move the toilet out of the way. To block septic gases and keep objects from falling through the closet flange into the closet bend, stuff a plastic bag filled with crumpled news­paper into the pipe; of course remember to remove it before reinstalling the toilet.

With the waste pipe temporarily sealed, con­sider the toilet’s closet flange atop the closet bend. Ideally, the top of the flange should be the same height as the finish floor. If your tiling increases the height of the floor h in. or less, the height of the flange shouldn’t be a problem. Just run tiles to within!/ in. of the flange. When you apply a new wax ring to the bottom of the toilet horn, the


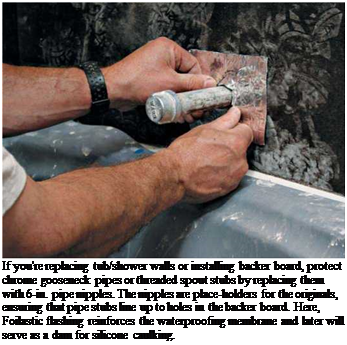
Подпись: Corner out of PlumbПодпись: If the thicker new walls reduce the visible profile of existing valve stems, don't panic. Most major plumbing suppliers offer threaded valve extensions to make the stems longer. That's much cheaper than tearing out the walls to replace the valves. 1111 image797Подпись: Corner walls too far out of plumb can't be tiled successfully. Their tile joints won't align, and the mismatch will be glaringly obvious.Подпись: If you're replacing tub/shower walls or installing backer board, protect chrome gooseneck pipes or threaded spout stubs by replacing them with 6-in. pipe nipples. The nipples are place-holders for the originals, ensuring that pipe stubs line up to holes in the backer board. Here, Foilastic flashing reinforces the waterproofing membrane and later will serve as a dam for silicone caulking. wax will compress and seal the joint adequately. In fact, you can buy extra-thick wax rings for such situations.

But if the tiled floor will be more than И in. higher than the closet flange (which may result if you install a mud bed or backer-board setting bed) replace the flange and set the new one higher. If waste pipes are plastic, cut off the existing bend-and-flange section and cement on new components to give you the flange height you need. This is easier said than done, however: If there’s no room to maneuver new pipes, you may need to cut into flooring or framing. Thus many plumbers prefer to build up existing flanges by stacking И-in. plastic flange extenders (the same diameter as the flange), caulking each with sili­cone, and using long closet bolts to resecure the toilet base. But check your local plumbing code to see if this method is allowed.

If drainpipes are cast iron, whose sections join with band clamps, you may want to hire a plumber to replace flanges that are too low or waste pipes that have deteriorated. Often, there’s not enough room to attach band clamps adequate­ly, or the substructure may need replacing as well.

Removing a sink may be a good idea, too. The method depends on the sink type: whether coun­tertop, pedestal, or wall mounted. For each, shut off the water, and then disconnect supply lines and drainpipes.

Countertop sinks vary in their attachment. Most are held in place with clips on the under­side of the counter and sealed with a bed of caulking or plumber’s putty between the sink lip and the counter. After disconnecting the pipes, unscrew the clips and, if necessary, break the caulking seal by running a utility knife between the sink lip and the counter. If the new sink is smaller than the old one, you’ll need to reframe the opening in the counter.

Remove in-counter faucet assemblies. Then tile within!4 in. of the holes, and caulk the spaces with silicone or plumber’s putty. If your installa­tion will involve just thinset and tile, the old valve stems should be long enough to reuse. But if you’re building up the setting bed with backer board or mud, buy new faucet assemblies with longer valve stems.

Shower and tub hardware can be masked off with plastic bags if you’re not tearing out the shower walls or building up setting beds, but do remove chromework so it doesn’t get discolored by mortar or adhesive.

To remove a showerhead assembly, gently pry the escutcheon from the wall (it may be seated in plumber’s putty). Then wrap a rag around the chrome gooseneck pipe and use a pipe wrench to
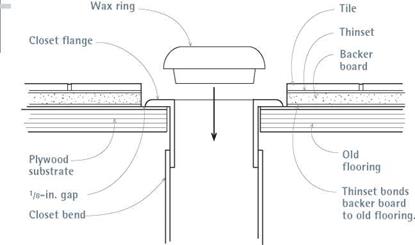
image799Подпись: Ideally, the top of the toilet flange should be the same height as the finished floor. If not, consider the options outlined in the text.Подпись: JOINTS

unscrew it. (The rag prevents the wrench’s teeth from gouging the chrome finish.) Removing valve handles is slightly more complex because you must first unscrew valve handles from valve stems, and those screws are frequently hidden behind decorative caps. Once you’ve removed handles and escutcheons, wrap the exposed valve stems with plastic so their threads don’t get fouled with mortar.

The last item on the shower wall, the tub spout, can often be unscrewed by hand. If not, you can usually gain some leverage by inserting a rubberized pliers handle into the spout opening.

Tile to within ‘/ in. of the valve stems and pipe stubs, and caulk the gaps with silicone so water can’t get behind the wall. Escutcheons will cover the cut tiles.

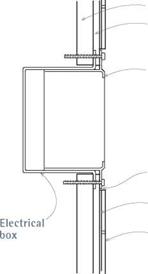
Build up electrical boxes so they’re flush with new tiled surfaces. О After turning off electricity to the box—and using a voltage tester to make sure it’s off—remove the outlet faceplate, unscrew the device from the box, and screw in a box extender. Run tiles to within /б in. of the extender; the faceplate will cover tile cuts. Note: All bathroom receptacles and all those within 4 ft. of a kitchen sink must be GFCIs.

Move appliances so the floor they’re sitting on can be tiled. Where those appliances are under-

Extending I Electrical Boxes

image800

Old drywall

‘/4-in.

backer board Box extender

‘/їв-in. gap

Thinset

Tile

A box extender is usually a plastic sleeve that screws to an existing electrical outlet box, so that the box face is flush to a new tiled surface.

I Tile Height at Toilet

counter, anticipate the additional height of the new flooring and raise or alter countertops accordingly so appliances can be returned to their nooks.

Cut door bottoms so there’s about!4-in. clear­ance between the bottom and the highest point of the tiled floor or the threshold. Do this after the tile and threshold are set because it’s difficult to know beforehand exactly how thick the floor will be.

Choose a threshold that reconciles floor heights and materials on either side. For this, you’ll need to think through its installation, such as scribing and cutting it to the door jambs and the adhe­sives or fasteners.

Installing Setting Beds

This section addresses mainly the most common setting beds and mentions only briefly those that are less common or problematic. Backer-board brands vary, so follow manufacturer-specific recommendations about waterproofing, connec­tors, installation procedures, and so on.

Expansion

All tile substrates and setting beds need V«-in.- wide expansion joints where they abut walls, fixtures, and cabinet bases. This keeps grout joints from compressing and cracking when materials expand. These joints are usually caulked with flexible sealants, such as silicone.

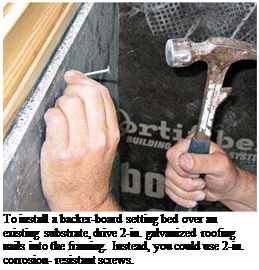
Подпись: This worker wasn't able to score the WonderBoard enough to snap it after several passes with a utility knife, so he switched to a handheld grinder with a diamond blade. Faster, but dusty.Подпись: To install a backer-board setting bed over an existing substrate, drive 2-in. galvanized roofing nails into the framing. Instead, you could use 2-in. corrosion- resistant screws. Подпись:COMMON SETTING BEDS

Here you’ll find additional details on backer board, mortar beds, SLCs, drywall, and concrete slabs. Setting tile directly on plywood is not rec­ommended. But it’s widely done, so that’s addressed, too.

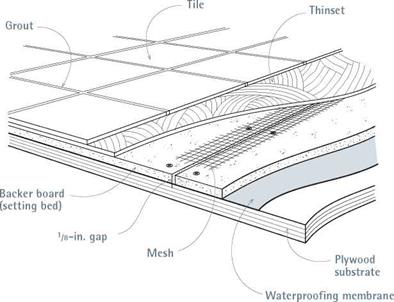
Installing backer board. Backer boards are cementitious backer units. They are strong, durable, and unaffected by moisture—and so are superb setting beds for wet and dry installations. However, because moisture will wick through CBUs, install a waterproofing membrane first in wet applications in order to protect wood sub­structures from damage.

Wear a respirator mask and eye protection when cutting and drilling backer-board panels, which can be scored and snapped much like drywall, though many installers score both sides. Although a utility knife can do the job, a dry­cutting diamond blade in a handheld grinder leaves other methods in the dust—literally. Wear a face mask when using this grinder, as well as hearing and eye protection. To drill holes for pipes, use a carbide-tipped hole saw.

For most backer-board installations, space galvanized roofing nails or corrosion-resistant screws every 6 in. to 8 in. Screws are more expen­sive and slower to install, but some tilesetters swear by them; Rock-On® cement-board screws cut their own countersink so the heads will be flush. Nail advocates argue that nails are less likely to crush panel edges and are easy to drive flush. To attach 58-in. backer-board panels directly to studs, use lh-in. screws or nails. If installing panels over drywall or plywood substrates, use 2-in. screws or nails.

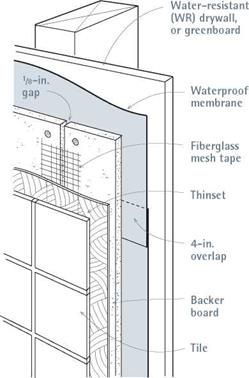
Backer-board panels are available in a variety of widths (32 in. to 48 in.), lengths (3 ft. to 10 ft.) and thicknesses (14 in., 58б in., 58б in., 58 in., and 58 in.). Thinner panels are typically installed over plywood or drywall. Use at least 58-in. backer board if you’re attaching it to bare studs; other­wise it will flex too much and crack the tile joints. For a floor rigid enough to tile, install 58-in backer board over 54-in. tongue-and-groove plywood, with joists spaced 16 in. on center. For all instal­lations, leave a 58-in. gap between the backer – board panels. Cover those joints with 2-in.-wide, self-adhering fiberglass mesh tape before cover­ing the tape with thinset adhesive—the same material used to set the tiles.

Feather out the thinset as flat as possible, but it doesn’t have to be perfect because the joints will be covered by adhesive and tile. Finally, leave a 54-in. expansion gap where the panels abut the base of walls, tubs, and plumbing fixtures; you’ll fill those gaps later with flexible sealant. Keep the bottom edge of backer board 54 in. above the tub so water doesn’t wick into panels; caulk the gap later with silicone.
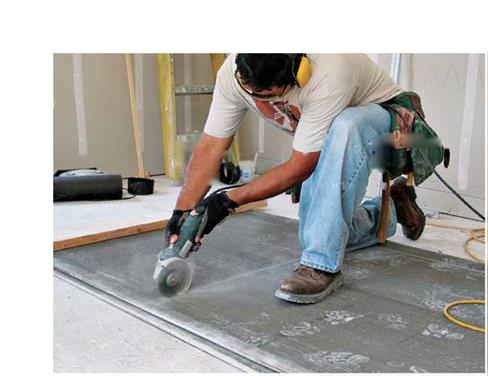
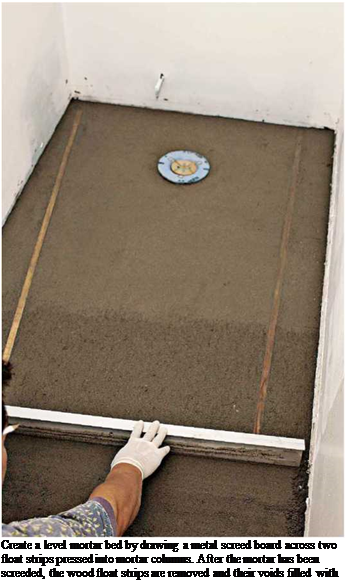
image802Installing the mortar bed. Mortar beds make a superb substrate but are complicated to install. First attach a curing membrane (a waterproofing membrane beneath the mortar) over the framing or drywall; then add reinforcing wire mesh. Next apply two or more parallel mortar columns, and place a wooden float strip atop each column. Checking frequently with a spirit level, tap the float strips into the mortar until the floor strips are level or the wall strips are plumb. Then fill between the strips: Dump mortar onto floors between the strips or trowel it onto walls. Flatten

image803

Note how well self-leveling compound levels itself when accidentally dumped onto the ground of a work site. Even its thin tapered edge is strong. When used to level floors, its optimal thickness is about 1 in.

the mortar by placing a screed board across the float strips and drawing it side to side in a sawing motion. Dump excess mortar into a bucket as the screed board accumulates it.

Once the mortar bed is more or less flat, remove the strips, and fill the float-strip voids with mortar. Then trowel out the irregularities.

To help the thinset coat adhere, lightly roughen it by rubbing the surface with a wood float or a sponge float. Allow the mortar to set about an hour before using a margin trowel to clean up the mortar beds edges. Some veteran tilesetters set tile immediately thereafter, but most mortals should allow the mortar to cure for 24 hours before tiling.

Mixing mortar in correct proportions is an art. Floor mud, or deck mud, is dry and rather crum­bly: 1 part portland cement, 5 parts sand, and 1 part water. However, once screeded, compacted, and well cured, deck mud can support great loads. Wall mud is wetter and more like plaster because it must be spread onto vertical surfaces; it con­tains lime to improve its adhesion. Wall muds proportions: 1 part portland cement, 4 parts sand, / part lime, and 1 + parts water; use enough water so the mud trowels on easily. Add water slowly because mud won’t stick if it’s too wet.

Applying leveling compound. SLCs can level isolated low spots or even whole floors. Appli­cation requires few skills beyond opening 50-lb. sacks of SLC powder, mixing the powder with water, and pouring the mix onto a floor. You don’t even need to spread it around much. It flows like water, levels itself, and starts to harden in about 15 minutes. Well, that’s a bit oversimplified, but not much.
Getting Ready to Tile

Подпись: Create a level mortar bed by drawing a metal screed board across two float strips pressed into mortar columns. After the mortar has been screeded, the wood float strips are removed and their voids filled with mortar. First, be sure the substructure is sturdy enough to bear the weight. Specs for one popular

Подпись: SAFETY ALERT Older resilient flooring sometimes contains asbestos, which is seldom a problem unless it becomes airborne. Before sanding or abrading it, take a sample to a flooring specialist, who can tell if it's asbestos. Next consult a local building code officer, who can tell you if it's safe to install new flooring or if you must hire an asbestos- abatement specialist to remove the old flooring. llllll

SLC, LevelQuick, recommend at least a 54-in. exterior-plywood subfloor over joists spaced up to 24 in. on center; use two 52 -in.-thick pours to achieve a 1-in. optimal thickness. Wait 24 hours between pours. Whatever the substrate, it should be clean, dry, and free of chemicals—such as curing compounds in concrete slabs—that might prevent a good bond.

Before pouring, install a waterproof mem­brane and reinforcing mesh, which is usually wire, although a self-furring plastic lath called Mapelath® shows promise. One essential prep detail: Completely seal and dam off the section of floor you’re leveling, or the free-flowing SLC mix will disappear down the smallest hole and form a heavy mortar pad where you least want one. Pay close attention to board joints, baseboards, and the like; caulk or seal joints with duct tape, pack them with fiberglass insulation—whatever it takes to contain the liquid till it hardens. SLCs are expensive but, in most cases, less expensive than floating a mortar bed. As important, they’re great setting beds.

Preparing masonry surfaces. Concrete walls, slabs, and block are good setting beds as long as they’ve cured for at least a month and as long as they’re clean (no chemical residues), dry, free from active cracks, and level or plumb within ‘/ in. in 10 ft. (If it’s an out-of-level floor, see "Applying Leveling Compound,” on p. 391.)

If you’re tiling basement surfaces, the big issue is cracks. If masonry cracks expand and contract seasonally, it’s unwise to tile over them because the tiles will crack. Likewise, if one side of a crack is higher than another, it’s probably caused by soil movement. (If the crack is inactive and both sides of it are in the same plane, you can vacuum out the crack, dampen it, and fill it with a latex thinset adhesive before applying the thinset setting bed.)

Dry installations. Unpainted drywall is an acceptable setting bed for dry installations. (In damp or wet installations, never adhere tile directly to drywall.)

In dry installations, use at least 58-in. drywall if attaching it directly to studs 16 in. on center. Or sandwich two layers of drywall, with a layer of adhesive between, to create a more rigid lamina­tion. But if you install a double layer of drywall, offset the panel edges by at least 16 in.

In either case, leave a 58-in. gap between panel edges, cover the joints with self-sticking fiber­glass mesh tape, and then apply a layer of latex thinset adhesive over the tape. Drywall tools are fine for this application—but not drywall joint tape or compound. When installing drywall as a setting bed, you don’t need to fill screw holes or
feather out joints perfectly smooth because you’ll be covering them with thinset and tile.

Plywood beds. Plywood is not recommended as a setting bed, but if you must use it, use only exterior grade and leave 58-in. gaps between the panel edges. Plywood substrates for floors and countertops must be at least 158 in. thick—best achieved by laminating a h-in.-thick plywood underlayment panel to a 58-in. plywood subfloor. To prevent squeaking and to stiffen the assembly, trowel construction adhesive between the panels. Offset the panels so their edges don’t align. In addition to the adhesive, use 1-in. corrosion – resistant nails or screws spaced every 6 in. on center. To secure this laminated plywood to the joists, drive 16d galvanized nails into the joist centers. To avoid high spots that might crack the tiles, sink all screw or nail heads below the surface of the top layer. Sand and vacuum the plywood before notch-troweling on an epoxy thinset adhesive.
SETTING BEDS

Tile can be set on a variety of setting beds. Keep in mind that the substrate below the setting bed must be securely attached to the framing mem­bers. That assembly must be thick and stable enough to support loads with minimal deflection (J4(> of the span). And when used in damp or wet areas, it needs to remain unaffected by sustained exposure to water.

Mortar beds. Where walls aren’t plumb, floors aren’t flat, and corners aren’t square, mortar beds are usually the best setting bed. They can easily be screeded level or plumb to create a flat sur­face. In fact, a mortar bed is the only practical choice if you’re tiling the sloping floors of a shower stall. But few novices have enough skill to float a mortar bed. If your surfaces are badly out

image792

Applying mortar beds takes strength and a lot of skill. After installing a curing membrane and attaching wire mesh, you must carefully mix and trowel the mortar on, level or plumb float strips, and screed off excess mortar till the bed is uniformly flat. Then, after it has set a bit, use a wood float to roughen its surface slightly, which improves the adhesion for the thinset to follow

of whack and you’re not experienced in floating mud, hire a pro for this job.

Backer board. If walls and floors are reasonably plumb and level, backer board is a durable set­ting bed for wet and dry installations. It’s stable, unaffected by moisture, and easily cut and attached. Backer board is also called cementi­tious backer units (CBUs), HardiBacker®, Durock®, and WonderBoard—the last three being popular brands. These products feature a cement-based core, reinforced by fiberglass mesh or integral fibers. Because there’s considerable variation among brands, always consult product literature for details on installation.

Glass-mat gypsum board. This board (one brand is DensShield®) has a water-resistant core and heat-cured acrylic coating. It’s not as rugged as backer board, but it’s an acceptable setting bed in tub surrounds and other light-duty wet areas. Don’t confuse this product with drywall. Glass – mat gypsum board is specifically designed to be a tile backer.

Unpainted drywall. Drywall is an acceptable setting bed where walls stay dry. Caution: Never bond tile directly to drywall in damp or wet installations. Water-resistant (WR) drywall (or greenboard) is an acceptable substrate in damp or wet installations only when it is covered with a waterproofing membrane and then a mortar bed or backer board.

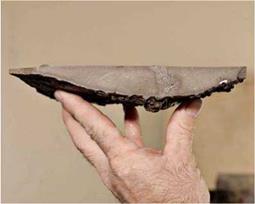
Tile applied directly to drywall in wet installa­tions invariably fails sooner or later, often because people showering bump the walls, com­pressing the drywalls gypsum core. No longer supported evenly by the core, the grout loosens, water enters and soaks the paper, and—all too often—the framing rots.

Exterior-grade plywood. It’s usually a mistake to use plywood, even exterior grade, as a setting bed. Exposed to moisture, plywood tends to swell and delaminate. If you must use it as a setting bed for floor or countertop installations, be sure to cover it with a continuous waterproofing membrane; the base should be at least 1 Ys-in. thick (for example, h-in. plywood underlayment laminated to a %-in. plywood subfloor). On walls, %-in. plywood is the minimum. Never use parti­cleboard, oriented strand board (OSB), or interi­or-grade plywood as setting beds.

Self-leveling compounds. Self-leveling com­pounds (SLCs), such as LevelQuik®, have many of the virtues of a mortar bed but require few of the skills needed to float one. Basically, SLCs are fortified mortar powders mixed thin and poured onto out-of-level floors. With a small amount of troweling, they spread across the floor and, with­in minutes, start to set. Just 2 hours later you’ve got a hard, almost perfectly level mortar-setting bed ready to tile.

That’s the short list of common setting beds. For other materials see "Odd or Problematic Setting Beds,” on p. 392.

ADHESIVES

Once you’ve chosen a suitable setting bed for your wet or dry installation, choose a compatible adhesive. Adhesives vary greatly from brand to brand, so again, always follow the manufacturer’s mixing and application instructions exactly.

There are three major groups of adhesives: mas­tics, which come ready mixed; thinset adhesives, which are cementitious powders generally mixed on-site just before setting the tile; and epoxy thin – sets that, like most epoxies, require your mixing a hardener and a resin.

Organic mastics are the least expensive of the three adhesive options. Because they come premixed, they’re the most convenient option, but they’re also the weakest. They are okay for attaching tiles to dry counters or walls—over dry- wall, for example—but they’re inappropriate

Подпись:

where there’s water, heavy use, or heat. Mastics just don’t have the strength of thinsets.

Mastics require a nearly flat setting bed. That is, when they are applied thickly to fill voids, they neither cure completely nor bond thoroughly. Mastic cleans up well with water or solvent if you remove the excess material at once. Opened con­tainers don’t keep well, so throw away any left­over mastic after you’ve set the tiles.

Thinsets have great bonding and compressive strength. Being cement based, they bond best with mortar beds or backer board but are appropriate for virtually all setting-bed materials. Thinsets are also used to laminate rigid setting beds to sub­strates in order to create an inflexible substructure for tiling. (Construction adhesive is also used in such laminations, but it is flexible and so doesn’t achieve the rigidity of a thinset lamination.)

Despite the cement ingredients they have in common, thinsets vary widely, depending on their additives. Water-based thinsets are the weakest of the group, although they are generally stronger than mastics. Latex – and acrylic-based thinsets (also known as polymer-modified thin – sets) are strong and somewhat water resistant and are, all in all, the best choice for bonding tile to backer board, mortar beds, SLCs, drywall, and concrete slabs. And they’re a close second for bonding almost everything else.

Most thinsets are mixed from powder. After mixing, they have a "bucket life” of about 2 hours. After being troweled onto a setting bed, they start to set in 15 minutes to 20 minutes.

Epoxy thinsets have excellent compressive and tensile strengths. They also bond well and yet retain flexibility when cured. After drying, they are unaffected by moisture and so are suitable for all situations and substrates. There’s a catch, of course: Epoxies are four or five times more expensive than other thinsets and quite tempera­mental. You must mix the liquid resins and hardeners in exact proportions with the dry ingredients. Setting times are similarly exacting. If directions say 20 minutes, you can set your watch by them. Above all, clean up epoxy before it sets; some types sponge clean with water, others with solvents.

GROUT

Grout is a specialized mortar that seals the joints between tiles. Most grouts contain sand, cement, and a coloring agent. Grout may also contain additives to stabilize color, increase water and stain resistance and increase strength and flexi­bility. Most grouts and premixed additives are sold as a powder, which is subsequently mixed with liquid and allowed to stand (or slake) for

Waterproofing a Tub Surround

image794

This tub surround would be sufficiently rigid without the WR drywall. But installers frequently add a drywall layer to build up the wall thickness when they’ll be using bullnose edge trim.

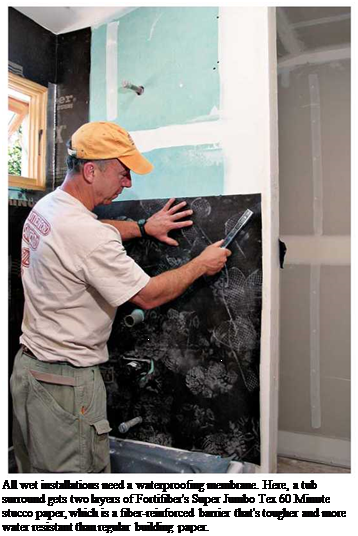
Подпись: Manufacturers frequently change their grout colors, so buy 10 percent more than you need for your current installation. Once the job is done, wrap the extra grout in a plastic bag, label it as to where it was used, and store it in a dry place. While you're at it, buy caulking the same color as your grout; many tile stores carry color-matched caulk, both sandless and sanded. llll Подпись: All wet installations need a waterproofing membrane. Here, a tub surround gets two layers of Fortifiber's Super Jumbo Tex 60 Minute stucco paper, which is a fiber-reinforced barrier that's tougher and more water resistant than regular building paper.

10 minutes before final stirring to the correct consistency.

Use sandless grout for joints narrower than ‘/ in. Use sanded grout for joints Z in. and wider.

Most tile suppliers carry grout in hundreds of colors. Whatever the color, remember that the greater the contrast between grout and tile, the more obvious the joints and workmanship.

MEMBRANES

Tile, grout, and many setting beds are unaffected by water. But they are porous, so water can migrate through them, potentially damaging plywood sub­strates or wood framing. To prevent such damage in damp or wet areas, install a waterproofing membrane first. Even areas that are normally dry, such as entryways, should have a modest building – paper membrane if the floors will be subject to wet mopping and dripping umbrellas.

For walls above the water line in wet areas and for countertops subjected to occasional water, a 15-lb. building-paper membrane is stan­dard, but installing a 60-minute stucco paper
(which is impermeable for 60 minutes) makes sense. It’s stronger, less likely to tear, and more water resistant. When installing such membranes, overlap the lower courses and vertical seams of paper by 4 in. Although some builders recom­mend 4-mil. polyethylene as a waterproofing membrane, stucco paper has one big advantage: Unlike plastic, it is semipermeable. Therefore, it allows water to escape should any get behind the barrier.

Below the water line, such as in a shower pan, you need to protect wood substructure with an impervious membrane. Thus most shower pans are lined with sheet rubber, such as 30-mil, fiber-reinforced chlorinated polyethylene (CPE), whose seams are overlapped and chemically bonded with a solvent. Of course, you don’t want to puncture CPE shower-pan membranes with screws or nails. Instead, roll the membrane onto a fresh layer of latex thinset adhesive, and cover it with a mortar bed.

Note: The comments in this section are gener­alizations. Follow the manufacturer’s installation instructions for specific adhesives, membranes, and setting-bed materials.

SETTING AND GROUTING

Setting means positioning and adhering tile to a substrate. Grouting means sealing the joints between tiles with a special mortar.

A notched trowel spreads adhesive. Two edges of the tool are flat, designed to spread the adhe­sive initially. Then on subsequent passes, use the notched edges to comb a series of parallel ridges, which will spread evenly when the tile is pressed into it. Notch height should be about two-thirds the thickness of the tile.

A margin trowel is a utility tool that’s great for mixing small batches of powdered adhesives, cleaning mortar off other trowels, buttering indi­vidual tiles with adhesive, and removing excess grout or adhesive that oozes up between tiles.

Plastic spacers and wedges enable you to shim individual tiles so their edges align to your layout lines.

A beater board is just a flat board placed over tile sections and rapped gently with a rubber mallet to seat the tiles in the adhesive. Not all tilesetters use a beater board. Many just press tiles in firmly or use a fist to seat them better.

image791

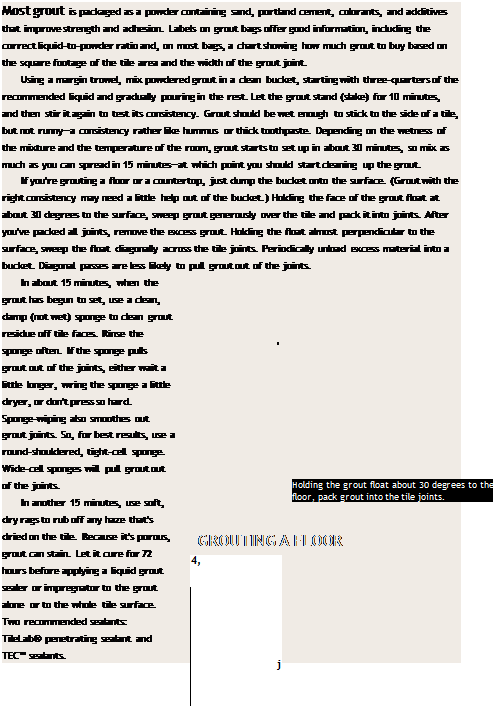
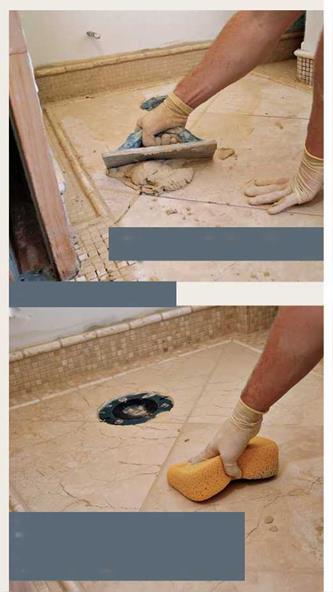
A grout float (rubber-faced trowel) applies grout in a process that takes at least two passes. Holding the face of the grout float at about 30°, sweep the grout generously over the tile and pack it into the joints. Then, holding the float almost perpendicular to the surface, remove the excess grout, unloading it periodically into a bucket. To avoid pulling grout out of the joints, make your passes diagonally across the tile joints.

Round-cornered, tight-pored sponges are less likely to pull grout out of tile joints. After grout starts to haze over, wipe lightly with a dampened sponge, rinsing the sponge often. Get several types of sponges. Kitchen sponges with scrub pads on the back are useful for removing stub­born grout.

A mixing bit in an electric drill can mix large amounts of powdered adhesives or grout. Slow mixing speeds of 300 rpm to 400 rpm work best. And keep the bit immersed to minimize mixing in air, which weakens the batch. Wear a respira­tor mask.

Materials

Here’s a quick survey of materials you might use to create a durable tiling job.

Think of the job as if it were a layer cake. For example, in floor tiling, the bottom layer (concep­tually the table under the cake) would be the floor joists. Nailed to the joists, in most cases, is a plywood substrate. For a wet installation such as a shower wall, next comes a waterproofing mem­brane, followed by a setting bed of cementitious backer board or a mortarbed. Troweled onto the setting bed is a setting material, typically thinset adhesive or organic mastic. Tiles are applied to the setting bed, and once the bed has hardened, tiles joints are grouted. Later, a sealer may be

Mastering the mess

Controlling the mess is a big part of successful tile setting. If you’re tiling a tub surround, cover floors with builder’s paper or plastic, mask off cabinets, and line the bathtub with a heavy can­vas drop cloth before you start. Masonry debris is very abrasive, so vacuum as it accumulates. Also, keep a clean 5-gal. plastic bucket (joint compound pails are perfect) full of clean water for sponging mortar, adhesive, or grout off tools. Last, a bundle of clean dry rags is useful for buffing dried grout haze off tile and soaking up messes.

I Typical Wet Installation Floor applied to make tile and grout more water or stain resistant.

Methods and materials are rarely predictable in renovation, so it’s a good idea to survey the back or underside of the surface you’re about to tile, both to see how many layers there are and to check if they’re in good condition. You can pull out a heating register to see a cross-section of the flooring, for example. Or test-drill a small hole in an inconspicuous spot to determine the thickness and composition of an existing wall, floor, or countertop.