Category RENOVATION 3

WATER RESISTANCE AND DURABILITY

There are almost as many physical distinctions among tiles as there are tile types, but the most important traits to consider are water resistance and durability.

Water resistance. Here, three of four official categories of tiles include the word vitreous, which means glasslike, and suggest how much the tile will resist or absorb water. The categories are nonvitreous, semivitreous, vitreous, and impervious. Nonvitreous is the most absorptive, and impervious the most water resistant.

Use nonvitreous tiles on dry areas, such as interior fireplace surrounds and hearths. Use semivitreous or better on shower walls, tub sur­rounds, backsplashes, and areas that are inter­mittently wet. Use vitreous and impervious tiles for wet installations like pools, hot tubs, and outdoor surfaces in rainy cli­mates. In general, the less water a tile absorbs, the less hos­pitable it will be to bacteria and mold. That’s why hospitals and laboratories usually use imper­vious tiles.

Durability. Tile durability rat­ings, based on structural strength and surface imperfec­tions, typically assign softer, weaker tile to less demanding areas and harder, impervious tile to heavily trafficked, wet, and outdoor areas. In like man­ner, tiles are rated for walls, floors, and counters. A reputable

tile supplier will give you good advice on appro­priate uses and durability and will stand behind the tiles you buy.

Tools

Many tile suppliers sell or rent tiling tools and offer workshops on techniques and tool use.

Tools and safety. Tiling is deliberate, methodical work and is not as inherently dangerous as some remodeling tasks. Still, it poses hazards; so for starters, please note these minimal safety rules:

► o Use a voltage tester to ensure that power has been shut off to outlets, fixtures, switches, and devices you’ll work near. In addition, ensure that bathroom and kitchen receptacles have ground-fault circuit interrupter (GFCI) protection, as spelled out in Chapter 11. Corded power tools should be double insulated and grounded with a three – prong plug. Or use cordless tools instead.

► Rubber gloves reduce the risk of electrical shock and prevent skin poisoning from prolonged handling of mortar, adhesives, sealers, and the like.

► Wear goggles when cutting tiles, whether making full cuts with a wet saw or nibbling bites with a tile nipper. Tile shards can be as sharp as a scalpel.

► Wear a respirator mask when mixing masonry materials, applying adhesive, cutting cementitious backer board, and so on.

► Knee pads will spare you a lot of discomfort. Buy a pair that’s comfortable and flexible enough to wear all day. Flimsy rubber knee pads won’t protect your knees.

► Open windows and turn off pilot lights on gas appliances when using volatile adhesives or admixtures. Closely follow manufacturer’s instructions.

Подпись: Straightedges are an indis-pensable part of tile layout and installation. They tell you whether surfaces are flat and help you align tile edges, as shown.BASIC TOOLKIT FOR TILE

► Safety equipment: rubber gloves, goggles, respirator mask, voltage tester, and knee pads.

► Measuring and layout: straightedges, framing square, spirit level, pencil or felt – tipped pen, chalkline, tape measure, story pole, and scribe (or an inexpensive student’s compass).

► Setting and grouting: notched trowel, margin trowel, plastic spacers and wedges, beater board, rubber mallet, grout float, round-cornered sponge, and clean rags.

► Cutting: snap cutter, tile nippers, utility knife with extra blades, and wet saw.

► Cleanup: sponges, rags, plastic buckets, plastic tarps, and shop vacuum.

► Miscellaney: hammer and wire cutters.

MEASURING AND LAYOUT

Substrates are never absolutely flat or perfectly plumb, so layout is a series of reasonable approx­imations. Clean tools give the most accurate readings, so wipe off mortar or stray adhesive before it dries.

► A 4-ft. spirit level is long enough to give you an accurate reading. It’s indispensable for checking plumb and leveling courses of wall tiles. If a 4-ft. level proves unwieldy on the short end walls of a bathtub, use a 2-ft. level or a torpedo level instead.

► A tape measure lets you measure areas to be tiled, triangulate diagonals for square, and perform general layout.

► Snap a chalkline to mark tile layout lines before applying adhesive.

► Straightedges are useful for aligning tile courses, marking layout lines on substrate, and guiding cuts on backer board and plywood. Professional tilesetters have metal straightedges of different lengths, but wood’s okay if it’s straight and sealed to resist water.

► A framing square establishes perpendicular layout lines on floors, walls, and countertops.

► A story pole is a long straight board marked in increments representing the average width of a tile plus one grout joint (see "Storytelling," on p. 395). With it, you can quickly see how many tiles will fit in a given area, as well as where partial tiles will occur.

► Use a scribe to fit sheet materials (cementitious backer board, plywood) to a bowed wall or to transfer the arc of a toilet flange to a tile.

CUTTING

Always wear goggles when cutting or nipping tile, especially when using power tools.

A snap cutter works well on manufactured vitreous and impervious tile. This tool has a little cutting wheel—make sure it’s not wobbly or
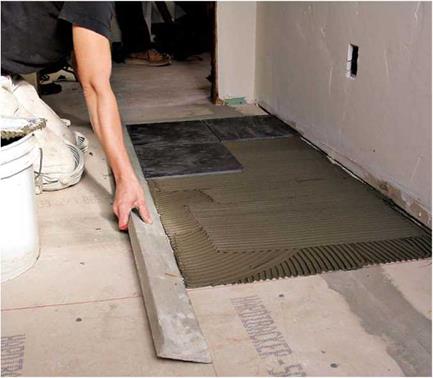
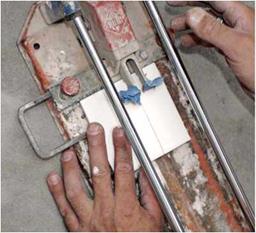
image785

image786

Snap cutters work great for straight cuts on vitreous tile. With this model, you score the tile in one pull and then push down on the tool’s wings to snap the tile along the scored line. Here, blue painter’s tape keeps the cutter’s wings from scratching the tiles.

image787

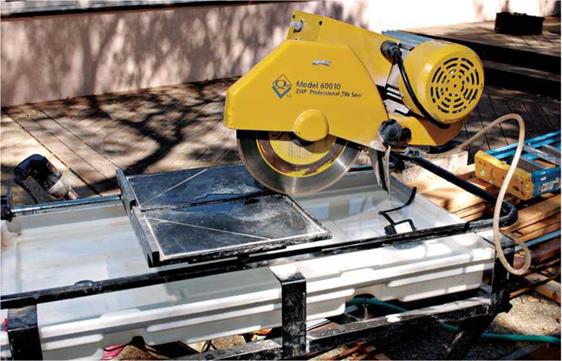
Wet saws are relatively cheap to rent, and they cut almost any type of tile cleanly. Wear safety glasses and hearing protectors when using one. To extend blade life, change the water often.


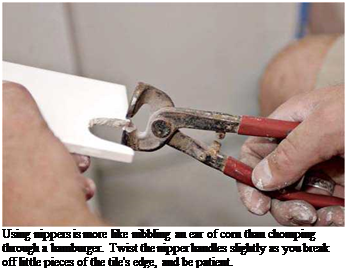
Подпись: Using nippers is more like nibbling an ear of corn than chomping through a hamburger. Twist the nipper handles slightly as you break off little pieces of the tile's edge, and be patient.

chipped—that should score the tile in one pull. Then reposition the handle so the "wings” of the tool rest on the scored tile, and press sharply to snap it. Note: When using a snap cutter, it’s tough to get a clean break on nonvitreous tile, tiles with textured surfaces, and floor tiles. For those you’ll need to rent a wet saw.

A wet saw, which you can rent, is especially use­ful when cutting nonvitreous or irregular tiles or trimming less than 1 in. off any tile. It cleanly cuts all tile types. To make U-shaped cuts around soap dishes and the like, make a series of parallel cuts with the wet saw before removing the waste with tile nippers.

Tile nippers allow you to cut out sections where tiles encounter faucet stems, toilet flanges, and the like. Nippers require some practice and lots of patience. Take small nibbles—use only part of the jaws—nibbling away from the sides of a cut into the center, gradually refining the cutout.

As you approach your final cut-lines, go slowly.

A carbide-tipped hole saw is perfect for cutting holes for faucet stems and pipe stubs. To be safe around pipes and water, use a cordless drill with this saw.

A handheld grinder with a diamond blade can cut curved lines in tile (make a series of shallow passes) or plunge cuts for holes in the middle of a tile. Be sure to stop the cuts short of your cut-lines and remove the waste with a pair of
nippers. Because a grinder is noisy and throws lots of dust, use it only outdoors, and wear a respirator mask and eye protection.

A utility knife scores cementitious backer board (which you snap like drywall), marks off tile joints in fresh mortar, cleans stray adhesive out of joints, and so on. However, if you’ve got much backer board to cut, instead use a handheld grinder with a diamond blade.

Keep tile from overheating and cracking as you drill by immers­ing it in a water-filled box just larger than the tile—build the box from scrap wood and caulk it so it won’t leak. If countertop tile is already installed, build a dam of plumber’s putty around it and add water before drilling. Mexican and other handmade tiles tend to crack when drilled without mortar support under­neath, so install them before drilling. To avoid electrical shocks, use a cordless drill.
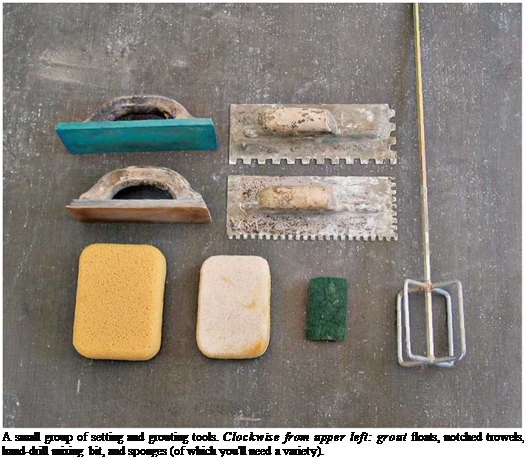
Подпись: A small group of setting and grouting tools. Clockwise from upper left: grout floats, notched trowels, hand-drill mixing bit, and sponges (of which you'll need a variety). 1111

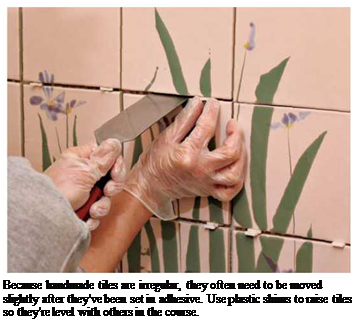
Подпись: Because handmade tiles are irregular, they often need to be moved slightly after they've been set in adhesive. Use plastic shims to raise tiles so they're level with others in the course.

Tiling

Tile surfaces arable,

and—if you’re patient—fairly easy to install. Yet although tile has a hard finish, the ultimate dura­bility of the installation depends on the integrity of what lies beneath.

Choosing Tile

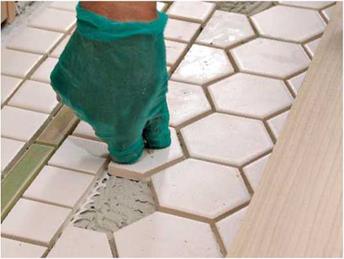
There’s a riot of tiles to choose from, including slate, white porcelain hexagonals, ruddy Mexican pavers, tumbled marble, glass mosaic, brick veneer, cast cement, limestone quarry tile embed­ded with fossils, and so on. You can even paint your own designs on unglazed tiles and then have them kiln-fired. Although some types of tile are better suited to certain uses than others, finding a tile you like is rarely a problem.

SEVEN TIPS FOR SELECTING TILE

► Where will you use it? Does it need to be waterproof? Does it need to withstand kitchenware?

► Sketch the area to be tiled. Include dimensions, fixtures, corners, odd jogs, and adjoining surfaces such as wood flooring or carpet. This sketch is a systematic first step in assembling a materials list.

► Choose a tile store with knowledgeable staff that will take the time to answer your questions. Plan to visit the shop on a weekday, which is likely to be less busy and thus a good time to get extra help. High-end tile stores have room mockups and may also have a Web site showing a wide selection of tiled kitchens and baths. Stores will also display many types of tile in 2 ft. sq. or 3 ft. sq. panels. Such visual expanses of tile convey much more than single-tile samples.

Подпись: ► If you like a particular tile, have your salesperson determine the manufacturer’s specs, which should tell you its suitability for various uses. For example, you wouldn’t want to install a wall-rated tile on a floor. ► At some point, reconcile the tiles you like with your budget. Some tile is breathtakingly Подпись: і ,6 : Щ, ; T/~ ^ FT? Hr Decorative and durable, tile can handle high humidity and heavy use-making it a great choice for kitchens and baths. A little Mexican, a little Moorish, this bathroom is always sunny.
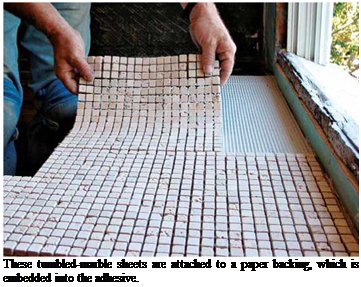
Подпись: These tumbled-marble sheets are attached to a paper backing, which is embedded into the adhesive. Подпись: Field and Trim Tileimage781image782expensive. Also check on availability. Will specially ordered tile arrive in time to meet your renovation schedule?
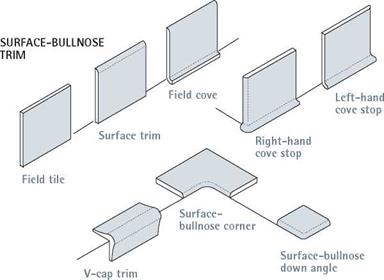
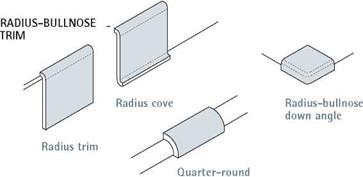
► Determine if trim tile is available for the pattern or type of field pattern you select. Trim tile is used to finish edges and corners and is especially important for counter installations.

► Test a tile sample at home. Here, you want to determine its suitability for your intended location by simulating actual use; for example, by scuffing it with shoes, banging it with pots, or dribbling it with water to check for absorption. Does the tile clean easily?

Color and size. In general, smaller tiles are bet­ter suited for small areas, such as counters. Larger tiles are more appropriate for larger areas, such as patio floors. Because light-colored tiles reflect more light, they make a room seem larger. Conversely, dark tiles make a room seem smaller. However, light colors tend to show dirt more readily. Vivid colors or busy designs can provide nice accents, but when used to cover large areas, they may seem overpowering.

Grout is a specialized mortar that seals the joints between tiles. Its color can make a big impact on the overall look. The closer the grout color matches the tile color, the more subdued and formal the surface. The more contrast between grout and tile, the busier, more festive, or more geometric the tile job will appear and the more it will highlight your tiling skill.

Manufactured vs. handmade. Mass-produced ceramic tile is popular because it has a clean classical look, and its uniform size makes it easy to install. Most smaller (й-in. to 2-in.) mass – produced tiles come evenly spaced and pre­mounted on paper sheets or fiberglass mesh, allowing you to simply to align the sheets’ edges.

image783

Trim tile is specially shaped to trim or finish off surface edges, corners, and the like and is thus distinguished from the main body of common, or field, tile. Trim tile is further classified as surface (or surface bullnose) and radius (or radius bullnose). Surface trim is essentially flat tile with one rounded edge. Radius trim, also known as quarter-round, curves dramatically to conceal the built-up bed on which it is set. Both types of trim include a range of specialty pieces that finish inside corners, outside corners, wall joints, and so on.

Подпись: PRO"ГIP Ask your tile supplier about appropriate adhesives each time you buy tile. The correct choice is not always obvious. Vitreous porcelain tile, for example, is not porous and so requires a strong, polymer-modified thinset. 1111 Подпись: Classic vitreous porcelain tile is widely used in bathrooms because it resists stains and sheds water.image784

Handmade tiles offer unique color and a handsome, handcrafted look. But these irregular tiles take greater patience and skill to lay out and install. Often handmade tiles need thinset adhe­sive applied to each back, as well as a thinset layer-troweled onto a setting bed. Because they are irregular, handmade may also need to be arranged with plastic spacers to align their edges with the underlying layout lines.

Sheet-mounted tiles. Some tile comes either face mounted or back mounted, typically on 12-in. by 12-in. sheets. You install face-mounted tiles by leaving the paper facing on till the adhe­sive dries. Then dampen the paper and remove it. Disadvantage: Paper facing obscures tile joints, making them tougher to align. Back-mounted sheets are easier to align, but the bond between the tile and the adhesive may be compromised slightly because the backing remains stuck in the adhesive.

Soundproofing

Most noise-related problems can be solved inex­pensively, without major architectural remedies. Basically, you can install materials that absorb sound or try to reduce the sound’s transmission by isolating it.

SOUND-ABSORBING MATERIALS

Within a room, use materials that absorb sound. Absorbent materials are often soft, porous, or bulky, such as carpet, cork, cloth drapes, furni­ture, or a shelf full of books. Conversely, avoid hard, highly finished surfaces that reflect soundwaves.

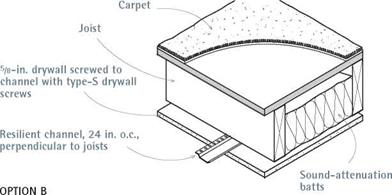
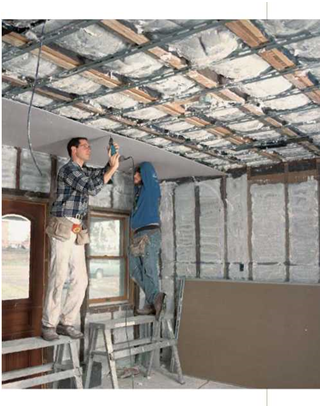
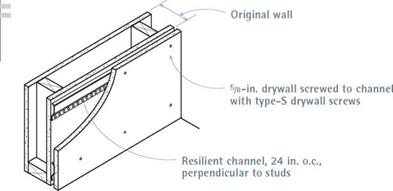
Fiberglass batts stapled between wall studs and ceiling joists are perhaps the most common means of absorbing sound. Two layers of 58-in. drywall, 358 in. of fiberglass, and the air trapped in the wall will muffle sound effectively. You can also insulate between ceiling joists with fiber­glass batts, nail up resilient channels, and then attach 58-in. drywall to the channels with 154-in. type-S drywall screws. Metal resilient channels are commonly used to hang ceilings and even walls. The resilient channel allows the surface to float, so it can move imperceptibly as sound­waves strike it.

A less common option is cellulose and mineral fibers troweled or sprayed onto walls and ceil­ings, somewhat like an acoustical plaster—the thicker the better. By using a special sprayer, you can apply these compounds up to 3 in. thick. Rigid-foam insulation panels are another option, but because the panels must be carefully fit and caulked to stud and joist bays, most installers opt for friction-fit fiberglass batts instead.

ISOLATING SOUND

Isolating sound, such as constructing double walls, generally takes more work and expense.

In addition, wherever sound can be transmitted through the building structure, you should add resilient materials.

If you have a central hot-air heating system, fans can be annoying sources of noise, causing vibration along ductwork. In this case, try to

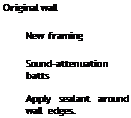
image775Подпись: OPTION A To reduce sound transmission through an existing wall, attach resilient channel and a layer of 5/8-in. drywall. image776Подпись: Deaden noise between floors by carpeting the floor, insulating between joists, and installing a ceiling of resilient channel and drywall underneath. For optimal sound deadening, insulate with special sound-attenuation batts.Подпись: Original wall New framing Sound-attenuation batts Apply sealant around wall edges. Подпись: 5/8-in. drywallПодпись: 1/2—in. cut through subflooring interrupts sound path.Подпись: OPTION C Double walls with discontinuous flooring is effective but eats up living space.

image777

Options for Deadening Sound

attach flexible collars (neoprene or canvas) to isolate ductwork vibration. Likewise, if your bedroom is plagued by a noisy fan in a heating system, you can reduce the noise either by remounting or replacing the fan or by packing insulation where the ductwork passes through a wall.

Double walls effectively isolate sound, but they require a lot of material and dramatically reduce room space. To further deaden (and literally cut off) the transmission of sound, say, between floors and walls, you can also cut a kerf through the flooring and subflooring between two walls. The kerf should stop short of the floor joists, however. (^) Note: If either of the double walls contains electrical outlets, turn off the elec­tricity and check with a voltage tester before cut­ting such a kerf.

Resilient neoprene or foam-rubber pads above the stud-wall top plates and below the sole plates can further deaden sound transmission. Any opening in a wall will allow sound to enter. If you need an extremely quiet room, minimize the number of doors and windows, and weatherstrip them. Installing weatherstripping gaskets around interior doors also cuts sound. Finally, minimize the openings that run through walls, such as ducts, back-to-back electrical outlets, and so on.

Soundproofing

RESTORING PLASTERWORK

Think twice before trying to restore damaged crown molding, medallions, or other plaster ceil­ing ornaments. Plastic or composite reproductions of plaster elements are good-looking, lightweight, easy to install and—once painted—indistinguish­able from plaster ornaments. Given the hourly rates of a skilled plasterer, replacing plaster with plastic repros is often more cost-effective.

However, if your plaster ornament has a repet­itive pattern with only a few damaged sections, you can cast replacement sections by creating a mold from an original, undamaged section.

Removing an ornamental section. If you want to make a casting, you need to remove an undamaged ornamental section. First, support the section that you will remove. To do this, posi­tion a 2×4 tee, its head covered with rubberized floor padding, under the ornament to cushion and protect its delicate details. Then use a circu­lar saw with a carborundum blade or a recipro­cating saw with an 18-teeth-per-inch (TPI), bimetal demolition blade to cut around the sec­tion. The section should include a complete pat­tern repeat plus 2 in. on each end to allow for some damage when you remove the piece. This is dusty work and you’re sure to hit nails, so wear a respirator mask and goggles.

О Note: There may well be wires or pipes run­ning through the ceiling, so explore beforehand after turning off the electricity to the area. In many cases, ceiling joists will be exposed in the attic above. Plan cuts so they miss wires and pipes. Replacing the section will be easier if you don’t cut through the lath, but that’s sometimes impossible to avoid. After cutting around the sec­tion, you can often slide a chisel behind it, and try to break off the plaster keyed into lath spaces.

Casting replacement sections. To reproduce replacement sections, you must first create a mold. After you’ve removed an original section in good condition, use a toothbrush to remove flak­ing paint; then repair any small damage with plaster of paris. Shellac the section so its surface will be slick. Then let it dry.

Casting Larger I Replacement Molding

image773

When a repetitive plaster pattern is damaged, replace damaged sections with castings made from sections that are intact.

image774Подпись: YOUR FINGERSПодпись: To mix plaster, pour it into water as you wiggle your fingers in the bottom of the pan. Mixed that way, the plaster will set slowly and will be usable longer. If you pour water into plaster, on the other hand, it will start setting within 5 minutes. Plaster is easier to clean up if you mix it in a plastic tub. Allow it to dry, and then strike or twist the bottom of the tub to make the plaster fall out in chunks. To make the mold, paint on a coat of RTV rub­ber and allow it to dry. Thereafter, alternate strips of cheesecloth and rubber, allowing each RTV – and-cloth layer to dry before applying the next coat. Three or four layers should give you a mold that’s sturdy enough. When the final coat is dry, peel the RTV mold off the original plaster sec­tion, and pour a new casting into the mold.
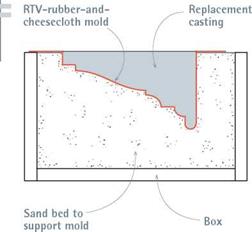
Here are some thoughts on casting materials. Although plaster is a suitable casting material, it’s heavy. If the original object is large—for example, a ceiling medallion—consider casting with a lightweight polymer like polyurethane or poly­styrene, which won’t shrink, paints well, and is available in different densities. Or you may need to support the mold in a bed of sand, so the new casting material doesn’t distort the mold. For such larger casts, fill a large enough box with sand, and—before peeling the mold from the original plaster section—press the mold into the sand. Then lift out the mold, and peel the rubber carefully from the original plaster. Return the empty mold into the impression it made in the sand. Pour the new plaster (or polymer), and level it off to the top of the mold. When the cast­ing is completely dry, lift it and the mold out of the box, and peel off the mold.

Installing new castings. Once you have cast replacement sections, measure both the damaged and replacement sections carefully so the repeti­tive pattern will match exactly when you install each replacement section. Then cut out the dam­aged ceiling sections, leaving the lath intact and being careful to cut the ends as cleanly and squarely as possible.

Before cutting the new casting to length, mini­mize fragmentation by first scoring the cutting line with a utility knife and then cutting with a fine-toothed hacksaw.

How you attach the replacement piece depends on its composition. If your casting is plaster, use Durabond 90 quick-setting com­pound to adhere the plaster ornament to the lath. Dampen the replacement piece so it doesn’t leach moisture from the Durabond, and use the 2×4 tee to support it till the compound sets—about 90 minutes. For good measure, predrill holes at a slight angle, every 10 in. along the edge of the casting to receive drywall screws with plaster washers. But if your replacement casting is a lightweight polymer, you won’t need screws. A few beads of construction adhesive or white glue will do the job. Before setting the replacement piece, dry-fit it to make sure it’s the same thick­ness as the old plaster; you may need to build it up slightly. Last, fill the cracks or flaws where the new sections join old, before painting the restored ornaments.

SMALL REPAIRS

Small cracks or holes in plaster can be filled with patching plaster or a setting-type joint compound such as Durabond 90, which sets in 90 minutes. Because joint compound is softer, sands easily, and sets slower than patching plaster, it’s easier to work with. Setting-type joint compounds (also known as hot mud) are also better for patching than drying-type joint compounds, which just aren’t as strong. Note: To ensure a good bond, strip paint from the surfaces you’re patching and sand the adjacent areas lightly before applying compound.

Small cracks in plaster are repaired by stripping surface paint, cleaning loose plaster, and under­cutting the cracks slightly with a knife or a small, sharp-pointed lever-type can opener (also called a "church key”) Undercutting allows the patching material to harden and form a key that won’t fall out. Before patching, wet the exposed plaster well and brush on a PVA (polyvinyl acetate) bon­der such as Plasterweld® or Elmer’s White Glue® to bond the patch to the old plaster.

Over the crack, stretch a length of self-adhering fiberglass mesh. Then use a taping knife to spread the patching material into the crack. Leave the first coat of joint compound a little rough so the second adheres better. After lightly sanding the
first coat, apply the second, feathering it out to blend-in the patch’s edges.

When the patch dries, sand it lightly with fine, 220-grit sandpaper, wipe it clean, allow it to dry thoroughly, and prime the patch with an oil – based primer.

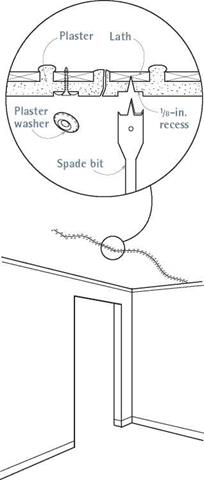
Large cracks often accompany sections of bowed or sagging plaster, which have pulled free from the lath behind. If the plaster is sound— not crumbling—you can reattach it to the lath using type-W drywall screws and plaster washers, which fit under the heads of the screws. A screw gun is good for this operation.

However, before you attach the screws, mark their locations on the plaster, and use a spade bit to countersink a hole ‘/ in. deep for each washer.

Sunk below the surface of the plaster, the screw heads and washers will be easy to cover with patching compound.

Place screws and washers every 8 in. to ‘0 in. on both sides of the crack and anywhere else the plaster seems springy and disconnected from the lath. Once you’ve stabilized the crack in this man­ner, scrape, tape, and fill it, as described earlier.

Small holes the size of a removed electrical out­let are easy to fill if the lath is still in place. Remove any loose plaster, brush out the debris, wet the lath and the surrounding plaster well, brush on a PVA bonder, and trowel in patching material. Leave the first coat a little rough, let it dry well, and apply bonder again before trowel­ing in a second, smooth coat.

Patching I Cracked Plaster

image770

Cracked plaster often means that it has pulled free from its lath. Use screws and plaster washers to reattach it, countersinking them so they’ll be easier to patch.

Patching Holes I in Plaster

image771

image772

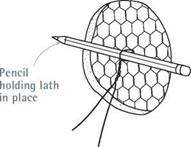
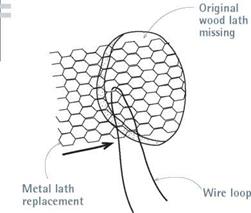
If plaster lath has been cut out, replace it before patching the hole. Insert and secure a small section of wire lath with a wire looped around a pencil, as shown. Twirl the pencil to draw the wire lath tight to the back of the plaster, then fill the hole with two coats of patching plaster. Unwind the wire and snip it when the first coat is hard.

If the hole has no lath behind it, you’ll need to add some. Scrape the loose plaster from the edge of the hole. As shown in "Patching Holes in Plaster,” on p. 373, cut a piece of metal lath larger than the hole and loop a short piece of wire through the middle of the lath. Then, holding the ends of the wire, slide the lath into the hole. To pull the lath tight against the back of the hole, insert a pencil into the front of the loop and turn the pencil like an airplane propeller until the wire is taut. The pencil spanning the hole holds the lath in place.

After wetting the lath and surrounding plaster, spread a rough coat of compound into the hole. When the coat has set, unwind the wire, remove the pencil, and push the wire into the wall cavity. The hardened plaster will hold the metal lath in place. Trowel on the finish coat.

Large holes with lath intact should be partially patched with a piece of drywall slightly smaller than the hole. Because a hole with square corners is easier to patch than an irregular one, square up the edges of plaster, using a chisel or a Dremel tool with an abrasive wheel. (Wear goggles.) Be careful not to cut through the lath. Use type-W drywall screws to attach the drywall to the lath behind, stretch self-adhering fiberglass mesh tape around the perimeter of the patch, and apply joint compound or patching plaster as described earlier. For best results, the drywall should be slightly thinner than the existing plaster, so you have some room to build up and feather out the patch.

As an alternative, pegboard is a dandy sub­strate for such patches because you can cut it easily with a jigsaw to fit irregular holes. Hold a sheet of!4-in. pegboard over the plaster, eyeball and trace the shape of the patch through the holes in the pegboard, and screw the pegboard to the lath—textured side out. The patching plaster will ooze through the holes in the pegboard and harden in the same manner that plaster keys into the spaces between lath strips.

Texturing Drywall and Plaster

Joint compound is a marvelous medium for texturing a drywall patch or matching the texture of existing plaster. All that’s needed is a little ingenuity.

► For a stippled plaster look, place joint compound in a paint tray, thin it with water till it is the consistency of thick whipping cream, and roll it onto the wall or ceiling using a stippled roller. Don’t over-roll the compound, or you’ll flatten the stipples.

► Create an irregular "splatter" texture by thinning the compound to a heavy-cream consistency, sucking it into a turkey baster and squirting it onto the wall.

► For an open-pore, orange-peel look, use a stiff-bristle brush or whisk broom to jab compound that is just starting to dry. Jab lightly and keep the bristles clean.

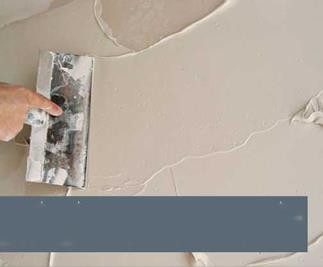
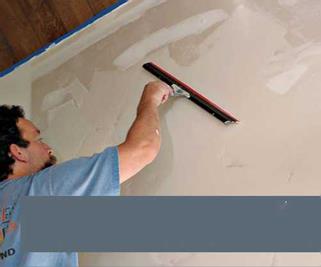
► To achieve the flat but hand-tooled look of real plaster, apply the compound in short, intersecting arcs. Then knock down the high spots with a rubber-edged Magic Trowel®, as shown.

► If you’re trying to duplicate a slightly grainy but highly finished plaster surface, trowel on the topping coat as smoothly as possible and allow it to dry. Then mist the surface slightly and rub it gently with a rubber-edged grout float.

Подпись: Before the compound starts to set, use a rubber-faced Magic Trowel to knock down high spots and partially smooth out the knife marks. The trowel should glide. Unload excess compound into your mud tray after each pass, and sponge the rubber edge clean every four or five passes.

You can achieve the irregular, hand-tooled look of plaster by covering drywall with joint compound applied in tight, intersecting arcs. Because of its crack-resistance, use 90-minute or 120-minutes setting-type compound. It’s okay if the drywall isn’t completely covered.

I

PLASTERING

image766

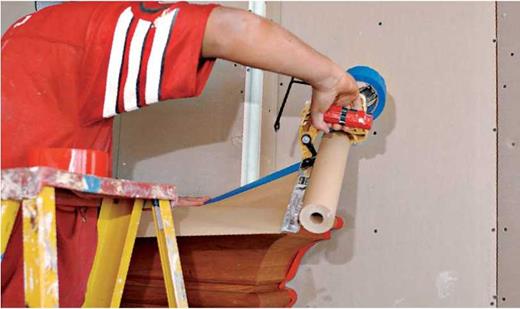
1. If casing, baseboards, or floors are already installed, cover them with paper and tape to protect them from plaster splatters.

image767 image768

Подпись:

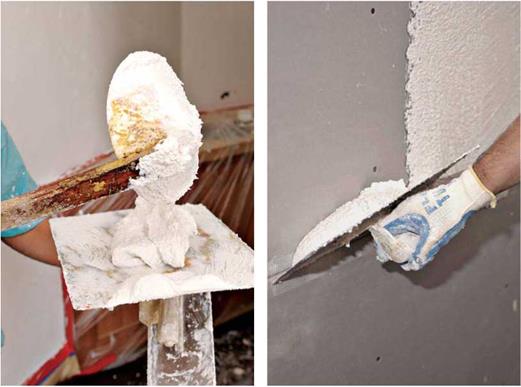
2. Mix the plaster to the consistency of soft – serve ice cream before ladling it onto a mason’s hawk. For skim-coat plaster, follow the manufacturer’s mixing instructions, which typically recommend adding 12 qt. to 15 qt. of water for each 50-lb. bag of plaster.

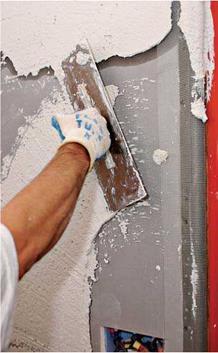
3. To prevent cracking, cover blueboard seams with self-adhering mesh tape. Load your trowel from the hawk and…

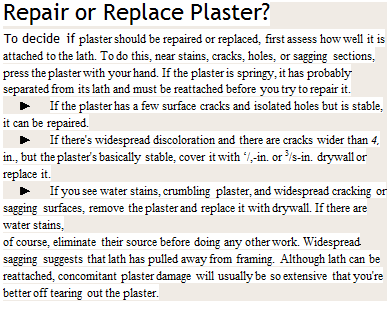
Подпись: Repair or Replace Plaster? To decide if plaster should be repaired or replaced, first assess how well it is attached to the lath. To do this, near stains, cracks, holes, or sagging sections, press the plaster with your hand. If the plaster is springy, it has probably separated from its lath and must be reattached before you try to repair it. ► If the plaster has a few surface cracks and isolated holes but is stable, it can be repaired. ► If there's widespread discoloration and there are cracks wider than 4, in., but the plaster's basically stable, cover it with ‘/,-in. or 3/s-in. drywall or replace it. ► If you see water stains, crumbling plaster, and widespread cracking or sagging surfaces, remove the plaster and replace it with drywall. If there are water stains, of course, eliminate their source before doing any other work. Widespread sagging suggests that lath has pulled away from framing. Although lath can be reattached, concomitant plaster damage will usually be so extensive that you're better off tearing out the plaster.

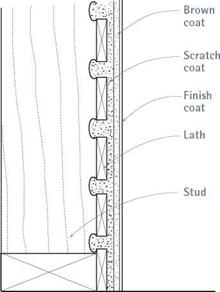
the gaps in the lath and becomes a mechanical key when it hardens.

3. Trowel on, then roughen the brown coat after it has set slightly.

4. Trowel on a finish, or white coat, which becomes the final, smooth surface.

In the old days, plasterers often mixed animal hair into scratch and brown coats to help them adhere. Thus old plaster that’s being demolished is nasty stuff to breathe. The finish coat was usu­ally a mixture of gauging plaster and lime, for uniformity. Scratch coats and brown coats were left rough and were often scratched with a plas­terer’s comb before they set completely, so the next coat would have grooves to adhere to. Finish coats were quite thin (Иб in.) and very hard.

Lath can be a clue to a house’s age. The earli­est wood lath was split from a single board so that, when the board was pulled apart (side to side), it expanded like an accordion. Although metal lath was available by the late 1800s (it was patented in England a century earlier), split wood lath persisted because it could be fashioned on-site with little more than a hatchet. By 1900, however, most plasterers had switched from lime plaster to gypsum plaster, which dried much more quickly. And about the same time, plasterers began using small paper-coated panels of gypsum instead of wood or metal lath. Called gypsum lath or rock lath, the panels were so easy to install that they dominated the market by the 1930s. But time and techniques march on. As mentioned earlier, after World War II, drywall all but replaced plaster as a residential surface.

I Keying Plaster to Wood

image769

This plaster cross section shows how the scratch coat of plaster oozes through the lath and hardens to form keys, the mechanical connection of plaster to wood.

TAPING AND FINISHING

To finish drywall, seal the panel joints with tape or cornerbead, then cover them with joint com­pound. Typically, three coats of compound are applied in successively wider coats and sanded after each application. The first coat, usually a high-strength taping compound, embeds the tape. The second coat should be a thin layer of topping compound or all-purpose compound that you feather out to hide the joints. With the third coat, you feather out the compound farther, creating a smooth, finished surface. (See "Joint Compounds,” on p. 358, for more about these materials.)

First coat. Fill nail holes or screw dimples in an X pattern: One diagonal knife stroke applies the compound, and the other stroke removes the excess.

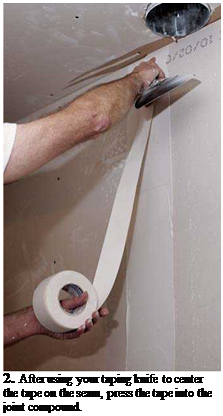
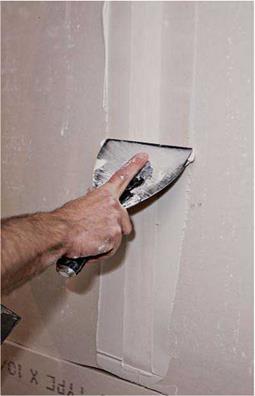
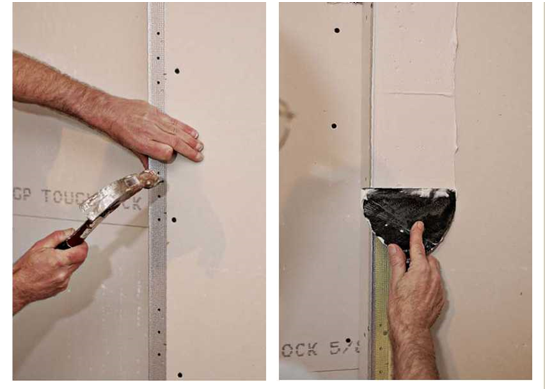
If you use paper tape on the joints, apply a swath of taping compound about 4 in. wide down the center of the joint. Press the tape into the 1. Before applying paper tape, cover the seam

center of the joint with a 6-in. taping knife. Then with an generous bed of joint compound apply compound over the tape, bearing down so you remove the excess.

If you use self-sticking mesh tape, stick it directly over the joint and apply the bedding compound over it. In other words, don’t apply a bed of compound first. Mesh tape must be bedded in setting-type compound, as explained earlier in this chapter.

AN ORDERLY

All that raw drywall can seem a bit overwhelm­ing, so here’s a taping and mudding sequence that starts easy, so you can become comfortable with the tools and materials:

► Screw and nail holes

► Bevel-edge joints (the long edges of panels)

► Butt-edge joints

► Outside corners

► Inside corners.

Подпись: 2. After using your taping knife to center the tape on the seam, press the tape into the joint compound. Подпись: JRLY Finish M *>лл**» ч АІІЛШІІІЧЛІ m Подпись: 3. After applying a layer of compound over the tape, remove the excess. If the tape moves, you're pressing too hard or your taping knife needs to be cleaned. (Steps continue on next page.)Подпись: PROTIP Apply joint compound generously. Without enough mud, the tape won't stick. But as you feather out the wet mud, scrape off excess; sanding off dried globs later would be tedious and time consuming. 1111 image758Have a pail of clean water and a sponge handy so you can rinse your taping knives periodically. They glide better if they’re clean. Keep the job site clean, too: If you drop a glob of compound on the floor, scrape it up and discard it so you don’t track it around the house.
TAPING AND FINISHING

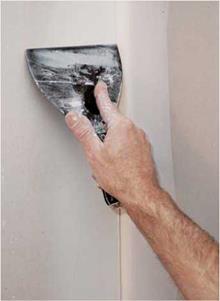
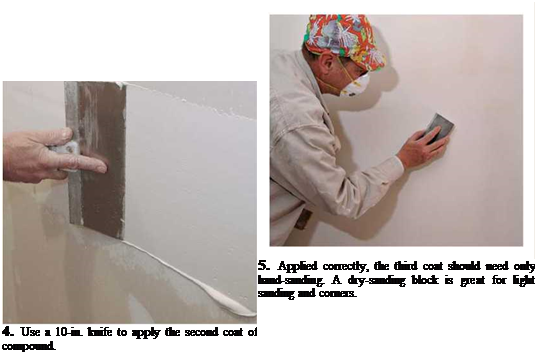
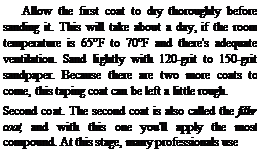
Подпись: Allow the first coat to dry thoroughly before sanding it. This will take about a day, if the room temperature is 65°F to 70°F and there's adequate ventilation. Sand lightly with 120-grit to 150-grit sandpaper. Because there are two more coats to come, this taping coat can be left a little rough. Second coat. The second coat is also called the filler coat, and with this one you'll apply the most compound. At this stage, many professionals use Подпись: The Art of Inside CornersПодпись: Use paper tape for inside corners. After applying a bed of compound to both surfaces, crease the tape, and place it in the corner. Then use a double-edged corner knife to press the tape into the compound before spreading a second layer of compound over the tape. Some pros snort at corner knives, preferring to use a flat 6-in. taping knife to press tape into compound, one edge at a time. When feathering- out joint compound, pros allow the compound to dry on one side of the corner before working on the adja-cent surface. In other words, "Never run wet mud into wet mud." image761a 10-in.-wide taping joint knife and feather out the seams roughly 8 in. to 10 in. wide. After applying the compound, smooth it out with an even wider blade—say, a 14-in. trowel.

As you’ll learn when working with joint com­pound, the lower the angle of the blade and the less pressure, the easier it is to smooth and feather (spread out) the mud. The greater the angle and pressure, the more compound you’ll remove.

This is easier to do than explain. Because butt – end joints are not beveled, they’ll mound slightly at the center of the seam. That’s okay. Use a 10-in. taping knife to build up the compound on both sides of the joint, feather out the edges, and then smooth the center. Consequently, butt-end joints may need to be wider than bevel-edge joints.

You may often need to feather butt-end joints 16 in. to 20 in. wide.

When this second coat is dry, sand with 150-grit to 220-grit paper. A pole sander will extend your reach and enable you to sand longer without tiring, but don’t sand too aggressively or you’ll abrade the paper face or expose the tape. Easy does it.

Third coat. The third coat is the last chance to feather out the edges, so use a premixed, all­purpose, drying-type compound, which is easy to thin out and sand because it has a fine consistency and dries quickly. Although premixed compound will be the right consistency, it’s okay to add a little water to thin it even more.

Because the third coat is only slightly wider (2 in.) than the second coat, you’ll be applying a relatively small amount of compound. Use a 12-in. trowel, with a light touch. Some pros thin this coat enough to apply it with a roller, and then smooth it with a trowel, so there are no trowel marks when they’re done.

image762"Подпись: MOPПодпись: TAPING TOOLSПодпись: hanicalimage763

Hand-sand the final coat, using fine, 220-grit sandpaper or a very fine sanding block. Shining a strong light on surfaces will highlight the imper­fections you need to sand.

Wrap up. If you intend to texture the surfaces, the third coat doesn’t need to be mirror smooth. Even so, don’t scrimp on the second coat, or else the joints may be visible through the texture

To give yourself the greatest number of deco­rating options in the future, paint the finished drywall surface with a coat of flat, oil-based primer. It will seal the paper face of the drywall and provide an excellent base for any kind of paint or wall covering.

DRYWALL REPAIRS

To keep solutions concise, let’s divide drywall repairs into four groups: nail pops and surface blemishes; fist-size holes through the drywall; larger holes; and discolored, crumbling, or moldy drywall. Any repair patches should be the same thickness as the damaged drywall.

Popped nails and screws are generally a quick fix: Drive another nail or screw 1 h in. away from the popped one to secure the drywall. If it’s a popped screw, remove it and fill the hole. Cover both the old hole and the new screw with at least two coats of joint compound. If it’s a popped nail, don’t try to remove it; drive it slightly deeper to dimple the drywall.

When a piece of drywall tape lifts, pull gently until you reach a section that’s still well stuck. Use a utility knife to cut free the loose tape, cover the exposed seams with self-sticking mesh tape, and apply two or three coats of compound—sanding lightly after each. Drywall repair kits with precut patches are available at most home centers.

To repair drywall cracks, cut back the edges of the crack slightly to remove crumbly gypsum and provide a good depression for a new filling of joint compound. Any time the paper face of dry – wall is damaged, cover the damaged area with self-adhering fiberglass mesh tape. Then apply three coats of joint compound. Because the repair area is small, it doesn’t matter what type of compound you use, though setting-type com­pounds are preferred.

Small holes in drywall are often caused by doorknobs, furniture, or removed electrical out­let boxes. Clean up the edge of the hole so the surface is flat. Then cover the hole with self­adhering fiberglass mesh tape. (Better drywall repair kits have metal-and-fiberglass mesh tape.) Use a light touch when applying the first coat of joint compound, pushing the mud through the tape, but don’t press so hard that you dislodge the mesh.

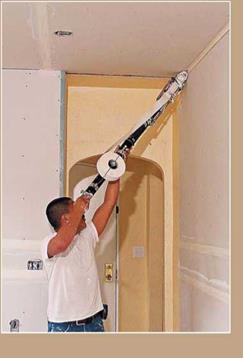
Mechanical drywall taping tools are commonly referred to as Bazooka® tools, after a popular brand, and they can be rented, usually for 2 weeks at a stretch. The suite of tools includes a taper that applies tape and com­pound simultaneously, as well as finishing tools, various head attachments, and flat boxes for taping seams.

These tools are great for larger jobs, creating uniform, flat surfaces that need little sanding. "You can put tape and mud up almost as fast as you can run," notes one pro. Most rental com­panies supply a video on how to use these tools, but taking a class in addition isn’t a bad idea.

Give the repair three coats of compound, feath­ering out the edges as you go. Take it easy when sanding. Especially after the first coat, the tape frays easily. By the way, there are precut drywall patches for electrical outlet boxes, which save time.

Large holes should be cut back till you reach solid drywall. Because mesh tape and compound will probably sag if the hole is much wider than 4 in., holes larger than that should be filled with a patch of drywall roughly the size of the dam­aged area. These patches need to be backed with something solid, so they’ll stay put.

The easiest backing is a couple of furring strips cut about 8 in. longer than the width of the hole and placed on both sides of the hole. To install each furring strip, slide it into the hole and, while holding it in place with one hand, screw through the drywall into the wood. Screws will pull the furring strips tight to the back of the drywall. Then cut the drywall patch, place it in the cutout area, and screw it to the strapping.

Cover the edges of the drywall patch with self­adhering mesh tape, fill the screw holes, and apply joint compound—three coats in all. Here, a setting-type compound, such as Durabond® 90, is a good bet because it dries quickly and is unlikely to sag. The more skillfully you feather the compound, the less visible the patch will be.

For holes larger than 8 in., cut back to the centers of the nearest studs. Although you should

Подпись: Drywall seams that coincide with door or window openings are likely to crack, vertically. That's merely a cosmetic problem. But large cracks running diagonally from the corners of windows or doors (inside or out) may be caused by foundation settling—a problem worth a closer look, perhaps by a structural engineer. For more information, see Chapter 1. 1111 image764image765

have no problem screwing a replacement piece to the studs, be sure to back the top and the bottom of the new piece. The best way to install backing is to screw drywall gussets (supports) to the back of the existing drywall. Then position the replace­ment piece in the hole and screw it to the gussets, using drywall screws, of course.

Discolored, crumbling, or moldy drywall is

caused by exterior leaks or excessive interior moisture. Be sure to attend to those causes before repairing the drywall. Excessive moisture is often due to inadequate ventilation, which is especially common in kitchens and baths. Leaks around windows and doors are often caused by inadequate flashing over openings.

If the drywall is discolored but solid, and if you’ve remedied the moisture source, wash the area with soap and water, allow it to dry thor­oughly, and prime it with white pigmented shel­lac or some other stain-resistant primer. The same solution works for minor mold on sound drywall.

However, if there’s widespread mold and the drywall’s crumbling, there’s probably extensive mold growing inside the walls. You’ll need to rip

out the drywall and correct the moisture prob­lems before replacing finish surfaces. In extreme cases, you’ll need to replace the framing. Chapter 14 covers mold abatement at greater length.

Plastering

This section is limited to plaster repairs because applying plaster takes years to master. The tools needed for plaster repair are much the same as those needed for drywall repair: a screw gun or cordless drill; 6-in. and 12-in. taping knives; a mason’s hawk; and a respirator mask, if you’ll be removing or cutting into plaster. There’s a lot of grit, so wear goggles, too. The tools and tech­niques for plaster are similar those needed for stucco, discussed in Chapter 7.

ANATOMY OF A PLASTER JOB

Traditional plastering has several steps:

1. Nail the lath to the framing.

2. Trowel a scratch coat of plaster onto the lath. The wet plaster of this coat oozes through

Drywall over Plaster

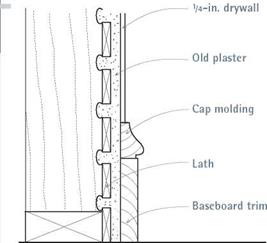
Подпись: Trim Considerationsimage746"Подпись: New drywall over old plaster can reduce the visible profile of existing molding it abuts so much that the molding looks undersize. In this case, you have two alternatives: Use molding to build up (increase the thickness of) trim where drywall abuts it. Or remove the trim and reinstall it over the drywall.Drywalling over plaster is a cost-effective way to deal with plaster that’s too dingy and deteriorated to patch or too much trouble to tear out. But this requires some important prep work.
► If you see discoloration or water damage, repair the cause of the leak or excessive indoor moisture before attaching drywall.

► Locate ceiling joists or studs behind the plaster. Typically, framing is spaced 16 in. or 24 in. on center, but you never know with older houses.

If ceiling joists are exposed in the attic above, your task is simple; otherwise, use a stud finder or drill exploratory holes. Once you’ve located the joists or studs, snap chalklines to indicate the centerlines you’ll screw the drywall into.

► Use screws and plaster washers to reattach loose or sagging plaster sections before you install drywall. To minimize the number of such fasteners, apply adhesive to the back face of the drywall, and be sure the screws grab framing—not just lath. Plaster washers are shown on p. 373.

► For ceilings, use 2-in. type-W drywall screws, which should be long enough to penetrate 3/s-in. drywall, 1 in. of plaster and lath, and 5/s in. into joists. On walls, ‘/4-in. drywall is a better choice because drywall sagging

is not an issue, and thin drywall doesn’t reduce the visible profile of existing trim as much. Otherwise, you may either need to build up existing trim or remove the trim and reinstall it over the drywall.

► If there’s living space above the plaster ceiling, attaching resilient channel may be a good move. These channels bridge surface irregularities and deaden sound. Screw the channels perpendicular to the joists. Then screw drywall panels perpendicular to the channels (see the photo on p. 376).

CUTTING DRYWALL

Drywall over Plaster

image747

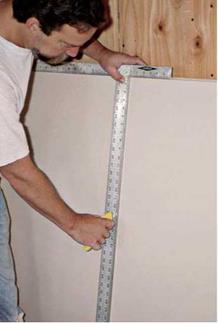
1. In one pass, score the paper face of the panel using a utility knife guided by a drywall T-square.


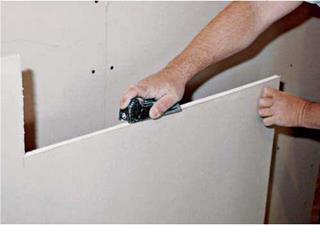
2. Snap the panel sharply away from the face cut (here hidden), to break the gypsum core along the scored line. Then cut through the paper backing along the break.


image749

3. If the cut is rough, clean it up with a drywall rasp.


image748

image750

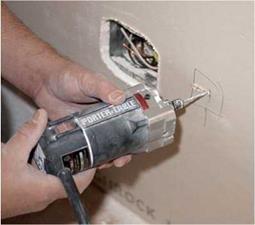
A drywall router quickly cuts out holes around outlet boxes. Beforehand, shut off the electricity to that circuit, and tuck wires well into the box so they can’t get nicked.

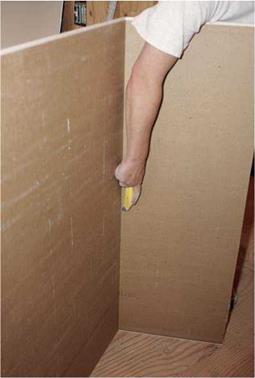
can use them like a workbench, cutting them in place.

Start by tearing off the end papers that join pairs of panels face to face, allowing you to move panels individually. In this manner, you’ll cut every other panel from the back.

Most professionals would rather score the front face first, but it doesn’t truly matter which side you cut first, as long as your blade is sharp, your snap is clean, and you don’t rip or snag the paper on the front face.

If the gypsum edge is a bit rough or the panel is a little long, clean up the edge with a drywall rasp. But be careful not to fray the face paper.

Outlet box, switch, and duct cutouts can be

made before or after you hang the drywall.

To make cuts before, measure from a fixed point nearby—from the floor or a stud, for example— and transfer those height and width measure­ments to the panel. A framing square resting on the floor is perfect for marking electrical recepta­cles. That done, use a drywall saw to punch through the face of the panel and cut out the opening, being careful not to rip the paper facing as you near the end of the cut.

That’s one way to do it. Problem is, the cutout rarely lines up exactly to the box.

Using a drywall router is quicker and more accurate. О e the power is off

and push any electrical wires well down into the box so the router bit can’t nick them. The router bit should extend only!4 in. beyond the back of the drywall.

Next, measure from a nearby stud or the floor to the (approximate) center of the box, and trans­fer that mark to the drywall. Then tack up the panel with just a few nails or screws—well away from the lumber the box is attached to. Gently push the spinning bit through the drywall and move it slowly to one side till you hit an edge of the box. Pull out the bit, lift it over the edge of the box, and then guide the bit around the outside of the box, in a counterclockwise direction. This method takes a light touch—plastic boxes gouge easily—but it’s fast and the opening will fit the box like a glove.

ATTACHING DRYWALL

Most professionals use drywall screws exclusive­ly, although some use a few nails along the edges to tack up a panel temporarily. Corner bead is often nailed up, too.

When attaching drywall, push the panel firm­ly against the framing before driving in the screw. Fasteners must securely lodge in a framing mem­ber. If a screw misses the joist or stud, remove the screw, dimple (indent) the surface around the hole, and fill it later.

The screw (or nail) head should sink just below the surface of the panel, without crushing the gypsum core or breaking face paper. You will later fill the resulting dimple with joint compound.

A Ripping GOOD TIME

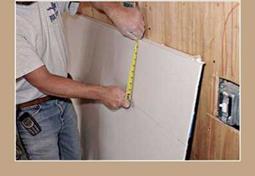
Cutting along the length of a drywall panel— ripping a panel—is fast and easy if you know how. Extend a tape measure the amount you want to cut from the panel. If you’re right-handed, lightly pinch the tape between the index finger and thumb of your left hand to keep the tape from retracting. Your right hand holds the utility – knife blade against the tape’s hook. Using your left index finger as a guide along the edge of the panel, pull both hands toward you evenly as you walk backward along the panel. Remember, the blade needs only to score the paper, not pene­trate the core, so relax and keep moving.

image751

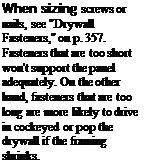
Подпись: When sizing screws or nails, see "Drywall Fasteners," on p. 357. Fasteners that are too short won't support the panel adequately. On the other hand, fasteners that are too long are more likely to drive in cockeyed or pop the drywall if the framing shrinks. 1111

Fastener Spacing

FRAMING

MEMBERS

FRAMING

SPACING

MAXIMUM

FASTENER

FRAMING*

Ceiling joists

16 in. o. c.

12 in.

24 in. o. c.

10 in.

Wall studs

16 in. o. c.

16 in.

24 in. o. c.

16 in.

* Fasteners should not be closer than 3k in. to the panel’s edge.

Screws are generally spaced every 12 in. along panel edges and "in the field,” for ceiling joists or studs 16 in. on center. Drywall edges are a bit fragile, so place screws back at least % in. from the edges. Where butt edges meet over framing, space screws every 8 in. along both sides of the butt joint.

Screws driven in crooked don’t hold as well, are more likely to tear the face paper, and can be tricky to fill with compound. That said, you sometimes need to angle screws slightly when securing both sides of a butt joint to a shared stud or joist. Just go easy.

Nails follow the spacing guidelines in "Fastener Spacing,” except that you should double-nail in the field. Paired nails are 1T2 in. to 2 in. apart, so the center of each pair of nails is spaced every 16 in. on wall panels. Along panel edges, do not double-nail. Instead, space single nails every 8 in. For best holding, use ring-shank nails.

Adhesives are most often used to affix drywall where nails or screws can’t—say, over concrete— but it’s sometimes used in tandem with them. Adhesive applied to wood studs allows you to bridge minor irregularities and to use about one – third the number of fasteners. And adhesive cre­ates a stronger bond than screws or nails alone.

Because adhesive adds a step and requires 48 hours to dry before you can tape the joints, it’s usually more practical to use adhesive only on butt joints. Apply two parallel 18-in. beads of adhesive down the middle of the joist or stud edge. Don’t make wavy, serpentine beads because that allows adhesive to ooze out onto the dry – wall’s back face, wasting adhesive. On such glued butt joints, space screws every 10 in. to 12 in. on both sides of the joint.

If you’re applying a second sheet of drywall over a first, you can apply construction adhesive or roll-on thinned joint compound. Myron Ferguson’s excellent book Drywall (The Taunton Press), discusses adhesives at greater length.

TIP

Mark joist centers onto the top of the wall plates before you install the first ceiling panel. That will enable you to sink screws into the joist centers when they’re covered by drywall. The pencil marks will also help you align screws across the panel, simply by eyeballing from those first screws to the uncov­ered joists on the other side.

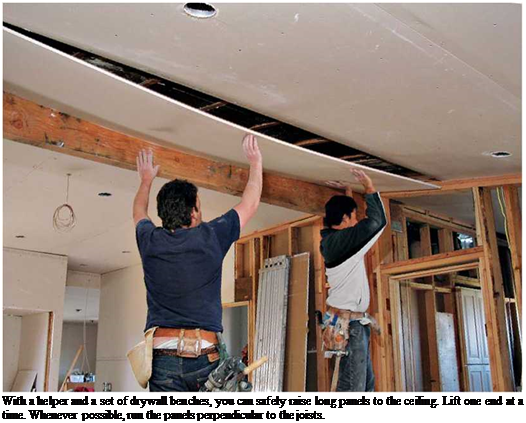
Подпись: With a helper and a set of drywall benches, you can safely raise long panels to the ceiling. Lift one end at a time. Whenever possible, run the panels perpendicular to the joists. ini

image753

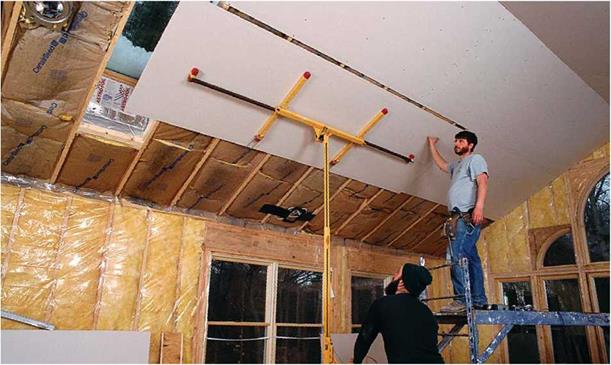
If the ceiling is higher than 9 ft., and especially if it’s a cathedral ceiling, rent a drywall lift.


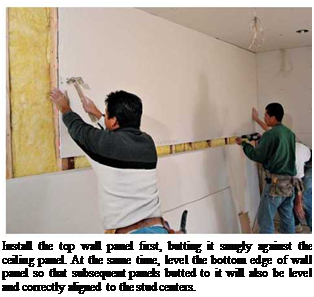
Подпись: Install the top wall panel first, butting it snugly against the ceiling panel. At the same time, level the bottom edge of wall panel so that subsequent panels butted to it will also be level and correctly aligned to the stud centers.

HANGING DRYWALL PANELS

Ceilings. Attach ceiling panels first. It’s much easier to cut and adjust wall panels than ceiling panels, should there be small gaps along the wall-ceiling intersection. Also, wall panels can support the edges of ceiling panels.

First, ensure there’s blocking in place to nail the panels’ edges to. In most cases, you’ll run panels perpendicular to the ceiling joists, thereby maximizing structural strength, minimizing panel sag, and making joists easier to see when fastening panels.

The trickiest thing about hanging ceiling pan­els is raising them into position. If your ceilings are less than 9 ft. high, drywall benches will ele­vate you enough to work. As you raise each panel end, keep its other end low. In other words, allow one worker to raise one end and establish footing before the second worker steps up onto the bench. Then, while both workers support the panel with heads and hands, they can tack the panel in place.

If the ceiling is higher than 9 ft., rent a drywall lift. Because the lift holds the panel snugly against ceiling joists, it allows you to have both hands free to drive screws.

Flying solo. If you can’t find an adjustable lift or friends to help, you can hang ceiling panels solo by using two tees made from 2x4s. Lean one tee against a wall, with its top about 1 in. shy of the ceiling joists. (The tee should be h in. to 1 in. taller than the ceiling is high.) Raise one end of
the panel up, onto that tee. Then, being careful not to dislodge the first end, position and raise the lower end of panel with the second tee until the entire panel is snug against the ceiling joists. Gradually shift the tees until the panel’s edges are aligned with the joist centers. Be patient.

Walls. It’s easier to hang drywall on the walls than on ceilings. Although one person can usually manage wall panels, the job is easier and goes faster with two. Be sure there’s blocking in the corners to receiver fasteners before you begin. To help you locate studs once they’re covered with dry – wall, mark stud centers on the top plates (or ceiling panels) and sole plates at the bottom.

When hanging wall panels, always start at the top, butting the first panel snugly to the dry – wall on the ceiling. That way, you’ll minimize gaps and sup­port ceiling edges better.

Important: If you’re installing wall panels hor­izontally, the top panel edge must be level and the butt ends, plumb. Otherwise, subsequent panels may be cockeyed and butt ends may not be cen­tered over the studs.

Once the upper wall panel is secured, raise the lower panel(s) snug against it. A homemade

image755
panel lifter is handy because it frees your hands to align the panels and sink the screws. A panel lifter is simply a first-class lever of scrap wood set on a fulcrum. Pressing down on one end of the lever with your foot, raises the other end, which lifts the panel, as shown in the bottom photo on p. 354.

Doors and windows. Joints around doors and windows will be weak and likely to crack if panel edges butt against the edges of the opening. That is, run the panel edges at least 8 in. past door or window jambs, and cut out the part of the panel that overlaps the opening. Pros do this because the wall framing twists and flexes slightly when doors or windows are opened and closed, which stresses the drywall joints.

Finally, expect to waste a lot of drywall when cutting paneling for doors and windows. Old houses are rife with nonstandard dimensions and odd angles, so don’t fight it. You can use some of the larger cutoffs in inconspicuous places like closets, but remember that the more joints, the more taping and sanding. Anyway, drywall panel isn’t expensive. So, when in doubt about reusing a piece, throw it out.

Curves. Curved walls are easy to cover with dry – wall. For the best results, use two layers of!4-in. drywall, hung horizontally. Stagger their butt – and bevel-edged joints. For an 8-ft. panel run horizontally, an arc depth of 2 ft. to 3 ft. should be easy. Sharper curves may require back-cutting
panels (scoring slots into the back so that the panels bend more easily), wetting (wet-sponging the front and back of the sheet to soften the gypsum), or using special flexible drywall, which has heavier paper facings that are better suited for bending.

Corners. Cornerbead reinforces and protects outside corners, uncased openings, and the like. It’s available in many materials. For best results, install it in a single piece. Cut the bead for out­side corners about h in. short: Push it snugly to the corner and slide it up till it touches the ceiling. The /2-in. gap at the bottom will be hidden by baseboard trim.

Galvanized metal bead was at one time the only type available, and it’s still widely used. To cut it, use aviation snips (also known as tin snips). The metal bead goes on the outside corners before the tape and joint compound are applied. Nail it up, spacing nails 8 in. apart, on both legs of the bead. Then cover it with compound.

Vinyl bead is less rigid than metal and able to accommodate outside corners that aren’t exactly 90°. Attach vinyl bead either by stapling it directly to the drywall, spraying the drywall corner with vinyl adhesive before pressing the bead into the adhesive and then stapling, or using a taping knife to press the bead into a bed of joint compound.

Paper-faced beads are embedded in joint com­pound. One of the best is the Ultraflex structural corner, which comes in varying widths and has

image756a plastic spine that flexes in or out so it can rein- BEDDING THE TAPE force inside or outside corners. Because they’re flexible, such tapes are great for corners of just about any angle.
AND CUTTING DRYWALL

Handling drywall is a bit like waltzing: You can do it by yourself, but it’s not all that much fun.

For starters, carrying an cumbersome 70-lb. panel around a work site is a two-person job. Both of you should be on the same side of the panel, same hand supporting the bottom edge, same hand balancing the top. (Imagine ballet dancers in a line.) As you walk, lean the upper part of the panel against your shoulder.

Hanging ceilings is definitely a two-person job, especially if you’re hanging longer panels to minimize joints. Once the two (or three) of you tack up a ceiling panel, one of you can finish attaching it, while another measures or cuts the next piece.

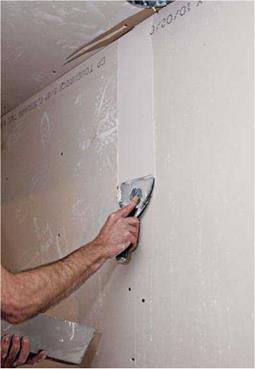
Measuring isn’t difficult, but you need to be aware of framing quirks. For example, if the walls aren’t plumb where they meet in the corners, take at least two measurements so you’ll know what angle to cut in the end of the panel you’re installing. If the two readings vary only slightly—say, !4 in.—there’s no need to trim the end of the panel because taping and filling the joint will take care of the gap. But if readings vary more than % in., trim the panel end at an angle, so there’s no gap where it abuts the out-of-plumb wall.

Second, if you’re running panels perpendicular to the framing, butt ends must meet over joist or stud centers. If framing members aren’t evenly spaced, you may occasionally need to trim a butt end to make it coincide with a joist center.

Last, and most important, cut panels about / in. short so you never need to force a panel into place. Forcing will crush an end that you’ll need to repair later. If it’s a ceiling panel, the gap will eventually be covered by wall panels fitted snugly against it.

Once you’ve cut a panel, snap parallel chalk­lines across its face, indicating stud or joist cen­ters behind the drywall once it’s in place. Guided by these lines, your screws or nails will always bed into framing.

Cutting drywall is literally a snap if the blades in your utility knife are sharp. Run the blade along a drywall T-square or a framing square, if that’s all you have. In one pass, score the paper covering. Then grasp the smaller section and snap it sharply away from the cut, breaking the gypsum core along the scored line. Then cut through the paper on the backside, and set aside the waste section.

Cutting is usually easiest if you lean the panel against a wall so you don’t need to bend over. But if you’ve already stacked panels on the floor, you

ESTIMATING MATERIALS

Start by consulting local building codes. They’ll specify the type, thickness, and number of drywall layers you must install throughout the house.

It’s possible to estimate drywall materials from a set of blueprints, but even the pros prefer to walk the job, measuring walls and ceilings and noting where using longer panels will minimize joints. That way, you get exactly the panel lengths you need.

As you walk through the rooms, record your findings on J4-in. graph paper. Use one sheet of paper per room, letting each square equal 1 ft. Then, when your materials arrive, you’ll know which room gets what.

1. Start by measuring the width and length of each room. In general, think in 2-ft. increments. That is, if a wall is 10 ft. 6 in. long, plan to buy 12-ft. panels and run them horizontally in order to get the fewest joints. If studs aren’t spaced a standard 16 in. on center, note that on your graph paper. (If you’re not sure of stud and joist spacing, use a stud finder.) Calculate the number of panels of each dimension you’ll need for each room.

2. Note door and window locations and dimensions, but don’t deduct their square footage from the room total. Portions of panels cut out for windows and doors will yield a high percent­age of nonfactory edges and butt joints, so it’s

I Estimating Drywall Needs

easiest to discard such scrap or piece it together in out-of-way places, such as closets.

3. Note the ceiling height. If the ceiling is 8 ft., two standard 4-ft. by 8-ft. wall panels run horizontally will reach it; if they’re 9 ft. high, use two horizontal 54-in.-wide panels. If ceilings are higher than 9 ft., you may want to rent scaffolding and a drywall lift.

4. Note the direction and spacing of ceiling joists. Panels run perpendicular to ceiling joists (or rafters, if a cathedral ceiling) are less likely to sag.

5. Special rooms. Install WR (water-resistant) drywall in laundry rooms, behind kitchen sinks, and in bathrooms other than in tub/shower areas. Cover tub/shower areas with cementitious board if they’ll be tiled. Install 58-in. type-X dry – wall on shared walls between the garage and liv­ing space. If existing plaster is in bad shape and you don’t want to tear it out, cover it with /4-in. or 58-in. drywall.

6. Special features include arches, curved stairwells, barrel ceilings, odd nooks, built-in bookcases or cabinets, and the like. For curves, you need flexible /4-in. drywall. Expect a lot of waste around complex areas, such as stairways.

Calculating DrywaU Square Footage

Chapter 4). Green or wet lumber will shrink as it dries, causing cracks and nail pops in a new drywall job, so don’t use it.

PANEL LENGTH (ft.)

SQUARE FEET PER PANEL*

NUMBER OF PANELS

TOTAL

SQUARE FEET

► Sight along studs and ceiling joists to see if they are aligned in a flat plane. To be more precise, stretch a taut string or hold a straight­edge across the framing members. Running

8

32

X

40

= 1,280

9

36

X

35

= 1,260

drywall panels perpendicular to framing will

10

40

X

30

= 1,200

help conceal minor misalignments, as will textured finish surfaces. But it’s better to

12

48

X

25

= 1,200

adjust misaligned framing, especially if the

14

56

X

20

= 1,120

drywall surface will be brightly lit or otherwise prominent. If a stud is misaligned more than

16

64

X

20

= 1280

/4 in., your options include hammering it into line, power-planing it down, and shimming

Total

7,340

up low spots, as described in Chapter 8

► Use a framing square to determine if * Calculations assume that all panels are 4 ft. wide. corners are square, and make sure there’s

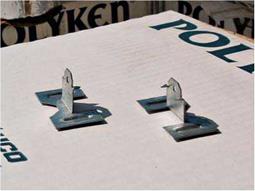
blocking in the corners, so you’ll have some­thing to attach the panel edges to. Or you can use drywall clips to "float" the corners.

Подпись:

► Install steel nail guards to protect plumbing pipes and electrical cables within U4 in. of joist or stud edges. Few things are as frustrating as discovering a leak or an elec­trical short after the drywall is up. Then make a final check of the electrical outlet boxes. They should be securely attached to the fram­ing with their edges flush with the drywall face (see Chapter 11).

► If appropriate to your climate, plastic vapor barriers or insulation should be in place now, as described in Chapter 14. If you’re drywalling over rigid foam insulation—say, on a cathedral ceiling—first affix 1X2 furring strips so you’ll have something to screw to.

Do not attach drywall directly to the foam because the insulation expands, contracts, and compresses.

9. Finally, make a master list of all the dry – wall you need for the complete renovation.

GETTING READY TO HANG DRYWALL

Here’s a final checklist before installing drywall:

► The building should be dry and relatively warm (between 60°F and 70°F). Keep tempera­tures constant. If a room becomes too hot (80°F or above), joint compounds may dry too quickly and crack. If the heating system is inoperable, rent a portable heater. Ventilation is also important for drying: Drying-type joint compounds evaporate a lot of water.

image744Подпись: Metal drywall clips can help secure drywall edges in corners where there's insufficient blocking. In conventional framing, blocking is nailed to top plates (and to wall ends) to create a solid base to screw or nail panels to.Подпись: The square factory edge of a drywall panel will not fit correctly when it abuts an out-of-plumb corner. Rough-cut the panel about 1 in. long, position it against the out-of-plumb wall, and use a scriber (a student's compass is fine) to transfer that angle to the face of the panel. Cut along the scribed line, and the panel should fit correctly. 1111 Framing lumber must be dry: 15 percent to 19 percent moisture content is optimal (see