Category RENOVATION 3

INSTALLINGм SQUARE-CUT DOOR CASING

Few frames are perfectly square, so use a framing square to survey the corners. Note whether a cor­ner is greater or less than 90°, and vary your cuts accordingly when you fine-tune the corner joints. Note, too, whether the floor is level, because side casing usually rests on the floor.

First, rough cut the casing. To determine the length(s) of side casings, measure down from the reveal line on the head frame to the finish floor.

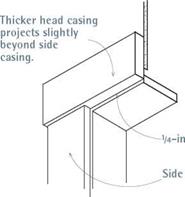
(If finish floors aren’t installed yet, measure down to a scrap of flooring.) Cut the side casings about h in. long so you can fine-tune the joints; then tack the casings to the reveal lines on the side frames. (Use 18-gauge or 20-gauge brads.) Next measure from the outer edges of the side casings to determine the length of the head cas­ing. If the ends of the head casing will be flush to the edges of the side casing, add only h in. to the head-casing measurement for adjustments. But if the head casing will overhang the side casing
slightly—a 14-in. overhang is common if head casing is thicker than side casing—add overhangs to your head-casing measurement. Cut the head casing, place it atop the side casings, and tack it up.

Fine-tuning casing joints. Because you cut the

side casings У in. long, the head casing will be that much higher than the head reveal line. But

image860

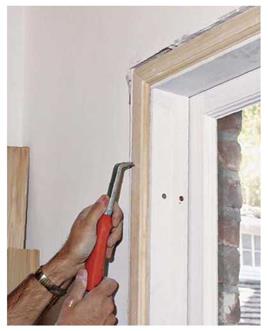
Use a scraper with replaceable carbide blades to shave drywall high spots and hardened joint compound. Use a utility knife to cut back shims still protruding around frames.

image861

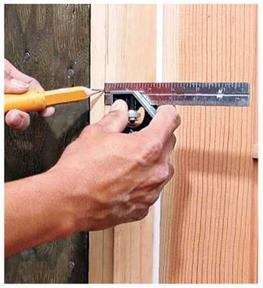
Using a combination square as a marking gauge, make light pencil marks on the jamb edges to indicate casing reveal (offset) lines. By offsetting casing and jamb edges, you avoid the frustrating and usually futile task of trying to keep the edges flush.

image862
INSTALLING SQUARE-CUT DOOR CASING

Square-cut head casing can easily span ganged windows or, as shown, a double door with windows on both sides. Here, a carpenter tacked up the door side casings before eyeballing the head casing to be sure the joints were flush.
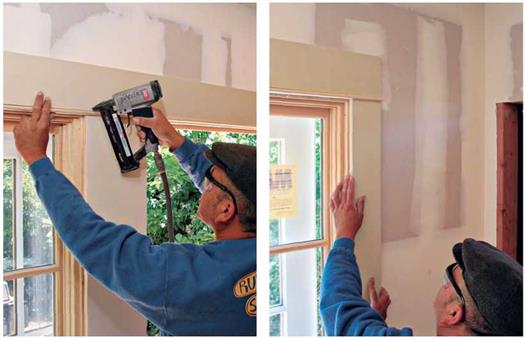
image863

Use a pin-tacker (brad nailer) to tack the head casing till you’re sure all joints are tight. When that’s done, secure the casing with 6d finish nails.

Slightly back-cut the side casings to ensure a tight fit to the underside of the head casing.
Подпись:

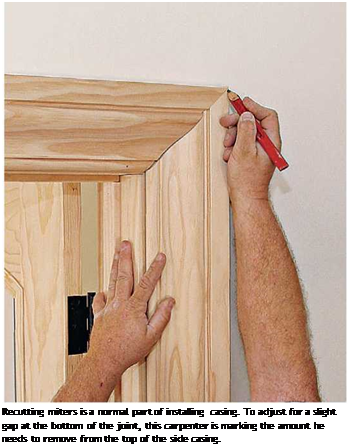
with all casing elements in place, you can see if the head casing butts squarely to the side casings, or if they need to be angle trimmed slightly to make a tight fit. Use a utility knife to mark where the head reveal line hits each side casing, and then remove the side casings and recut them through those knife marks. Retack the side cas­ings to the frame; then reposition the head casing so it sits atop the newly cut side casings. Finally, use a utility knife to indicate final cuts on both ends of the head casing, either flush to the side casing or overhanging slightly, as just discussed.

Gluing joints. Butt joints are particularly prone to spreading, so remove the tacked-up casing, and splice the joints with biscuits, as described earlier in this chapter. Spread glue on all joint surfaces, and nail up the side casing. (Insert bis­cuits, if used.) Draw the head casing tight to the side casing by angle-nailing a single 4d finish nail at each end. To avoid splits, predrill the two nail holes or snip the nails’ points. Then remove excess glue with a damp cloth.

INSTALLING MITERED DOOR CASING

Before installing the casing, first use a framing square to see if the doorway corners are square. If they aren’t, use an adjustable bevel to record the angles and a protractor to help bisect them. Then cut the miter joints out of scrap casing till their angles exactly match the door frame’s. You

Baseboard and Side Casings

SIMPLE BUTT JOINT

image865

image866

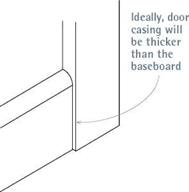
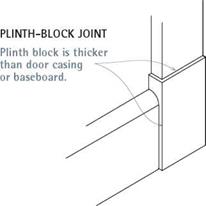
If baseboards are the same thickness as door casings, simply butt them together, or shape the end of the baseboard slightly to reduce its thickness.

can install mitered casing by first cutting the side casing and then the head casing, as you would with square-cut casing. But some carpenters maintain that the best way to match mitered pro­files is to work around the opening. That is, start with one side casing, cut the head casing ends exactly, and finish with the second side casing.

Mark the first piece of the side casing, and

then cut it. After marking a!4-in. reveal around the frame, align a piece of casing stock to a reveal line on a side frame. Where head and jamb reveals intersect in the corner, make a mark on the casing, using a utility knife. (Or make the utility-knife mark!4 in. higher if you’re not confi­dent you can cut the correct angle on the first try.) Miter-cut the top of the side casing so it matches the bisecting angle you worked out earlier on the scrap. Square-cut the bottom of the casing, and tack it to the frame using 18-gauge or 20-gauge brads.

Cut one end of the head casing in the same bisecting angle, leaving the other end long for the time being. Fit the mitered casing ends together, and align the bottom edge of the head casing to the head reveal line. Then, using a utility knife, mark the head casing where side and head reveals intersect in the second corner. You’ll cut through that mark, using the bisecting angle for the second corner (which may be different from the first corners). Again, there’s no shame in recutting, so you may want that utility-knife mark to be in. proud. When its miter is correct, tack up the head casing, and then line up the inside edge of the second side casing to the side reveal line. Use a utility knife to locate its cut­line. Back-cutting miters slightly can make fitting them easier.

Whether you simply glue mitered joints or bis­cuit join them, remove all three pieces of casing before securely nailing them. If biscuit joining, after slotting each piece, reinstall the leg jambs, apply glue and biscuits, and fit the head casing down onto the biscuits. You can use miter clamps or 18-gauge brads to draw the joint together till the glue dries. Be sure to wipe up the excess glue immediately.

Casing a Window

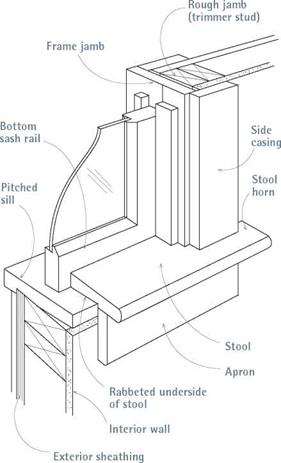
Подпись: Window Trimimage867Подпись: Use 6d or 8d finish nails to attach casing to rough jambs, 4d finish nails to attach the inside edge of casing to frame jambs, and 4d nails to tie the stool to the apron edge.

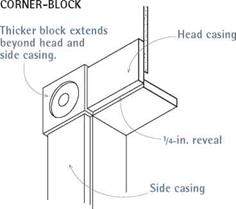
Подпись: Corner-Block Casing Casings with corner blocks are a variation of square-cut casing in which you have seven pieces of trim-two plinth (base) blocks, two cap blocks, two pieces of side casing, and one head casing-to measure, cut, and fit. Start by installing the plinth blocks, which are thicker and wider than the side and head casing. Plinths and cap blocks may line up to reveal lines on door frames, or they may line up with the inside frame edges; be sure to match the detailing of the existing casing. Tack up plinths, using 18-gauge brads. Then measure from the reveal line on the head frame to the top of the plinth blocks to determine the length of side casings. Tack up the side casings, aligning them to the reveal lines on the side frames. Depending on the detailing of the cap blocks, you may need to recut the tops of side casings. Recut the side casing as needed; then tack up the cap blocks and place a spirit level atop them to see if their top edges align and if they're level. Finally, measure between the cap blocks to determine the length of the head casing. (Use a rigid folding rule with a slide-out extension for this task.) If the door frame is slightly out of square, cut the head casing 1/i6 in. to V8 in. long, and back-cut both ends so you can shave them to fit. Once the tack-fit is tight, carefully pry off the tacked up pieces, cut biscuit slots, glue, insert biscuits, reassemble the pieces, and finish- nail the assembly. Glue all joints even if you don't use biscuits.

The casing of windows is essentially the same as the casing of doors, so review earlier sections about prepping frames and installing casing. The main difference is that the side casing of win­dows stands on a window stool, rather than on the floor. Consequently, most of this section
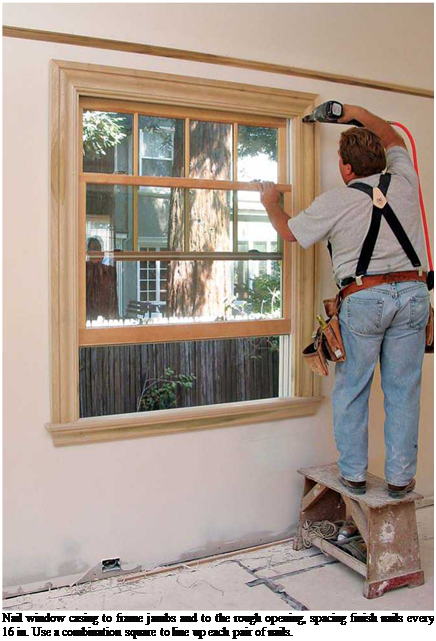
Подпись: Nail window casing to frame jambs and to the rough opening, spacing finish nails every 16 in. Use a combination square to line up each pair of nails. describes measuring and cutting the stool, which covers the inside of a windowsill, and the apron beneath the stool. Sills and stools vary, as described in "Windowsills, Stools, and Aprons,” on the facing page. The following text focuses on installing replacement stools appropriate to older windows.

MARKING THE WINDOW STOOL

Before you start, decide how far the stool "horns” will extend beyond the side casings and how far the interior edge of the stool will protrude into the room. Typically, horns extend И in. beyond ЗИ-in.-wide side casings, but use the existing casings as your guide.

To determine the overall length of the stool, mark И-in. reveals along both sides of the frame jambs. Then measure out from those reveals the width of side casings plus the amount that the stool horns will extend beyond that casing. Make light pencil marks on the drywall or plaster. Rough – cut a piece of stool stock slightly longer than the distance between the outermost pencil marks.

Next, hold the stool stock against the inside edge of the windowsill, centered left to right in the window opening. Using a combination square, transfer the width of the window frame, from the inside of one jamb to the other, to the stool stock. Use a jigsaw to cut along both squared lines, stopping when the sawblade reaches the square shoulder in the underside of the stool. So you’ll know when you’ve reached that shoulder, lightly pencil the width of the shoulder onto the top of the stool, using a combination square as a marking gauge. Next, cut in from each end of the stock to create the stool horns. Carefully guide your saw along the shoulder lines, being careful to stay on the waste side of the line. Clean up cut­lines with a chisel, if needed.

The cutout section of the stool should now fit tightly between the frame jambs. Now, rip down the rabbeted edge of the stool so that it will be snug against the window sash, and the stool horns will be flush to the wall (and jamb edges). Push the stool in till it touches the bottom of the sash, and then pull the stool back Иб in. from the sash to allow for the thickness of paint to come. Finally, measure the distance between the stool horns and the wall, which is the amount to reduce the width of the stool, along the rabbeted edge.

Use a table saw to rip down the width of the stool, then test-fit it again. If it is parallel to (but Иб in. back from) the sash rail, you are ready to cut each horn to its final length. If your stool is flat stock, that’s the last step. But if the stool is molded (has a shaped profile), miter returns to hide the end grain of the horns, as shown in the photo on p. 414.

­Finishing Tips

Details on stripping trim, prep work, stains, dear finishes, and paints are given in Chapter 18. Here’s a handful of additional tips:

► Most trim stock comes smooth enough to paint or stain. If you find rough spots, sand them with 120-grit to 180-grit sandpaper before finishing. If molding has only a few rough spots, wrap sandpaper around a block for flat trim or use a sanding sponge for shaped stock. Use a palm sander or an orbital sander on flat trim with a lot of rough spots.

► If you apply a first coat of finish or paint to the trim before installing it, you won’t need to worry about getting finish on painted walls and ceilings. Cut and attach the trim, sand and fill joints as needed, sink nail heads, fill holes with crayon putty, and lightly final sand. Apply the final coat in place, using long brushstrokes to achieve a smooth finish.

► After cutting prefinished trim, wipe sawblades with solvent to clean them.

► If you decide to finish the trim in place, tape 12-in.-wide masking paper to the area around the trim. When the finish is dry, peel off the masking paper.

► Use wax crayon putty to fill holes in prefinished trim. Avoid wood fillers because their solvent can partially dissolve the finish. However, if the wood is unfinished, apply filler before staining it. Filler can be stained and sanded, but be sure to test the colors on scrap blocks first.

► Use the smallest possible brads or nails to attach the trim, and you’ll have less to fill. On dark wood, brad holes are almost invisible.

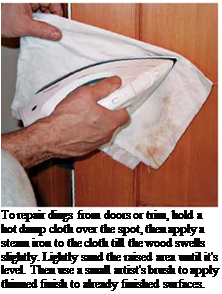
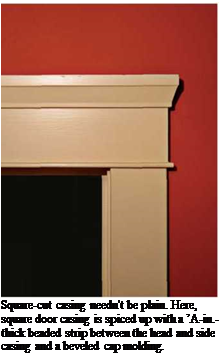
Подпись: To repair dings from doors or trim, hold a hot damp cloth over the spot, then apply a steam iron to the cloth till the wood swells slightly. Lightly sand the raised area until it's level. Then use a small artist's brush to apply thinned finish to already finished surfaces. Подпись: Square-cut casing needn't be plain. Here, square door casing is spiced up with a ’A-in.-thick beaded strip between the head and side casing and a beveled cap molding.

ing profiles as they converge at a corner; square cut, made with basic butt joints; and corner block, a variation of square cut with discrete blocks at the top corners and sometimes bottom corners as well. (Bottom corner blocks are also called plinths. Top corner blocks are called caps.)

PREPPING THE FRAME

Frame edges should extend no more than Zu in. beyond finish surfaces. If they protrude more, sink any nails, and then plane down the frame. If frame edges are level or, say, Уїв in. below the wall surfaces, leave them alone. If the edges are sunk more than that, build them up with shim strips ripped from stock of the same thickness. Scrape the old frame so that it’s flat, glue on the strips, tack with brads if you like, and wipe up the excess glue at once. Also survey the walls around the frame, scraping down globs of joint com­pound or hammering down (compressing) high drywall spots that would make the trim cockeyed.

MARKING A REVEAL

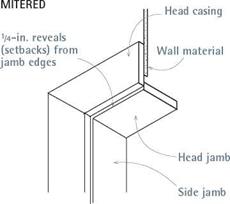
Boards are rarely perfectly straight, and frame jambs and casing stock are no exception. So instead of trying to nail board edges flush, set the inside edge of casings back ‘/ in. from the frame edges. This setback is called a reveal: It looks good and will spare you a lot of frustration. Use the rule of your combination square as a depth gauge. Set the rule to І4 in., and slide along the edge of the frame, making pencil marks as you go. Where head reveals intersect with side reveals, mark the corners carefully.

Common Interior Glues

COMMON,

CHEMICAL NAME(S)

PROS

CONS

BRANDS

White carpenter’s, Polyvinyl acetate

Moderate strength; inexpensive

Runny; poor initial tack; clogs sandpaper

Elmer’s® Glue-All®

Yellow carpenter’s, polyvinyl acetate

Strong; good initial tack; sands well

Titebond® Original

Polyurethane

Bonds to most materials; sands well; takes stain; fills gaps; water resistant

Glue expansion can spread joints not tightly clamped; slow tacking time; stains skin

Gorilla Glue®; Titebond

Cyanocacrylate

Instant bond; great for nonstructural joints; bonds many materials

Expensive; can’t adjust pieces once placed, skin/eye hazards

Super Glue™; Hot Flash; Turbo Flash

Hot glue

Quick-tack glue to create thin plywood templates

Limited strength, but okay for temporary positioning; low-stress joints

Hotstik; Bostick HotMelt

Contact cement

Instant bond; resists heat and water; best for attaching plastic laminate and veneers

Can’t adjust once sheet and substrate make contact; volatile solvent; needs good ventilation

DAP® Weldwood™; 3M® Fastbond®

* Several Web sites offer interactive product selectors. Specify how and where you’ll use the adhesive, and the selector will choose a product (www. titebond. com is particularly good).

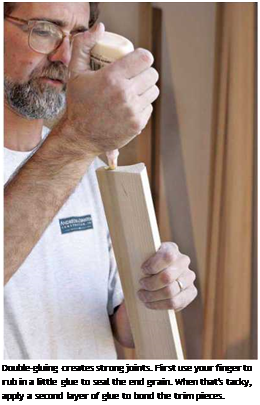
Подпись: Double-gluing creates strong joints. First use your finger to rub in a little glue to seal the end grain. When that's tacky, apply a second layer of glue to bond the trim pieces.

the trim. But splicing joints with biscuits is by far the better way to keep them from spreading. Use a biscuit joiner to cut slots into mating edges; then inject glue into the slots and spread it evenly on the casing ends. Place biscuits in the slots and reassemble the joints, drawing the joints tight with a single 4d or 6d finish nail angled into butt joints or end-nailed through miter joints. Use a damp cloth to wipe off excess glue.

Drive nails into framing whenever possible.

If framing members are spaced 16 in. on center, nail trim to every stud or ceiling joist it crosses. Where trim runs parallel with the framing, as with side casing, nail the trim at the ends and roughly every 16 in. in the field. Equally impor­tant is using the right nail or screw to avoid splitting the wood trim. (The table on p. 415 recommends sizes for most trim applications.)

To attach narrow molding such as quarter – round, use a single row of finish nails. On wider molding, use two nails to prevent cupping: Set the nails at least ‘A in. from the edge, and use a square to line up nail pairs.

It’s usually not necessary to predrill softwood trim to prevent splits. If you use a pneumatic nailer, do not nail too close to the edge, and don’t use to too big a nail. However, when nailing hard-

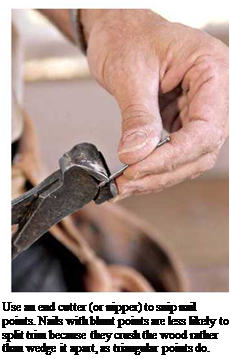
Подпись: Door and I Window Casings image854Подпись: Use an end cutter (or nipper) to snip nail points. Nails with blunt points are less likely to split trim because they crush the wood rather than wedge it apart, as triangular points do. Подпись: SQUARE-CUT OR BUTTПодпись: . revealПодпись: casingimage856image857wood trim or nailing the ends of boards, pre­drilling is smart. Use a drill bit whose shank is thinner than the nail’s. Alternatively, you can minimize splits by using nippers to snip off the nail points, as shown in the photo at right. It’s a bit counterintuitive, but it works.
Before painting, caulk all gaps between the casing and the wall.

Casing a Door

Before casing doors and windows, review "Assessing and Prepping the Opening,” on p. 92, particularly the remarks on margining, centering jambs in relation to a wall’s thickness. Then sur­vey the door and window frames to be cased; use a 4-ft. level and a square to see if the frame jambs are plumb, margined, and square.

CASING ELEMENTS

Door casing is trim that covers the gaps around a door frame. It thus goes on after a door has been hung. Most often casing consists of three pieces: two side casings (leg casings), which cover frame jambs, and one piece of head casing, which goes over the frame head. Six pieces, if you count both sides of a doorway.

There are three common casing joints: mitered, preferred for trim that is molded (shaped) because it enables you to match mold

. The Case for Not Leveling Trim

The older a house, the less likely its floors and ceilings will be level. So don’t make yourself crazy trying to level baseboards and crown molding: You won’t succeed, and trim that’s level next to a surface that isn’t will only emphasize the discrepancy. Interior trim, like politics, is an art of compromise. Trim edges should be roughly parallel to floors and ceilings. As master carpenter Joseph Beals puts it, "Baseboard is effectively floor trim, and the floor plane is the critical reference, level or not."

Midwall elements such as chair rails, picture rails, and wainscoting call for yet more fudging. Ideally, chair rails should be level and wainscoting stiles (vertical pieces) should be plumb, but those ideals may clash with existing trim that’s neither. In that case, split the difference: Tack up a length of trim that’s level. Then raise or lower one end till your eye accepts the compromise.

Trim can also help give the illusion of a level ceiling-helpful, when upper kitchen cabinets must be set level even if the ceiling isn’t. So after leveling and securing upper cabinets, install a strip of molding to cover the gap above. (You may need to rip it down at an angle.) If you look for it, you’ll see the uneven strip of molding between the cabinets and the ceiling. But if the cover trim matches the cabinet finish, chances are nobody else will notice the difference.

Finish Carpentry Fasteners

FASTENER

USES

COMMENTS

20-gauge brad

Attach small molding returns.

Glue returns first.

18-gauge brad

Tack-nail trim while adjusting; attach cabinet toekicks and side panels.

Tiny brad holes easily filled; easy to pry off tacked trim

4d (11/2-in.) finish nail

Attach inside edge of casing to rough jambs (jambs of rough opening).

Snip nail point if worried about splitting casing.

6d (2-in.) finish nail

Attach outside edge of ‘/i-in.-thick casing (through ‘/i-in. drywall) to rough jambs.

Nail should sink at least ‘/ in. into framing.

8d (21/2-in.) finish nail

Attach outside edge of 3/4-in.-thick casing (through drywall) to rough jambs; attach baseboard; attach crown molding.

Place nails a minimum of 3/ in. from edge; snip nail points to minimize splits.

21/2-in. to

3-in. finish-head

screw

Secure window – or door-frame jambs to rough openings.

Frame jambs twist or flex as doors and windows are operated, so use pairs of screws at each point.

GENERAL CUTTING

Tight trim joints require accurate layouts, sharp saws, and consistent methods.

Recuts are a fact of life. If you’re filling and painting trim, slight gaps are acceptable. But if you’re using a clear finish, joints must be tight. Before you start cutting trim, always check the accuracy of power-saw miter-stop settings by cut­ting a few joints from scrap. Then cut stock a hair long so that you can recut joints till they’re right.

Cut lines consistently. It doesn’t matter whether your sawblade cuts through the middle of a cut line or just past it. What matters is that your method is consistent. For example, moving the width of a saw kerf to one side of the line or the

Подпись:other can make the difference between tight and open joints. Some pros prefer to just “kiss” the inside of the cut-line with the saw kerf so that the line stays on the board.
Keep tools sharp. This applies to saws, chisels, planes, and utility knifes. Whenever a blade becomes fouled with resin or glue, wipe it clean immediately with solvent. A sharp tool is easier to push and thus less likely to move the stock you’re cutting. Likewise, a clean power-saw blade is less likely to bind or scorch wood.

Handsaws usually cut on the push stroke.

Start handsaw cuts with gentle pull strokes, but once the kerf is established along the cut-line, emphasize push strokes. (Western saw teeth are set so that they cut more on the push stroke, whereas Japanese saws cut more on the pull stroke.) As you continue the cut, keep your elbow behind the saw, which will help you push the saw straight and follow the cut-line.

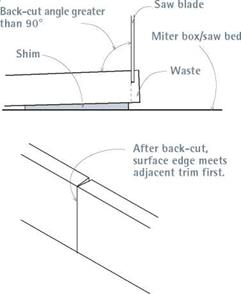
Подпись:Подпись: I Back-Cutting Trimimage848"Подпись: By raising the board's end and keeping the sawblade plumb, you create a back-cut joint whose surface edges can easily be shaved to create tight joints.

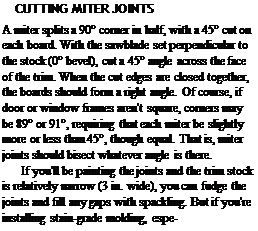
Подпись: CUTTING MITER JOINTS A miter splits a 90° corner in half, with a 45° cut on each board. With the sawblade set perpendicular to the stock (0° bevel), cut a 45° angle across the face of the trim. When the cut edges are closed together, the boards should form a right angle. Of course, if door or window frames aren't square, corners may be 89° or 91°, requiring that each miter be slightly more or less than 45°, though equal. That is, miter joints should bisect whatever angle is there. If you'll be painting the joints and the trim stock is relatively narrow (3 in. wide), you can fudge the joints and fill any gaps with spackling. But if you're installing stain-grade molding, espe-
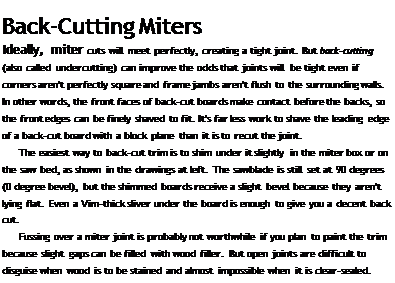
Подпись: Back-Cutting Miters Ideally, miter cuts will meet perfectly, creating a tight joint. But back-cutting (also called undercutting) can improve the odds that joints will be tight even if corners aren't perfectly square and frame jambs aren't flush to the surrounding walls. In other words, the front faces of back-cut boards make contact before the backs, so the front edges can be finely shaved to fit. It's far less work to shave the leading edge of a back-cut board with a block plane than it is to recut the joint. The easiest way to back-cut trim is to shim under it slightly in the miter box or on the saw bed, as shown in the drawings at left. The sawblade is still set at 90 degrees (0 degree bevel), but the shimmed boards receive a slight bevel because they aren't lying flat. Even a Vim-thick sliver under the board is enough to give you a decent back cut. Fussing over a miter joint is probably not worthwhile if you plan to paint the trim because slight gaps can be filled with wood filler. But open joints are difficult to disguise when wood is to be stained and almost impossible when it is clear-sealed.

use an outfeed roller or a sawhorse to support the far end of long pieces so they don’t bow or flap as you try to cut them.

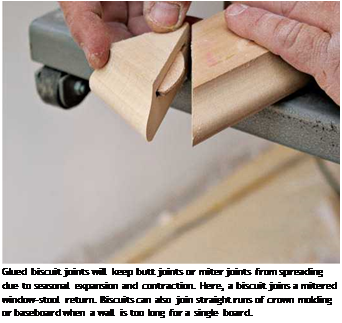
Подпись: Glued biscuit joints will keep butt joints or miter joints from spreading due to seasonal expansion and contraction. Here, a biscuit joins a mitered window-stool return. Biscuits can also join straight runs of crown molding or baseboard when a wall is too long for a single board. cially if it’s 5 in. or 6 in. wide, faking a miter joint will look terrible. So if a frame is out of square, take the time to cut and recut joints as necessary so that they bisect the frame’s angle.
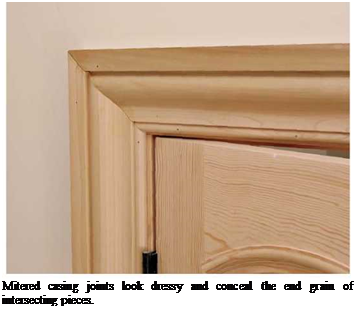
There are two good reasons to use miters. First, mitering aligns the profiles of moldings so that bead lines and other details join neatly along the joint and sweep uninterrupted around the corner. Second, although flat trim allows you to butt or miter joints at corners, with butt joints you would see the rough end grain of one of the adjoining boards. Even if you sand down the roughness, end grain soaks up extra paint or stain and so often looks noticeably different from adjacent surfaces.

Two Ways to Splice Trim

image850

SPLICING TRIM

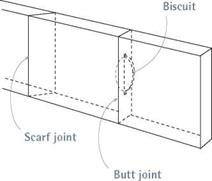
When a wall is too long for a single piece of trim, you can splice pieces by beveling their ends at a 60° angle and overlapping them (called a scarf joint), or by butt joining them and using a biscuit to hold the joint together. If boards shrink, gaps will be less noticeable in a scarf joint because you’ll see wood, rather than space, as the overlap separates. In general, scarf joints are better suit­ed to flat stock, whereas shaped molding will dis­play a shorter joint line if butted together.

(Viewed head-on, the joint is a thin, straight line.)

Position splices over stud centers so you can nail board ends securely to prevent cupping. Where that’s not possible, say, where a baseboard butts to door casing, nail the bottom of the base­board to the wall sole plate, and angle-nail the top of the baseboard to the edge of the casing. Predrill the trim or snip the nail points to mini­mize splits.

COPING A JOINT

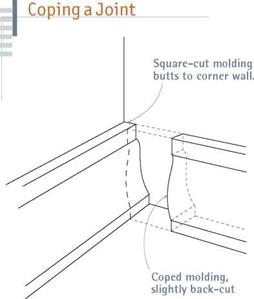
All wood trim shrinks somewhat. Where beveled boards overlap, gaps aren’t as noticeable, but shrinkage on some joints—mitered inside cor­ners, in particular—are glaringly obvious because you can see right into the joint. For this reason, carpenters cope such joints so that their meshing profiles disguise shrinkage. Basically, a coped joint is a butt joint, with the end of one board

image851

A coped joint is first mitered, then back-cut along the profile left by the miter so that the leading edge of the trim hits the adjacent trim first. That thinner, leading edge can be easily shaved to fit tightly.

WORKING WITH MDF

If you want a cost-effective, easily worked material for plain-profile trim, MDF (medium-density fiberboard) is hard to beat. And you can add visual interest by installing cove, bullnose, quarter – round or other simple molding along MDF’s plain edges.

Advantages. MDF cuts and shapes beautifully. For smooth edge cuts, use a 60-tooth 10-in. blade. Because it has no grain, MDF crosscuts and rips equally well, and its edges can be routed as well, although most MDF trim is simply butt joined. (No need for biscuits to hold the joints closed.) Use a pneumatic nailer to attach it; MDF won’t split. Sand it with 150-grit sandpaper and prime with an oil-based primer (latex roughens the surface). However, MDF does have quirks you need to work around.

Disadvantages. MDF is heavy (a 14-in. sheet weighs about 100 lb.); lighter versions cost more. It’s dusty to cut and shape. As noted in the tip above right, its edges suck moisture. In fact, MDF can swell from ambient moisture, so seal it imme­diately after cutting or shaping it. Seal the edges with two coats of shellac-based primer. Then
paint all six sides of the panels with an oil-based primer. Perhaps MDF’s most annoying quirk is its tendency to mushroom around nail heads: MDF is so dense that it doesn’t compress when you nail it; fiber near the nail just bulges up. After set­ting the nail heads, use a Sandvik carbide scraper to scrape down bumps, and then prime it.

Because of MDF’s tendency to wick moisture, it’s a poor choice for bathroom trim or window installations where condensation is common— no matter how well it’s sealed. In those locations, go with wood instead.

POLYMER MOLDINGS

Though many old-house owners prefer wood molding, its supply and quality have been dwin­dling for decades, leading to a run on third-world forests—now being cut down at an alarming rate. Whereas polymer moldings (especially polyurethane) are available in most traditional architectural styles, from simple colonial to elaborate Victorian.

Once installed and painted, polymer moldings are virtually indistinguishable from wood trim. The following sections note some of the unique features.

Stability. Unlike wood, polymer molding won’t warp, split, rot, or get eaten by termites.

Although it does expand slightly (3з8 in. for a 12-ft. piece) in a heated room, special corner pieces “float” over section ends, allowing them to slide freely as they expand. Polymer molding has no grain, so there is no built-in bias to twist one way or the other; there are no splits, cracks, or knots.

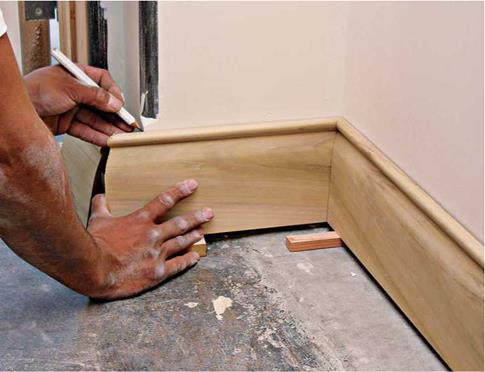
Подпись: PROTIP For odd-shaped or complicated pieces, such as winding stair treads, make a template using heavy paper, cardboard, or strips of Vs-in. plywood hot-glued together. "The Beauty of Templates," on p. 317, has more more about templates. 1111 Подпись: When mitering or coping corner joints, make sure a joint fits well before cutting the other end of the trim to final length. Whenever possible, mark the trim in place— that's easier and more accurate than transferring tape-measure readings.image846Quick installation. Synthetic moldings are less labor intensive. Whereas complex wood mold­ings are built up piece by piece and their joints painstakingly matched, synthetics come out of the box ready to install. Most polymer moldings are glued up with a compatible adhesive caulk, such as polyurethane or latex acrylic, and tacked up with finish nails or trim-head screws, which are needed for support only till the glue sets. Pieces are so light, in fact, that you can install them single-handedly.
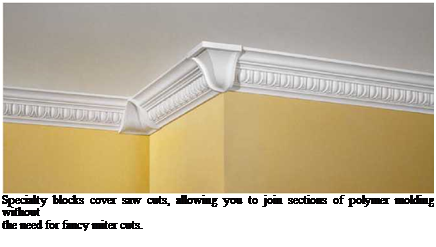
Easy working and finishing. Most polymers can be trimmed like soft pine, using a 12-TPI (teeth per inch) to 13-TPI saw in a miter box. There’s no need for fancy joinery because most systems have corner pieces that cover joints. Touch up holes with plastic wood filler, and caulk field joints on long runs. You also may need a bead of caulk where straight lengths of molding meet existing surfaces that are irregular.

Polymer molding is typically primed white in the factory and could be installed as is, but most homeowners paint it. You paint smooth-surfaced urethanes just like standard wood trim. Some products can be stained, but that gets into the iffy territory of making plastic look like wood.

Basic Skills

Using quality tools and materials matters but not as much as the skill and judgment of the renova­tor. This section of tips will help hone your skills in measuring, cutting, and attaching trim.

MEASURING

Accurate measurements are crucial because trim is pricey, and even small discrepancies will stand out. In the following paragraphs you’ll find a few new twists on the old chestnut "Measure twice and cut once.”

Use a sharp point to mark stock. A stubby lumberyard pencil is fine for marking framing lumber. But because the margin of error is small on trim, use a sharp pencil to mark precisely. A utility knife leaves an even thinner line, though it’s more difficult to see.

Mark trim in place, if possible. It’s almost always more accurate than taking a tape reading and transferring it to stock, especially if your memory’s bad.

Change directions. If you normally measure left to right, double-check your figures by changing direction and measuring right to left.

Use templates instead of remeasuring. When you need to cut many pieces the same length, carefully cut one, check it in position to make sure it’s accurate, and use that piece to mark the cutline on others. You can also clamp a template to a bench or saw table, to act as a stop block. As you cut successive pieces, simply butt a square – cut end against the block, and the blade will cut each in exactly the same place.

When in doubt, go long. If you’re not quite sure of the exact measurement and don’t want to climb back up the ladder to recheck, cut the piece a lit­tle long. You can always make a long board shorter, but reversing the process is quite a trick.

Xmarks the scrap. As you mark cut-lines, pen­cil a prominent X on the scrap ends of boards. This habit will sooner or later help you avoid wasting trim because you mistook the scrap end for the measured end.

Materials

Trim materials include custom-milled hard­woods; softwood boards, molding, and stock caps; MDF (medium-density fiberboard); and polymer moldings that replicate detailed histori­cal styles in lightweight, easy-to-install sections.

CHOOSING TRIM

Because trim is costly (especially hardwood trim), buy it from a local shop that mills its own. That way, you’ll be more likely to get trim that is straight, knot-free, and stored in humidity – and temperature-controlled warehouses. If you’re trying to match existing trim, a local milling shop is also your best bet. You may pay a setup fee but, all in all, the final cost of a room or two of custom trim may be more reasonable than you think.

Stock trim from a lumberyard or home center is often so warped that you must pick through the racks and eyeball each piece to see if it’s straight. Discard any pieces that are obviously heavier than the rest—usually a sign of excessive moisture. (Trim is typically dried to 7 percent to 10 percent moisture content.) Examine each piece for splits and cupping across the width.

Also sight down the length of each board for excessive twisting. You can force a twisted piece into position by toenailing and clamping it, but the extra stress is likely to open a joint or cause splitting down the road.

If you want the wood grain to show, be even more picky or pay more for a select grade. But if you plan to paint the trim, most surface blemishes can be sanded, filled, or sealed with white pig­mented shellac (see Chapter 18) or a primer-sealer to suppress knot or tannin bleed-through. Finger – jointed molding, which joins short sections of clear softwood, is another option. Though usually painted to conceal its glued finger joints, finger- jointed molding is also available with a wood veneer, which can be stained and clear finished.

COMBINING STOCK ELEMENTS

Standard molding is often milled from 1-in. stock (actual size, % in.). Thus you’ll find it easy to create more complex trim by combining 1-in. boards with stock molding caps. For example, with baseboards, you might start with a 1×8, add a quarter-round shoe at the bottom and a cove- molding cap at the top.

However, if you want to dress up a room with complex crown moldings, consider installing polymer millwork instead—whose monolithic casting greatly simplifies installation. Likewise, though you can build them up by hand, mantels and fireplace surrounds also are sold as pre-

Подпись: Specialty blocks cover saw cuts, allowing you to join sections of polymer molding without the need for fancy miter cuts. Most glues will bond MDF, but PRO-TIP

Don’t bring trim stock to a job site till the drywall joints are dry and the building is heated. Otherwise, trim ends will absorb moisture, swell, and become dif­ficult to install. Never store trim in unheated areas or garages.

1111

^^PROnP

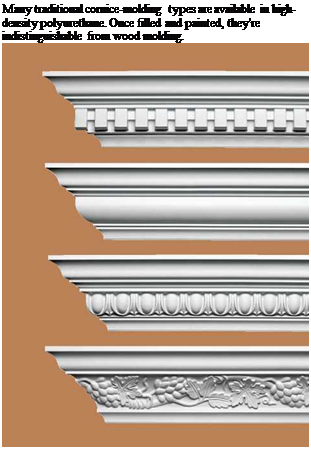
Подпись: its edges tend to suck water out of the thinner ones. To minimize this tendency, double-glue joints (rub in a thin first layer to seal the edges, then a second to bond the joints) or apply glue size to seal the edges. Polyurethane glue is probably the best allaround choice.Подпись: llllПодпись: Many traditional cornice-molding types are available in high-density polyurethane. Once filled and painted, they're indistinguishable from wood molding.

assembled units and as kits requiring minimal assembly.

You can combine stock moldings with rela­tively inexpensive paneling to make wainscoting and frame-over-panel walls. By cutting a piece of paneling in half, you can use two sections, each 4 ft. by 4 ft., topped with a built-up combination of moldings to form a cap. Paneling with vertical, regularly spaced grooves gives the illusion of individual boards. To change the style and create Craftsman-style wainscoting, you could use!4-in.- thick redwood plywood with the grain running vertically and install redwood strips every foot or two to create detail and cover the seams between sheets. For more, see “Wainscoting,” on p. 430.

NAILING AND DRILLING

Because most trim is light, it is usually nailed up with finish nails, which have slimmer shanks and smaller heads than other nails. Trim-head screws (shown in the photo on p. 90) are often specified when molding is heavy or complex or when trim pieces will be subject to twisting or flexing, as happens with door frames and stair treads.

A finish hammer has a smaller head than a framing hammer and so is easier to control when trying to avoid denting the trim. Stop when the nail head is almost flush with the wood surface; then use a nail set to drive the nail head below the surface. Always set nails before sanding or finishing.

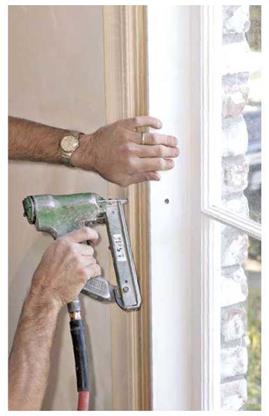
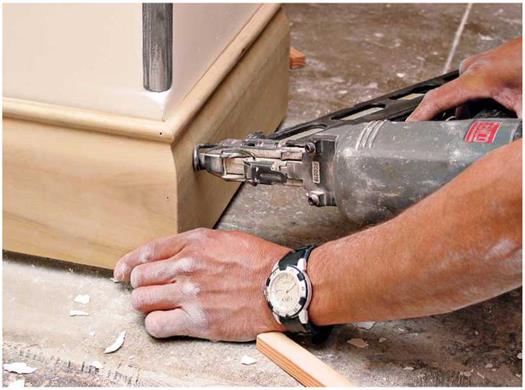
Finish nailers have largely replaced hand nail­ing, because pressure settings can be adjusted so the nail goes just below the surface; thus you don’t have to set the nails. Finish nailers won’t dent trim, and you can nail with one hand while holding joints together with the other. Production carpenters favor pneumatic models with air hoses running to a compressor, but cordless models with spare batteries work well, too, for installing small amounts of trim.

Nailers are designed to shoot specific nail gauges (thicknesses). Standard finish nailers

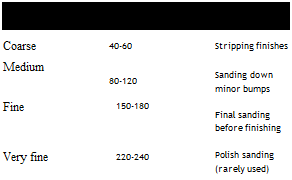
Подпись: True Grit: Which Sandpaper for WhatПодпись: COMMON NAME GRIT NUMBER ("teeth"/sq. in.) USES Coarse 40-60 Stripping finishes Medium 80-120 Sanding down minor bumps Fine 150-180 Final sanding before finishing Very fine 220-240 Polish sanding (rarely used) Подпись: A SANDPAPER Pimage839

shoot 15-gauge nails, whereas brad nailers (pin tackers) shoot 18-gauge to 20-gauge brads. (The higher the gauge number, the thinner the nail shank and the weaker the nail.) Most home­owners should stick with 15-gauge nailers, but brad nailers are great for tacking up trim: Brad holes are tiny, so you can easily pry off and repo­sition the trim if needed. Brads are also useful for attaching thin cabinet elements like finish toekicks or cabinet side panels. If you don’t have many brads to drive, use a hand brad pusher.

Cordless drill drivers are the essential tool in most carpenters’ belts. Although they range up to h-in., 18-volt monsters, unless you’ve got fore­arms like Popeye get a 18-in., 12-volt cordless drill-driver, which has a keyless chuck for quick changing of bits. A 12-volt model accepts either drill bits or screw tips and has plenty of power for finish carpentry tasks. For production carpen­ters, the next step up in power (and price) is a 12-volt impact driver, which accepts only screw tips; some models can drive more than 250 two – inch screws on a single battery charge. (Whichever tool you buy, get a spare battery for recharging while you work with the other one.) You’ll find more on drills, drivers, and bits in Chapter 3.

image840

When it comes to finish nails and nailers, smaller is often better. This pin nailer weighs less than 5 lb. and shoots 1-in. to 272-in. nails.

Sandpaper is coated with tiny abrasive particles (grit), which make tiny cuts in the material being sanded. Sandpaper is rated according to the concentration of grit per square inch.

The lower the grit number, the larger, coarser, and more widely spaced the grit particles. Conversely, the higher the grit number, the finer and more closely spaced the grit is.

The abrasive on today’s sandpaper will be either aluminum oxide, silicone carbide, ceram­ic particles, or garnet. Aluminum oxide is the most common abrasive for sanding wood because it’s relatively long lasting; whereas sil­icone carbide, being harder, is better for sand­ing metal, fiberglass, paint, and such. If you’re renting a big drum sander to strip wood floors, its belts will likely be low-grit ceramic sand­paper. Garnet, the softest of the bunch, is often the grit found on fine and very fine sandpapers.

If you’re sanding wood, avoid closed-coat sandpaper, which will clog quickly because there’s no place for wood dust to go. A better choice for woodworkers is open-coat sandpaper, in which only one-third to two-thirds of the surface is coated with grit. Closed-coat sand­paper is used to sand metal.

MEASURING AND LAYOUT

Whenever possible, hold a trim piece in place and use a pencil or a utility knife to mark the cut-line. This is usually more accurate than transferring tape-measure readings.

Tape measures are frequently used to measure trim longer than 6 ft. Check your tape measure to be sure that the hook at the tape end isn’t bent and that the rivet slot hasn’t become elongated from the hook’s repeated slamming into the case—either of which will give inaccurate read­ings. However, for best accuracy, start measure­ments from the 1-in. mark, remembering to deduct 1 in. when taking readings.

A 6-ft. folding rule with a sliding-brass exten­sion is best for readings less than 6 ft. because the rigid rule won’t flop around as a tape meas­ure will. Unfold the rule to its greatest length
between two points and slide the extension the rest of the way. Then hold the extended rule next to the trim stock and mark the cut-line.

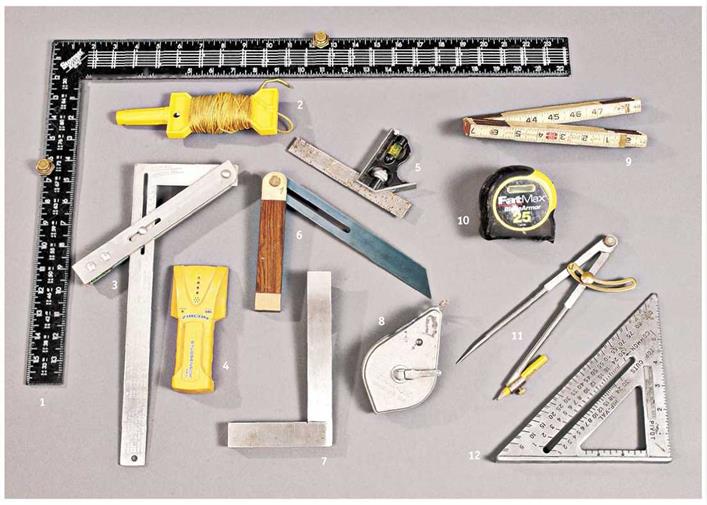
A framing square held against a door or win­dow frame quickly tells if it’s square or not— a good practice when sizing up a trim job.

A combination square is both a square and a 45° miter gauge, so it can be used to mark square and miter cuts. Because its ruler can be extended from the tool body and fixed with a screw, the square can double as a depth or marking gauge. The combo also has a bubble-level insert for lev­eling small surfaces such as windowsills.

An adjustable (sliding-T) bevel copies and transfers angles accurately. Because frame cor­ners are rarely 90° exactly, use an adjustable bevel to record the angle needed and then make miter cuts that bisect the actual angle.

Levels, 2 ft., 4 ft., and torpedo, should be part of any finish carpenter’s tool chest; use smaller levels in tight spaces.

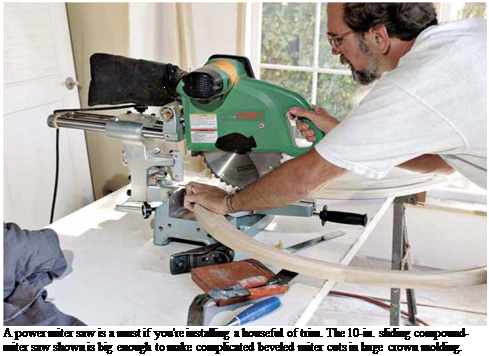
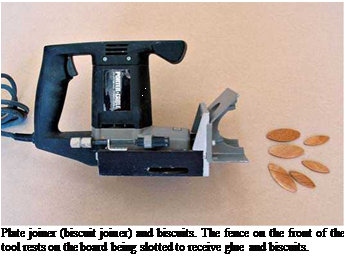
Подпись: TIPПодпись: For razor-smooth cuts and tight joints, buy an 80-tooth carbide-tipped blade for a 10-in. power miter saw or a 100-tooth blade for a 14-in. saw. If you save such blades for finish work only, they'll last a lifetime. 1111 Подпись: A power miter saw is a must if you're installing a houseful of trim. The 10-in. sliding compound-miter saw shown is big enough to make complicated beveled miter cuts in large crown molding. Подпись: Plate joiner (biscuit joiner) and biscuits. The fence on the front of the tool rests on the board being slotted to receive glue and biscuits.

Buy or borrow a laser level if you need to set cabinets at the same height or align different trim elements in a room.

CUTTING

Which tool you choose depends on how much trim you’ll cut. Wear safety glasses and hearing protection when operating any of these tools.

A miter box with a backsaw will suffice if you are casing only a doorway or two. A backsaw has a reinforced back so its blade is rigid; it should have 12 teeth per inch (TPI) or 13 TPI, with minimal offset (splay), so it cuts a thin kerf. Also useful: a dovetail saw (a small backsaw with 20+ TPI) and a slotting saw, whose kerf is even finer because its teeth are not offset.

Buy a power miter saw if you’ll trim at least one room or several casings. Well worth the cost, a power miter adjusts to any angle for miters (angles cut across the face of a board, with the blade perpendicular to the stock). A sliding compound-miter saw, though more expensive, is more versatile. In one stroke, this saw will cut a miter and a bevel (an angle cut across a board, in which the sawblade is tilted)—hence the name compound miter. It will also cut through wider stock such as wide baseboards or crown molding.

A table saw may be the only table tool you need if you are cutting only miter or butt joints. Table – saw guides are generally not as accurate or as easily to re-adjust as the guides on power miter saws, so recutting miter joints will be a bit more work. With a power miter saw, you clamp the stock steady and move the blade, whereas cutting a miter on a table saw requires feeding long pieces of trim at an odd angle to the blade.

Still, table saws be can a good choice for tight budgets because they can also cut stock to length (crosscut) and width (rip cut), prepare edges for joining, and cut dadoes (slots) easily.

A sliding miter trimmer (also known as a Lion Miter-Trimmer™) looks like a horizontal guillo­tine and bolts to a bench. Because its blade is razor sharp, it slices wood rather than sawing through it. Although it can shave off paper-thin amounts of wood till joints fit exactly, it’s been eclipsed by power miter saws for on-site trim installations.

A quality power jigsaw (sometimes called a saber saw) is indispensable for fitting and notch­ing wood, such as fitting thresholds around integral door stops.

Use a coping saw to cut along molding profile lines, ensuring a tight fit where molding meets in inside corners. For more, see p. 414.

A plate joiner (biscuit joiner) is a specialized saw with a small, horizontal circular blade that cuts slots into board edges. After slotting boards to be joined, inject glue and insert a football­shaped wooden wafer, called a biscuit, which will swell to create a strong joint with no need for nails or screws.

SHAPING AND SANDING

A block plane and a palm sander are probably all you’ll need unless you plan to shape board edges to create complex molding, in which case, get a router.

Block planes are most often used to trim miter joints for a tight fit. If you slightly back-bevel

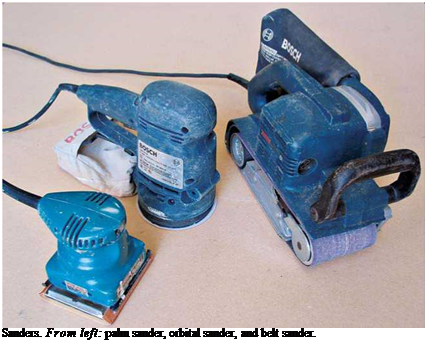
Подпись: Sanders. From left: palm sander, orbital sander, and belt sander. Подпись: a TIPSmiters, the edges of the face will make contact first. Block planes can also shave down a door or window jamb that is too proud (too high above the wall plane), thereby allowing the trim to lie flat. A power plane (see the photo on p. 167) can do everything a handplane can but more aggres­sively, so practice on a piece of scrap and check your progress after each pass. Caution: Before planing existing trim, first use a magnet to scan the wood for nails or screws, setting them well below the surface before planing.

Rat-tail files and 4-in-1 rasps (see the bottom photo on p. 40) remove small amounts of wood from curved surfaces, so that coped joints fit tightly.

Routers are reasonably priced and invaluable for edge-joining, template cutting, mortising, and flush trimming when used with a table. Router tables vary, but on most you mount the router

Handplanin

When handplaning, clamp the wood securely, and push the tool in the direction of the grain. While holding the shoe of the tool flat against the edge of the wood, angle the tool’s body 20° to the line of the board, so that the plane seen from above looks like half of a V. At this angle, the plane blade encounters less resist­ance and clears shavings better.

upside-down, to the table’s underside, so the router bit protrudes above the tabletop. A guide fence enables you to feed stock so that the router bit shapes its edges uniformly—much as a large shaper in a lumber mill would.

Before setting up a router table, however, read up. Fine Woodworking magazine’s Web site (www. taunton. com/finewoodworking) has hun­dreds of references on routers and router tables. Above all, heed all safety warnings about routers: Their razor-sharp blades spin 10,000 rpm to 30,000 rpm.

Sanders are needed for a variety of jobs. A palm sander (or block sander), is useful for shaping contours and sanding in tight places and for light sanding between finish coats. Orbitalsanders are intermediate in cost, weight, and power. Random orbital sanders sand back-and-forth and orbitally (the center of the sander’s pad shifts constantly); they cut faster and leave fewer sanding marks.

If you buy only one sander, this is the one to get. Belt sanders are great for preparing stock and stripping old finishes, but they are so powerful that they tend to obliterate details, so use them sparingly. A belt sander is particularly useful for fitting scribed cabinet panels, as shown in the top right photo on p. 311. Whatever the size of the sander, change the paper often; you shouldn’t need to lean on a sander to make it cut.

Finish Carpentry

After framing and

wires, insulating, and hanging drywall, it’s time to install interior trim. Somewhat like a picture frame, trim is decorative. But it’s also functional, concealing gaps and rough edges where walls meet floors, ceilings, doors, and windows. Although finish carpentry is not as fundamental as structural framing or foundation work, it com­pletes the picture, and often makes or breaks a renovation project.

Interior trim is often called casing, or molding if its face is shaped. Trim helps establish the character of a room, so it’s wise to respect exist­ing trim when replacing or supplementing it. Carefully remove and save existing molding if it’s in decent condition. If that type is no longer available, try to locate new molding with a simi­lar feeling. Or you might be able to combine and overlap stock moldings to create a more complex and interesting look. Another choice is using pre­
fab, high-relief synthetics that duplicate large – scale moldings not available in wood today.

Many woodworkers and carpenters can re-create old trims. A homeowner who’s good with a router and can find the right bits may be able to do the same.

Finally, see Chapter 13, for concise advice on choosing and installing counters, cabinets, and fixtures appropriate to those rooms. For guid­ance on installing door and window hardware, read Chapter 6.

Tools

Most of the tools for finish carpentry are presented in the basic collection discussed in Chapter 3, though upcoming sections address a few specialty tools. Still, by and large, successful trimwork depends more on the hands behind the tools than on the tools themselves. Also, when working with power tools and striking tools, safety glasses are

Trim covers gaps between building materials and dresses up a room. Here, baseboards are shimmed ’/> in. above a concrete basement subfloor so carpet can be tucked under it. Pneumatic nailers are much faster than hand nailing and far less likely to split or dent trim.


image834

image835STANtXV

Measuring and layout tools. 1, Framing square; 2, string; 3, adjustable square; 4, stud-finder; 5, combination square; 6, adjustable bevel; 7, steel try square; 8, chalkline; 9, folding rule with sliding extension; 10, tape measure;

11, compass; 12, Swanson Speed Square.

Подпись: PROnP Get organized. Before you begin, set up a workstation with all the tools and materials you'll need. Keep the area clean and your materials sorted: Clutter and chaos eventually lead to wasted time and costly mistakes. 1111

a must, especially when joinery requires close work at eye level.