ESTIMATING TILE
If you’re installing a popular tile that a local supplier has in stock, wait till you’ve installed the setting bed before estimating tiles. If you order too many, most local suppliers will take back extras, as long as they aren’t damaged or returned too long after purchase. Ordering tiles is not complicated unless surfaces to be tiled have a lot of jogs, recesses, odd angles, and obstacles. Using a tape measure and a pad of graph paper, calculate the square footage of the surface to be tiled and add 8 percent to 10 percent for waste, damage, and future repairs.
Handmade or exotic tiles are another story.
Because they’re expensive and must be ordered
I Tiling a Floor_________________________________________
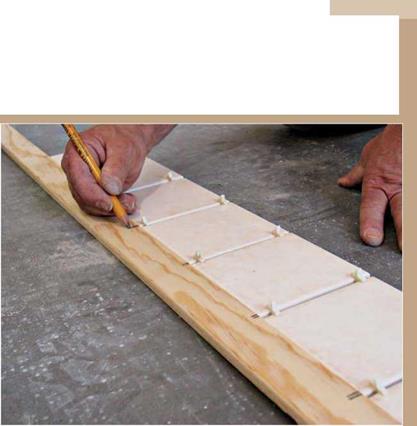
Tile layouts impose a grid that’s basically square in a room that often isn’t. Start by recording the room’s dimensions, use a framing square to see which corners are square, and note any obstacles to be tiled around.
|
|
|
|


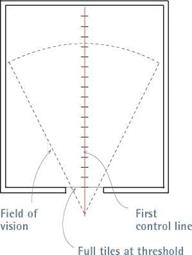
If the doorway is the focal center of the room, use a story pole to find the tile-joint mark closest to the middle of the doorway. Ideally, the first control line will run through that mark, and there will be full tiles along the threshold.
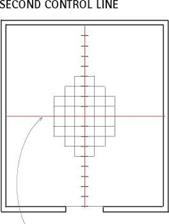
The second control line is perpendicular to the first, intersecting it roughly midway along its length. Although you can start setting tiles anywhere, it’s best to start where control lines meet in the highly visible middle of the room.
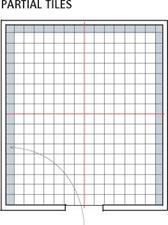
Place angle-cut and partial tiles away from the room’s focal center. Because cutting tiles takes longer than installing full tiles, most installers cut tiles after the field of full tiles is in place.

![]()
well in advance, suppliers rarely accept returns. To save money, try to draw layouts that are accurate to an inch so you can count individual tiles. But you should still order extra tiles—say, 5 percent above your tile count—which is preferable to waiting 2 months for the next tile shipment from Italy. Besides, tile colors can vary greatly between batches. Your detailed drawings will also help you accurately frame out the area to be tiled.
Finally, when ordering tile, calculate the number of trim pieces separately from your calculations for field tiles. For each distinct piece of tile trim (such as surface cove, V-cap trim) add 15 percent to the lineal feet of trim indicated by the layout. Order at least two specialty trim pieces for any one-of-a-kind piece (such as radius-bullnose down angle). This is also the time to order compatible adhesives and color-matched grout and caulk.
Most tiles are square or rectangular. So the most common floor-layout dilemma is in imposing a grid that’s basically square onto a room that isn’t. Laying out walls and countertops is much the same, except that wall layouts are more affected by plumb. Wherever they occur, though, layout lines have the same purpose: They keep tile joints straight. When setting tile, it’s easy to obsess about individual tiles and spacers, getting lost in close-up details. Thus layout lines help you keep the big picture in view and so keep tile joints from straying.
FOUR TIME-TESTED TIPS OF TILING
Though the following rules make sense most of the time, bend them when you must.
Use full tiles at focal centers. A focal center is any area that the eye is drawn to: the front edge
|
|
|
|
|
|
|
|
|
|
|

|


Leave a reply