Rejuvenating
If your grout is moldy, use a soft-bristle plastic brush to scrub the joints either with household cleaner, a weak bleach solution, or a tile-specific cleaner like Homax® Grout and Tile Cleaner. Wear rubber gloves and goggles, and always brush such solutions away from your face. If the mold returns, try installing a ventilator fan to reduce the moisture in the room. If the grout is intact but dingy, scrub, rinse, and allow it to dry before applying a grout colorant, which will both color and seal the grout. Follow the manufacturer’s instructions.
However, if tiles are loose; if surfaces flex; or if you see water damage around fixtures, at the base of a tub or shower, or along the backsplash of a counter, the substrate has probably deteriorated and should be replaced. In other words, you’ll need to tear out tiles and substrate.
There’s an interim condition, often caused by applying grout that was too thin or by over-sponging it, in which tile is intact but grout is worn or crumbling. In that case, use a grout saw to cut out the old grout, taking care not mar the tile edges. As you’ll realize quickly, this is a tedious job. Vacuum out the debris, scrub the joints with a cleaning solution, rinse well, and then use a grout float to apply polymer – modified grout, which will adhere better. It’s possible to regrout only part of a surface, but matching old and new grout color can be difficult, so it’s better to regrout the entire surface. Wait 72 hours, before sealing the grout joints.
Removing hardened caulk along the tub can be a chore. Chiseling it out is perilous because tub enamel and tile chip easily. Fortunately, acetone dissolves caulk. To use the acetone, cut cotton clothesline to the length of the caulk seam, wet the clothesline with acetone, and place it next to the caulking before covering both with duct tape. Left overnight, the acetone will soften the caulk. Caution: Acetone is volatile and thus flammable, and nasty to handle and breathe. Don’t use acetone around pilot lights, open flames, and the like. Wear rubber gloves and a respirator mask with cartridges.
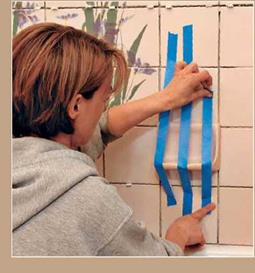 It’s smart to tape specialty tile pieces in place until their thinset has hardened. That’s especially true for heavy pieces, such as the soap niche shown, and for pieces with a relatively small bonding surface, such as bullnose edge trim. Caveat: Wait until the field tiles have bonded securely before taping to them.
|
|
|
 |
|
|


Leave a reply