SETTING AND GROUTING
Setting means positioning and adhering tile to a substrate. Grouting means sealing the joints between tiles with a special mortar.
A notched trowel spreads adhesive. Two edges of the tool are flat, designed to spread the adhesive initially. Then on subsequent passes, use the notched edges to comb a series of parallel ridges, which will spread evenly when the tile is pressed into it. Notch height should be about two-thirds the thickness of the tile.
A margin trowel is a utility tool that’s great for mixing small batches of powdered adhesives, cleaning mortar off other trowels, buttering individual tiles with adhesive, and removing excess grout or adhesive that oozes up between tiles.
Plastic spacers and wedges enable you to shim individual tiles so their edges align to your layout lines.
A beater board is just a flat board placed over tile sections and rapped gently with a rubber mallet to seat the tiles in the adhesive. Not all tilesetters use a beater board. Many just press tiles in firmly or use a fist to seat them better.

A grout float (rubber-faced trowel) applies grout in a process that takes at least two passes. Holding the face of the grout float at about 30°, sweep the grout generously over the tile and pack it into the joints. Then, holding the float almost perpendicular to the surface, remove the excess grout, unloading it periodically into a bucket. To avoid pulling grout out of the joints, make your passes diagonally across the tile joints.
Round-cornered, tight-pored sponges are less likely to pull grout out of tile joints. After grout starts to haze over, wipe lightly with a dampened sponge, rinsing the sponge often. Get several types of sponges. Kitchen sponges with scrub pads on the back are useful for removing stubborn grout.
A mixing bit in an electric drill can mix large amounts of powdered adhesives or grout. Slow mixing speeds of 300 rpm to 400 rpm work best. And keep the bit immersed to minimize mixing in air, which weakens the batch. Wear a respirator mask.
Here’s a quick survey of materials you might use to create a durable tiling job.
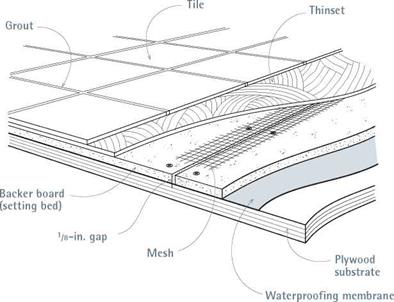
Think of the job as if it were a layer cake. For example, in floor tiling, the bottom layer (conceptually the table under the cake) would be the floor joists. Nailed to the joists, in most cases, is a plywood substrate. For a wet installation such as a shower wall, next comes a waterproofing membrane, followed by a setting bed of cementitious backer board or a mortarbed. Troweled onto the setting bed is a setting material, typically thinset adhesive or organic mastic. Tiles are applied to the setting bed, and once the bed has hardened, tiles joints are grouted. Later, a sealer may be
Mastering the mess
Controlling the mess is a big part of successful tile setting. If you’re tiling a tub surround, cover floors with builder’s paper or plastic, mask off cabinets, and line the bathtub with a heavy canvas drop cloth before you start. Masonry debris is very abrasive, so vacuum as it accumulates. Also, keep a clean 5-gal. plastic bucket (joint compound pails are perfect) full of clean water for sponging mortar, adhesive, or grout off tools. Last, a bundle of clean dry rags is useful for buffing dried grout haze off tile and soaking up messes.
I Typical Wet Installation Floor applied to make tile and grout more water or stain resistant.
Methods and materials are rarely predictable in renovation, so it’s a good idea to survey the back or underside of the surface you’re about to tile, both to see how many layers there are and to check if they’re in good condition. You can pull out a heating register to see a cross-section of the flooring, for example. Or test-drill a small hole in an inconspicuous spot to determine the thickness and composition of an existing wall, floor, or countertop.


Leave a reply