Category RENOVATION 3

PROnP

Tape dispensers hold paper or mesh tape and clip to your belt, so your tape is always ready to roll. Bigger dispensers hold a 500-ft. roll.
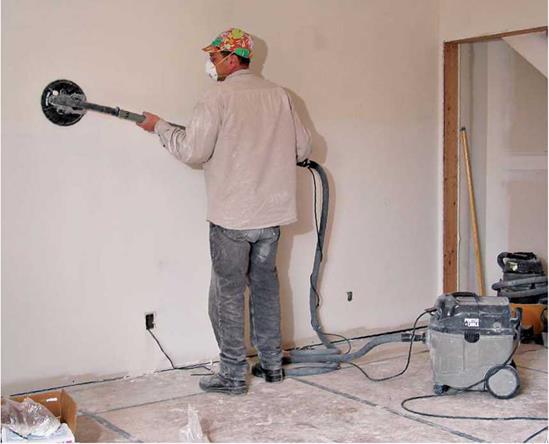
image7371111

image738Подпись: Adjust your screw gun so that it sets screws just below the surface of the drywall.

Finally, tape up sheet plastic to isolate the rooms you’re sanding, especially if you’re living in the house. Painter’s tape will do the least dam­age to trim finishes and paint.

MATERIALS

This chapter began with sizes and types of dry – wall. Now let’s look at screws, joint tape, corner beads, and joint compound before planning and estimating supplies.

Drywall screws have all but replaced nails.

Here are the three principal types:

► Type-W screws have a coarse thread that grips wood well. They should be long enough to penetrate framing at least 58 in. In double­layer installations (two h-in. panels), use type-W screws at least 1 /4 in. long.

► Type-S screws have fine threads and are designed to attach drywall panels to light-steel framing and steel-resilient channels. At least

% in. of the screw should pass through metal studs, so 1-in. type-S screws are commonly used for single-ply li-in. or 58-in. drywall installations. If you’re attaching drywall to heavy-gauge (structural) steel, use self-tapping screws.

► Type-G screws are sometimes specified to attach the second panel of a fire-rated,
double-layer installation. That is, the first panel is the substrate to which the second panel is screwed and glued with construction adhesive. Ideally, screws should also penetrate framing, so ask building inspectors about installation requirements if your local code specifies type-G screws.

Nails are still used to attach corner bead and to tack panels in place. Ring-shank drywall nails hold the best in wood; don’t bother with other nail types. Nails should sink M in. into the wood.

Wet -SANDING

Using a large sponge to wet-sand drywall joints will definitely reduce dust, but wet-sanding isn’t feasible for a project of any size because you must rinse the sponge and change the water continually. Also wet-sanding soaks the paper facing, sometimes dislodges the tape, and tends to round joint compound edges rather than taper them. That said, if you’re drywalling a small room and don’t like moving the furniture out of the room, wet-sanding is a cleaner way to go.

Подпись:image739Подпись: METAL CORNER BEAD FLEXIBLE VINYL BULLNOSE

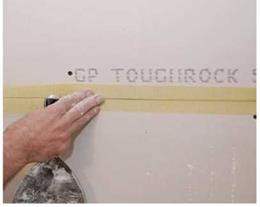
Joint tape is used to reinforce drywall seams and is available as 2-in.-wide paper tape and 1/2-in.- or 2-in.-wide fiberglass mesh tape. Self­adhesive mesh tape is popular because it’s quicker. You can apply it directly to drywall seams and then cover it with joint compound in one pass. Whereas, with paper tape, you must first apply a layer of joint compound, press the paper tape into it, and then apply a coat of compound over that. If there’s not enough compound under paper tape, it may bubble or pull loose.

Still, many professionals swear by paper tape because it’s cheaper than fiberglass mesh, it’s stronger than mesh and less likely to be sliced by a taping knife, it won’t stretch, and it is lightly creased up the middle, making it easier to install and align in an inside corner. Consequently, pros use mesh tape only with setting-type compounds, which cure harder and stronger than drying-type compounds, described on p. 358.

However, self-adhesive mesh is perfect for drywall repair. If you press the mesh over a crack or small hole, you may be able to hide the prob­lem with a single layer of joint compound.

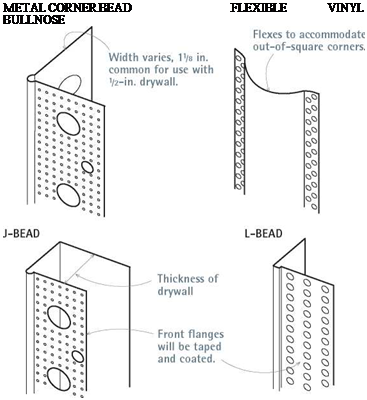
Comerbeads and trim beads finish off and pro­tect drywall edges. They’re available in metal, vinyl, PVC plastic, and paper-covered variations. Most attach with nails or screws.

Cornerbeads are used on all outside corners to provide a clean finish and protect otherwise vul­nerable drywall corners from knocks and bumps. (As noted earlier, inside corners are formed with just tape and compound.) Cornerbeads come in a number of different radii; larger bullnose vari­eties give you a dramatic curve. Whatever type you choose, though, install it in one piece.

J-beads keep exposed ends of drywall from abrading. These beads are typically used where panels abut tile or brick walls, shower stalls, or openings that won’t be finished off with trim—in other words, where the edge of the drywall is the

I Corner and Edge Treatments

Drywall Fasteners

ATTACHING TO™

FASTENER USED

DRYWALL THICKNESS (in.)

MINIMUM FASTENER LENGTH (in.)

Wood studs, ceiling joists, rafters

Type-W drywall screws (coarse thread)

38, У2, 5/

1, 1‘/8, 1‘/4

(penetrate framing У in.)

Wood studs only

Ring-shank drywall nails

38, ‘/2, У

1‘/8, 1/4, 138

(penetrate framing 5/8 in.)

Light-gauge metal framing

Type-S drywall screws (fine thread)

38, ‘/2, 5/

3/4, 7/8, 1

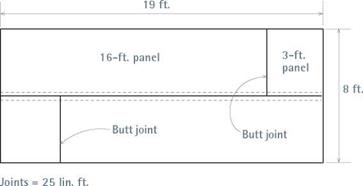
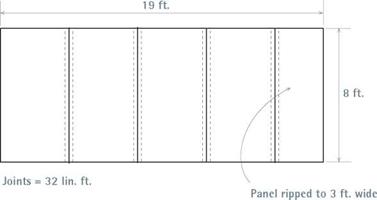
Подпись: Store premixed joint compound at room temperature (60°F to 70°F) so it's ready to apply. At lower temperatures, it doesn't spread as easily. Never allow it to freeze; throw it out if it does because it won't bond well after freezing. Added tip: Store self-adhering mesh tape in a plastic bag so its adhesive won't dry out. 1111 Подпись: I Minimizing Drywall Jointsimage741"image742Подпись: Hanging wall panels horizontally often reduces the number and length of the joints. With studs a standard 16 in. o.c., you could reduce the total lineal feet of taping by running panels horizontally instead of vertically. For the room dimensions shown, however, the upper layout also creates two butt joints, which can be tedious to feather out.

finished edge. L-beads are similar; they’re used where panels abut windows, suspended ceilings, paneling and so on. In general, L-beads are easier to install on panels already in place. J – and L-beads are sized to drywall panel thickness; some types require joint compound, some don’t.

Flexible arch beads often come in rolls that are presnipped, so as you unroll them, they assume the shape of the arch you’re nailing or stapling them to. Apply joint compound and finish them as you would any drywall seam.

Joint compounds can be broadly divided into drying types and setting types. They differ in ease of use, setting (hardening) time, and strength.

Drying-type joint compounds are vinyl based and dry as water evaporates from them. They usually come premixed and are easy to apply and sand. Typically, you can apply a second coat 24 hours after the first, if you maintain a room temperature of 65°F. There’s little waste with
drying-type compound. And, once opened, it will keep for a month if you seal the bucket tightly.

Setting-type joint compounds, which contain plaster of paris, are mixed from powders. They set quickly and so allow you to apply subsequent coats before the compound is completely dry. In general, they bond better, shrink less, and dry harder than drying types. They harden via a chemical reaction, hence their nickname, "hot mud.” Depending on additives, they’ll set in 30 minutes to 6 hours. However, setting-type compound sets up so quickly and so hard that it can be a monster to sand. Once it’s mixed, you’ve got to use it up. It won’t store.

So, unless you’re a drywalling whiz, use a pre­mixed, all-purpose, drying-type joint compound. A 5-gal. bucket will cover 400 sq. ft., roughly, a 12-ft. by 12-ft. room. with 8-ft. ceilings. The com­pound is ready to use right out of the bucket. It’s reasonably strong, and each application should dry in a day.

One further distinction: Drying-type and set­ting-type joint compounds are further formulated as either taping compounds—used for the first coat, in which you embed the tape—or topping compounds, used for the second and third coats because it feathers out (thins) better and dries faster. Again, all-purpose compound can be used for all three coats, but you might want to experi­ment with the two types once you’ve had some practice. Some pros use setting-type joint com­pound for the first and second coats and drying – type for the third (and last) coat.

PLANNING THE JOB

Before estimating materials, walk each room and imagine how best to orient and install panels. These five rules, known to drywall pros, will save you a lot of pain.

Rule 1: Use the longest panels possible. This minimizes the number of joints. A 4-ft. by 14-ft. or 4-ft. by 16-ft. panel is heavier and less wieldy than a 4-ft. by 8-ft. panel. But hanging larger panels is relatively fast, compared to the time it takes to tape, coat, and sand the joints of the smaller panels.

Rule 2: Think spatially. Running panels hori – zontally—perpendicular to studs and ceiling joists—can reduce the number of joints and pro­mote stronger attachments. For example, two 4-ft. by 12-ft. wall panels run horizontally will reach an 8-ft. ceiling and create only one hori­zontal seam to be filled. Two 54-in.-wide (4/2-ft.) panels run horizontally will reach a 9-ft. ceiling. However, if ceilings are higher than 9 ft., you may be able reduce the number of joints by installing wall panels vertically (parallel to studs).
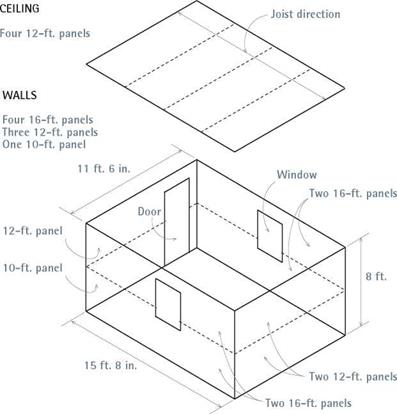
image743

Rule 3: Minimize butt joints. Long edges of pan­els are beveled to receive tape joints, but the short edges (butt edges) are not. Consequently, butt joints are difficult to feather out, and they are likely to crack. So try to minimize the number of butt edges. Where you can’t avoid them, position them away from the center of a wall or ceiling. Last, always stagger (offset) butt joints; never align them. Otherwise, you may need to feather joint compound out 3 ft. wide to get a barely acceptable joint.

Rule 4: Install drywall that’s thick enough.

Otherwise spans may sag between ceiling joists and bow between studs. For example, if you’re running panels parallel to ceiling joists spaced 24 in. on center, 58-in. drywall is much stronger and less likely to sag than ’/2-in. panels. For this, be sure to comply with local codes.

Rule 5: Don’t scrimp on panels. Expect a cer­tain amount of waste, especially if you’re installing around stairs or sloping ceilings. It’s a mistake to try to piece together remnants, because that creates a lot of butt joints and looks awful. Likewise, scrimping on screws or joint compound results in weak joints and screw pops.

Finish Surfaces

image728Подпись:image729

People have Idings since

prehistoric times. Archaeologists have unearthed plaster walls and floors dating to 6000 B. C. in Mesopotamia. And the hieroglyphics of early Egypt were painted on plaster walls. In North America, plaster had been the preferred wall and ceiling surface until after World War II, when drywall entered the building boom. Although drywall represents a historic shift in building technology, the shift was more one of evolution than revolution because drywall’s core material is gypsum rock—the same material used since ancient times to make plaster.

Drywall

Sometimes called Sheetrock® after a popular brand, drywall consists of 4-ft.-wide panels that are screwed or nailed to ceiling joists and wall studs. Sandwiched between layers of paper, dry – wall’s gypsum core is almost as hard and durable as plaster, though it requires much less skill to install. Appropriately, the term drywall contrasts these dry panels with plaster, which is applied wet and may take weeks to dry thoroughly.

Panel joints are concealed with tape and usu­ally three coats of successively wider layers of joint compound that render room surfaces smooth. Each panel’s two long front edges are slightly bev­eled, providing a depression to be filled by joint tape and compound. Note: Each layer of joint com­pound should be allowed to dry thoroughly before sanding smooth and applying the next coat.

DRYWALL TYPES

Drywall’s paper facing and core material can be manufactured for special purposes to make it more flexible, water resistant, fire resistant, sound isolating, scuff resistant, and so on. The upcoming pages will help you determine the size and type of drywall you choose.

► Where it will be used. Local building codes may require water-resistant (WR) dry – wall in high-humidity rooms or fire-resistant (type-X) panels elsewhere to retard fires.

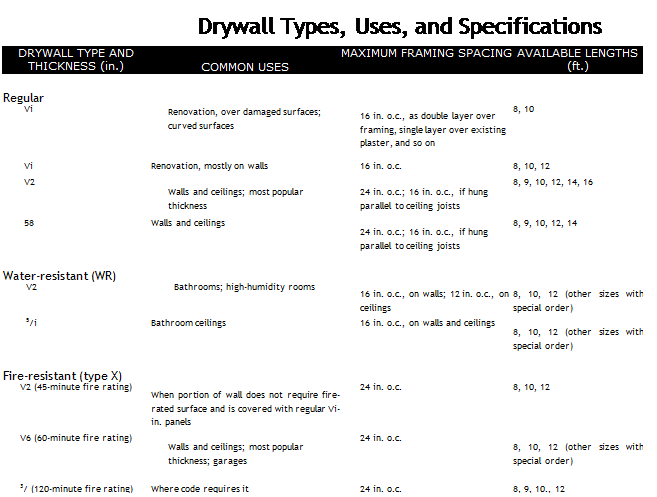
► Distances it must span. Because gypsum is relatively brittle, the drywall must be thick enough to span the distance between ceiling joists without sagging and between wall studs without bowing (see "Drywall Types, Uses, and Specifications," on p. 352).

► Skill and strength of installers. The longer the sheets, the heavier and more unwieldy they are to lug and lift, especially

a concern if you’re working alone or if ceilings are high.

► Access to work areas. Using sheets longer than the basic 8 ft. reduces the number of end joints that need taping. But these jumbo 14-ft. and 16-ft. panels are practical only if your doors and stairwells are large enough to admit them.

Regular drywall comes in four thickness:

‘A in., 58 in., ‘A in. and 58 in; and in sheets 8 ft. to 16 ft. long, in 2-ft. increments. There are also 4-ft. by 9-ft. sheets. To minimize wall joints when installing drywall horizontally, regular drywall also comes in 54-in. widths.

The most commonly used thickness is ‘A in., typically installed over wood or metal framing.

A sheet that size weighs about 70 lb., still man­ageable for strong people working solo.

To increase fire resistance and deaden sound, you can double up 52 in. panels, but that may be overkill. More often, a single layer of 58-in. dry – wall is used for those purposes. Being stiffer, 58-in. panels are harder to damage, so they’re a smart idea in hallways if you’ve got kids. And they’re less likely to sag between ceiling joists and bow between studs.

Renovators commonly use ‘/4-in. and 58-in. sheets to cover damaged surfaces and thereby avoid the huge mess of demolishing and remov­ing old plaster. For best results with this thin dry – wall, use both construction adhesive and screws to attach it. However, neither thickness is sturdy enough to attach directly to studs in a single layer.

Finish Surfaces
Because they’re thin and flexible, two layers of ‘4-in. drywall are routinely bent to cover curving walls, arches, and the like. Attach the second layer with construction adhesive and screws. If the curved area has a short radius (5 ft. to 5 ft.), wet the drywall first (discussed in detail later in this chapter). There’s also a ‘4-in. flexible drywall with

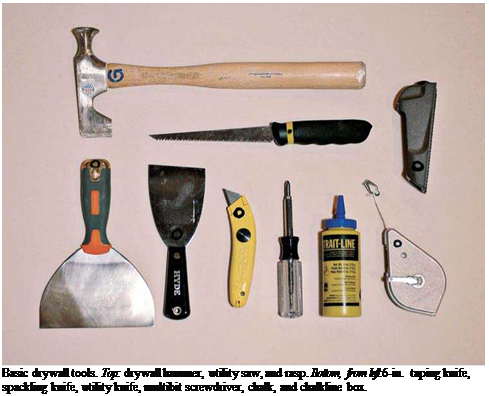
Подпись: Basic drywall tools. Top: drywall hammer, utility saw, and rasp. Bottom, from left:6-in. taping knife, spackling knife, utility knife, multibit screwdriver, chalk, and chalkline box. heavier paper facings designed for curved sur­faces, but this usually needs to be special-ordered.
Water-resistant drywall (WR board) is also called greenboard, after the color of its facing. Its water-resistant core and water-repellent face are designed to resist moisture in bathrooms, behind kitchen sinks, and in laundry rooms. In general, it is a good base for paint, plastic, or ceramic tiles affixed with adhesives, and for installation behind fiberglass tub surrounds.

Although WR board can cover most bathroom walls, it should not be used above tubs or in shower stalls. In particular, it’s not recommended as a substrate for tile in those areas because sus­tained wetting and occasional bumps will cause the drywall to deteriorate, resulting in loose tiles, mold, and water migration to the framing behind. As a substrate for tile around tubs and showers, cementitious backboard is a far more durable and cost effective. Mortar is also durable there, but more expensive.

For the reasons just cited, don’t install WR board over a vapor barrier, especially if this drywall will later be painted with oil-based paint, papered with vinyl wallpaper, or otherwise covered with a vapor-retarding membrane. Sandwiched between two impervious layers, the drywall will deteriorate.

Fire-resistant drywall (also called type X) is specified for furnace rooms, garages, common walls between garages and living spaces, shared walls in multifamily buildings, and so on. The thicker the type-X drywall, the higher the fire rat­ing: 45 minutes for 14 in., 1 hour for 58 in., 2 hours for 54 in. Fire-resistant drywall has a core rein­forced with glass fibers, making it more durable and somewhat harder to cut.

Most codes specify 558-in. drywall for single­family residences—a thickness also adequate to span garage ceiling joists spaced 24 in. on center.

Other specialty drywalls are available. Foil – backed drywall is sometimes specified in the Cold Belt to radiate heat back into living spaces and prevent moisture from migrating to unheated areas. Abuse-resistant drywall, sound-mitigating drywall, and vinyl – and fabric-covered panels with prefinished edges are also manufactured.

Blueboard is a base for single – or two-coat veneer plastering and is now widely used instead of metal, wood, or gypsum lath. It is available in standard 4-ft.-wide panels.

Gypsum lath is specified as a substrate for traditional full-thickness, three-coat plastering.

Its panels are typically 16 in. by 48 in.

Cementitious backerboardhas a core of cement rather than gypsum. Used as a tile sub­strate, it is installed much like drywall (see Chapter 16 for details).

TOOLS

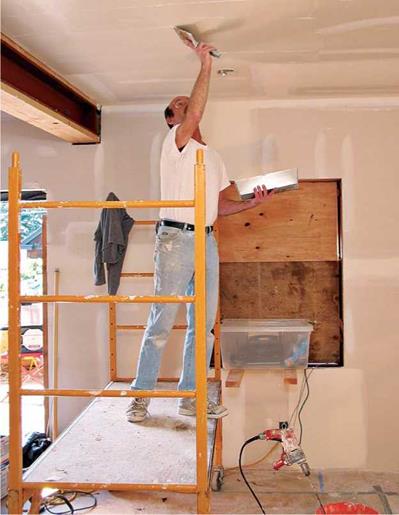
You can install drywall with common carpentry tools—framing square, hammer, tape measure, utility knife, and chalkline. Still, a few special­ized, moderately priced tools will make the job go faster and look better. If you’ve got high ceil­ings, rent scaffolding.

Layout tools include a 25-ft. tape measure, which will extend 8 ft. to 10 ft. without buckling; a 4-ft. aluminum T-square for marking and cutting panels; a chalkline box for marking cut­lines longer than 4 ft.; a compass or a scriber to transfer out-of-plumb wall readings to inter­secting panels; and a 2-ft. framing square to transfer the locations of outlet boxes, ducts, and such onto the panels.

Cutting and shaping tools may be simple, but must be sharp. Drywall can be cut with one pass of a sharp utility knife, a quick snap of the panel, and a second cut to sever the paper backing, as shown in the center photo on p. 562. Buy a lot of utility-knife blades and change them often; dull blades create ragged edges. Use a Surform® rasp to clean up cut drywall edges. The sharp point of a drywall saw enables you to plunge cut in the middle of a panel without first drilling, though the edges of the cut will be rough.

A drywall router or a laminate router with a drywall bit is the pro’s tool of choice for quick, clean cuts around electrical outlet boxes, ducts, and the like. With a light touch and a little prac­tice, you can use this tool to cut out boxes

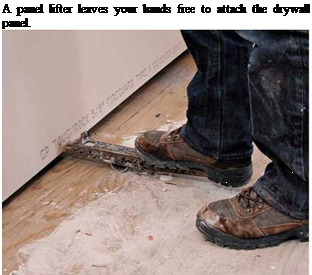
Подпись:Подпись: A panel lifter leaves your hands free to attach the drywall panel.

image733

already covered by drywall panels, as shown in the photo on p. 363.

Similarly, you can use a utility saw to cut out the waste portion of a drywall panel that you’ve "run long” into a doorway or window opening.

Lifting tools will help get you or the drywall up into place. Two lifting tools can be handmade: A panel lifter is just a first-class lever inserted under the bottom of a panel to raise it an inch or so, leaving your hands free to attach the drywall. Metal lifters are not expensive, but 1×2 scraps work almost as well.

The second homemade tool, a T-support, temporarily holds a panel against ceiling joists while you attach it. Cut a 2×4 T-support about h in. longer than the ceiling height so you can wedge it firmly against the panel. Or you can rent a hydraulic stiff arm, an adjustable metal version of a T-support.

For taping and sanding, some pros swear by stilts, but they’re awkward and ill-advised for amateurs. Already off-balance from working over your head, you could easily fall backward and injure yourself. For that reason, stilts are banned by many state regulatory agencies and excluded from most workers’ insurance coverage.

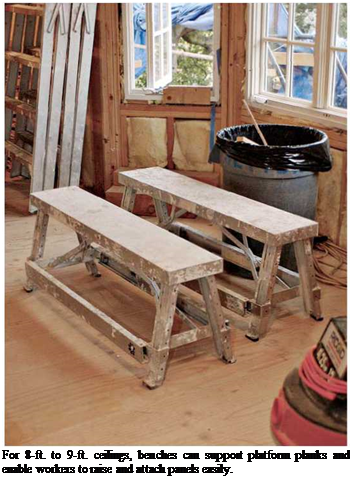
Adjustable drywall benches should enable you to reach 8-ft. or 9-ft ceilings easily. Alternatively, you can lay planks across sturdy wooden saw­horses.

Ultimately, renting a drywall lift and/or scaf- foldingis the safest way to go, especially if ceil­ings are higher than 10 ft. If there’s no danger of falling off your work platform, you can focus on attaching drywall. Scaffolding is also indispen­sable during the taping and sanding stages.

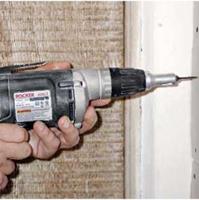
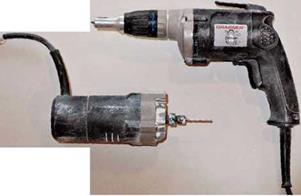
Attachment tools are typically a corded screw gun or a drill with screw bits to attach drywall.

A cordless drill with screw bits is fine for a drywalling a room, but pros who have thousands of screws to drive use corded screw guns, which have clutches and depth settings that set the screws heads perfectly—just below the surface. The pros also use a drywall hammer for incidental nailing. A standard carpenter’s hammer will do almost as well, but the convex-head of a drywall hammer is less likely to damage the paper facing of a panel, should you need to drive down a nail.

Adding a self-feeding screw attachment to the screw gun would probably speed up the job, but few pros use them. Finally, if you’ll be installing double layers of drywall, use a caulking gun to apply construction adhesive to the outer face of the first layer.

Taping and finishing tools are used to apply joint compound through to sanding the joints. The workhorse of taping is the 6-in. taping knife, perfect for filling screw holes, spreading a first layer of joint compound, and bedding tape.

To apply the successively wider and thinner second and third coats of joint compound, you’ll need wider taping knives or curved trowels.

Taping knives typically have straight handles and blades 10 in. to 24 in. wide; a 12-in.-wide knife will suffice for most jobs. Trowels have a handle roughly parallel to the blade and a slightly curved blade that "crowns” the compound slightly. Trowel blades run 8 in. to 14 in. long.

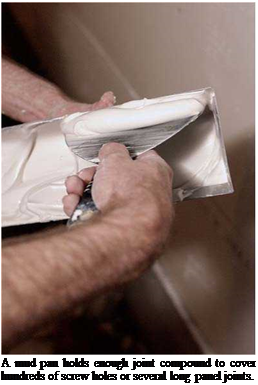
Applying "mud” (joint compound) takes finesse, so most pros use a mud pan or a hawk to

Подпись: Drywall router (bottom) and screw gun.image734"Подпись: A mud pan holds enough joint compound to cover hundreds of screw holes or several long panel joints. the vanishing Nail

Drywall screws install faster than drywall nails. They also hold better and are less likely to damage a panel’s paper facing. Ring-shank nails are used to tack up panels, but screws take over from there. Besides, screws are quiet and nonconcussive, so installers are less likely to disturb finish surfaces, tottering vases, or feisty next-door neighbors.

hold enough mud to tape several joints. As they work, drywallers are constantly in motion: scoop­ing mud, centering it on the knife blade, scraping off the excess, and returning it to the pan or onto the hawk.

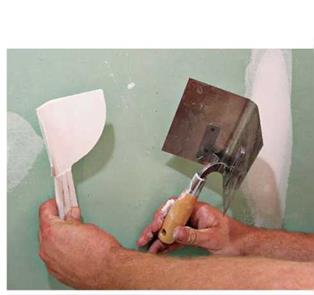
Comer knives enable you to apply mud to both sides of an inside comer simultaneously. To finish outside corners (those that project into a room) consider making your own tool.

Boil a plastic flat knife, and once it’s soft, bend into the shape you need, as shown in the photo at right.

For high-volume jobs, you can rent taping tools that dis­pense tape and compound simultaneously. See “Mechanical Taping Tools,” on p. 369, for more information.

Sponges and a pail of water will keep tools clean as you go.

Even tiny chunks of dried com­pound will drag and ruin freshly applied layers, so rinse tools often, and change water often.

A perfectly clean 5-gal. joint compound container is a great rinse bucket. Use a second one to store and transport delicate trowels and knives.

Sanding equipment starts with special black carbide-grit sandpaper, which resists clogging by gypsum dust; it comes precut to fit the rubber­faced pads attached to poles and hand sanders. Sandpaper grit ranges from 80 (the coarsest) to 220 (fine); 120-grit paper is good to start sanding with. Finish-sand with 220-grit or a rigid dry – sanding sponge (a special sponge that is never wetted).

A sanding pole with a pivoting head enables you to sand higher—8 ft. ceilings are a snap— and with less fatigue because you use your whole upper body.

Sanding joint compound generates a prodi­gious amount of dust, so buy a package of good – quality paper dust masks that fit your face tightly; they’re cheap enough to throw out after each sanding session. If you’re sanding over your head, lightweight goggles and a cheap painter’s hat will minimize dust in your eyes and hair.

Подпись: Left:a home-bent knife for shaping outside corners. Right:an inside-corner knife.Подпись: PRO"ГIP New taping knives and trowels may have burrs or sharp corners that can tear the drywall's paper facing. Before you use a new tool, sand its edges and corners lightly with very fine emery paper. Rinse these tools repeatedly with warm water as you work, dry them when you're done, and store them apart from heavy tools so their blades won't get nicked. 1111 image736A shop vacuum with a fine dust filter is a must; vacuum at each break so you don’t track dust all over the house. Dust-free sanding attachments are available for shop vacuums (as shown in the top photo on p. 356). Although they virtually eliminate dust, they’ll sand through soft topping coats and expose the joint tape in a flash if you’re not careful. For best results, run them at low speed settings and use fine, 220-grit sandpaper.
A dust-free sander attached to a shop vacuum cuts dust dramatically, but in unskilled hands it will oversand soft topping coats.

Three Things to Ask an HVAC Specialist

Upgrading the heating and cooling equipment in your house is a good way to improve interior air quality and con­serve energy. Ask a reputable local HVAC contractor about the following:

► Induced-draft gas furnaces. Roughly two-thirds of North American homes have forced-hot-air (FHA) sys­tems, so replacing an existing FHA furnace is a great way to increase efficiency without disturbing existing ducts and registers. Induced-draft furnaces can achieve annual fuel-use efficiencies of 90 percent to 97 percent because they extract heat from combustion gases. (Older well – maintained furnaces might have efficiencies closer to

70 percent, or less.) Because combustion gases are cooler, they’re less buoyant, so the system uses a fan to expel them—hence the name induced draft.

► Heat-recovery ventilators. Tightly insulated houses conserve energy, but they may also recycle stale air endlessly. In response to the dilemma of introducing fresh air without expelling conditioned air, heat-recovery ventila­tors (HRVs) were developed. Typically, an HRV has two fans: one to bring in fresh air and one to expel stale air. It also has a heat exchanger that recovers 75 percent to 80 percent of the heat in the outgoing air and preheats incoming air. HRVs can filter pollen and dust from incoming air and, by
equalizing air pressure in tight houses, prevent potentially dangerous situations such as back-drafting (furnace com­bustion air, including carbon monoxide, being sucked back down a vent flue by negative air pressure). Some HRVs also remove excess humidity from incoming air.

► Central air cleaners. Most standard central heating/ air-conditioning filters don’t do a good job. If you’re con­cerned about interior air quality and removing allergens (such as dust mites, mold, and pet dander), you have a variety of air cleaners to choose from, including pleated media, self-charging electrostatic filters, electronic air cleaners, and by-pass HEPA filters. In general, air cleaners vary by fineness of filtering (dust arrestance), ease of installing into existing ductwork, airflow impedance, and cost. To make sense of this and many other HVAC topics, visit www. dulley. com. On air filters, mechanical engineer Jim Dulley notes, "For do-it-yourself installation, self­charging electrostatic models are ideal because they require no sheet-metal ductwork to install."

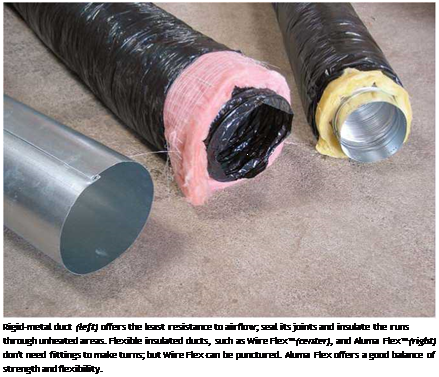
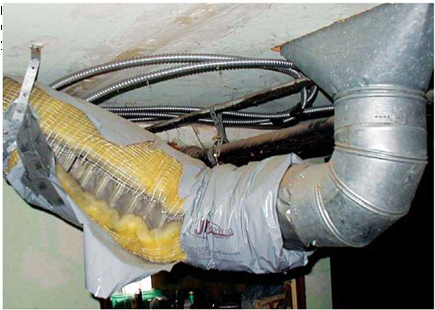
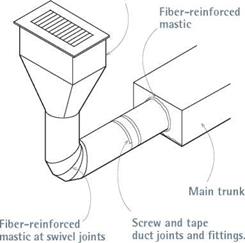
► Upgrading ducts. Sealing ducts can prevent air leaks and, in many cases, reduce excess moisture. But if ducts are rusty and as tired as the one shown on p. 333, or are uninsulated as they traverse unheated areas, maybe it’s time to replace them. Three popular types are shown above.

Space-Saving Walls

To conserve space, builders often attach 1×3 furring strips to basement walls. These strips help secure insulation and provide a base for attaching drywall. But furring strips are viable only if the foundation walls are dry and relatively plumb and flat. If foundation walls are lumpy and off-plumb, a stud wall erected inside the foun­dation is the only way to create a flat plane for finish materials.

Подпись: of the rim joists. Then insulate the rim joists with rigid insulation or encapsulated (poly- wrapped) fiberglass batts. ► Lumber in direct contact with masonry walls or floors should be pressure-treated; relatively benign biocides in pressure-treated wood include alkaline copper quat (ACQ) and copper boron azole (CBA). If you use non- treated furring strips, prevent rotted ends by keeping the bottoms of the vertical strips 1/2 in. above concrete floors. ► Don’t place fiberglass or cellulose next to masonry walls because fibrous materials will retain moisture and foster mold. In basements and crawl spaces, closed-cell XPS panels are a better choice because they are impermeable to and unaffected by moisture. Open-cell XPS is Fortunately, not all stud walls guzzle space. Lightweight steel studs are only 15/ in. deep; but, as noted in Chapter 4, they can be quirky to work with. The third option, flat-framing, is a winner: Rotate 2×4 studs 90° so that their broad side faces the foundation wall and use 2×2 plates at top and bottom. Because modern 2x4s are actually 1V2 in. by 31/ in., a flat-framed wall is only 11/ in. deep, and the 3V2-in. faces give you plenty of surface for screwing on drywall. Besides, unlike skimpy furring strips, 2x4s won’t split.
Space-Saving Walls

image722

Where winters are less severe, it’s

In cold climates, avoid thermal breaks by butting rigid-insulation panels together and sealing seams with builder’s tape.

acceptable to have thermal breaks between insulation panels. Use power – actuated nails or concrete screws to attach furring strips directly to masonry walls. See the wall-top details shown in the drawing at left.

image724
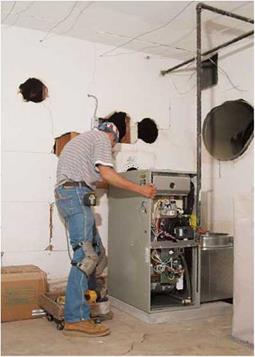
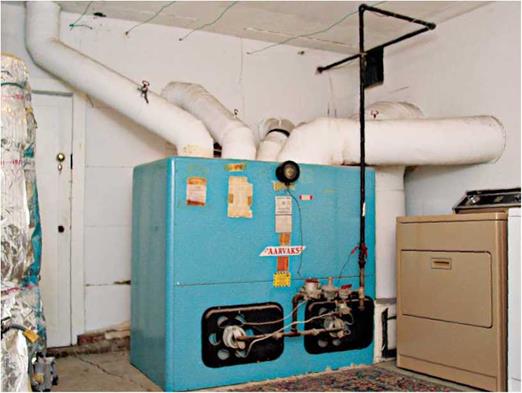
BEFORE AND AFTER: THE FURNACE

This old 1930-era forced-hot-air system has asbestos-insulated ducts and a gas burner that guzzled fuel in the dead of winter.

image725

The induced-draft, condensing gas furnace that replaced the old one (above) is much smaller (note the duct holes of the old furnace) and achieved 95 percent fuel efficiency.

also acceptable in sub floor areas but, as noted earlier, open-cell foams are more permeable and will allow moisture to migrate.

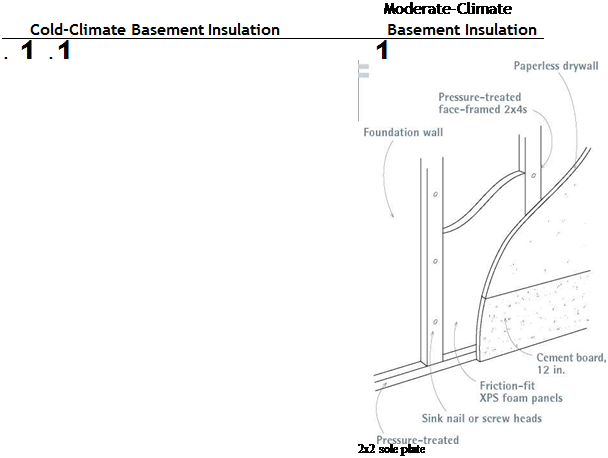
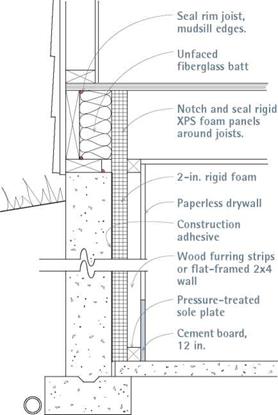
Mold grows on paper-faced drywall, so don’t use it in basements. Instead, use paper­less drywall such as Fiberock®, Humitek™, and DensArmor™. Cement board, such as WonderBoard® and HardiBacker®, is com­pletely impervious to water, but it is expensive and requires more work to install. Consider running a 12-in. band of cement board along the bottom of the walls to prevent moisture absorption through the basement floors, and then use something less expensive above it, as shown in the drawings on the facing page.

Cold climates. In cold climates, basement wall insulation should be continuous; in other words, there should be no thermal breaks. To achieve this continuity, use construction adhesive to adhere XPS panels directly to the foundation or to a vapor barrier adhered to the walls, if required by code. To find an adhesive that’s chemically compatible with rigid-foam panels, read the product literature for both materials. As you install the panels, butt their edges tightly together and cover the joints with builder’s tape.

Подпись: Rigid-metal duct (left) offers the least resistance to airflow; seal its joints and insulate the runs through unheated areas. Flexible insulated ducts, such as Wire Flex™ (center), and Aluma Flex™ (right) don't need fittings to make turns; but Wire Flex can be punctured. Aluma Flex offers a good balance of strength and flexibility.

If space is tight in the basement, flat-frame a 2×4 wall 16-in. on center, with 2×2 top and bottom plates. Use a powder-actuated nailer or concrete screws to secure the bottom plate to a concrete floor. (Wear ear and eye protection.) Use wood screws to attach the top plate to the first-floor joists or, where joists run parallel, to 2×4 nailers inserted between the floor joists and rim joists. (Predrill holes for the concrete screws.)

Installing 2-in. panels of XPS will yield an R-10 rating. In very cold climates, you might want add 1 f2-in. panels between the studs of the new 2×4 wall as well, creating a composite rating of R-17.5 for the two layers.

Moderate climates. In moderate climates, ther­mal breaks in the basement walls are acceptable. So you can attach vertical furring strips directly to the masonry walls, using powder-actuated nails or concrete screws, and then place foam panels between the strips. Use pressure-treated wood. Because conventional 1×3 furring strips are only 14 in. thick, use 2x2s or 2x4s on-face instead, spac­ing them 16 in. on center. If there’s a possibility that they could wick moisture from the basement floor, keep the furring strips 1 h in. above floors.

BLOWING-IN INSULATION

Loose-fill insulation—usually cellulose—can be blown in at low pressure to supplement existing attic insulation or pumped into wall cavities at high pressures to achieve a dense pack that’s virtually airtight. Before insulating, be sure to review earlier sections of this chapter on sealing air leaks, correcting excess moisture, and block­ing insulation to keep it away from potential ignition sources such as chimneys and unrated recessed lights. Also keep insulation away from knob-and-tube wiring that’s still energized (see Chapter 11 for more information about this old wiring).

Equipment. You can rent insulation blowers and hoses. And some suppliers will loan the equip­ment free if you buy the insulation from them. If you’re loose-filling an attic in a two – or three – story house or dense packing insulation in walls,
you’ll need a more powerful machine, usually wired for 240 volts or 120/240 volts. Almost all pumping units require two workers, one to feed insulation into a hopper and the other to operate the hose. Consequently, most machines have a remote on/off switch so the hose operator can stop the blower as cavities fill up. A remote switch also allows you to shut off the blower at the first sign of a clogged hose. Most machines have adjustable gates or air inlets that control the air-insulation mixture. Have the equipment sup­plier explain safe operating procedures to both workers.

Units typically come with 3-in. corrugated plastic hoses whose sections join with steel cou­plings. If you’re blowing-in attic insulation at low pressure, 3-in. hoses can blow a lot of insulation quickly. (When filling large, open places such as attic floors, pump a low-air, insulation-rich mix.) When filling wall cavities at low pressure,

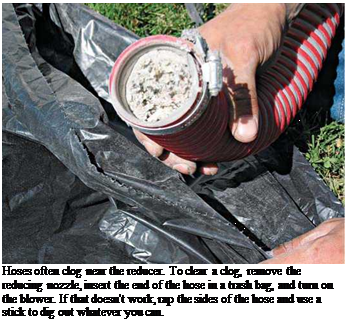
Подпись: Hoses often clog near the reducer. To clear a clog, remove the reducing nozzle, insert the end of the hose in a trash bag, and turn on the blower. If that doesn't work, rap the sides of the hose and use a stick to dig out whatever you can. installers typically use a 3-in. by 1-in. reducer to minimize the size of the holes they’ll need to patch later. However, when dense-packing cellu­lose into wall cavities, some professionals prefer to duct-tape a 5-ft. or 6-ft. length of 1-in. clear vinyl tubing to the end of the 3-in. hose.
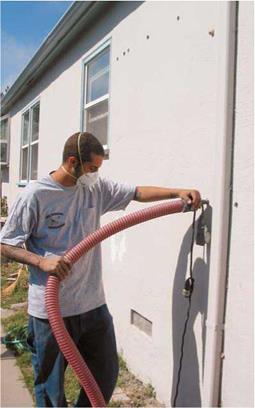
Narrower hoses are easy to snake into tight spaces—you can feed them into the far reaches of a cavity—and they deliver insulation at greater velocity. Clear vinyl tubing also allows you to see if the insulation is flowing freely. Because nar­rower hoses are more likely to clog, run an air – rich, low-insulation mix through them. To clear clogs, blow air alone through the hoses.

In addition to a tight-fitting dust mask and eye protection, you’ll need a drill and drill bit (or hole saw) to drill into exterior sheathing, a flat bar to pry up siding, and a shingle ripper or a mini-hacksaw to cut through nail shanks if you’ve got wood siding. If there’s vinyl or aluminum sid­ing, you’ll also need a zip tool, which has a hook on one end, to lift the tops of the courses you want to remove and get access to the nails holding the siding strip. If the exterior is stucco, you’ll need a tungsten carbide hole saw to drill through it.

image717

Blown-in installation is typically fed through a 3-in. hose that is reduced into a 1-in. nozzle, which is inserted into holes drilled in the siding. The remote switch draped over the end of the hose enables the operator to shut off the blower quickly, should a clog develop.

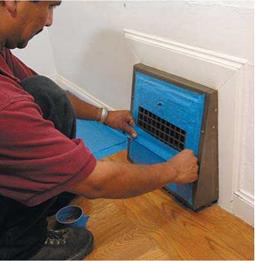
Prep work. When insulating from inside the house, first seal off the heating registers to keep insulation out of the ducts, and rent a commercial shop vacuum with a fine filter for cleanup. Before insulating, clear the room of furniture or cover it with plastic tarps. Important: Before drilling, turn off the elec­

trical power to the affected areas, and use a voltage tester (see p. 235) to make sure the power’s off.

Insulating open attics. You’ll want to avoid blocking the airflow from soffit vents; so before blowing insulation, install blocking or air chutes to hold the insulation back. If the attic joists are exposed, run planks across them so you can move safely around the attic. If you staple loca­tion flags to the joists, they can double as rough depth gauges as you add insulation. If the attic has floorboards (rather than plywood), pry them up in the center of the attic to expose the joists. Then blow insulation into the joist bays. It’s diffi­cult to blow insulation much farther than 4 ft., so remove boards every 8 ft. or so and feed in about

Подпись: A POTENTIAL ASBESTOS RISK

Подпись: Vermiculite is a small, pebble-like, gold or brown mineral fiber (colored rather like mica) that was widely used for insulation and soundproofing. A loose-fill material, it was often poured in attic floors. But vermiculite often contains asbestos. If you see it in your home, don't disturb it, for only an experienced asbestos-abatement contractor should remove it. Visit the U.S. Environmental Protection Agency's (EPA's) Web site for more information (www.epa.gov).

Vermiculit

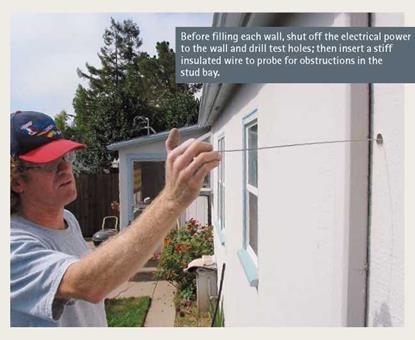
Подпись: 4 ft. of the blower hose under the floorboards on both sides of the opening, gradually withdrawing the hose as the bays fill. Insulating closed walls. Blowing-in insulation is a dusty job, so do it from outside the building if possible. The task varies according to the siding you have. If you have wood, vinyl, or alu- Exploring Exterior Walls Before you order insulation and rent a blower, see if the exterior walls are already insulated. О You can explore them from inside the house by turning off the electrical power to a section of wall (use a voltage tester to be sure the power's off) and removing a section of baseboard. Use a utility knife to cut through a small section of plaster or drywall and look inside the wall. Or you can go outside and pry off a section of siding and drill a hole through the sheathing to see what's inside. If there's no insulation, you're good to go. In houses built in the 1940s and later, you may find anything from multiple layers of crinkly, tar-impregnated insulation paper to 1-in. or 2-in. fiberglass or mineral-wool batts. If wall cavities are less than half filled, you can probably insert 1-in. vinyl tubing into them and blow-in cellulose to improve heat retention. But if you wad up old batts as you try to push in tubing, blowing in more insulation probably won't be cost-effective: You'll have cold spots. Focus instead on adding attic insulation and sealing air leaks. If you find that the exterior walls are uninsulated, next explore to locate fire-stops (blocking between studs) and let-in braces running diagonally. A length of stiff insulated wire or flexible vinyl tubing makes a good probe. Typically, there will be one fire- stop per stud bay, thus dividing each bay into two cavities. You'll need to drill one hole in each cavity to fill it with insulation, so drill holes in the upper third of each cavity. Drilling toward the top of a cavity also minimizes the chances that you'll drill through electrical cables in exterior walls. Cables that run horizontally are usually 12 in.—the height to most receptacles—to 24 in. above finish interior floors. Finally, don't forget to drill into the stud bays above and below windows and above doors. image718minum siding, remove a course or two when you drill your exploratory holes toward the top of each wall cavity. It’s possible to drill through wood siding and plug it later; but it’s preferable to remove the wood siding, drill through the sheathing, and then replace the siding over the plugged sheathing. If there’s vinyl or aluminum siding, insert a zip tool under the top of the course you want to remove, and slide a flat bar under nails holding the siding strip. Then replace the siding after plugging the insulation holes.
If you have stucco siding, drill directly through it; stucco is tenacious and malleable so plugs will hold well and can be hidden easily by texturing patches to match the surrounding surface.

Ideally, the holes you drill should be slightly larger than the diameter of the insulation injector —the hose reducer or the vinyl tubing used to blow in insulation. If the injector is smaller than the hole, pressurized air escaping will roughly equalize the amount being blown in. If the holes and the injector are exactly sized, little air will escape and the wall cavity will quickly become so pressurized that you can’t blow in insulation. Conversely, if the holes are too large, insulation will be blowing all over the place and you’ll have larger holes to patch. So make the holes roughly ‘/ in. larger than the diameter of the injector.

As you blow cellulose into each drilled hole, cover the hole (and the inserted tube) loosely with a rag or a scrap of fiberglass insulation.

The rag will allow pressurized air to escape but will prevent the cellulose from blowing out.

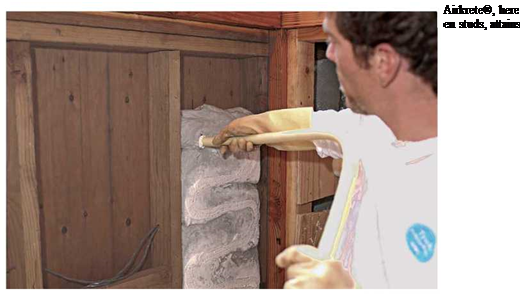
As the insulation starts becoming densely packed, the insulation flowing through it will slow. When a cavity is almost full, it will become so airtight that it will block the flow of additional insulation, causing the blower to whine. (If you stick your index finger into the hole of a filled cavity, it will meet resistance similar to that of poking a middle-aged stomach.) After filling a few cavities, you’ll get a sense of how much insu­lation you need to fill each one, and the blower’s whine will become familiar. At that point, use the remote on/off to shut off the blower and allow the pressure in the hose to subside. Then pull out the injector and go on to the next cavity.

Note: If you insert clear vinyl tubing all the way into cavities to dense-pack them, gradually pull back the tubing 8 in. to 12 in. as each starts to fill and the insulation flow slows.

Plugging the holes. After each cavity is filled, plug the holes in sheathing with precut beveled wood plugs or corks. (Your insulation supplier should have them in stock.) Smear exterior-grade polyurethane glue around the edges of each plug, and use a hammer and a scrap block to drive the

Подпись: o THINGS TO BE AWARE OFimage719Подпись: If you blow-in insulation too densely, you can cause the interior drywall to bulge. So as you fill the first few stud bays, have someone monitor the drywall or plaster surfaces for nail pops, cracks, and bulges. Such excessive pressure isn't common, but it can happen. Second, if a cavity takes forever to fill, either the hose is clogged or the cavity has an opening, and you're pumping cellulose into a nearby cabinet or crawl space. To clear clogs, disconnect the last hose coupling, shut off the insulation feed, and blow air through the hose. If insulation is flowing and the cavity's still not filling, shut off the blower, find the escape hole and plug it. plugs flush to the sheathing. Replace the siding sections, caulk the joints, prime, and paint.
If you drill holes in interior walls to blow in cellulose, plug the holes with manufactured styrene foam plugs that push in till they’re slightly below the wall surface. To reduce dust and ensure clean edges, some installers hand-make a drywall punch by angle-cutting a short length of electrical metal conduit (EMT) at a sharp angle, so that one end looks like the point of an enlarged hypodermic needle. Use a hammer to rap the blunt end of the punch. Finally, cover the plug or the punched hole with self-adhering mesh tape (see Chapter 15), and one or two coats of setting-type joint compound; feather it out to make a smooth join.

USING RIGID-FOAM PANELS IN BASEMENTS

There are almost as many ways to insulate base­ment walls as there are builders. In this brief section you’ll find two space-conserving assem­blies that should prevent mold, while retaining conditioned air.

Suggestions. Here are six suggestions for insulating below grade:

image720

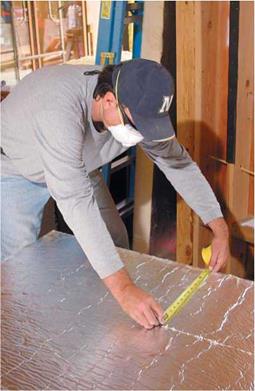
Transfer cut-lines quickly to rigid insulation by using your measuring tape as a marking gauge. Slide your hands in unison-one holding the tape in position along the panel edge, the other holding a utility knife next to the tape’s free end.

► If a basement is chronically damp because of exterior water, correct that problem before insulating. See "Damp Basement Solutions," on p. 224.

► Plastic vapor barriers aren’t usually needed on foundation walls insulated with foam panels, unless required by local codes— typically, in regions with severe winters. Once you’ve remedied exterior water sources, allow incidental moisture in the foundation walls to migrate outward or inward, so the walls can dry.

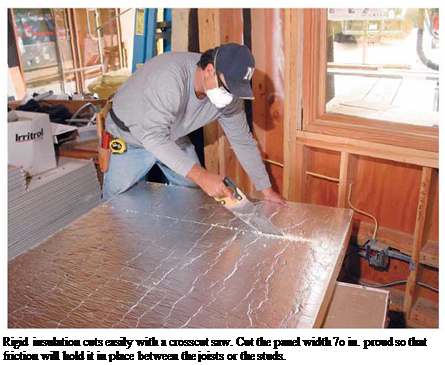
Подпись: Rigid insulation cuts easily with a crosscut saw. Cut the panel width 7o in. proud so that friction will hold it in place between the joists or the studs.

Seal and insulate the tops of foundation walls because that’s where basements most often leak air and lose heat. Caulk along the mudsill-foundation joint and apply expandable foam along the tops and bottoms

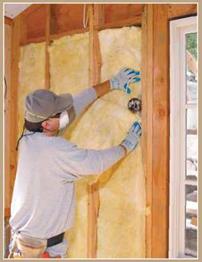
INSTALLING FIBERGLASS BATTS

All batts are installed in basically the same way, so the following tips for installing fiberglass batts also hold true for cotton and mineral-wool batts, unless otherwise noted.

Getting started. Carefully seal air leaks before insulating; air currents can dramatically reduce
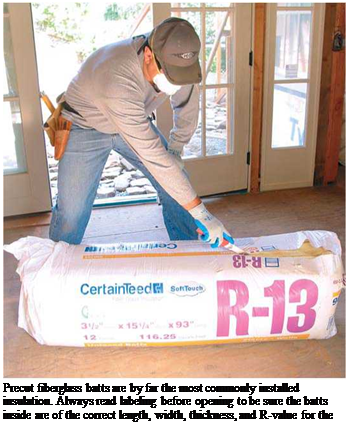
an installation’s R-value. Then suit up with the appropriate safety gear to keep fiberglass off your skin and out of your lungs. Wear a respirator mask, eye protection, long-sleeved shirt, long pants tucked into your socks, and work gloves.

To determine how much insulation to buy, measure the square footage of walls, ceilings, and floors and then divide by the number of square feet in an insulation package. Also printed on the packaging is the insulation’s R-value and the width of the batts. Because most joists, studs, and rafters are spaced 16 in. on center, 15-in.-wide batts are the most common size. The fewer cuts you make, the faster the job will go; thus many contractors buy precut 93-in. batts to insulate standard 8-ft. walls. (Although 8 ft. equals 96 in, the 3-in. shortfall in batt length anticipates the space occupied by the top and bottom plates.) Batts that long can be a bit unwieldy, though, so you might want to use precut 4-ft. batts in those stud bays where you must fit insulation around pipes and wiring.

When no vapor barrier is required or a sepa­rate vapor barrier will be installed later, most contractors prefer to install unfaced batts.

They’re quicker to install because there’s no facing to cut through, and you can friction fit the batts. By contrast, kraft paper-faced or foil-faced batts,

Recommended Levels of Insulation*

.INSULATE TO THESE LEVELS

IF YOU LIVE IN A CLIMATE THAT IS…

AND YOUR HEATING SYSTEM ISL..

CEILING

WOOD- FRAME WALL

FLOOR

BASEMENT/CRAWI SPACE WALLS*

Warm: cooling and minimal heating needs (FL, HI, coastal CA, U. S. southeast)

Gas/oil or heat pump Electric resistance

R-22 to R-38 R-38 to R-49

R-11 to R-13 R-13 to R-25

R-11 to R-13 R-13 to R-19

R-11 to R-19 R-11 to R-19

Mixed: moderate heating and cooling needs (U. S.

Gas/oil or heat pump

R-38

R-11 to R-22§ R-11 to R-26§

R-13 to R-25

R-11 to R-19

southwest, southern midwest, northwest, mid-Atlantic)

Electric resistance

R-49

R-25

R-11 to R-19

Cold: heating and moderate

Gas/oil or heat pump

R-38 to R-49

R-11 to R-22§

R-25

R-11 to R-19

cooling needs (all of Canada except Pacific coast; mountain-

Electric resistance

R-49

R-11 to R-28§

R-25

R-13 to R-19

ous regions, U. S. northern midwest, New England)

Table adapted from U. S. Department of Energy (DOE) Energy Star Program table "Cost-Effective Insulation R-Values for Existing Homes" (www. energystar. gov) and 1997 "Insulation Fact Sheet." t Insulation is also effective at reducing cooling bills; levels assume you have electric air-conditioning.

Ї Do not insulate crawl space walls if the crawl space is wet or ventilated with outdoor air.

§ R-values are for insulation only, not the whole wall; R-values may be achieved with a combination of cavity insulation and rigid-board insulation.

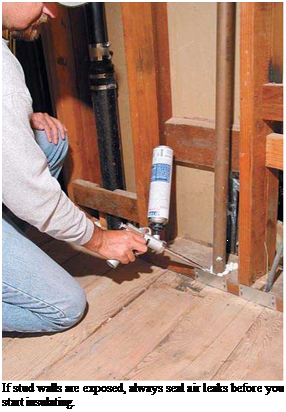
Подпись: If stud walls are exposed, always seal air leaks before you start insulating.

Stapling Faced Insulation to Studs or Rafters

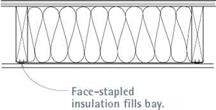
image705

image706

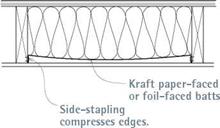
Always staple the insulation’s kraft-paper or foil facing to the edges of the framing. Stapling facing to the sides of the studs or rafters compresses the insulation’s edges and creates voids that air can flow through.

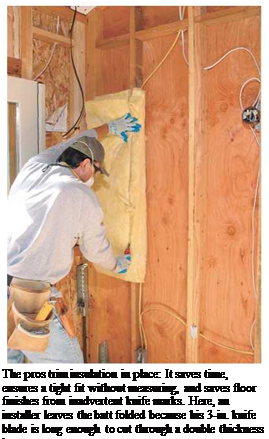
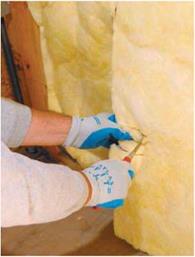
Подпись: The pros trim insulation in place: It saves time, ensures a tight fit without measuring, and saves floor finishes from inadvertent knife marks. Here, an installer leaves the batt folded because his 3-in. knife blade is long enough to cut through a double thickness in one pass.

whose facing serves as a vapor barrier, must be cut carefully to avoid tears and face-stapled to the framing edges as shown in the drawing above. In general, place insulation facing toward the side of the building that’s usually warmer—in cold climates, place the facing toward the inside of the building.

Cutting and placing insulation. Fiberglass insulation cuts easily with a utility knife, although its short blade requires several passes and should be changed as it gums up or gets dulled. Consequently, professional insulators use a long-bladed insulation knife or hone one edge of a putty knife till it’s razor sharp. A common way to cut an insulation batt is to place it on the subfloor, measure off a cut-line, and press a 2×4 into the batt to compress the insulation and guide the knife. If you’re cutting several pieces to the same length, you can save measuring time by marking the batt length on the subfloor with masking tape. To cut faced batts cleanly, place the facing side down on the subfloor.

However, most insulation contractors prefer to insert batts into stud bays and trim them in place. To trim a batt’s width, for example, place one side of the batt into the bay and use the stud on the other side as a cutting guide. To get a tight fit, cut the batt about!4 in. wider than the stud bay.

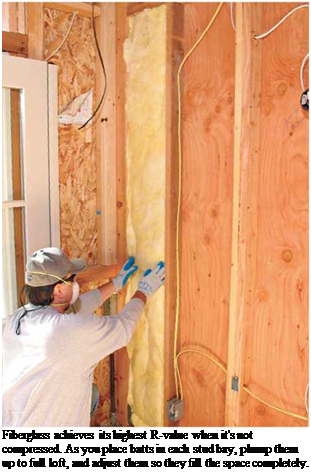
Подпись: Fiberglass achieves its highest R-value when it's not compressed. As you place batts in each stud bay, plump them up to full loft, and adjust them so they fill the space completely. Подпись: Before insulating attic floors, locate electrical boxes and IC-rated recessed lights. Using coat hangers and bright scrap plastic—newspaper delivery sleeves are perfect—make little flags about 1 ft. high and staple them to the joists near each box or fixture. When the floor is covered with insulation, those little flags will show you where the electrical elements are, should you need to repair or replace them. llll Подпись: PПодпись:image709

As you place batts, make sure they fill the bays fully. Fiberglass insulates best at “full loft,” so before placing a batt between studs or joists, shake it gently to plump it up to its full thickness. Thus, if you use sev­eral batts to fill a bay, butt their ends together rather than over­lapping and compressing them. To avoid compressing the edges of faced batts, always staple facing flanges to the edges— not the sides—of studs or rafters. Use a hammer tacker with M-in staples.

Insulating the attic. Start insulating the attic by sealing air leaks (described earlier in this chapter). If attic floor joists are exposed, place planks across them so you can move safely. (Stepping from joist to joist is a good way to misstep and fall through the ceiling.)

If there is a rough floor and you’re not ready to finish the attic, it’s easiest to remove floorboards every 6 ft. to 8 ft. and blow in loose-fill insulation. But batts are easy enough to install if you can pry up floorboards and insulate the floor in sections. Starting at one side of the attic, pry up and stack the floorboards, place batts, and renail the floor­boards before moving to the next section.

To allow moisture to migrate, use unfaced batts when first insulating a floor in warm or mixed-climate zones. Use unfaced batts when adding insulation in any climate. When insulat­ing an attic floor for the first time in very cold climates, use kraft paper-faced insulation because it’s permeable; install with the facing down, toward the living spaces. Never use imper­meable foil-faced batts or plastic vapor barriers when insulating an attic floor or ceiling because they’d trap moisture.

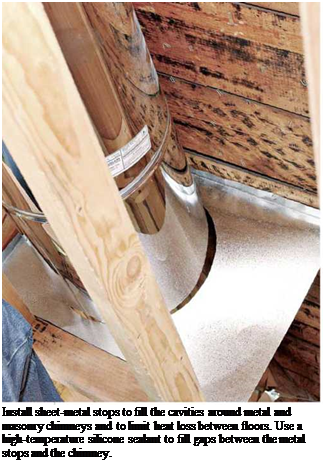
Fitting batts is straightforward: Cut them to length and place them so they fill the joist bays completely. If there’s diagonal bridging, slit the insulation down the middle, 4 in. to 6 in. from the end, and fit the slit ends around the bridging. As with walls, split batts (see accompanying photos) to feed them over and under wires and pipes. Note: Keep insulation and other com­bustible materials back at least 3 in. from masonry or metal chimneys, and non-IC-rated recessed light fixtures, as noted in the Safety Alert on p. 330. When adding insulation, place new batts

reventin

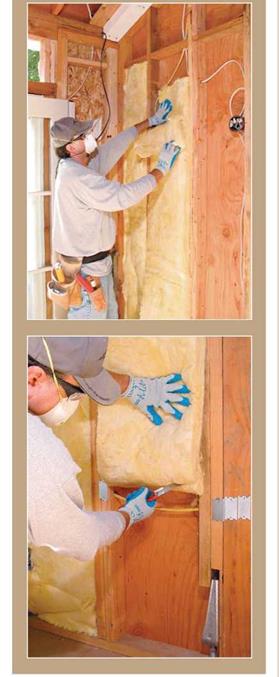
To prevent cold spots behind pipes and wiring, split batts in two-sort of like pulling apart a sandwich—so that each piece is roughly half the batt thickness. Slide one half of the batt behind the wiring or pipes, and place the other half in front. Where it would be tedious to split and slide batt ends behind the obstruction in the middle of the stud bay, instead slice halfway through the batt as shown below; split the fiberglass at the cut-line, and fit the insulation behind the obstruction.

Подпись: INSULATING AROUND ELECTRICAL UUtletS Electrical outlet boxes in exterior walls can be big energy losers because builders often forget to insulate behind boxes. To stop air leaks, split insulation batts and slide portions behind the boxes. In very cold climates, you might also want to install airtight outlet boxes. Be careful not to knick cables around boxes. ^ Before insulating around any outlet, disconnect the electrical power to the area and use a voltage tester to be sure the power is off. image710image711

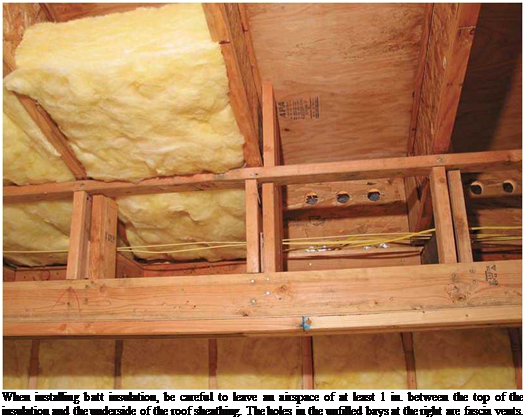
Подпись: When installing batt insulation, be careful to leave an airspace of at least 1 in. between the top of the insulation and the underside of the roof sheathing. The holes in the unfilled bays at the right are fascia vents.

perpendicular atop old ones. Finally, install air chutes (baffles) between rafters, or block off insulation where rafters meet walls, so that air can flow freely from soffit vents to ridge or gable – end vents.

If you want to finish the attic with drywall, you can forego insulating the floor and instead insulate the kneewalls and rafters. But because an insulated floor deadens sound, you may want to insulate it anyhow. Before inserting batts into the rafter bays, staple lightweight rigid-foam air chutes to the underside of the roof sheathing.

The chutes create a 1-in space between the sheathing and the insulation on the attic floor, so that air can keep flowing under the roof. If the rafters are spaced regularly on 16-in. centers, unfaced friction-fit batts will stay in place till the drywall goes up. But if the rafter spacing is wide (24-in. on center or greater) or irregular, friction- fit batts may sag or fall out. Instead, you might use any of these options: (1) staple paper-faced batts to the rafter edges, (2) have foam insulation sprayed to the underside of the roof sheathing after installing air chutes, or (3) trim rigid-foam panels to fit between the rafters and glue them to the underside of the roof sheathing. If there are gaps between the panels and rafters, shoot a compatible foam into the gaps.

image713Подпись:InsuLatin

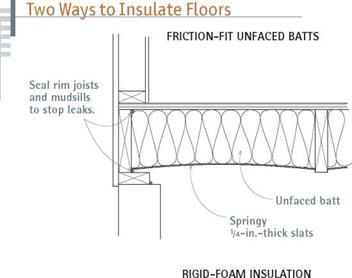
When insulating a floor over an unconditioned crawl space or basement, you’re fighting gravity and moisture.

First, let’s deal with gravity. The easiest way to install fiberglass batts without needing three hands is to precut a number of thin wood slats— ‘/4-in. fence lath is light and springy—Yi-in. longer than the distance between the joists.

As you hold the unfaced batts in the joist bays with one hand, use the other to wedge the slats into place, under the insulation. Being slightly long and springy, the slats will bow up and support the insulation; insert them every 16 in. to 24 in.

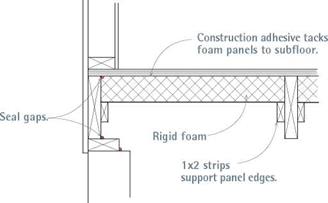
image714image715If the subfloor area is damp or if there’s heavy condensation during warm months, rigid-foam panels are a better choice than fiberglass batts. (Mice are also less likely to tunnel through or nest in rigid foam.) Use a compatible con­struction adhesive to glue the foam panels to the underside of the subfloor. If floor joists are straight and regularly spaced, trim panels so they are in. wider than the distance between the joists. But if the joists are irregular, trim the foam panels a bit smaller and use expanding foam to fill any gaps.

INSTALLING FIBERGLASS BATTS

Подпись: SAFETY ALERT Rotating paddles of an insulation blower that are strong enough to break up compressed insulation can also mangle hands and arms, so keep them out of the hopper when the paddles are turning. Instead, shut off the machine or use a stick to dislodge balky clumps of insulation. Illlll

CLEANING UP MOLD

Mold can’t grow without moisture, so first identi­fy and correct the source(s) of the excess mois­ture before you start cleaning up. Otherwise, the mold can return.

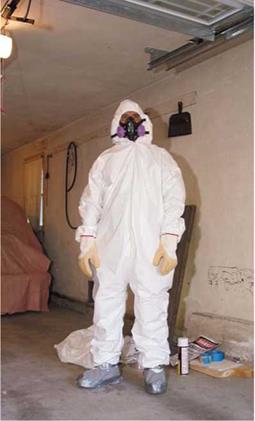
Necessary precautions. Limit your exposure to mold spores by wearing a respirator mask with N95 (or higher) filters, rubber gloves, eye protec-

I A Bathroom Fan

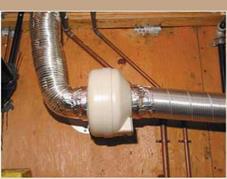
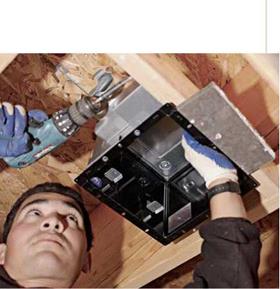
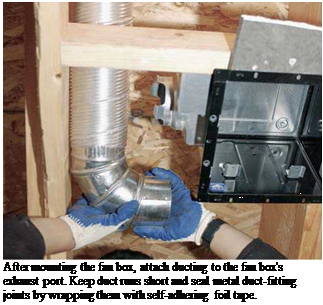
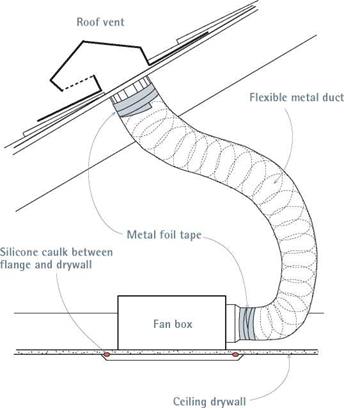
Подпись: Moisture can condense in bathroom-fan ducts that run through unheated areas. To reduce in-duct condensation, insulate the ducts; keep the duct runs short; and if you're venting the duct through a wall, slope the duct downward toward the wall cap so the moisture will run out if it does condense.Подпись: 1111Подпись:Подпись:image699

tion, and disposable coveralls, which you should discard at the end of each day. After assessing the mold’s extent, determine the shortest way out of the house for contaminated materials—maybe out a window—to minimize spreading mold spores to clean areas. Use sheet plastic to seal doorways and heating registers in affected areas, and turn off central HVAC systems till the reme­dial work is complete. Seal damaged materials in plastic before transporting them from the site. Never sand moldy materials because that will spread spores. Finally, rent a commercial-grade vacuum with HEPA filters; if possible, vent it to the outside.

Assessing the extent. If mold is limited to small areas at the top of a bathroom or exterior wall, it may be surface mold caused by condensation or inadequate ventilation. However, if mold is wide­spread around windows or doors, bathroom drywall is crumbling, or tiles mounted on dry – wall are loose, there’s probably mold growing in the walls. Start looking at the base of the walls. О Turn off the electrical power to the area, remove the baseboard, and use a utility knife or a hole saw to cut small holes in the drywall. If there’s no mold, you can easily patch the holes and cover them with the baseboard. More likely, you’ll find stained or rotted wall plates and exten­sive mold colonies.

Throw out moldy drywall or hardboard. On the other hand, moldy lumber and engineered wood products such as plywood, particleboard, and OSB (oriented strand board) may just have surface mold, so probe them with an ice pick or

image700

pocketknife to see how sound they are. If they are spongy, replace them. Engineered wood products are particularly susceptible to rot because they contain adhesive binders that fungi feed on.

Remediation. Wash surface mold with soap and water and let it dry well. There’s no need for caus­tic bleaches to kill mold spores (and irritate your lungs) because washing should remove mold. After the surface has dried, paint it with a stain killer such as B-I-N.® If mold has caused the drywall’s paper facing to roughen or delaminate, cut back the drywall at least 1 ft. beyond the damaged area and replace it.

If your inspection revealed mold growing inside wall cavities, use sheet plastic to seal off the affected area, including the heating registers; then cut back damaged drywall to the nearest stud center on both sides, and cut out damaged framing, if any. If you must replace more than one stud, erect temporary shoring to support the loads above (see Chapter 10). To contain spore­laden dust, have a helper hold the hose of the commercial-grade vacuum near the materials being cut. Using soapy water, scrub the surface mold from the framing, and allow all materials to dry before installing new drywall—framing mois­ture content should be 15 percent to 20 percent

Подпись:Подпись:Подпись:Подпись:image701

or less. (Borrow or buy a moisture meter to check.) Wrap moldy debris in 6-mil plastic and have it carted away.

Insulation

Seal air leaks before installing insulation because insulation won’t be an effective thermal barrier if air can move freely around and through it.

As you’ll see, stopping air is also a major consid­eration in choosing insulation that’s right for the renovation.

CHOOSING INSULATION

There are dozens of insulating materials, which can be classified into four groups: batt (in precut lengths or continuous rolls), blown in, rigid foam, and sprayed on.

Batts are made of recyled cotton, mineral wool, and fiberglass; but fiberglass batts are the giant

Insulation Values

TYPE OF

R-VALUE

INSULATION

PER INCH

Batts and blankets

Fiberglass

3.2

High-density fiberglass

3.8

Cotton

3.2

Mineral wool

3.2

Loose fill (blown in)

Cellulose

3.2

Fiberglass

3.2

Mineral wool

3.1

Cotton

3.2

Rigid board

Expanded polystyrene (EPS)

4.0

Extruded polystyrene (XPS)

5.0

Polyisocyanurate

6.5

Spray on (contractor applied)

Polyurethane

6.0

Open-cell polyurethane

3.6

Wet-spray cellulose

3.5

Magnesium silicate

3.9

to Fight moi

R-Values of Common Building Materials

MATERIAL

R-VALUE

8-in. concrete (solid)

0.90

4-in. common brick

0.80

31/2-in. wood stud (on edge)

4.5

‘/2-in. plywood sheathing

0.63

3/,-in. plaster or ‘/2-in. drywall

0.40

Glass

Single pane

0.89

Double pane

1.91

Triple pane

2.80

Подпись:of the group, accounting for three-quarters of all residential insulation. As a group, batts are easy to install; cost effective; and available in a variety of widths, thicknesses, and densities. Batts faced with kraft paper, foil, or plastic are installed by stapling facing flanges to framing edges; unfaced batts are friction fitted between studs, joists, or rafters. In attics, unfaced batts are instead laid perpendicularly atop existing batts to improve heat retention.
Batt insulation is an effective thermal barrier if it’s installed correctly and fills cavities com­pletely. Unfortunately, framing is often irregular in older houses, and batts with precut widths may not totally fill the cavities. Consequently, if installers don’t fill gaps, cut batts a bit short, allow facing flanges to pucker, or don’t take time to fit insulation behind pipes and electrical cables, air movement can dramatically reduce the insulation’s R-value.

That caveat noted, batts are safer to work with and more insulative, thanks to numerous innova­tions. In response to eye, skin, and lung irritation caused by loose glass fibers, insulation makers now offer fiberglass batts encapsulated in perfo­rated or woven plastic wrapping—particularly
helpful when you’re insulating ceilings and don’t want fiberglass fibers raining down on you. In some products, such as Miraflex®, the fiberglass has been reformulated so that it’s soft, itchless, and formaldehyde free. And there is a slew of high-density fiberglass batts: 3h-in.-thick batts that are rated at R-ll, R-13, and R-15 and 51/2-in.- thick batts rated at R-21. Note: If you compress batts into the cavities, you’ll decrease the insula­tion’s loft and thus reduce its R-value slightly.

Cotton batts (usually unfaced) are formalde­hyde-free, absorb sound well, block air infiltra­tion, insulate well, and won’t make you itch. Cotton batts are treated with a natural biostat (borate) to inhibit mold and make them fire resistant. Wear a disposable paper mask when installing cotton: Although its lint is more benign than airborne glass fibers, avoid breathing it any­way. Mineral wool (also called rock wool) is spun from natural stone such as basalt or from blast­furnace slag and is the most fire resistant of any insulation. Mineral wool batts are installed mainly in commercial buildings because they are costly, heavy, and raise health-related concerns similar to those of fiberglass.

Blown-in insulation is the best insulation for wall cavities when you don’t want to rip out fin­ish surfaces. It’s also good for insulating attic floors for the first time and adding to insulation that’s already there. Loose-fill fiberglass is occa­sionally blown in, but cellulose is by far the material most often blown in. At low densities (1.5 lb./cu. ft.) cellulose traps air and is an effec­tive insulator (R-3.5). And when it’s dense packed (3 lb. to 4 lb./cu. ft.), that increased density effec­tively seals air leaks. In fact, some New England contractors report that old houses retrofitted with dense-packed cellulose are as airtight as new houses with polyethylene vapor barriers under the drywall.

Blowing-in insulation is dusty work, so most contractors prefer to gain access to wall cavities by prying off small sections of exterior siding and drilling through exterior sheathing. You can work from the inside, drilling discrete holes in the plas­ter or drywall, but empty the room first. In either case, a successful insulation depends on filling all cavities completely—not so easy if walls contain nonstandard framing, diagonal bracing "let into” studs, or fire-stop blocking.

Most blown-in cellulose is environmentally friendly and reasonably pleasant to work with if you wear a dust mask. Made from recycled paper, cellulose doesn’t itch, and is often treated with borates to make it more resistant to mold, insects, and fire. Treated cellulose will not rot if it becomes wet, but it will absorb water. If leaks or condensation are minor, moisture will migrate
out of the walls in time. But cellulose doesn’t dry quickly, so if it gets soaked, remove it; otherwise, drywall installed over it could get moldy and deteriorate. For this reason, although cellulose can be wet-sprayed into open cavities, only an experienced installer should do so.

Rigid-foam panels are the best choice for insu­lating below-grade areas such as basement and crawl space walls, where there’s sometimes seep­age or condensation, and for retrofitting insula­tion to exterior sheathing or foundations. In other words, use panels wherever batt, blown-in, or sprayed-on insulation can’t do the job. Conversely, don’t use rigid foam where odd spaces and air infiltration require insulation that can be shaped. Rigid-foam panels boast some of the highest R-values per inch, but the poorest UV and fire resistance, so consult local codes to determine how to fireproof rigid panels.

Expanded polystyrene (EPS), extruded poly­styrene (XPS), and polyisocyanurate (polyiso) are the panels most commonly installed in homes. Panels come in widths of 12 in., 16 in., 24 in., and 48 in.; lengths in multiples of 2 ft., up to 12 ft.; and thicknesses from h in. to 4 in. EPS is the least expensive and has the lowest R-value (R-4 per inch); it is usually unfaced. XPS is inter­mediate in price and R-value (R-5 per inch); often faced with foil or polyethylene film, it is the most water resistant of the panels discussed here and hence the best for insulating foundations. Polyiso is the most costly, has the highest R-value (R-6.5 per inch), and has the lowest compressive strength of the three materials—though its foil
facing improves its durability. Since the insula­tion industry switched from ozone-depleting blowing agents to pentane in manufacturing it, polyiso has been considered an environmentally friendly material.

Sprayed-on foams should be applied only by contractors with specialized training and equip­ment. Most foams are two-part compounds that mix at the applicator nozzle. If the components don’t mix properly or the nozzle partially clogs, you can end up with a substance that won’t cure completely or insulate well. But correctly applied, sprayed-on foams fill even the oddest – shaped cavities, achieve high R-values, and block air movement effectively.

Permeability—the ability of water to permeate and migrate through the foam—is another criti­cal factor. Basically, permeability depends on the

Подпись: InsulationПодпись: DO YOU NEED?Подпись: How much insulation you need depends on climate, the house's heating system, and which part of the house you're insulating, as shown in "Recommended Levels of Insulation," on p. 340. Or you can use the U.S. Department of Energy's interactive ZIP Code Insulation Program™ (which is free online). To get a detailed insulation plan, type in your ZIP code, and then check the boxes that best describe the house and its heating system. Major insulation manufacturers offer similar calculators. You should also consult your local building authority, which has the final say and, in many cases, can tell you about tax incentives or rebates that encourage homeowners to insulate and save energy.

image703

HOW MUCH

Подпись: Standard fiberglass can itch like crazy. So even if you wear a long-sleeved shirt and a pair of gloves, wash well at the end of each day with cold water. Exactly why cold water reduces itching is unclear (shrinks pores perhaps), but it works.Подпись: llll

amount the foam expands. Open-cell foams, which use water as a blowing agent, expand as much as 100 times and so are quite permeable (high-perm ratings). Use open-cell foams where you want moisture to migrate through wall or ceiling cavities or on the inside of foundation walls that haven’t been damp proofed adequately on the exterior. Closed-cell foams, manufactured with pentane as a blowing agent, expand roughly 30 times, and thus are less permeable (low-perm ratings).

It’s not always obvious what type of foam to install where. In warm regions, for example, high-perm, open-cell foam is typically sprayed under roof sheathing, to allow moisture to migrate freely. But in very cold regions, low-perm, closed-cell foam is sprayed to the underside of roof sheathing. So ask reputable local insulation contractors for their recommendations.

Soffit-to-Ridge Ventilation

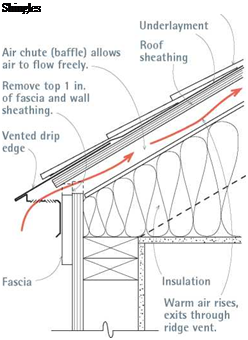
Подпись:Подпись: Drip-edge vents allow you to add ventilation to a roof that has no soffits. Carefully cut off the top 1 in. of the fascia, using a nail-cutting circular- saw blade (wearing eye protection). Slide the upper leg of the vent under the shingles and, if possible, under the underlayment.If sealing holes and insulating attic floors are the first steps in reducing excessive moisture and heat in an attic, increasing ventila­tion is the second. And nothing exhausts moisture or cools the area under a roof as effectively as passive soffit-to-ridge ventilation, as shown here and in Chapters 5 and 7. (Gable-end vents help but are usually 1 ft. to 2 ft. below the highest and hottest air; power vents require electricity to do a job that soffit-to-ridge vents do for free.)
As a bonus, in winter, cool incoming air can prevent snowmelt and ice dams along eaves. Also, in summer, when unvented roofs can reach 150°F to 160°F, soffit-to-ridge ventilation can prolong shingle life and make upper-floor rooms appreciably cooler.

Keeping vent channels open from soffit to ridge is essential to keeping air flowing. Continuous soffit vents are typically screened to keep critters from blocking the vents with nests or food caches. In snow country, experts recommend baffled ridge vents because they’re less likely to become clogged by wind-driven snow. (Wind passing over baffles creates a negative pressure that sucks air up from under the roof, clearing the vents.). And whenever there’s insulation between rafters or attic floor joists, install air chutes (also called baffles) to hold insulation back from vent channels.

If the roof has no overhang (and thus no soffits), you can still ventilate its lower edges. Trim back the top 1 in. of fascia boards, as shown at right, and install vented drip edges, which have perforated or slotted undersides. Their upper flanges fit under shingle starter courses. Add a ridge vent and you’re set to go.

Подпись: TIPПодпись: You can further reduce air infiltration by caulking around the interior edges of exterior frame walls. Caulk before installing a cold-climate vapor barrier or (in warm climates) before fastening drywall panels. In either climate, apply a flexible latex caulk to top and bottom plates, to the first studs of intervening walls, and around the rough openings of doors and windows.Подпись: llll

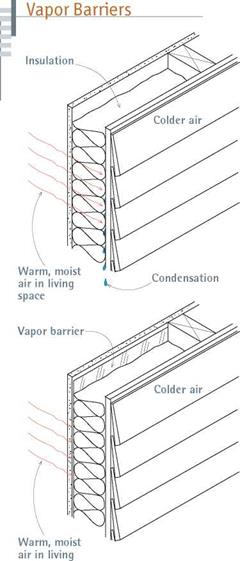
tears. Vapor barriers must never be installed on ceilings, because water vapor should be allowed to rise into and be ventilated out of the attic. And vapor barriers should generally not be installed in moderate or hot climates because buildings in those regions tend to dry toward the interior, where the air is cooler.

Note: The only exception to putting a vapor barrier on the living-space side of the insulation is in the basement. Because moisture can wick through concrete or concrete block walls, apply polyethylene sheeting directly to the interior foundation and crawl space walls, affix furring strips (if needed), and then install rigid insulation panels over the vapor barrier. The barrier must be continuous, without tears or gaps, as explained in "Using Rigid-Foam Panels in Basements,” later in this chapter.

Dissenting opinions. Some builders strongly advise against installing vapor barriers in any cli­mate because, as the builders assert, moisture that enters wall cavities will be trapped there, without enough air circulation to allow drying or
enough wall permeability to allow migration. Further, if insulation gets soaked by driving rains, mold and rotted framing are almost inevitable. Even if the dissenters overstate their case, it’s smart to allow in-wall moisture a way out. If you do install a vapor barrier inside, create a more permeable exterior "skin” by using latex paint rather than oil-based paint on exterior walls. Latex breathes better. You can also increase exfiltration by installing rain-screen walls (see p. 141) or by driving plastic shims (see www. wedgevent. com, for example) under the siding to increase circulation.

Controlling Moisture and Mold

Moisture inside a house generally isn’t a problem unless it’s excessive and sustained. (Indoor rela­tive humidity should be 35 percent to 40 percent during the heating season.) Signs of excessive moisture include condensation running down windows, moldy bathrooms or closets, soggy attic insulation, and exterior paint peeling off in

Подпись: SOURCES OF EXCESSIVE MOISTURE
Подпись:image694
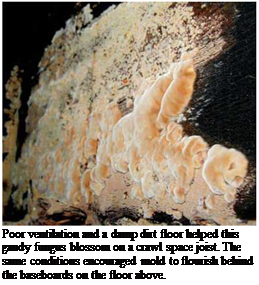
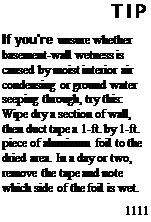
Подпись: Poor ventilation and a damp dirt floor helped this gaudy fungus blossom on a crawl space joist. The same conditions encouraged mold to flourish behind the baseboards on the floor above. Подпись: TIP If you're unsure whether basement-wall wetness is caused by moist interior air condensing or ground water seeping through, try this: Wipe dry a section of wall, then duct tape a 1-ft. by 1-ft. piece of aluminum foil to the dried area. In a day or two, remove the tape and note which side of the foil is wet. 1111 SEALING CRAWL SPACES

Crawl spaces are well named: They tend to be dark, dank, dirt-floored areas only a few feet high. To disperse moisture, building codes pre­scribe 1 sq. ft. of ventilation for each 150 sq. ft. of dirt floor or 1 sq. ft. of vents for every 1,500 sq. ft. of floors covered with a moisture barrier.

Problem is, open crawl spaces mean cold floors and heat loss in winter; and in summer, warm moist air entering through the vents invariably condenses on the cooler surfaces of the crawl space—leading to mold and worse. So it makes more sense to seal and condition crawl spaces.

Otherwise, mold spores growing in the crawl space will be sucked into living spaces by bath and kitchen exhaust fans and carried all up to the attic by the stack effect of rising heated air.

You’ll start by raking the crawl space to remove debris and sharp rocks, which could puncture plastic moisture barriers. But before stirring up crawl space dust and debris, please read the safety alert on p. 334. Heavy sheeting will last longer: 6-mil polyethylene is minimal, but commercial waterproofing firms, such as Basement Systems®, use 20-mil polyester cord-reinforced sheeting, which can withstand workers crawling and objects stored on it. Seal vent openings by gluing 2-in.-thick foam insula­tion over them, using a polyurethane sealant such as Vulkem 116, which is also appropriate for sealing moisture barriers to concrete walls.

In a rectangular crawl space without jogs, it typically takes five large sheets of polyethylene to

Подпись: ALERTПодпись: If rodents have nested in your crawl space or basement, disturbing those nests or breathing contaminated particles may expose you to a number of serious diseases and microorganisms, including Hantavirus, which causes hantavirus pulmonary syndrome, for which there is no vaccine or antivirus. Licensed pest-control firms know the safest means of trapping such pests, preventing their reentry, and removing contaminants. Often, they first moisten the affected areas with a 1:10 bleach solution (also a viricide) to minimize dust, while wearing N-100 respirators and disposable Tyvek suits.Подпись: IlllllПодпись: PROГIP If you pour a concrete slab in a basement or crawl space, place the concrete directly on the polyethylene sheeting. Don't place sand or pea gravel over the plastic before pouring concrete because water collecting on those aggregates would keep the slab damp. llll Подпись: Bath-FanПодпись: Removing moisture is the primary function of a bathroom fan-good to remember when considering all the extra features you could buy. First, get a quiet fan: 3 sones to 4 sones is tolerable, 1 sone is very quiet. Next, consider switches. Because fans usually need to continue venting after you leave the shower, get an electronic switch with an integral timer so the fan can keep running after the light has been turned off. Or put the light and the fan on separate switches. You can also connect the fan to a humidistat, which is a moisture sensor that will turn off the fan when a preset moisture level is reached.Подпись:image696

isolate the space: a single floor sheet which runs about 1 ft. up onto walls; and four wall pieces which overlap at the corners and the floor by 1 ft. and run up the walls to a height 2 in. to 3 in. below the mudsills. (Leave mudsills exposed so they can be inspected periodically.) Because the sheets are heavy, cut them outside on a well – swept driveway, roll them up, and then unroll them in the crawl space. Overlap seams roughly 1 ft., caulking each overlap with polyurethane sealant, and then taping the seams with a com­patible peel-and-stick tape such as Tyvek tape.

Use polyurethane caulk to attach the tops of sheets to the crawl space walls; if the walls are dirty, wire-brush them first to ensure a good seal.

Because the moisture barrier must be contin­uous to be effective, sealing the floor sections becomes more difficult if there are masonry piers or wood posts present. In that case, use two pieces of polyethylene to cover the floor, with each piece running roughly from the base of a post to the crawl space perimeter. Slit the plastic and run it up 6 in. to 8 in. onto each pier; caulk and tape the plastic to the pier. If there is metal flashing under the wood posts, wrap the posts with plastic, too. But if the posts rest directly on masonry pads, jack each post enough to slide a piece of metal flashing or heavy plastic under­neath; otherwise, moisture will wick up through the post and eventually rot it.

The wall portions of the sheeting will be less likely to pull loose if you mechanically attach them toward the top of crawl space walls. If you use sheeting as heavy as a pool liner (20-mil), you can drill holes through it into the concrete and drive in nylon expansion fasteners. Lighter grades of polyethylene can be wrapped several times around furring strips and then attached to walls with a powder-actuated nailing system. (For this, wear eye and hearing protection.) If condensation persists in a sealed crawl space, insulate the walls with rigid-foam panels over the plastic wall sheeting. Finally, add a dehumidifier to condition damp air that gets into the crawl space.

BELLS AND WHISTLES

INSTALLING A BATHROOM FAN

Bathrooms add a tremendous amount of mois­ture to interior spaces. Fortunately, bathroom fans are increasingly powerful and quiet running. And remote inline fans, typically installed in attics some distance above bathrooms, are qui­eter still. Place the fan near the shower, and vent the ductwork from the fan out the roof or through a gable-end wall. Soffit and sidewall vents aren’t as desirable because expelled mois­ture could get drawn up into the attic by a soffit to ridge airflow. Keeping moisture out of attics and wall cavities is crucial, and you can achieve it by airtight connections—by caulking the fan housing to the ceiling and sealing each duct joint with aluminum foil tape, not fabric duct tape.

First create a cardboard template of the fan box (housing). Mark the approximate position of the fan by driving a screw or nail through the ceiling before going up into the space above the bathroom and finding the marker. If you have an insulated attic above, take along a dustpan to shovel loose insulation out of the way; wear a dust mask and gloves. After you’ve located the marker, place the fan template next to the nearest joist—most fan boxes mount to ceiling joists— and trace around it. (If the fan box has an adjustable mounting bar, you have more latitude in placing the fan.) Use a jigsaw or reciprocating saw to cut out the opening. To keep the drywall cutout from falling to the floor below, screw to the drywall a piece of scrap wood slightly longer than the cutout.

To mount the fan housing, you may need to remove the fan assembly first. If the housing

Подпись: After mounting the fan box, attach ducting to the fan box's exhaust port. Keep duct runs short and seal metal duct-fitting joints by wrapping them with self-adhering foil tape.
Подпись: To keep moisture from leaking into the attic, apply silicone caulk between fan box flanges and mating surfaces, such as drywall. To ensure airtight joints, use metal foil tape to seal ducting to the fan's exhaust port and to the roof vent or sidewall vent.

Подпись: There are complex formulas for sizing bath fans, but a good rule of thumb is 1 cfm (cubic foot per minute) per square foot for bathrooms 100 sq. ft. and smaller. For bathrooms larger than that, allot 50 cfm for each fixture (toilet, lav, shower), and allow 100 cfm for hot tubs.Подпись: llllimage698

flange mounts flush to the underside of the ceil­ing, as shown in the photo at left, use a piece of drywall scrap to gauge the depth of the unit rela­tive to the finish ceiling. But whether the housing flange sits above or below the ceiling drywall, caulk the flange well with polyurethane sealant to create an airtight seal between the two materials. To further secure the fan and anchor the edges of the drywall opening, run blocking between the joists—along two sides of the opening—and screw the drywall to the blocking. In some cases, you’ll be screwing through the fan’s housing flanges as well.

Follow the wiring diagrams provided by the manufacturer. In general, it’s easier to run electri­cal cable through a switch box first because junc­tion boxes inside fan housings tend to be cramped. Bathroom fans should be protected by a GFCI (ground-fault circuit interrupter); see Chapter 11 for more information.

Keep duct runs as short as possible to reduce air resistance. After attaching the lower end of the flexible duct to the fan’s exhaust port and sealing the joint with metal duct tape, hold the free end of the duct to the underside of the roof sheathing (or gable-end wall) and trace its out­line onto the sheathing. Drive a screw through the middle of the circle. Then go outside and locate the screw, which represents the middle of the vent hole you need to cut. Sketch that circle onto the roof: If the circle would cut into the tabs of any shingle—roughly the bottom half of a shingle strip—use a shingle ripper (see the left photo on p. 121) to remove those shingles before cutting the vent hole in the sheathing. Be gentle when removing shingles so you can reuse them.

Use a utility knife to cut the circle into any remaining shingles and the roofing paper. Flash the fan’s roof vent as you would any other roof vent: Feed its upper flange under the shingle courses above and over the courses below. Caulk or nail the flange edges per the installation instructions and renail the surrounding shingles. Once the roof vent is flashed, go back under the roof and attach the free end of the duct, also seal­ing that joint with metal duct tape. Enjoy your shower.

LEAKY DUCTWORK

Because ductwork usually runs through basements or uncondi­tioned crawl spaces, sealing it will reduce heat loss and sub­floor moisture being drawn into living areas. Leaky ducts can waste 25 percent to 30 percent of total heating/cooling costs. Sup­ply ducts most often leak where they take off from the main sup­ply trunk, at section joints, and where ducts join register boots. Ironically, many leaks are caused by fabric duct tape that has dried out and cracked after a few years. Even if it looks intact, remove fabric duct tape.

Sealing Ducts

Living space

Register boot

image690

Secure joints between duct sections and fittings with at least three sheet-metal screws. Then wrap the joints with aluminum duct tape—not fabric duct tape! Apply fiber-reinforced mastic to hand – snipped and swivel joints.

There are three ways to reduce duct heat loss. Apply aluminum duct tape to joints between sec­tions and to the factory-formed joints where round ducts snap together. Along hand-snipped or swivel joints, which aren’t as airtight, seal ducts with fiber-reinforced mastic, which you can apply generously to joints, using a brush or your hand (wearing disposable plastic gloves). Finally, to further reduce heat loss and condensa­tion, insulate ducts in unconditioned spaces. Wrap l-in.-thick, foil-backed batts around the outside of the ducts; avoid interior duct linings such as ductboard, which can reduce airflow, absorb moisture, and grow mold.

WEATHERSTRIPPING AND CAULKING

Weatherstripping can reduce air leaks around doors and windows. Door weatherstripping is discussed in Chapter 6; two of the more popular types, tubular and metal-leaf, are also appropri­ate for windows. Install tubular weatherstripping for casement or awning windows, which are hinged as doors are and thus will seat solidly against compressible stripping. Metal-leaf strip­ping offers a tighter seal for double-hung win­dows, but installing it requires removing interior stops and possibly planing down sashes.

Interior door and window casing may leak air if there’s not a good paint seal to surrounding

Подпись: Install sheet-metal stops to fill the cavities around metal and masonry chimneys and to limit heat loss between floors. Use a high-temperature silicone sealant to fill gaps between the metal stops and the chimney.
Подпись: spaceimage692walls. If you notice gaps or cracks around the perimeters of the casing, caulk them with acrylic latex caulk, which you can tool smooth with an index finger. (Wash up with warm, soapy water.) Allow the caulk to cure before painting it.

Gaps around exterior casing are most com­mon on south-facing walls, where the sun is strongest. Typically, wood trim shrinks across its width, creating gaps where siding abuts. Fill gaps with exterior acrylic latex or siliconized latex caulk. (Pure silicone caulks don’t paint well, and many polyurethane caulks have poor UV resist­ance.) Because caulking alone is not terribly durable, paint it as soon as it has cured. To effec­tively block air and moisture infiltration, the edges of door and window frames should be caulked, flashed, recaulked (over flashing strips), and then recased, as shown on p. 129.

AIR AND MOISTURE RETARDERS

Any building material that is sufficiently imper­meable to slow the flow of air and airborne mois­ture is considered an air-flow retarder, even if that’s not its primary function. If a retarder is installed specifically to stop water vapor, it’s called a vapor barrier. Most houses have both interior and exterior air-flow retarders: house – wrap or building paper, flashing, sheathing and siding on the outside, and drywall or plaster

In cold and very cold climates, polyethylene vapor barriers on the living-space side of insulation may prevent water vapor from condensing inside walls, which can lead to peeling paint, mold, and, in extreme cases, rotted framing.

inside. (Housewraps such as Tyvek are semi­permeable: They keep rain out but allow water vapor trapped in walls to migrate outward.)

Some insulation, such as high-density cellulose and polyurethane foams, can be considered air­flow retarders, as discussed later in this chapter.

Подпись: TIPПодпись: If windows rattle when the wind blows, remove and reset the interior stops snugly to the window sashes before weatherstripping windows. In moderate climates, tight-fitting sashes will cut air infiltration significantly. 1111 In cold and very cold climates, there should be a polyethylene vapor barrier installed on the living-space side of the insulation to prevent warm, moist air from migrating into wall cavities and condensing there during cold weather. Several things to note about vapor barriers: To be effective, they must be continuous—no gaps or
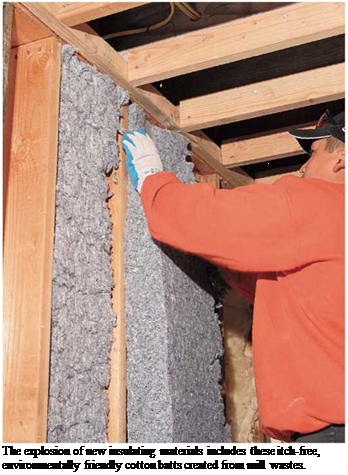
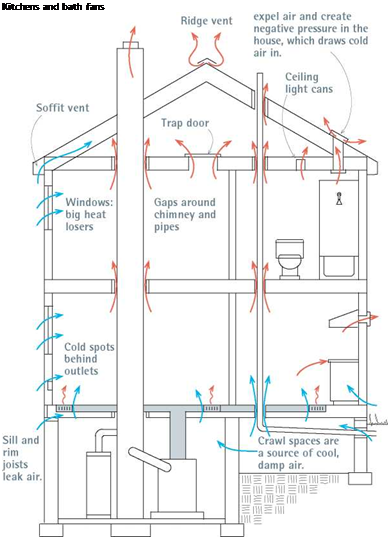
Energy Conservation and Air Quality

Подпись: The explosion of new insulating materials includes these itch-free, environmentally friendly cotton batts created from mill wastes.

Controlling the

ture, and heat determines how comfortable, affordable, and durable a house will be. In the old days, houses were often drafty and cold, but because energy was cheap homeowners could compensate by throwing another log into the woodstove or by cranking up the thermostat. All that changed in the 1970s, when energy costs went through the roof. . . literally, in houses with uninsulated attics. In response, builders yanked fuel-guzzling furnaces and replaced leaky doors and windows with tight, factory-built ones. They also caulked gaps; installed weatherstripping; and insulated walls, floors, and ceilings to block drafts (infiltration) and slow the escape of condi­tioned air (exfiltration). This insulated layer between inside and outside air is called the ther­mal envelope.

Although tightening the thermal envelope saved energy, it spawned a whole new set of prob­lems, including excessive interior moisture, peel­ing paint, moldy walls, rotted studs, and a buildup of pollutants that were never a problem when windows rattled and the wind blew free. In many houses, furnaces no longer had enough incoming air to burn fuel or vent exhausts effi ciently. In some super-tight houses today, turning on a bathroom fan or a range hood can even cre­ate enough negative pressure to pull exhaust gases back down the chimney (back-drafting) and suck mold spores up from dank crawl spaces.

Fortunately, this chapter can help you control the flow of air, moisture, and heat while balanc­ing comfort, costs, and health concerns. Because HVAC (heating, ventilation and air conditioning) systems have become incredibility sensitive and complex, installing and adjusting them is best left to HVAC specialists. If you want information on designing and constructing energy-efficient houses, consult Joe Lstiburek’s Builder’s Guide to Mixed Climates or Builder’s Guide to Cold Climates (both The Taunton Press).

Sealing Air Leaks

Retaining conditioned air is tricky, even in well – insulated houses. As air is heated, it rises and expands, pushing against the inside of the ther­mal envelope. If it finds holes or gaps in the enve­lope, it escapes. Likewise, winter winds can drive cold air into a building. In new construction, air­flow retarders such as housewrap are installed in large sheets on exterior walls before the siding is put on. Or inside walls are insulated and covered with polyethylene vapor barriers before the dry-

wall goes up. However, where siding and drywall are already in place, sealing air leaks is largely a piecemeal affair of locating and caulking leaks, one gap or hole at a time.

LOCATING AIR LEAKS

Professionals use powerful blower-doors to depressurize interiors and thereby draw-in huge volumes of air to help locate leaks. But during the heating season, you can find most leaks your­self with a wetted finger, a smoking incense stick, and common sense. Begin by running your hand around window and door frames and along room
corners. If your house has leaks, you’ll feel drafts, especially if it’s cold and windy outside. The incense smoke will also show where warm air is leaving the building. But common sense is the best detector.

Подпись: I How Air Moves through a HouseПодпись:Подпись:

Подпись: How Heat Moves Heat is transferred by one of three mechanisms: radiation, conduction, or convection. Radiation is the movement of heat through space, in the form of infrared waves; heat and light waves radiate in all directions from a central source, such as the sun or a hot stove. Conduction is the passing of energy from particle to particle, usually between objects touching each other, as when a stovetop burner touches a tea kettle. Convection is the transfer of heat or cold by the movement of air, with warmer air rising and cooler air descending. Heat transfer in houses is usually a combination of all three mechanisms. For example, sunlight radiates into a room and heats a dark tile floor. A cat lying on the floor receives radiant heat from the sun and conductive heat from the floor. And even in a room where the air seems still, there will be convective loops as warmed air rises from warmed floors and heat vents, and falls near cold windows. As likely, there will also be convective heat loss—that is, air moving through walls can account for 20 percent to 30 percent of the total heat loss of an insulated house. Building materials conduct heat at different rates. The more resistance a material has to heat transference by conduction, the higher its resistivity value, or R-value. In general, the less dense the material, the better insulator it is and the higher its R-value. And the denser the material, the better it conducts heat or cold and the poorer it is as an insulator. Thus dense masonry materials tend to be poor insulators, wood intermediate, and fluffy cellulose fibers excellent. Glass, being very dense, is an excellent conductor but a poor insulator. Thus glass windows, even double- or triple-paned ones, lose a lot of heat, compared to other building materials.

Heated air rises, so start your detective work in the attic. If it’s uninsulated, you’ll see plumbing ducts, electrical cables, recessed lighting cans, heating and fan ducts, chimneys, and a host of other penetrations in the attic floor through which heated air is escaping. If there’s an old

plaster ceiling below, there may also be a lot of heat loss through cracks. Especially note bath – or kitchen-fan vents that terminate in the attic. They should be vented outside, rather than into the attic, because the moist air they pump into an attic can condense there, soaking insulation, fram­ing, and drywall—creating a paradise for mold and rot (see the photo on p. 12).

After investigating the attic, go downstairs and examine ceilings for cracks, cold spots, and mold. Frequently, corners on exterior walls will be cold because insulation stops short of fram­ing. Or insulation may have slumped at the tops of walls. Continue down the walls, noting drafts or gaps around windows and doors—especially under doors—and cold spots around electrical receptacles and switches on exterior walls. Com­mon walls between houses and attached garages are frequently underinsulated, and openings there can allow car exhaust and volatile fumes to infiltrate living spaces. Check local building codes: Most require fire-resistant drywall and fire­stopping caulks on common walls with garages.

Finally, inspect basements and crawl spaces. Caulk gaps between framing and foundations, and use rigid-foam panels to insulate basement walls. Conventional wisdom long held that out­side air should circulate freely through dirt – floored crawl spaces. But as house envelopes grew tighter, scientists determined that the nor­mal pressurization of heated air and negative
pressures from exhaust fans routinely pull moist, often mold-laden crawl space air up into living areas. Consequently, engineers now recommend sealing, insulating, and conditioning crawl spaces, especially in hot, humid regions, as explained later in this chapter.

FIXING LEAKS

Подпись: PrioritiesПодпись: SPENDING TO SAVE ENERGY:Подпись: If your budget is tight, weatherize your house and upgrade its systems in this order (each is explained in detail in this chapter): 1. Seal holes and gaps in attic floors and exterior walls. Then weatherstrip leaky doors and windows. If you have a forced-hot-air system, seal leaky metal ducts as well. 2. Insulate the attic floor. If you have an uninsulated basement or crawl space, do that next because it's probably admitting a lot of cold air. Next insulate walls. Blow in cellulose if you don't want to tear out finish surfaces. 3. Upgrade your central heating/cooling systems if they predate the 1990s. Modern induced-draft, condensing gas furnaces can attain 90 percent to 97 percent efficiency. 4. Replace leaky doors with insulated ones. Replace leaky windows with doubleglazed units. Vinyl or vinyl-clad wood windows are the most efficient upgrades. Polyurethane sealants are the best bet for filling gaps around door and window frames, electrical cable, water pipes, and plumbing vents. These sealants are typically expanding spray-in foams,
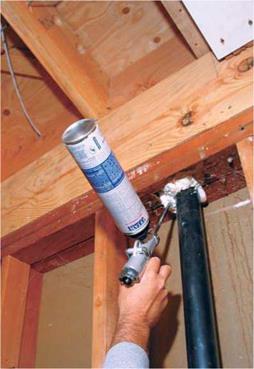
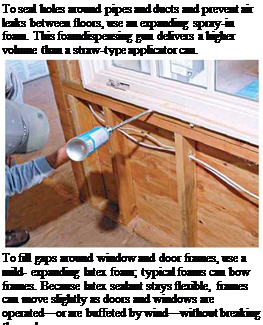
Energy Conservation and Air Quality

DIFFERENT JOBS, DIFFERENT FOAMS

image687Подпись:PRO"ГIP

If the attic is insulated, you’ll need to put on gloves and a face mask and move that insulation before you can seal openings in the attic floor. But don’t merely cuss those batts; examine them. Fiberglass batting actually filters dirty air, so look for blackened areas on the undersides of batts, where heated air has blown through ceiling cracks into the attic.

1111

Подпись: ALERTПодпись: Keep insulation and other combustible materials back at least 3 in. from masonry or metal chimneys and non-IC-rated recessed light fixtures. (Note: An IC fixture can be insulation covered.) To cover openings around chimneys, insert sheet-metal stops, and use high-temperature silicone caulks to fill gaps in those stops. Replace old recessed light fixtures with new IC-rated cans; these can be covered with insulation, thereby blocking heat loss while avoiding fires that could result from heat buildup in non-IC-rated cans.Подпись: IlllllПодпись:image689

available in 12-oz. to 33-oz. aerosol cans with straw-type applicators for incidental home use. Contractors often use screw-on cans designed for dispenser guns. High-volume pros attach 10-lb. to 16-lb. disposable cylinders to pneumatic dispensers.

Foams vary in many ways, including durabili­ty, temperature ranges, curing times, fire resist­ance and—most notably—expandability. Read the product literature carefully. As handy as foams with 700 percent expansion would be to fill large gaps, they could buckle door frames badly. To seal gaps around doors and windows, instead select a low-pressure or mild-expanding foam sealant. Expandable latex polymer foams are gaining popularity because, like latex caulk, they clean up with soap and water before they’ve cured.

Because gaps between foundations and fram­ing can involve high humidity, great temperature shifts, and dissimilar materials, acrylic latex or silicone caulks may be more appropriate to seal air leaks in basements and crawl spaces. If gaps are wider than й in., stuff foam backer rod into the gaps before caulking. Important: If the house has mouse or rat problems, stuff larger holes or cracks with й-in. galvanized mesh before spray­ing foam into gaps. Rodents will chew through foam, so place the mesh toward the house exterior.

If you find holes too big for expandable foams, stuff plastic garbage bags full of insula­tion and jam the bags into the openings. Or cover the opening with a sheet of rigid-foam insulation or a piece of plywood, and seal the edges with spray-on foam. Don’t forget uninsulat­ed attic hatch covers: Use construction adhesive to glue a 3-in.-thick piece of Styrofoam®

(or two 2-in.-thick panels) to the upper face of the hatch.

SEALING