Category RENOVATION 3

AN OVERVIEW OF BATHROOM FIXTURES

This short section provides an overview of what’s available and a few buzzwords to use when you visit a fixture showroom. Start your search on the Internet, where most major fixture and faucet makers show their wares and offer design and installation downloads. One of the most elegant and informative sites is www. kohler. com.

Lavatories (bathroom sinks) are available in a blizzard of colors, materials, and styles. Styles include pedestal sinks, wall-hung units (including corner sinks), and cabinet-mountedbcvaiories. Wall-hung lavs use space and budgets economi­cally, but their pipes are exposed, and there’s no place to store supplies underneath. Pedestal sinks are typically screwed to wall framing and sup­ported by a pedestal that hides the drainpipes. Counter-mounted lavatories are the most diverse, and they use many of mounting devices dis­cussed earlier in this chapter for kitchen sinks. Less common are vanity top (vessel) basins, which sit wholly on top of the counter, as shown in the photo at right.

Lavatory materials should be easy to clean, stain resistant, and tough enough to withstand daily use and the occasional dropped brash or blow-dryer. The most durable lavs are enameled cast iron. Although lighter stainless-steel lavs are tough and stain resistant; their sleek, polished look is distinctively modern, so they may not look good when matched with traditional porce­lain fixtures. Vitreous china (porcelain) lavs have a hard, glossy finish that’s easy to clean and durable, but it’s not as durable as enameled cast iron. Hard use can chip and crack vitreous fix­tures. Spun-glass lavatories are made from soda lime glass, often vividly colored and irregularly textured. Finally, solid-surface lavatories are typi­cally bonded to the underside of a countertop of a similar material (see "Countertops for Kitchens and Baths,” earlier in this chapter).

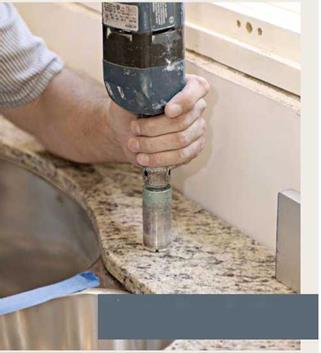
Important: Make sure lavs and lav faucets are compatible. Most lavatories are predrilled, with faucet holes spaced 4 in. (centerset) apart, or 8 in. to 12 in. (widespread). There are single lavs for single-hole faucets. And undermounted lavs may have no faucet holes at all; you need to drill the holes in the counter itself.

Toilets and bidets are almost always vitreous china and are distinguished primarily by their types and their flushing mechanisms. Close to 99 percent of toilets sold are of these three types: traditional two-piece units, with a separate tank and bowl; one-piece toilets; and wall-hung toilets. The other 1 percent includes composting toilets, reproductions of Victorian-era toilets with pull – chain flushing mechanisms, and so on. As noted in Chapter 12, toilet-base lengths vary from 10 in. to 14 in. (12 in. is standard), which can come in handy in a renovation when the wall behind the toilet is too close or too far.

Choosing a toilet is a tradeoff among factors such as water consumption, loudness, resistance to clogging, ease of cleaning, and cost. Wash­down toilets are cheap, inclined to clog, and

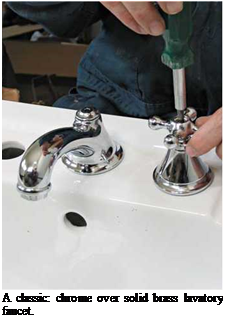
Подпись: A well-made faucet has some heft to it, and when you turn its handle or handles on and off, they feel solid—like the thunk of a well-made car door when you close it. To compare faucet quality, play with the most expensive faucets in the showroom. Then, if you find a less expensive model with some of that satisfying solidness and in a style you like, it might serve well enough. 1111 Подпись: A classic: chrome over solid brass lavatory faucet.

banned by some codes. Reverse-trap toilets are quieter and less likely to clog than wash-downs. The quietest and most expensive models are typi­cally siphon-jet or siphon-vortex (rim jet) toilets. Siphon toilets shoot jets of water from beneath the rim to accelerate water flow. Kohler® also offers a PowerLite™ model with an integral pump that accelerates wastes to save water and a Peacekeeper™ toilet that "solves the age-old dispute over leaving the seat up or down. . . .

To flush the toilet, the user simply closes the lid.” A Nobel Prize for that one!

Bathtubs and shower units are manufactured from a number of durable materials. And site – built tub/shower walls can be assembled from just about any water-resistant material. Bathtubs are typically enameled steel, enameled cast iron, acrylic, or fiberglass; preformed shower units are most often acrylic or fiberglass. Steel tubs are economical and fairly lightweight; set in a mortar bed, they retain heat better and aren’t as noisy if you knock against them. Cast iron has a satisfy­ing heft, retains heat, and is intermediate in price; but it’s brutally heavy to move. For that reason, many remodelers choose enameled steel, acrylic, or fiberglass to replace an old cast-iron tub. Acrylic and fiberglass are relatively light­weight and are available in the greatest range of shapes and colors; their prices range widely, from moderate to expensive.

Standard tub sizes are 2 ft. 6 in. to 3 ft. wide; lengths are 4 ft. 6 in. to 5 ft. However, if space is tight, you can opt for a compact tub or replace a tub with a shower stall. Shower stalls come as com­pact as 32 in. sq., but that’s a real elbow knocker. Stalls 36 in. sq. or 36 in. by 42 in. are more realis­tic. One-piece molded tub/shower units don’t win beauty prizes, but if properly detailed and sup­ported, they are virtually leakproof.

CHOOSING A LAVATORY FAUCET

If you’re buying a new lav and new faucets, make sure they’re compatible. As noted earlier, lavato­ries often have predrilled faucet holes spaced

4 in., 8 in., or 12 in. apart. Most inexpensive to moderately priced faucets with two handles have valve stems 4 in. on center. Beyond that, the biggest considerations are faucet bodies, finishes, handle configurations, and spout lengths.

Faucet bodies will last longest if they’re brass, rather than zinc, steel, or plastic. Brass is less likely to leak because it resists corrosion and can be machined to close tolerances. Forged brass parts are smoother and less likely to leak than cast brass, which is more porous. If you spend

5 minutes operating an nonbrass faucet, it will likely feel looser than it did when you started.

image684

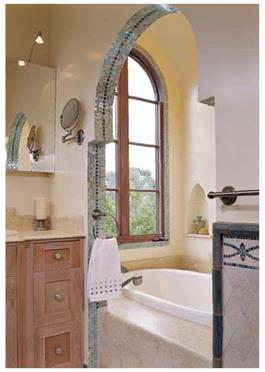
This Moorish-inspired bath alcove has iridescent glass tiles.

Faucet finishes are applied over faucet bodies to make them harder, more attractive, and easier to clean. The most popular finish by far is polished chrome, which is electrochemically bonded to a nickel substrate; it doesn’t corrode and won’t scratch when you scrub it with cleanser. Manu­facturers can apply chrome plating to brass, zinc, steel, and even plastic. But although chrome plat­ing protects faucet surfaces, their inner workings will still corrode and leak, if they’re inclined to.

By the way, brass-finish faucets consist of brass plating over chrome (over a solid-brass base). Brass finishes oxidize, so they should be protected with a clear epoxy coating. Alterna­tively, faucets finished with physical vapor depo­sition (PVD) coatings gleam like brass, but won’t dull or corrode.

Faucet handles are an easy choice: one handle or two. Hot on the left, cold on the right—who’d have thought you could improve on that? But there’s no denying that single-lever faucets are much easier to use. Also consider the valves inside the faucets. Ceramic-disk and brass ball – valves will outlast plastic and steel.

Spouts should have a little flare and be long and high enough to get your hands under them to lather up properly. If you’re a hand scrubber, look for a spout at least 6 in. to 8 in. long that rises a similar amount above the sink.

CREATING BATHROOMS THAT WORK

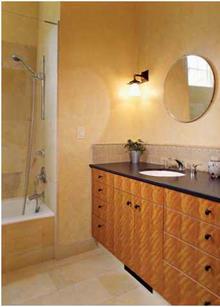
image679Подпись: The understated beauty of nature continues in this cabinet's soft, beveled edges and muted finishes. Slip- matched “ropey" cherry doors and drawers are edged with solid wood. Note the fine-grained “absolute black" granite countertop and matte black metal pulls.

Here are 12 factors that help make a bathroom comfortable, functional, and easier to clean:

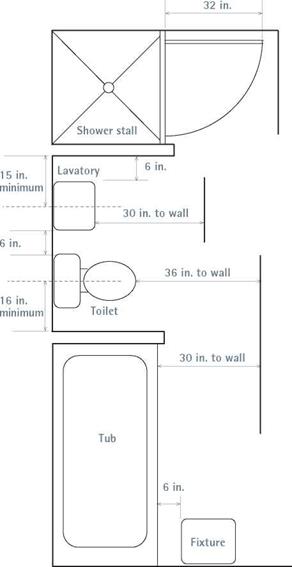
► Enough room to use fixtures. Bathroom space isn’t efficient if there’s not enough room to use the fixtures easily and safely. "Bath Fixture Clearances," on p. 324, shows mini – mums, which may be superseded by local building codes.

► Keep it secure and intimate. Although shared bathrooms should be accessible to the rooms they serve, bathroom users should feel secure once inside. Avoid multiple-door accesses. Keep the room’s scale intimate as well: Warm, cozy spaces are best.

► Put private fixtures far from the door.

The most-used and least private fixture, the lavatory, should be nearest the door, so people can pop in and wash their hands quickly. But toilets and tubs should be farther away. Insulate walls and install a tight-fitting door to suppress bathroom sounds. Cast-iron waste pipes are quieter than plastic ones.

► Alcoves and half-walls. Placing fixtures in alcoves and odd spaces around the perimeter of a room maximizes the floor space in the middle. Isolating toilets or tubs with

image680

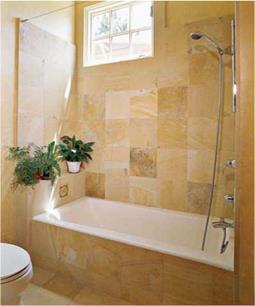
The tile on the tub surround and floors is Solnhofen limestone, which was formed 150 million years ago in the Mesozoic Era, when warm seas covered present-day Germany. Close up, you can see fossilized sea snails in the stone.

Подпись: I Bath Fixture Clearancesimage681Подпись: Bathrooms with minimal clearances are a tight fit. If you've got room to spare, by all means space fixtures farther than the prescribed minimums. their own doors also makes it possible to share a bathroom during morning rush hours, yet still have privacy.
► Natural light. Windows and skylights allow rooms to be small without causing claustrophobia. To block the view of neigh­bors, install translucent or textured glass, or place windows high on the wall. Windows in showers are generally not a good idea because water sits on windowsills and rots them. Ideally, skylights should open.

► Adequate artificial light. For general lighting, plan on 3 watts to 4 watts of incan­descent or 1.5 watts to 2 watts of fluorescent lighting per square foot. For fixtures in alcoves, use a 75-watt or 100-watt recessed, vapor-proof ceiling fixture. To illuminate bathroom mirrors, however, install light fixtures on the walls: one over the mirror and one on each side. Ceiling fixtures alone will make that face in the mirror look ghoulish.

► Comfortable fixtures. "Standard Cabinet Dimensions," on p. 301, suggests counter heights. If they are too high or low for your family, change them so you don’t need to stoop or stand on tiptoes. As for tubs, if you can’t stretch out in a standard tub or squared tub as you’d like, look into oversize models or slope – back, cast-iron clawfoot tubs in a salvage yard. Shower stalls should be big enough to towel off in—36 in. by 36 in.

► Handsome hardware. Buy well-made shower valves, showerheads, and lavatory faucets with nickel – or chrome-plated finishes. They cost two or three times what bargain home-center accessories do, but they’ll last. The same goes for towel bars, switch plates, mirrors, and other accessories—buy quality.

► Use appropriate materials. Water reigns in a bathroom, so use materials that can withstand it. Resilient flooring and tile are great on bathroom floors; wood isn’t. Even when wood is face sealed with a tough modern finish, its end grain can absorb water. And in time, standing water will cloud most finishes. As explained in "Setting Beds," on pp. 383-384, don’t use drywall as a substrate for tile around tubs and showers.

► Ventilate, ventilate. Even if there’s a window in the bathroom, be sure there’s an exhaust fan in the ceiling near the shower.

If it’s a light/fan combo, the fan switch should have an integral timer so the fan can keep running after the light is turned off. See "Controlling Moisture and Mold," on p. 332, for the whole story.

► GFCI protection. All electrical outlets, including fans, must be protected by ground fault circuit interrupters (GFCIs). Shocks could be fatal in such a moist environment, so the National Electrical Code requires GFCI protection on all bathroom and many kitchen outlets. See Chapter 11 for more information.

► Easy-to-clean details. Countertops with integral bowls are much easier to keep clean because there’s no seam for crud to collect in. For the same reason, undermount sinks are

Подпись:preferable to sink rims or mounting clips that sit atop the counter. Nonporous baseboards or backsplashes allow you to swab comers with a mop or sponge without worrying about dousing walls or wood trim. Finally, you can mop bathroom floors in a flash if you have wall-hung toilets.
Choosing a Range Hood

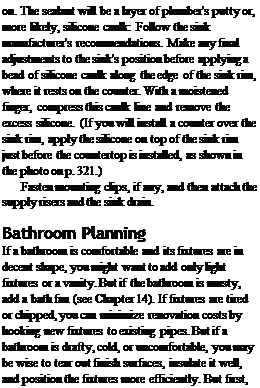
Cooktops and stoves should be vented by a range hood. In addition to sucking up the smoke of a charred steak, range hoods exhaust airborne grease that might other­wise migrate to a cool corner and feed mold or adhere to woodwork and discolor its finish, as shown in the photos on p. 454.

Range hoods are most often wall-mounted directly over a range. Alternatively, there are downdraft and side-draft vents that pop up from a counter area to suck away fumes. Over island and peninsula ranges, you can install chimney-type vents. In gen­eral, install the type of vent that will carry exhaust gases outdoors with the shortest and straightest duct run possible. Because heated air rises, wall-mounted and chimney types are inherently efficient, whereas downdraft and side-draft vents pull heated gases in directions they wouldn’t go naturally and can even pull burner flames sideways.

Range hoods vary from low-powered and inexpensive (less than $50) to custom – designed units that cost thousands. A 100-cfm (cubic feet per minute) wall-mounted hood should be adequate to vent the average four-burner, 30-in.-wide range. But if that same range is located on a kitchen island, its range vent should draw 125 cfm to 150 cfm. More is not better when sizing range hoods. For one thing, larger hoods are noisier. Midsize range hoods average 3 sones to 3.5 sones (a measure of noise), which is too noisy to have a conversation near; monster hoods can reach 8 sones. (As a compari­son, refrigerators register 1 sone.) Oversize hoods can also expel so much air that they create back-drafting, in which negative in-house air pressure draws furnace or fireplace exhaust gases back down the chimney (see Chapter 14 for more on back-drafting).

Ideally, a range hood should be slightly wider than the range, say, 3 in. wider on each end, and mounted 30 in. above the range. But follow the hood maker’s suggested mounting height; more powerful hoods can be installed higher. Finally, buy a unit with a good-quality filter that can withstand regular washing with soap and water. Most filters are aluminum mesh, better ones are stainless steel; many can be popped into the dishwasher, which spares homeowners a very greasy and unpleasant task.

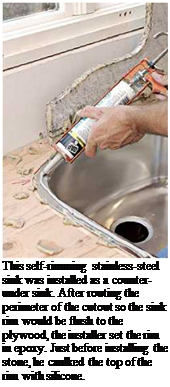
Подпись:Подпись: on. The sealant will be a layer of plumber's putty or, more likely, silicone caulk: Follow the sink manufacturer's recommendations. Make any final adjustments to the sink's position before applying a bead of silicone caulk along the edge of the sink rim, where it rests on the counter. With a moistened finger, compress this caulk line and remove the excess silicone. (If you will install a counter over the sink rim, apply the silicone on top of the sink rim just before the countertop is installed, as shown in the photo on p. 321.) Fasten mounting clips, if any, and then attach the supply risers and the sink drain. Bathroom Planning If a bathroom is comfortable and its fixtures are in decent shape, you might want to add only light fixtures or a vanity. But if the bathroom is musty, add a bath fan (see Chapter 14). If fixtures are tired or chipped, you can minimize renovation costs by hooking new fixtures to existing pipes. But if a bathroom is drafty, cold, or uncomfortable, you may be wise to tear out finish surfaces, insulate it well, and position the fixtures more efficiently. But first, here are a few thoughts on what makes bathrooms pleasant. In general, be skeptical of range hoods that recirculate air through a series of filters rather than venting it outside.
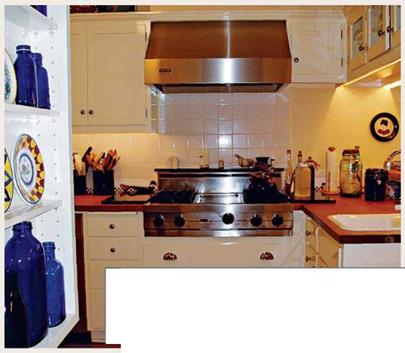
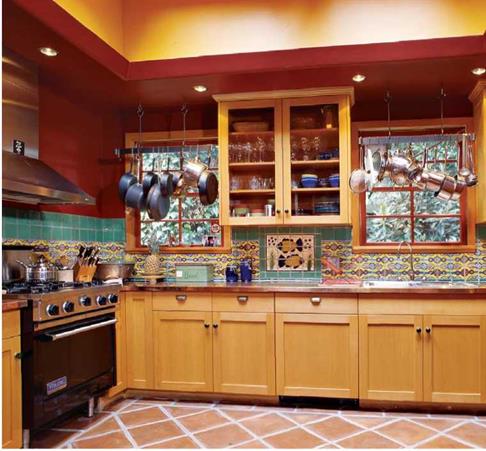
image676

A nicely matched stainless-steel range hood and cooktop. Because cooktops are used far more often than ovens, the architect paired an oven and a microwave on an opposite wall, and put large drawers for pots and pans under the cooktop—so they’d be close at hand.

image677Подпись: The Rutherfords' kitchen is well stocked with Mexican spices and colors. At left is a brushed-stainless-steel range hood. Sheet-copper counters are “not for the faint of heart," Marty Rutherford notes. “Everything stains copper. But each time you polish it, it just glows and becomes more mellow."

Kitchen Lighting

image678

Ceiling light set back 10 in. to 12 in. from

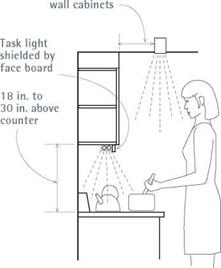
To illuminate work areas without strong shadows, use a combination of task lighting and general lighting.

Installing a Granite Countertop

Once you’ve looked at granite samples and narrowed your choices to a few varieties, consult the fabricator—the company that will be cutting and installing your stone.

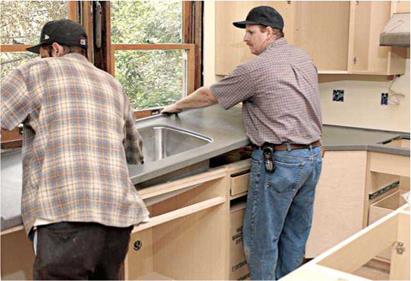
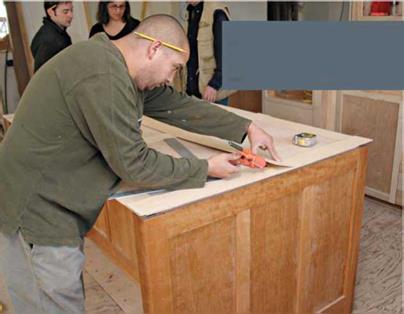
For example, if you choose a granite with large crystals, joints between sections may be more obvious than those between finely grained stone. Besides, some richly figured stones are more likely to crack or spall when subjected to everyday use. A fabricator’s practical concerns can be a good counterpoint to a kitchen designer’s artier point of view. In any event, cabinets and the plywood substrate must be installed before measurements for a stone countertop can be made.

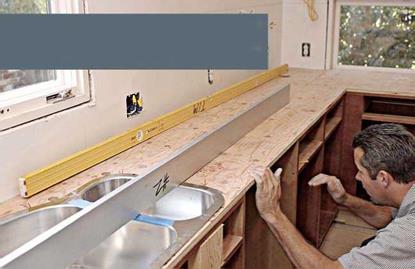
1. Подпись: sink to hundreds for a custom-made, 16-gauge commercial-grade sink with multiple bowls. ► Enameled cast-iron or enameled-steel sinks are available in numerous colors and provide a classic look that works in modern and traditional kitchens. Enameled sinks have a hard finish; but the enamel can chip, making the metal substrate likely to rust. Abrasive Подпись: 2. After ensuring that the substrate is flat, installers typically lift the slabs, stand them on edge, and carefully lower them into position to test clearances, cutouts, overhangs, and so on.

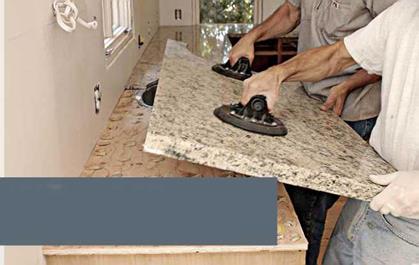
Подпись: 4. After caulking the undermount sink with silicone, installers set the slab on the epoxy grid. To avoid spreading the epoxy too thin, installers don’t slide the stone in place—they lift and lower it as close to the final position as possible. Suction-cup handles help. Подпись: 5. After leveling the slabs, pros ensure that the joint are flush by sliding a razor blade back and forth acro; them. If one side is higher, the razor blade clicks as it hits a high point or falls from a high point to a low one. More sensitive than a fingertip!
Подпись: . .УЖ

An experienced installer takes nothing for granted and will scrutinize substrates for high and low spots before anything else. However, it’s a general contractor’s responsibility to make the substrates flat—not the counter installer’s.

Подпись: cleaners quickly dull enamel finishes. Cast iron is so heavy that it takes two people to install it and so hard that it’s monstrously difficult to drill if you need an additional hole for a water filter or some other accessory. Delicate dishes or glasses dropped on it are doomed. Cost: $200 to $500+ for cast iron; slightly less for steel.image663image664"Подпись: 3. If the dry-fit is acceptable, installers set the slabs aside and apply a grid of epoxy blobs, which adhere the stone to the substrate and act as a support. Epoxy typically takes 48 hours to set fully. To keep the stone from moving while the epoxy grid cures, installers use a smaller amount of a different fast-acting epoxy.image665Подпись:Solid-surface sinks are usually manufactured from the same material as the counter and glued (chemically bonded) to the underside of the counter for a seamless, leakproof joint that won’t catch food scraps.

As with counters, solid-surface sinks are stain resistant, nonporous, and easy to clean.

And you can sand them smooth if they get gouged or scorched.

For aesthetic reasons, solid – surface sinks are rarely

installed with dissimilar Solid-surface sinks are chemically

counters; although a near-cousin, quartz bonded to a counter of the same

composite, looks enough like granite that it material, creating a leak-free seam.

contrasts well with other counter materials.

Cost: $200 to $750 for a solid-surface sink.

► Acrylic sinks have a lot going for them.

They’re lightweight, nonporous, and easy to keep clean. They’re also stain and crack resis­tant, available in many colors, and reasonably priced. However, compared to solid-surface materials, acrylics are relatively soft, so they should be cleaned with nonabrasive cleaners.

They can be damaged by extreme heat and may be incompatible with petroleum-based cleaners and caulks. Cost: $150 to $300.

Mounting style. There are a number of mount­ing styles, although almost all require a bead of sealant along their perimeter to keep water from getting under the sink rim. Mounting styles include self-rimming, undermount, integral, flush mount, and separate rim.

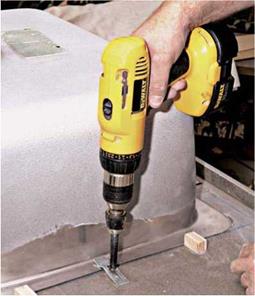
► Self-rimming sinks (see p. 320) are popular and easy to install because the sink rim sits on the countertop—after you’ve applied a bead of silicone sealant around the perimeter of the sink cutout. Heavier sinks, such as cast iron, are held in place by the adhesion of the sealant and the weight of the sink; whereas lighter sinks, such as stainless steel, require clips on the underside of the counter. When a self-rimming sink is set under a countertop, as shown at left, it may be called a counter-under sink.

► Undermount sinks are placed under a counter whose sink opening must be finished because it isn’t covered by the sink rim.

Counters with undermount sinks are easy to keep clean because there’s no rim to block food scraps; just sweep them into the sink.

image666Typically, clips attach the rim to the underside of the counter; many contractors also add framing inside the sink cabinet to support the sink when it’s filled with water.
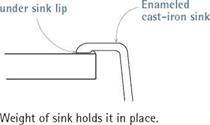
I Sink-Mounting Details

Подпись:
Подпись: PROTIP If you're cutting a finish surface such as plastic laminate, cover the metal shoe (base) of your jigsaw with masking tape to keep the shoe from scratching the countertop. llll

image667

SELF-RIMMING SINK Sealant

UNDERMOUNT SINK

~1~ґ

Counter overhangs sink.

гг

Sealant

Sink clip or wood frame supports sink.

Leakproof

INTEGRAL SINK

seam

image668

Counter and sink are same material, bonded chemically.

► Integral sinks are bonded to a counter of the same material, creating a seamless, leak – free joint. Integral sinks are common to solid – surface and quartz-composite counters.

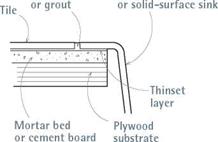
► Flush-mount (tile-edge) sinks, have a rim the same thickness as the tile layer, when both rest atop a thin-set mortar bed. Such sinks are typically enameled steel or cast iron. You can fill the tile-sink rim joint with grout or silicone seal­ant, but acrylic latex sanded caulk has the best qualities of both and comes in several colors.

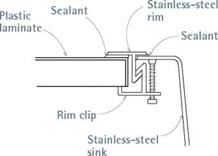
► Separate-rim sinks are usually stainless steel and employ a separate stainless-steel rim to cover the joint between the small sink rim and the edge of the counter. To prevent leaks, you must seal both the sink-side and the counter-side of the rim.

INSTALLING A KITCHEN SINK

Because self-rimming sinks are the most com­mon, this section focuses on their installation. If your sink has another mounting device, follow the manufacturer’s installation instructions.

FLUSH-MOUNT OR TILE-EDGE SINK

Sanded caulk Enameled cast-iron

image669

SEPARATE-RIM SINK

image670

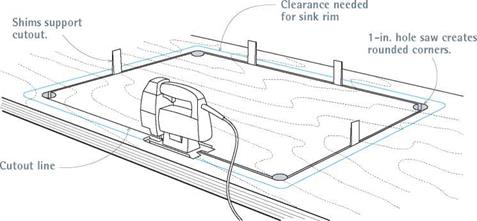
Lay out the opening. Mark the sink cutout (opening) on the counter or the plywood sub­strate. Most sinks come with a paper template of the cutout; if yours doesn’t, make one of card­board. To do that, turn the sink upside-down onto the cardboard and, with a felt marker, trace its outline. Next, use a yardstick to draw a second outline, M in. inside the first, on the cardboard. Sink rims are typically 54 in. wide, so the inner line represents the size of the cutout, and the outer line shows how much clearance the sink rim needs. Position the cutout template on the counter so there’s clearance on all sides; then use a felt marker to trace around the template.

Cut the opening. Drill a hole at each corner of the cutout for your jigsaw blade; if you use a hole saw to drill the corners, its arc should match the rounded corners of the sink body. As you cut each side of the sink opening, stop just short of the cor­ner hole. Then drive a shim into the saw kerf—from the underside of the counter—to keep the cutout section from falling. (A wood shingle is a perfect shim.) With a few shims in place, finish cutting

image671
Подпись: Because sink rims are typically 3/4 in. wide, create cardboard templates to show both the clearance needed for the rim and the cutout line needed for the sink body.

Подпись:

I Cutting Out a Sink Opening

to the comer holes and lift the cutout section, using the corner holes as finger holds. Use a wood rasp to smooth rough cut-lines or splinters.

Install the sink. Wearing heavy work gloves, put your fingers in the sink drain and faucet holes, lift the sink, and lower it into the cutout. Two people should lift and set the sink if it’s cast iron; put wood scraps around the cutout to set the sink on so it doesn’t crush your fingertips. Check the sink’s fit in the cutout—look under the counter as well—before lifting the sink out. Trim the cutout as needed. Then mount the drain basket, faucet
assembly, and accessories to the sink; they’re harder to attach once the sink is in place. To cushion the sink hardware and create a water­tight seal, use the flexible seals or plastic plates provided by the manufacturer. If the unit has a hollow body, put a bead of plumber’s putty beneath its lip. Dont do this ifthe countertop is stone; the oil in the putty may stain the stone. Silicone will work, too, but it can make the faucet difficult to remove if you decide to replace it.

Just before installing the sink in its opening,
apply a cushion of sealant for the sink rim to rest

image673

Here an undermount sink is being clip mounted to the underside of a solid-surface counter…


image674

… and then lifted as a unit and placed atop a base cabinet. Supplemental plywood frames inside the cabinet will also support the sink rim.


ORDERING COUNTERTOPS

Once you’ve identified several reputable coun­tertop shops in your area, get bids. For your protection, develop detailed floor plans and, as you proceed, put everything in writing. That way, you’ll be sure that quotes from different shops reflect similar details, deadlines, and so on. The following guidelines are adapted, with permission, from Sullivan Counter Tops, Inc. (visit www. sullivancountertops. com).

Visit suppliers in your area. Look at counter­tops in several different showrooms, and discuss your options with the salespeople. Share any information—samples of wall paint or cabinet finishes, magazine ads showing counter surfaces, photos of sinks or sink fixtures—that will clarify the style and look you’re after. A salesperson’s willingness to spend time and answer questions says a lot about a supplier.

Get bids. Provide a floor plan, drawing, or sketch to the countertop suppliers, and ask each to gen­erate a written bid. The bid should also specify a completion date, terms of payment, and the scope

of the installation. In most cases, quoted prices will not include plumbing, electrical work, or adjustments to the cabinets such as sink cutouts and leveling plywood substrates. Tearing out old countertops is usually extra, too. Based on bids and supplier reputations, choose a supplier.

Schedule the job. Most installations require two visits from the supplier: the "measure date” and the "install date.” It’s difficult to pinpoint a meas­ure date until the cabinets are installed, but in general, 2 weeks’ to 4 weeks’ notice should be enough. Typically, solid-surface (such as Corian) and plastic-laminate countertops require about 1 week between the measure date and the install date. Quartz-composite countertops (such as Zodiaq) require about 2 weeks. Most countertop suppliers will allow you to change the installation time without penalty, provided you give them enough notice.

Be prepared for meetings. The measure date is your last chance to give input on details such as underlayment issues, color, edge treatment, and splash detail. Whatever you finally decide on, get it in writing. During this meeting, the supplier will review job site conditions, so the general contractor should be there, too.

Important prerequisites

► Cabinets must be set before the job can be measured. In other words, the cabinets must be screwed together and screwed to the walls, not just pushed into place. The cabinets cannot be moved even И in. after the countertop supplier has measured because countertops are fabricated to close tolerances.

► Cabinets must be set level. As general rule, cabinets must be set on a level plane within % in. over a 10-ft. length. Such stringent requirements are a concern not only to installers but also, in some cases, to manu­facturers as a condition of warranty.

► All appliances and sinks should be on the job site at the time of the measure. The fitting of sinks and appliances is often critically close. Design or construction issues that could cause problems or delay the installation should be resolved on the measure date. If the sinks and appliances are on site, the supplier can inspect them. If there’s a defect, damage, or, say, a sink rim that won’t fit the countertop, you’ll need time to replace the item before installation.

Kitchen Sinks

Because a kitchen is one the most-used rooms in the house, do a little research before choosing its most-used fixture.

CHOOSING A KITCHEN SINK

Keep four criteria in mind when considering sinks: size and number of bowls, sink-hole compatibility with faucets and accessories, mate­rials, and mounting styles.

Size and number of bowls. Sinks are available in dozens of sizes and shapes. For the record, a 22-in. by 33-in. two-bowl unit is the most popular, perhaps because it fits neatly into “standard” sink cabinets 24 in. deep by 36 in. long. Two bowls allow you to prep food in one, and put used bowls and pots in the other, during the mad dash to din­ner. Typically, there’s a garbage disposer on one side. If you’ve got a dishwasher and don’t need to wash dishes in the sink, a large single-bowl sink is best suited to washing pots and pans; 10 in. deep is optimal. If you’ve got plenty of counter space and two family members like to cook, install two separate sinks. By the way, three-bowl sinks (45 in. wide) are overkill for most home kitchens.

Most sinks have one to four holes. Typically the spout and faucet handles take up three of those holes, but some single-lever faucets require only one hole. Filling an extra hole is generally not a problem, what with soap dispensers, hot-water dispensers, spray units, filtered-water dispensers, and so on to choose from. Incompatibility more often occurs when a faucet assembly’s valve stems have a different spacing than the holes in the sink. Always measure the sink and the faucet assembly to be sure. Likewise, if the sink is undermounted, an installer must drill holes into a countertop, making sure they have the same spacing as the faucet to be installed.

Materials. Sink materials include many of those used for countertops. You can use almost any­thing that will hold water, but ideally it should be


light enough to install without breaking your back, easy to clean, durable, moderately priced, heat resistant, and stain resistant. Few materials fill the bill as well as stainless steel.

► Stainless-steel sinks represent roughly three-quarters of all kitchen installations. Typically, they have a brushed or polished finish; brushed finishes are easier to maintain


ORDERING COUNTERTOPS

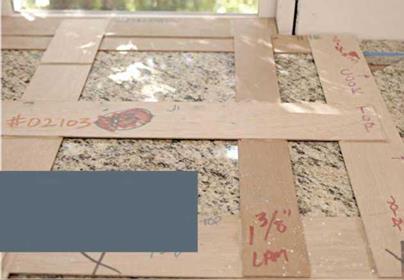
Templates are useful for transferring accurate measurements to any sheet material or flat surface, whether it’s a piece of drywall that needs to be notched beneath an exposed stair or a new door that must be fit to an old, out-of-square door frame. When the going gets rough, the pros make templates. Nowhere is this truer than when those large sheets are granite slabs. Often, countertop suppliers create templates during the "measure date" described in "Ordering Countertops," on the facing page.


ORDERING COUNTERTOPS

image656

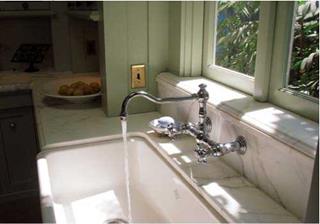
This enameled cast-iron farmhouse sink is big enough to rinse as large a turkey as you can lift. The faucet’s spout swings out of the way for complete access to the sink. (Fixture available from www. bathsfromthepast. com.)


JHS> AWrt ■ЗТІ ^ETdli/iiv 6^ Г4>т^-


The more complex the site conditions or cutouts, the more information the template contains. This small section notes the type of granite, edge bevels, and thickness and the location of the sink cutout. The template’s back edge registers to the window width.


image657image658

image659image660image661image662because water spots don’t show as conspic­uously. A sink’s gauge (thickness) is the real differentiator. Thicker gauges (16 gauge to 18 gauge) are harder to flex and dent and are quieter to use; whereas thinner gauges (20 gauge to 22 gauge) are less expensive, less durable, and more inclined to stain. Cost: This can range widely, from $40 for a 22-gauge single-bowl
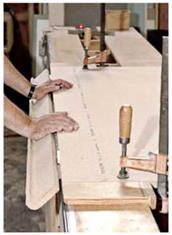
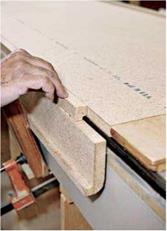
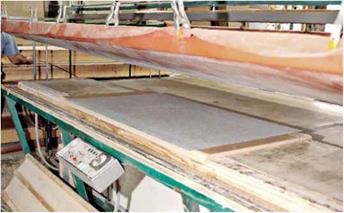
POST-FORMING A COUNTERTOP

image653

2. Plastic laminate can be brittle when it’s cold, so the assembly is next moved to a bench with a heated edge. Inverted, the countertop is clamped to the bench and the backsplash is pulled to its final position—at a right angle to the countertop.


image654

3. The ’/i-in. spacers placed earlier are removed, and coved strips along the joint between the countertop and backsplash are hot-glued. Coved strips keep the top and back pieces in place and, because the cove has the same arc as the laminate, they support it as well.


image652

1. At a custom-counter shop, the post-forming machine is a vacuum press that applies heat and pressure to wrap the laminate to the shaped edges of the countertop and splashboard. Note: The substrate is still in two pieces, so when moving the assembly, both pieces must be supported.


4. Cutting is done by a $100,000 table saw with a diamond blade large enough to cut a razor-clean miter through both the countertop and the backsplash, in one pass.


image655

and, to a degree, stain-proofs them, too. Miracle Sealant’s 511 Porous Plus, a penetrating sealer, is effective at stain-proofing cementitious materials from grout to concrete. One of the best books on casting your own countertop is Fu-Tung Cheng’s Concrete Countertops (The Taunton Press).

Wood is a sentimental favorite because it’s warm and beautiful, but it must be correctly finished and carefully sealed to prevent damage around sinks or along seams where water could collect. There are so many types of wood that it’s tough to generalize about traits, but most types scorch, scratch, and stain easily, and water will swell and rot wood unless you keep it sealed. Thus a growing number of fabricators such as Spekva of Denmark, are producing oil – finished, butcher-block and laminated-wood countertops that will remain durable if you peri­
odically apply a food-safe oil recommended by the manufacturer. Such countertops are pricey but, in Spekva’s case, the wood is harvested from sustainable, managed forests.

POST-FORMED PLASTIC LAMINATE TOPS

Roughly half of residential laminate countertops are post-formed—in which a shop or factory adheres and wraps a single, continuous sheet of laminate to a particleboard substrate, creating a seamless joint between the counter and back – splash. This leak-free joint is the principal reason why most contractors order post-formed lami­nate tops rather than adhering the laminate to the substrate themselves. However, if you want a dif­ferent transition from countertop to wall, perhaps a tile backsplash, or simply want to save money, laminating a flat countertop is not that difficult.

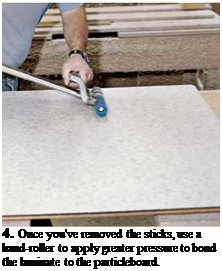
Подпись: Revenge OF THE TREES Are wood countertops a safe surface for propping food? A 1993 study by the University of Wisconsin Food Research Institute suggests that solid-wood cutting- boards are safer than plastic ones. In one experiment, both types of boards were contaminated with Salmonella bacteria and left to stand unwashed overnight. In the morning, the bacteria on the wood boards had died, but they had multiplied on the plastic boards. Scientists haven't determined what agents in the wood killed the bacteria, so be sure to scrub all cutting boards and countertops to be safe. Подпись: PROTIP Once the laminated countertop is scribed and secured to the base cabinet(s), do the cutout for the kitchen sink. Kitchen-sink cutouts are best done on site because the remaining substrate front and back would likely break in transit if you did the cutout at the shop. 1111 Подпись: PROTIP If you choose a replacement sink the same size as the old one, you won't need to adjust the counter opening to install a larger sink. Moreover, if there's an under-counter dishwasher next to the sink cabinet, there may be no room for a longer sink. 1111 Although the photos in "Adhering Laminate Yourself,” on p. 314, were shot entirely in a cus­tom counter shop, they depict the most critical steps for doing the job yourself. The photos in "Post-Forming a Countertop,” on p. 315, show tasks that require specialized equipment and can be done only in a shop. A custom counter shop will also trim the counter to length, trim excess laminate, and cut miter joints if the counter is L – or U-shaped.
If you opt for a post-formed top, the installa­tion becomes a good deal simpler. The counter installer’s principal tasks will then be scribing the top of the backsplash so it fits flush to the wall, drawing mitered sections together with draw – bolts, and securing the counter substrate to the top of the base cabinet. However, as discussed in the next section, the first step in fitting counter­tops is taking careful measurements.

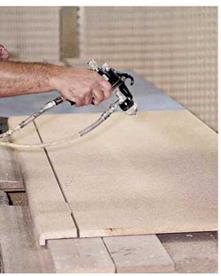
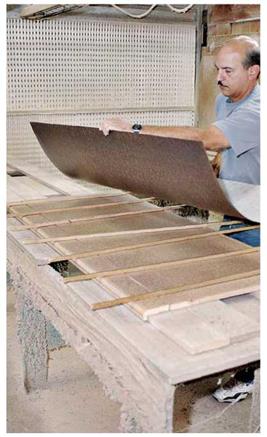
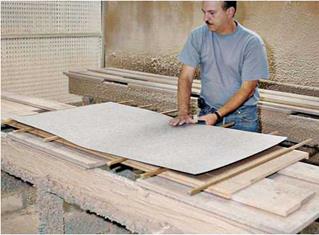
ADHERING LAMINATE YOURSELF

image648

1. After rough-cutting the substrate and the laminate and touch-sanding them, spray both surfaces with a water-based contact cement. (Wear a respirator mask with organic vapor filters.) The curved piece at left, separated from the counter by a ’/4-in. spacer, will become the backsplash. The gap will enable the laminate to bend in a gentle radius.


2. After allowing the contact cement to set for 15 minutes—surfaces are usually warmed to speed drying-place ’A-in. sticks atop the particleboard, and then place the laminate on the sticks. The sticks allow you to accurately position the laminate over the substrate without allowing cemented faces to touch.


3. After measuring the laminate’s overlap and correcting its position, pull a middle stick and hand-smooth the laminate to the particleboard. Once there’s contact, you’re committed. Working outward from the middle, pull out sticks and smooth the laminate by hand.


image649image650

Подпись: 4. Once you've removed the sticks, use a hand-roller to apply greater pressure to bond the laminate to the particleboard.

irregular tile surfaces can be tricky to seal around sinks and splashbacks, so water can seep in and damage wood substrates.

Stone slabs include granite, marble, soapstone, limestone, and slate. Stone is naturally beautiful, but it’s also heavy, hard to work, and very expen­sive. Yet for all its heft, stone is relatively fragile and must be supported by a substrate—usually 14-in. plywood. Granite, the most popular stone, is available in slabs % in. and 1 !4 in. thick, up to 5 ft. wide and 10 ft. long. But because of its great weight, granite is usually installed in several sec­tions 6 ft. long or less. Section seams are filled with a caulk that’s color-matched to the granite, so seams are virtually invisible. To create a thicker edge, fabricators epoxy two layers of stone. When pattern matched and polished cor­rectly, the seams are almost invisible. Harder stones such as granite are highly scratch resist­ant. Softer stones, such as soapstone, can be scratched, but their softness allows you to easily sand out scratches or buff them out with steel wool. Stone is generally water resistant, though most stones are somewhat porous and so will stain unless protected. Penetrating sealants such as Aqua Mix Stone Sealer’s Choice® and Miracle Sealant’s 511 Porous Plus™ are well regarded in
the stone trade. For more recommendations, visit www. stoneworld. com.

Because stone is a natural material with inherent flaws and irregularities, few installers offer a warranty once an installation is complete. In the trade, it’s called "a tail-light warranty”; in other words, once the installer’s truck leaves your driveway, the warranty expires.

Concrete has become tres chic as a countertop material because it’s tough, reasonably priced, and highly malleable. It can be stained and pol­ished to look like exotic stone, factory-cast with colorful glass shards in the bottom of its mold. Or it can be cast directly atop a base cabinet.

Concrete weighs roughly the same as stone. However, because a concrete slab needs to be fully 1 /2 in. thick, you need to overbuild base cabinets to support the additional weight. (Stone tops need to be 1h-in. thick only along their front edge.) Because the bottom of in-place form molds can sag between supports until the concrete sets, it’s smart to add cross-counter webs to support the forms. Concrete is notorious for cracking and staining, but you can minimize those problems by reinforcing the slab adequately with steel or poly fibers and finishing the surface meticulously.

Concrete gurus praise Berylex®, an admixture that strengthens and internally waterproofs slabs

Countertops for Kitchens and Baths

Most materials in this section require special training and equipment for installation. In fact, solid-surface and stone-polymer countertop mak­ers will sell counter stock only to certified fabri­cators. Some materials, such as plastic laminates, can be successfully installed if you’re handy. But,

image646

image647

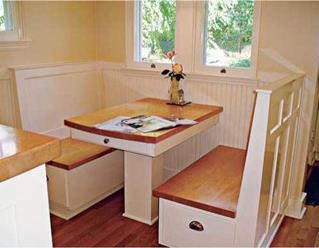
The dining area does double-duty. Both bench seats have built-in hanging file cabinets, so the owner can sit at the table and deal with household bills. And under the butcher-block top, a small end drawer holds flatware.


Countertop Choices

CHARACTERISTIC

PLASTIC

LAMINATE

SOLID

SURFACE

QUARTZ

COMPOSITE

CERAMIC

TILE

STONE

CONCRETE

WOOD

Durability, scratch resistance Fair

Excellent*

Excellent

Good

Goodt

Good

Fair!

Ease of cleaning

Excellent

Excellent

Excellent

Fair§

Excellent

Good

Fair

Stain resistance

Good

Good

Excellent

Fair

Fair

Poor

Poor

Water resistance

Good

Excellent

Excellent

Fair

Good

Good

Poor

Heat resistance

Poor

Fair

Good

Excellent

Excellent

Excellent

Poor

Expense

$

$$$

$$ to $$$

$$

$$$

$ to $$

$$

Material scratches, but scratches are easily sanded out. f Durability depends on type of wood and finish; wood is generally a bad choice near sinks and water. t Harder stones (granite) wear well; softer stones (soapstone) scratch and stain easily.

§ Glazed tiles resist stains, water, and heat; but grout joints deteriorate if not sealed and maintained.

as you’ll see, desirable details, such as wrapped front edges and integral backsplashes (no seams to leak!), are best fabricated in a pro shop. All in all, it’s smarter to choose a reputable installer than to try installing a countertop yourself. Tile countertops are discussed in Chapter 16.

CHOOSING COUNTERTOPS WISELY

The wide array of countertop colors, materials, and details (such as edges and backsplashes), give you tens of thousands of combinations to choose from. Here’s help narrowing your choices.

Plastic laminate, a tried-and-true surface (often called Formica® after a popular brand), accounts for more than two-thirds of all coun­tertop installations. Standard laminate is only Мб-in. thick, so it is typically glued to a %-in. particleboard substrate to lend rigidity and ensure adequate support. Plastic laminate remains so popular because it’s tough, stain – resistant, quite economical, and available in a great range of colors and patterns. There are also extra-thick and fire-resistant laminates.

One disadvantage is that the seams can degrade and admit water. And once the substrate is water damaged and the laminate is lifting, the countertop is beyond repair.

Solid-surface countertops began with DuPont’s Corian®, which is still the best-seller in this category. Most brands are polyester or acrylic resins with a mineral filler. Solid-surface countertops have a lot going for them: They’re water and stain resistant; nonporous and easy to clean and thus great for food prep; and leakproof because they have seamless, chemi­cally bonded backsplashes and integral sinks. Unlike laminates, solid-surface sheets are the same material top to bottom, so if you scratch them or put too hot a pot on them, you can sand out the blemishes. Most brands come with a 10-year warranty. Note that this material is gen­erally expensive.

Quartz composites are a new and rapidly grow­ing group that includes brands such as Zodiaq® and Silestone®; the blend is roughly 93 percent quartz and 7 percent polymers and pigments. Quartz composites have many of the virtues of stone countertops and few of the failings. Quartz composites are scratch, heat, and stain resistant; completely nonporous so they’re easy to clean; and less likely to fracture during transit because mineral particles are uniformly dispersed and free from the imperfections of natural stone.

Plus, a 10-year warranty is standard. However, these composites are expensive. And stone con­noisseurs will know the countertop is not natural stone because of its uniformity.

Ceramic tile is beautiful and durable. Its great variety of colors, shapes, and sizes allows almost unlimited freedom to create your own patterns. Glazed tiles themselves are largely resistant to heat, water, stains, and scratches. Tile can be applied successively over a plywood substrate or a mortar bed, and a diligent novice can install it successfully. Tile prices vary widely, and thus can fit almost any budget. But its grout joints are rel­atively fragile, easily stained if they’re not sealed and maintained, and tend to collect crud. Also,

INSTALLING WALL CABINETS

Wall cabinets must be leveled, plumbed, and solidly anchored, so transfer the locations of stud centers to the back of each wall cabinet, and predrill screw holes in the mounting rails, as you did for base cabinets. Remove the doors and shelves so the cabinets will be easier to lift and position next to the alignment marks you drew earlier along the wall cabinet layout line. Before lifting anything, however, use a 6-ft. spirit level to refresh your memory as to where the wall’s surface is out of plumb and where it bulges or recedes. Make light pencil notations on the wall.

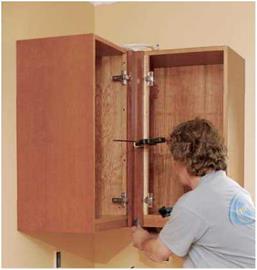
Supporting cabinets. It’s better to have a helper hold wall cabinets in place as you mount them. But if you’re working solo, the simplest support is a temporary support strip, a straight, predrilled M-in. by Hi-in. plywood strip placed immediately below the wall cabinet layout line and screwed to each stud with a #8 wood screw (see "Cabinet-Mounting and Edge Details,” on p. 306). With the cabinet bottom sitting atop it, the strip will support the box’s weight, freeing one of your hands to screw the top mounting rail to a stud. That first screw will hold the cabi­net in place, but don’t sink it so deep that it bends the mounting rail.

Plumbing and shimming. Once that first screw is in, the cabinet should stay put, so you’ll have both hands free to shim the cabinet and check for plumb. A cabinet sitting on a leveled strip should have a level bottom and plumb sides— but check to be sure. The front of the cabinet must also be plumb. So if it’s not, insert shims between the wall and the cabinet. Although you can easily shim behind the top mounting rail, the support strip will prevent shimming from underneath; instead, shim the bottom corners from the side. If the top of the cabinet needs to come forward, slightly back out the screw in the top mounting rail. Once all the cabinet faces are plumb, drive a second screw through the top mounting rail and a third screw through the bot­tom rail, near the shim point. You will add another screw to the bottom rail later, after you remove the support strip and shim behind the fourth corner of the cabinet box.

Ideally, each wall cabinet should be secured to at least two studs with two #8 wood screws through the top mounting rail and two screws through the bottom rail. However, many wall cabinets are too narrow to reach two studs. Screwing cabinet boxes to each other lends addi­tional support and spreads the load. But if a cabi­net will be heavily loaded or if you’re uneasy

SCRIBING A PANEL TO AN IRREGULAR WALL

image644

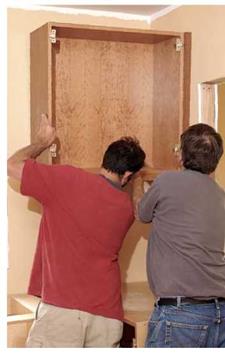
Hanging wall cabinets is easiest with four hands: Two hold and adjust, while two check level and drive screws.


image642

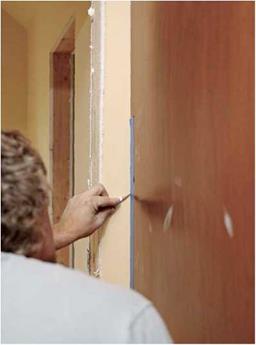
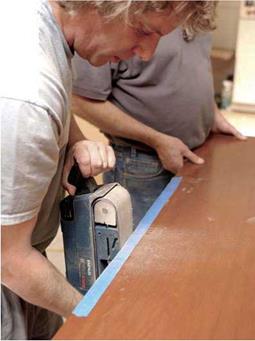
To scribe an end panel (here, a refrigerator panel), first level and plumb its edges. Put painter’s masking tape on the panel and scribe directly onto the tape to make the line more visible. If the wall irregularity is slight, hold a pencil flat to the wall and slide it up and down.


image643

A belt sander held 90° to a scribed line enables you to see how much wood you’re removing.

Use a 120-grit belt, back-bevel the edge slightly, keep the sander moving, and stop just shy of the line. Finish off with a sanding block or a handplane.


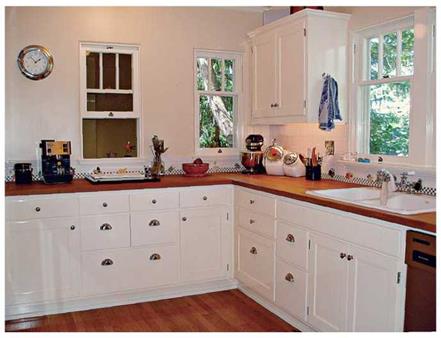
Подпись: In this Eugene, Oregon, bungalow, you're more aware of individual elements because painted base cabinets offer a nice contrast to the red oak floors and maple butcher- block countertops. The traditional enameled cast-iron sink continues the contrast-and-enjoy scheme.Подпись:image645

hanging it on only one stud, cut open the wall and let in (mortise) a piece of 1 x blocking into at least two studs. You’ll need to repair the wall—a rough patch is fine if it’s hidden by cabinets—but you’ll have plenty to screw to.

Tying cabinets together. Install the wall cabi­nets in roughly the same order you did base cabinets. If the cabinet layout is L – or U-shaped, start with a corner cabinet and work outward.

As you set successive cabinets, place a straight­edge or a 6-ft. level held on-edge across several cabinet faces to make sure they’re flush. You may need to back out screws or drive them deep­er to make the cabinets flush. Once they’re flush, clamp and screw them together as you did for the base cabinets. At that point, you can remove the support strip. With the strip gone, the space
behind the bottom mounting rail will be accessi­ble, so add shims and screws as needed.

Finishing touches. Patch holes left by the support-strip screws or cover them with trim. Custom cabinetmakers often use a piece of trim with the same finish as the cabinets as a support strip and just leave it in place. Thus if the front of the cabinet has a 1 %-in.-wide trim piece running along the bottom to hide a light­ing strip, use a piece of HCin.-wide trim as a support strip. Cover the cabinet-mounting screws with wood plugs or stick-on screw cov­ers. Finally, install the shelves, drawers, doors, and hardware such as pulls or knobs.

These days, most cabinets use European – style door hinges (shown at left), which are easy to remove, reattach, and adjust. Hinges are set into 35mm-diameter holes bored precisely into the door frames. The doors are attached to the cabinet box via baseplates; these hinges easily clip on and off the baseplates without the need to remove any screws. Once the cabinets are installed, clip on the doors and use the adjust­ment screws to raise the hinges up or down, in or out, until the reveals (gaps) between the doors are equal and the doors lie flat.

TWO WAYS TO SECURE A TOEKICK

As you install each cabinet, first transfer the stud center marks to the mounting rails on the back of the cabinet. Then drill through the marks, using a bit that’s thinner than the shanks of the mounting screws— or a countersink bit. Drill slowly to avoid splintering the plywood on the inside of the cabinet, or stop the countersink bit just as its point emerges. Then finish drilling from the other side.

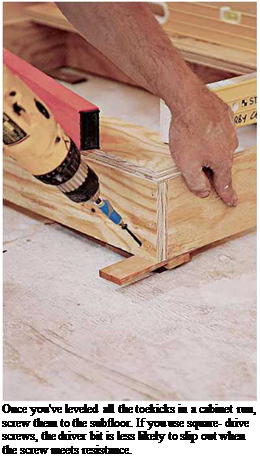
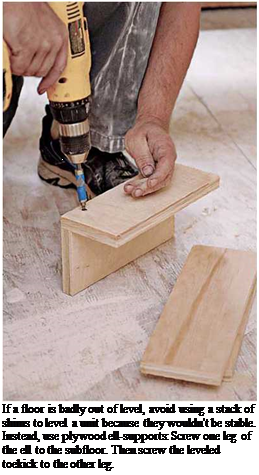
Подпись: Once you've leveled all the toekicks in a cabinet run, screw them to the subfloor. If you use square- drive screws, the driver bit is less likely to slip out when the screw meets resistance. Подпись: If a floor is badly out of level, avoid using a stack of shims to level a unit because they wouldn't be stable. Instead, use plywood ell-supports: Screw one leg of the ell to the subfloor. Then screw the leveled toekick to the other leg. 1111

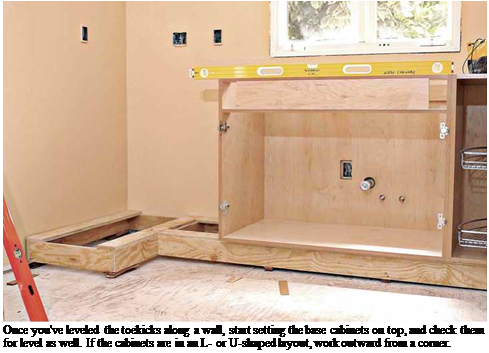
Подпись: Once you've leveled the toekicks along a wall, start setting the base cabinets on top, and check them for level as well. If the cabinets are in an L- or U-shaped layout, work outward from a corner. Setting cabinets with integral toekicks. If
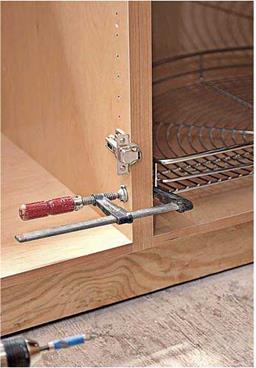
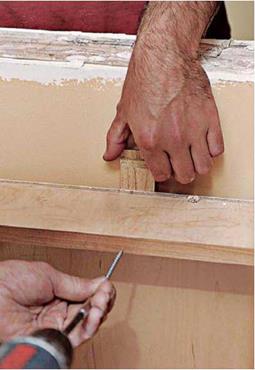
your cabinets have integral (built-in) toekicks, be sure to review the preceding section on rough toekicks. Shimming units with integral kicks is similar, but more difficult. Basically, you’ll shim each cabinet under its sidewalls, front, and back. The difficulty arises because you can’t go back and adjust rear shims once you’ve installed the next cabinet. So take the time to level the top of each base cabinet perfectly. Otherwise, the order in which you install cabinets is the same for either type.

Setting base cabinets. If you’re installing a single run of cabinets along one wall, it really doesn’t matter where you start, except that if there’s a sink cabinet centered under a window, start there. If your cabinet layout is L – or U-shaped, start in a corner because there, where cabinet runs con­verge in a corner, their tops will need to line up perfectly if the countertop is to be level in all directions. So take pains to be sure that first cor­ner top is at the right height—in relation to the base cabinet layout line—and level in all direc­tions. Once that corner cabinet is perfectly level,

image637

When you’re sure that base cabinets are at the correct height and leveled, align their front edges or face frames and use padded clamps to draw adjacent cabinets together. Then sink two wood screws through side panels to secure them.


image638

If the walls are irregular—and most are—shim behind the cabinet mounting rails before screwing them to the studs. Otherwise, back panels and rails could distort.


Подпись:you have a good shot at extending that level out­ward as you add cabinets.

When you’ve leveled the corner cabinet in all directions, you can screw it to the toekick and, through its mounting rails, to the studs behind it. But more often, carpenters prefer to “gang” cabi­nets together, lining up their tops so they’re level and, using quick-release clamps with padded jaws, aligning and drawing the cabinet edges or face frames together. Once you’ve lined up the cabinet edges and frames, use two wood screws to join them. Drill pilot holes first with a counter­sink bit so the screw heads will be flush. If cabi­net panels are 3з4 in. thick, use 114-in. screws to join them, so the screw points don’t pop through.

After securing the cabinet edges and frames, check the cabinet tops for level and height one last time. Then, depending on the type of cabinet, screw the cabinet bottoms to the toe – kicks, or screw integral toekicks to the subfloor. Finally, screw the cabinet backs to the studs, through the pilot holes you predrilled. If a wall is wavy, shim low spots behind the mounting rails; otherwise, screws could distort the mounting rails and possibly misalign the cabinet boxes. Screws should sink at least 1 in. into the studs, so use #8 screws that are 212 in. or 3 in. long.

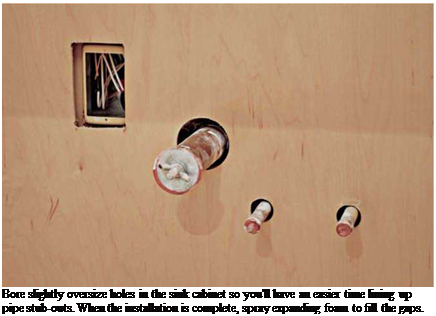
Подпись: Bore slightly oversize holes in the sink cabinet so you'll have an easier time lining up pipe stub-outs. When the installation is complete, spray expanding foam to fill the gaps.

Don’t use drywallscrews because they don’t have much shear strength. If your base cabinets have top and bottom mounting rails, drive two screws per stud to anchor the cabinets—in other words, sink a screw each time a mounting rail crosses a stud. Later, you can use wood-grained, stick-on screw covers to hide the screws.

Setting sink bases. Sink bases with back panels take a bit more work because you must bore or cut through the back panel for pipe stub-outs and
electrical outlets, if any. Perhaps the easiest way to transfer the locations of those utilities to the back of the cabinet is to position the cabinet as close as you can to layout marks on the wall, and then place a spirit level behind it. Holding the level vertically, place it next to each stub-out, plumb the level, and then mark that pipe’s posi­tion on the wall and on the cabinet’s back stringer. Pull the sink base away from the wall, measure how far each stub is below the layout line, and measure down an equal amount on the back of the cabinet. Use a slightly oversize hole saw to bore holes, stopping when the saw’s center bit comes through the inside of the cabinet. Finish drilling from the inside of the back panel to avoid splintering it.

Setting islands. Kitchen islands are installed much the same as other base cabinets, except that they can’t be screwed to studs. Therefore, the rough toekick must be sturdy and well attached to the subfloor. For that reason, use ell-supports to level rough toekicks or integral toekicks and anchor them to the subfloor.

Here, glue and screw the ells to the subfloor after snapping chalklines to show you exactly where the island will sit. Place an ell at least every 18 in. to 24 in. and, to further bolster rough toekicks, add crosspieces at the same interval. You can’t overbuild a kitchen island, especially if you’ve got kids who think cabinets are jungle gyms.

image641