Installing a Granite Countertop
Once you’ve looked at granite samples and narrowed your choices to a few varieties, consult the fabricator—the company that will be cutting and installing your stone.
For example, if you choose a granite with large crystals, joints between sections may be more obvious than those between finely grained stone. Besides, some richly figured stones are more likely to crack or spall when subjected to everyday use. A fabricator’s practical concerns can be a good counterpoint to a kitchen designer’s artier point of view. In any event, cabinets and the plywood substrate must be installed before measurements for a stone countertop can be made.
1. 

 |
 |
An experienced installer takes nothing for granted and will scrutinize substrates for high and low spots before anything else. However, it’s a general contractor’s responsibility to make the substrates flat—not the counter installer’s.
► 

![]()
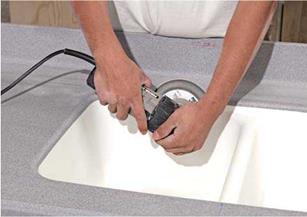
![]() Solid-surface sinks are usually manufactured from the same material as the counter and glued (chemically bonded) to the underside of the counter for a seamless, leakproof joint that won’t catch food scraps.
Solid-surface sinks are usually manufactured from the same material as the counter and glued (chemically bonded) to the underside of the counter for a seamless, leakproof joint that won’t catch food scraps.
As with counters, solid-surface sinks are stain resistant, nonporous, and easy to clean.
And you can sand them smooth if they get gouged or scorched.
For aesthetic reasons, solid – surface sinks are rarely
installed with dissimilar Solid-surface sinks are chemically
counters; although a near-cousin, quartz bonded to a counter of the same
composite, looks enough like granite that it material, creating a leak-free seam.
contrasts well with other counter materials.
Cost: $200 to $750 for a solid-surface sink.
► Acrylic sinks have a lot going for them.
They’re lightweight, nonporous, and easy to keep clean. They’re also stain and crack resistant, available in many colors, and reasonably priced. However, compared to solid-surface materials, acrylics are relatively soft, so they should be cleaned with nonabrasive cleaners.
They can be damaged by extreme heat and may be incompatible with petroleum-based cleaners and caulks. Cost: $150 to $300.
Mounting style. There are a number of mounting styles, although almost all require a bead of sealant along their perimeter to keep water from getting under the sink rim. Mounting styles include self-rimming, undermount, integral, flush mount, and separate rim.
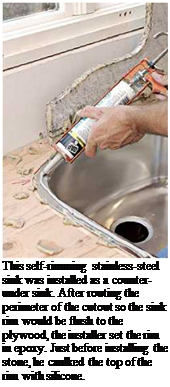
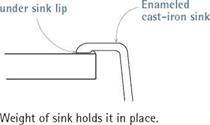
► Self-rimming sinks (see p. 320) are popular and easy to install because the sink rim sits on the countertop—after you’ve applied a bead of silicone sealant around the perimeter of the sink cutout. Heavier sinks, such as cast iron, are held in place by the adhesion of the sealant and the weight of the sink; whereas lighter sinks, such as stainless steel, require clips on the underside of the counter. When a self-rimming sink is set under a countertop, as shown at left, it may be called a counter-under sink.
► Undermount sinks are placed under a counter whose sink opening must be finished because it isn’t covered by the sink rim.
Counters with undermount sinks are easy to keep clean because there’s no rim to block food scraps; just sweep them into the sink.
 Typically, clips attach the rim to the underside of the counter; many contractors also add framing inside the sink cabinet to support the sink when it’s filled with water.


|
|
|
SELF-RIMMING SINK Sealant |
|
UNDERMOUNT SINK ~1~ґ |
Counter overhangs sink. |
|
гг |
Sealant |
|
Sink clip or wood frame supports sink. |
Leakproof |
|
INTEGRAL SINK |
seam |
|
|
Counter and sink are same material, bonded chemically.
► Integral sinks are bonded to a counter of the same material, creating a seamless, leak – free joint. Integral sinks are common to solid – surface and quartz-composite counters.
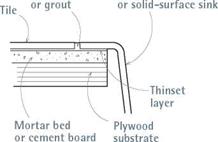
► Flush-mount (tile-edge) sinks, have a rim the same thickness as the tile layer, when both rest atop a thin-set mortar bed. Such sinks are typically enameled steel or cast iron. You can fill the tile-sink rim joint with grout or silicone sealant, but acrylic latex sanded caulk has the best qualities of both and comes in several colors.
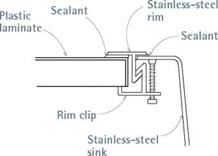
► Separate-rim sinks are usually stainless steel and employ a separate stainless-steel rim to cover the joint between the small sink rim and the edge of the counter. To prevent leaks, you must seal both the sink-side and the counter-side of the rim.
Because self-rimming sinks are the most common, this section focuses on their installation. If your sink has another mounting device, follow the manufacturer’s installation instructions.
FLUSH-MOUNT OR TILE-EDGE SINK
|
Sanded caulk Enameled cast-iron
|
|
SEPARATE-RIM SINK
|
Lay out the opening. Mark the sink cutout (opening) on the counter or the plywood substrate. Most sinks come with a paper template of the cutout; if yours doesn’t, make one of cardboard. To do that, turn the sink upside-down onto the cardboard and, with a felt marker, trace its outline. Next, use a yardstick to draw a second outline, M in. inside the first, on the cardboard. Sink rims are typically 54 in. wide, so the inner line represents the size of the cutout, and the outer line shows how much clearance the sink rim needs. Position the cutout template on the counter so there’s clearance on all sides; then use a felt marker to trace around the template.
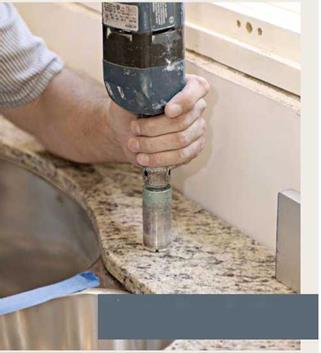
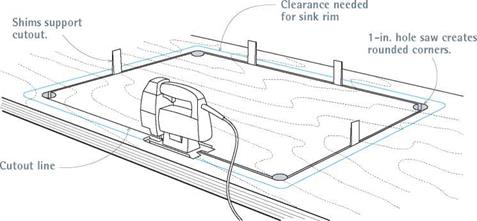
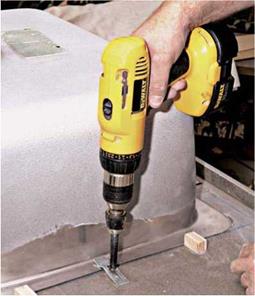
Cut the opening. Drill a hole at each corner of the cutout for your jigsaw blade; if you use a hole saw to drill the corners, its arc should match the rounded corners of the sink body. As you cut each side of the sink opening, stop just short of the corner hole. Then drive a shim into the saw kerf—from the underside of the counter—to keep the cutout section from falling. (A wood shingle is a perfect shim.) With a few shims in place, finish cutting
 |
 |
to the comer holes and lift the cutout section, using the corner holes as finger holds. Use a wood rasp to smooth rough cut-lines or splinters.
Install the sink. Wearing heavy work gloves, put your fingers in the sink drain and faucet holes, lift the sink, and lower it into the cutout. Two people should lift and set the sink if it’s cast iron; put wood scraps around the cutout to set the sink on so it doesn’t crush your fingertips. Check the sink’s fit in the cutout—look under the counter as well—before lifting the sink out. Trim the cutout as needed. Then mount the drain basket, faucet
assembly, and accessories to the sink; they’re harder to attach once the sink is in place. To cushion the sink hardware and create a watertight seal, use the flexible seals or plastic plates provided by the manufacturer. If the unit has a hollow body, put a bead of plumber’s putty beneath its lip. Dont do this ifthe countertop is stone; the oil in the putty may stain the stone. Silicone will work, too, but it can make the faucet difficult to remove if you decide to replace it.
Just before installing the sink in its opening,
apply a cushion of sealant for the sink rim to rest
|
|
||




Leave a reply