Category CARPENTRY

OTHER USEFUL POWER TOOLS

Although not often used by frame car­penters, two other power tools worth mentioning are routers and sanders. These tools are typically used for finish work, like preparing a bookcase for stain or paint, which makes them more suit­able for trim and finish carpenters.

Routers

Routers are classified according to the largest-diameter bit shank that the collet (or chuck) can handle. Common sizes are Уд in., 3/s in., and У2 in. The most powerful routers have З-plus HP motors and can make big cuts through heavy stock in a single pass.

Equipped with the right bit, the router can be adapted to a number of carpen­try jobs. You can cut grooves and notches, round over edges, trim materi­als (like plastic laminate), and make moldings with a router. With the right attachment, you can cut perfect circles and even mortise doors for hinges.

For all its usefulness, though, a router can be a frightening tool. Its motor is directly connected to an unguarded bit, which protrudes from a base plate. The motor can spin the bit up to 25,000 rev­olutions per minute (rpm) or faster and makes more noise than a roomful of rock musicians. Because of the noise and the fact that the bit is exposed, I always wear ear protection and safety glasses

OTHER USEFUL POWER TOOLS

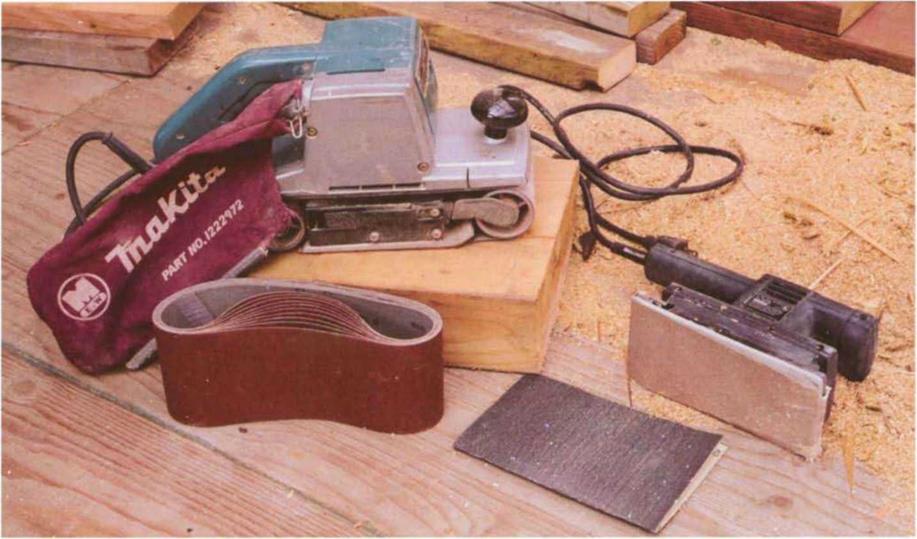
The belt sander (left) can remove a lot of stock quickly. The pad sander (right) is more suited to finish work.


Carpenters learn to work without sawhorses, but there are times when a good pair of horses can save your back or help you work overhead. Stock placed on sawhorses allows you to cut, drill, or shape materials without having to bend over. For a tempo­rary workstation, top a pair of horses with a sheet of plywood. Planks placed across horses make a good scaffold.

There are many different styles of sawhorses.

Some are works of art suitable for a living room, and others are simple structures. Here are plans and instructions for a strong sawhorse that can be made in just a few minutes.

Measure and cut the 8-ft. 2×4 into two 48-in.-long pieces. Then measure and cut four 30-in.-long legs from the 12-ft. 1×6.

Begin assembly with the crosspiece of the sawhorse. Turn one 2×4 on edge, center another 2×4 flat on the first so that they form a T, and nail them together with four 16d nails.

Next, position the end of a 1×6 leg flush with the top of the crosspiece (see the drawing on the facing page) and about 2 in. from the end. Nail the legs (or use 1 Уг-іп. drywall screws) with two 8d nails into both pieces of the T. Do the same with the remain­ing three legs, then set the sawhorse upright.

Nail the 48-in.-long 1×4 to the top of the crosspiece with two or three 8d nails. Countersink these nail heads with a nailset so you won’t hit them with a saw blade when you are cutting on the sawhorse.

Now take a plywood square and hold it against the legs on one side of the sawhorse. Make sure the top of the plywood is flush to the bottom of the cross­piece, then trace the outline of the legs onto the ply­wood. Repeat with the other piece of plywood on the other side of the sawhorse. These pieces brace the legs of the sawhorse.

Cut both plywood pieces along the lines you traced. Use several 8d nails or 1[4]/2-in. drywall screws to at­tach the plywood pieces to the legs, one on each end and flush with the bottom of the crosspiece. (You may have to predrill small pilot holes to keep the nails or screws from splitting the wood.)

when I’m working with a router. And I’m always extremely aware of where my hands are.

PNEUMATIC NAILERS

My first pneumatic tool drove only sta­ples, and I used it to nail subfloor and roof sheathing. Today, pneumatic nailers drive many types of fastener. In some areas of the country, they are almost as common on job sites as hammers.

What makes a pneumatic nailer so appealing is its speed. The nails are automatically fed into the nailer from a clip or coil (which can hold 200 nails or more), so you don’t have to keep reach­ing into your tool belt for nails.

Today, there’s a nailer for every job, from rough framing to roofing to the finest finish work. I own two framing nailers, a finish nailer, and a palm nailer. Both framing nailers drive 8d or 16d nails (see the photo below)—one feeds the nails from a clip, and the other feeds them from a coil. Both fit well in my hand,

PNEUMATIC NAILERS

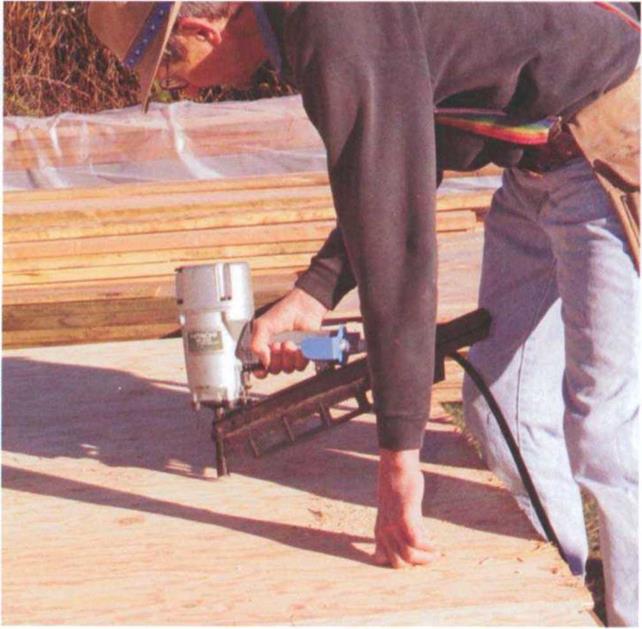
A framing nailer can be used for rough framing, as well as for nailing a ply­wood subfloor to joists. (Photo by Roe A. Osborn.)


PNEUMATIC NAILERS

A finish nailer works well for trimwork, such as nailing in the stool for a win­dow. (Photo by Roe A. Osborn.)


seldom jam, and require very little main­tenance. They take a drop of oil twice a day and need to be cleaned with a wire brush now and then, but that’s about it.

The same is true with my finish nailer, which drives nails from 1 in. (brads) to 2У2 in. (8d) long (see the photo above). Finish nailers not only drive the nails but can also set them below the surface of the wood, which saves a lot of nail­setting time. I use my palm nailer to drive nails in hard-to-get-at places, where it’s not easy to swing a hammer. It’s a
great tool for nailing in hurricane ties and joist hangers (see the photo on p. 56).

Most nailers operate off compressed air, though there are also electrically pow­ered brad nailers and staplers and propane-powered framing and finish nailers. Buying a nailer and the necessary air compressor, gauges, and air hoses represents a substantial investment, though these items can pay for them­selves in short order due to increased productivity.

Pneumatic-nailer safety

• A pneumatic nailer is as dangerous as a gun and needs to be treated with respect.

• Read and carefully follow the instruction manual regarding maintenance and use.

• Don’t point a nailer at yourself or at others.

• Don’t walk around with your finger on the trigger. You might bump the nailer against your leg, release the safety, and fire a nail accidentally.

• Adjust the air pressure as needed (larger nails re­quire more pressure). But don’t exceed the recom­mended amount of air pressure.

• Wear safety glasses or goggles.

• Don’t nail with the gun in front of your face, espe­cially if you are working on a vertical surface. If you hit a hard knot or metal strap, the gun can bounce back and strike you.

• Disconnect the gun from the air compressor when clearing a jammed nail.

• When nailing studs to a plate, drive the low nail first. Then remove the hand holding the stud and drive the high nail. If you drive the high nail first, sooner or later you will miss the wood plate and drive a nail through your hand.

• Take a break now and then to stay focused. An unfocused mind can cause you to shoot a nail into your body, which will bring you back to reality like an early morning alarm clock, sudden and unpleasant.

PNEUMATIC NAILERS

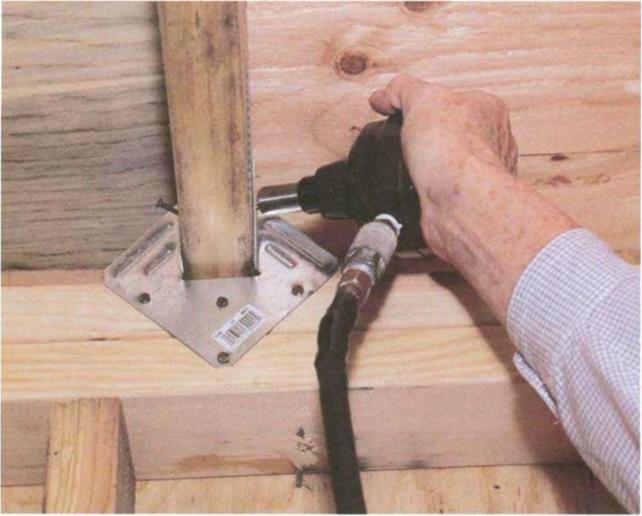
A palm nailer can drive nails in tight places, as when installing a joist hanger. (Photo by Roe A. Osborn.)


DRILLS

I remember making hole after hole with a hand-powered brace and bit in the early ’50s. I still have one hanging on the wall of my shop. Drilling bolt holes by hand in 2×6 sill plates was easy. But drilling a 1-in. bolt hole in a thick, solid beam took effort. Even with sharp bits, hand drilling was time-consuming. Today, a power drill fitted with the proper bit can drill the toughest hole in seconds. The power drill is a versatile tool. It makes holes in all sorts of mater­ial and can even be used for driving screws and for mixing paint and drywall compound.

DRILLS

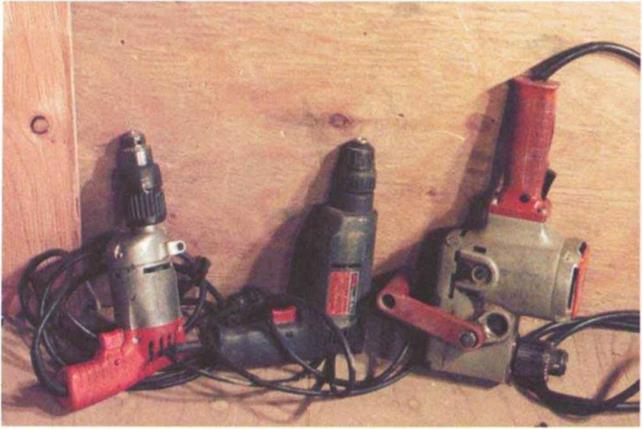
Every carpenter owns a power drill or two. Shown here are (from left to right) two 3/s-in. pistol-grip drills and a Уг-іп. right-angle drill.


Drill safety

• For clean, easy cuts, use sharp bits.

• Don’t force the drill. Let it cut at its own pace. When drilling into hard wood, coat the bit with wax or soap to make drilling easier. Use low speeds for drilling into steel and lubricate the bit with oil to re­duce friction and heat buildup.

• Treat any drill with respect, just as you would a cir­cular saw. Drills have a lot of torque (turning power). If a bit gets hung up on a hard knot or a nail, all the power of the drill is transferred to its handle, which will give your arm a powerful (and potentially wrist­breaking) twist.

• When drilling into heavy or thick material, use two hands to hold the drill steady. When drilling with an auger bit or with a powerful drill, use the side han­dle. The torque can be so great that it is hard to hold these tools with one hand.

• Work with your feet apart and your body in a well – balanced position. Be especially careful when drilling from a ladder. Make sure the ladder is stable and that you are not in an awkward position.

• Make sure what you are drilling is secure. If it is not stationary, clamp the workpiece to a sawhorse or to a workbench. Don’t try to hold the piece to be drilled with your hands. It’s too easy to lose control of the piece and injure yourself.

There are three basic things you should consider when buying a drill: its size, type, and chuck style. Drill sizes are dic­tated by the largest bit shank (the shaft of the bit) that will fit into the chuck (the jaws that hold bits). Common drill sizes are 1/4 in., 3/s in., and 1/2 in., and most carpenters own both 3/s-in. and У2-ІП. drills. My3/s-in. drill is reversible (mean­ing I can change the direction the bit rotates) and has a variable-speed switch. These two qualities allow me to use the drill for both driving and removing screws. Even better, when a bit gets stuck, I can switch to reverse and back it out of the hole. I use my powerful Уг-іп. drill when I need to drill larger holes (for example, for bolts or locksets). A handy accessory for а Уг-іп. drill is a side han­dle, which allows you to hold the drill securely with two hands when drilling large holes.

There are different types of drills. Some have a pistol grip, while others have two handles. Some drill straight on, while others drill at a right angle (see the photo on the facing page). The type of drill you need depends on the work you do.

I use my Уг-іп. right-angle drill in tight places (for example, in stud and joist bays) and hold on tight when I’m using it. This tool has a lot of power. The hammer drill is a variation of the stan­dard drill. This tool moves a drill bit in a circular and up and down motion at the same time. You can drill through concrete or other masonry materials like magic.

Although many drills have chucks that are tightened around a bit’s shank using a key, most carpenters now prefer drills with keyless chucks. That means the chuck is tightened by hand. Keyless chucks are fine for most work and allow for quick bit changing. But for heavy – duty drilling, you’ll still need a keyed chuck to keep the bit from slipping.

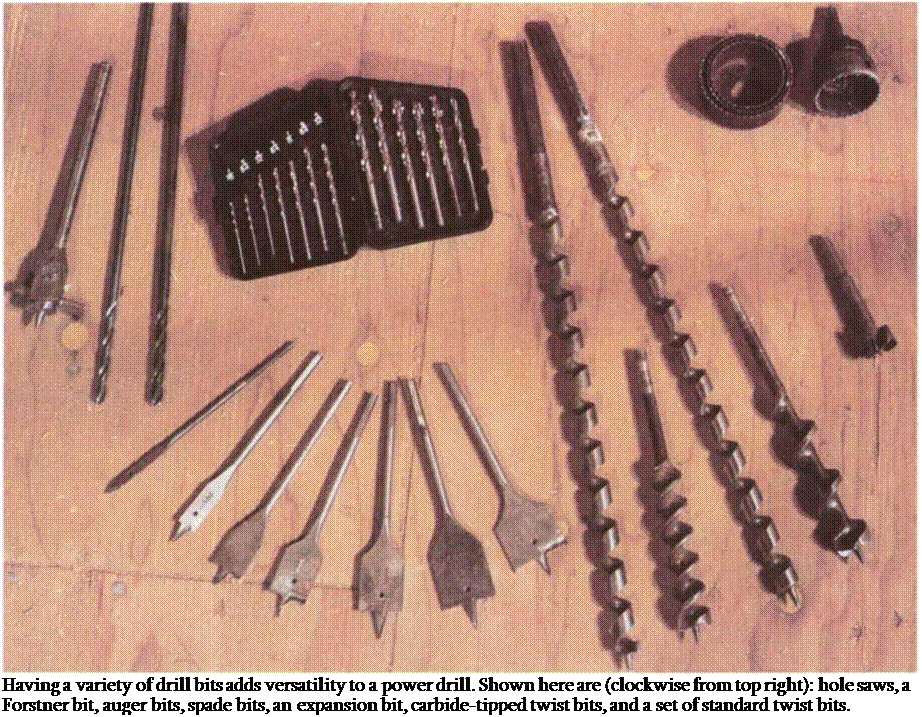
Подпись: Having a variety of drill bits adds versatility to a power drill. Shown here are (clockwise from top right): hole saws, a Forstner bit, auger bits, spade bits, an expansion bit, carbide-tipped twist bits, and a set of standard twist bits.
Bits

In general, buying drill bits in sets is less expensive than buying them individually.

I use standard twist bits (from Vm in. to Vi in.) to drill holes in wood, and hard­ened or carbide-tipped bits to drill holes in metal, masonry, tile, and glass.

bottoms, smooth sides, and a clean top edge that can later be filled with a wood plug.

Holes for door locksets (which are typi­cally 2[3]/s in. dia.) can be drilled with a hole saw. Available in sizes ranging up to 6 in., hole saws (which are bits that have teeth around the perimeter like a saw) can have bimetal teeth for cutting large holes, not only in wood but also in light metals, plastics, and fiberglass.

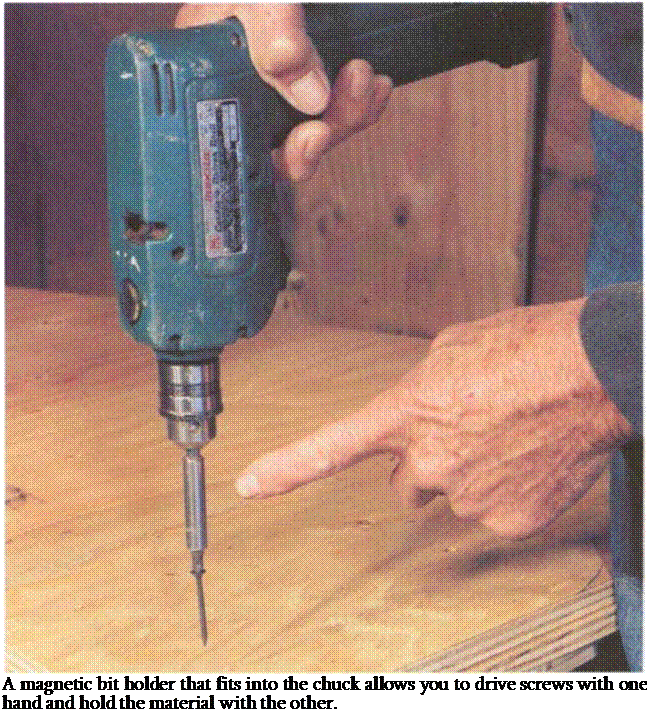
Подпись: A magnetic bit holder that fits into the chuck allows you to drive screws with one hand and hold the material with the other.
Auger bits are handy for cutting holes through thick material, such as бхб beams. They are self-feeding, meaning that they pull themselves into the hole, and don’t require a lot of force on the part of the drill operator. Adjustable expansion bits can cut holes of varying size.

For finish work, it’s often a good idea to countersink screws (putting the screw head below the finish surface) using a countersink bit. This type of bit has a
beveled face that makes the screw hole larger at the top to fit the head of a wood screw.

For driving screws, every carpenter car­ries different screwdriver bits. While you’ll still occasionally come up against a slotted screw, most screws on a con­struction site have a Phillips head. This configuration keeps the bit centered on the screw and provides better purchase, perfect for setting screws with a drill or screw gun. A useful accessory for driving screws is a magnetic bit holder, which

fits into the drill chuck to hold screw­driver bits (see the photo on p. 53). This setup makes it easier to drive screws with one hand and change bits quickly.

CROSSCUTTING

A cut across the grain is called a crosscut. To make one, first scribe a cut line on the stock using a square to draw the line straight. Make sure that the stock is adequately supported either by sawhorses or by 2x blocks placed on the floor so that the cutoff can fall free. Then place the saw base on the stock with the blade about 1 in. from the edge of the wood and align the blade with the cut line. Hold the saw with both hands, pull the switch, and slowly push the blade into the wood, following the cut line. Going slowly and cutting straight helps prevent kickback (for more on preventing kickbacks, see the sidebar on p. 43).

To make a square cut without scribing a cut line in 2x4s and other narrow stock, align the front edge of the saw base parallel to the edge of the stock and make the cut. Try this a few times on scrap, check­ing each cut with a square to see how you’re doing.

CROSSCUTTING

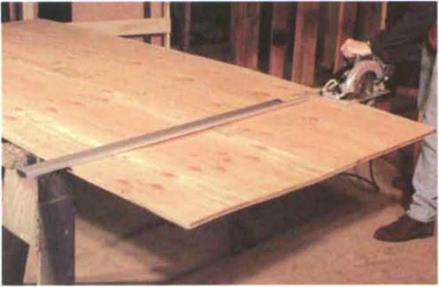
A straightedge ensures a straight crosscut.

To make a long, straight crosscut, say on finish – grade plywood or across a door, clamp a good straightedge to the workpiece and slide the saw base along it as you cut (see the photo above). You can make your own straightedge, but I use a com­mercial one from Griset Industries (see Sources on p. 198) that is arrow-straight and easy to clamp to the workpiece.

Another way to make a straight crosscut is to use a shootboard, which is simply a straightedge with a fence (saw guide) screwed to it. You can buy a shootboard (Olive Knot Products makes an ad­justable one—see Sources on p. 198), but it’s pretty easy to make one.

Just cut two pieces of 1/2-in. plywood—one 8 in. wide and one 1V2 in. wide—as long as the material you wish to cut. Glue or screw the 11/г-іп. piece to one edge of the 8-in. piece. The wider piece will be the base, and the thinner piece will serve as the fence. Place the circular saw on the base against the fence and cut off any excess material.

To use a shootboard, clamp it to the workpiece with the front edge of the base right on the cut line.

Place the saw on the shootboard against the fence, reset the blade so that it extends 1/e in. below the stock, and cut. The base will also keep the wood fibers from tearing out at the end grain (for more on preventing tearout, see the sidebar on p. 47).

RIPPING

A cut along the length of a board is called a rip cut, and it can be done in several ways. Most ripping is done simply by cutting freehand along a pencil mark or chalkline that has been laid out on a board. Again, make sure the stock is adequately supported and that the saw isn’t forced or twisted during the cut.

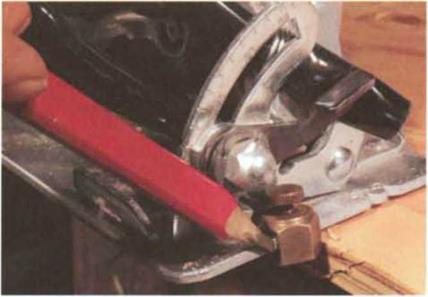
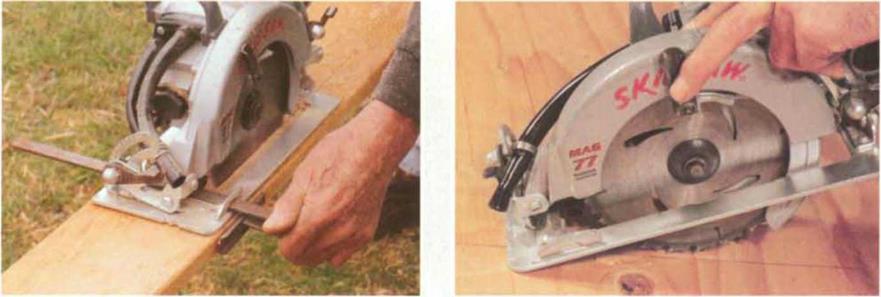
When you need an accurate rip cut, use a ripping – guide attachment. A good one is available from Prazi-USA (see Sources on p. 198). Another type of guide fits into the slots on the front of the saw base. Both guides work like a table-saw fence and can be adjusted to various widths (see the photo below). Both have a flange on one end that you hold against the edge of a board as you make the cut. If you have a flat saw base, you can attach a stair gauge to the front edge and use it as a ripping guide (see the photo at right).

PLUNGE CUTTING

A plunge cut is made in the middle of a board and is used, for instance, to cut a window opening in the center of a piece of plywood sheathing.

To make a plunge cut, lean the saw forward over the cut line so that it is resting on the front edge of the saw base with the blade about 1 in. from the wood (see the bottom right photo). Use the lever to raise
the guard and expose the blade, then start the saw and, using the front edge as the hinge point, slowly lower the blade into the wood. Hold the saw with both hands and continue the cut, following the cut line. When you get to the end of the cut, turn the saw off and let the blade stop spinning before pulling it out.

If you need to finish a cut near where you started, don’t try to back the saw into the cut. Instead, turn the saw around and finish from the opposite direction.

CROSSCUTTING

A stair gauge attached to a saw base makes a simple but effective ripping guide.

A ripping-guide attachment makes it easy to cut on a straight line, even on long stock. (Photo by Roe A. Osborn.)


To start a plunge cut, lean the front edge of the saw base over the cut line, and start the saw with the blade about 1 in. from the wood.


CROSSCUTTING

CROSSCUTTING

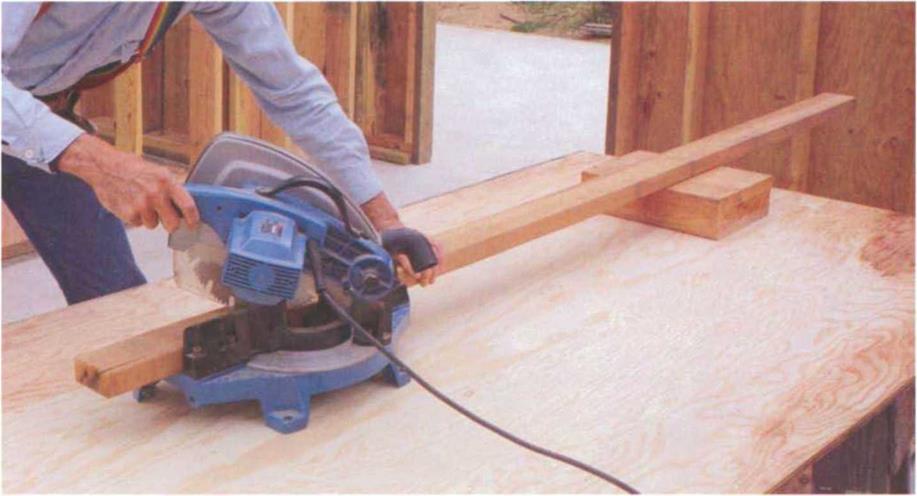
When cutting long stock with a miter saw (also called a chopsaw), support one end on an extension table, on a sawhorse, or on blocking, as shown here.


which can crosscut a 2×6, because of its versatility. Smaller models work well for cutting trim, while larger ones can cut through 4x stock.

There are now a variety of power miter saws that offer even greater capacity and versatility than the simple version just described. Some of the newest slid­ing compound miter saws have the capacity to crosscut up to a 4×12. They also tilt from side to side to allow you to make a compound (double-angle) miter cut. These saws are rugged enough for daily use by framers, yet are plenty accu­rate for finish work.

Some power miter saws come equipped with extension wings for the table, which can be useful for cutting relatively short stock. For longer stock, you may need extra support so that the stock
doesn’t lift and pinch the blade. Extension tables for miter saws are avail­able, but I usually support long stock with a block set to the side of a job – made table (see the photo above).

Reciprocating saw

Years ago, every carpenter had a key­hole saw for cutting in tight places. Nowadays carpenters use a reciprocating saw, which is basically a keyhole saw with a motor. It’s the tool of choice for remodeling work, such as tearing out walls, replacing doors and windows, or removing old cabinets, because it cuts through wood, metal (including nails and pipes), plaster, and plastic. It can also get into places you can’t reach with a circular saw: for instance, when you need to cut a hole in a subfloor right against a wall.

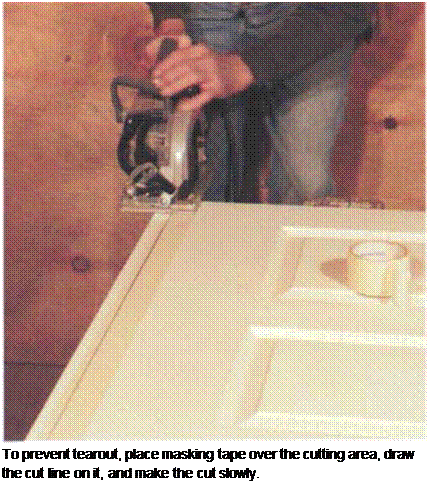
Preventing tearout
Подпись:

Tearout of wood fibers is a common occurrence when cutting wood, especially during crosscutting. This is okay for framing but not for finish work.

One way to prevent tearout is to lay a straightedge directly on the cut line and run a utility knife or a pocketknife along the line to score the wood fibers on the cutoff side of the line. This will prevent them from lifting up as the saw makes the cut.

Another way to prevent tearout is to lay a strip of masking tape over the area to be cut. The tape will hold the wood fibers in place during the cut. To prevent the tape from lifting any loose fibers from the wood when removing it, pull it toward the edge of the board.

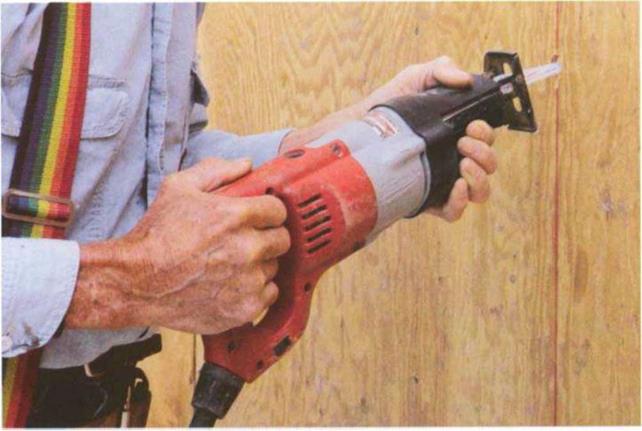
The first reciprocating saws had only one speed, but most of them now have either a two-speed or a variable-speed switch. While wood can be cut at high speed, hard materials—such as metal pipe—need a lower speed to minimize the heat generated by friction. The variable-speed mechanism also makes it easier to do plunge cuts and precision work. When using a reciprocating saw (say, for cutting into an existing wall), be careful not to cut through plumbing or wires. It’s a good idea to shut off power to any nearby electrical circuits when making blind cuts, but it’s an even better idea to avoid making blind cuts when­ever you can. Use both hands when using this saw, and hold the shoe
against the material being cut to make the cut faster and safer (see the top photo on p. 49).

Reciprocating saw blades are available in lengths from Vh in. to 12 in. A good all-purpose size is 6 in., which is large enough for most jobs and easier to con­trol than longer blades. In general, use the shortest blade that will do the job. I prefer to use bimetal blades, which are more expensive than standard blades but can cut both wood and metal. If you bend a blade while cutting, don’t worry. Blades can usually be straightened and reused, and you usually don’t even have to take them out of the saw to do it.

Power-saw safety

• Stay alert at all times. Accidents happen not so much when we are still learning but when we think we have mastered a tool. As a beginner, your mind is focused and you are careful. But once you gain ex­perience, you may feel so confident that you pay less attention to what you are doing.

• Keep small children away from power saws (and other tools).

• Use sharp blades. Dull blades don’t cut well and can cause accidents.

• When changing blades, unplug the saw.

• If the saw has a blade guard, make sure it’s work­ing properly, and use it. Cut scrap wood to practice working with the guard in place so you can get used to it.

• Don’t force a saw. Let it work at its own pace. Forcing a saw can overload the motor, causing it to overheat.

• When you feel the blade bind in the kerf, stop and start over.

• Wear safety glasses or goggles.

• Wear a mask if you are sensitive to sawdust.

• Use hearing protection.

• Don’t use a power saw—or any power tool—when you are fatigued.

• Remove anything that might distract you, such as a loud radio.

• Keep your fingers away from the blade! Blow— don’t brush—sawdust away from the cut line to clear the line as you cut.

However, the blade can get quite hot when cutting, so be sure to use pliers, not your fingers, to straighten it.

figsaw

The first carpenter I learned from was a master with a coping saw, which he used to cut intricate patterns. I think he would have loved a power jigsaw (also called a sabersaw), which can literally cut circles around a coping saw. It’s a versatile tool used for cutting circles, curves, and irregular patterns, as well as for making sink cutouts in countertops.

Most jigsaws have an adjustable base plate that allows you to make angled cuts. And I recommend getting a jigsaw with a variable-speed control, which gives more control over the cut through various types of materials. Like its cousin the reciprocating saw, a jigsaw can cut through wood, ceramic tile, plastic, fiberglass, and metal—when equipped with the proper blade.

Jigsaw blades are designed to cut either on the upstroke or on the downstroke, depending on the blade. To avoid tearout on the finish side of a work – piece, keep the finish side down if your

CROSSCUTTING

When using a reciprocating saw, place one hand on the handle to control the switch and the other on the rubber boot at the front end of the tool.

CROSSCUTTING

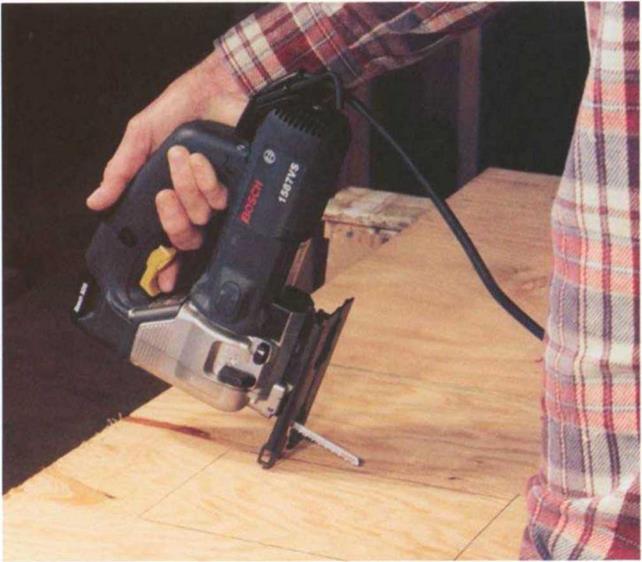
To start a plunge cut with a jigsaw, rest the front edge of the base plate on the workpiece with the blade clear of the wood. Start the saw and ease the blade into the wood.

blade cuts on the upstroke. Keep the finish side up if your blade cuts on the down stroke. To reduce vibration and chipping, hold the base plate firmly against the surface of the material when making your cut, letting the saw work at its own pace. If you push it too hard, especially through a knot, the blade could break. On a tight curve, cut very slowly so as not to bind or break the blade. And don’t brush sawdust away from the cut line with your hand; instead, blow the dust away and save your fingers.

Both jigsaws and reciprocating saws can cut an opening in thinner material, such as plywood paneling, without drilling an initial pilot hole. To make a plunge cut with a jigsaw, tilt the saw forward and rest the front edge of the base plate on the workpiece with the blade clear of the wood (see the bottom photo on
p. 49). Then start the saw and ease the blade slowly into the wood. Once the blade penetrates all the way through, the saw can be placed in its normal ver­tical position and the cut completed.

Portable table saw

When I first started framing back in the 1950s, the only power tool we had on the job was a table saw. It was a heavy monster with more iron in it than a John Deere tractor. It definitely was not portable. These days, table saws aren’t used much in framing, but they’re still very useful on the job site. Fortunately, these new machines are now so portable that they can be lifted with one hand. I find the table saw especially use­ful when it’s time for finish work. With it, I can easily and quickly cut siding and interior and exterior trim to size.

While these saws are convenient, they— like any tool—can be hazardous if used improperly. They’re light, so they should be secured to a work table at a comfort­able working height. Once secured, the saw won’t move around during a cut, which decreases the possibility of kick – back. For safety, always stand to one side of the workpiece so you’re out of the line of fire in case the material kicks back.

As with any power tool, familiarize your­self with the manual before using it, and make sure the blade guard is in place and functioning properly before plug­ging the saw in. Also, raise the blade so that it projects only about Vs in. above the material being cut. Hold the stock securely against the fence when ripping, but, of course, keep your fingers away from the blade area. If the stock is longer than the table, set up a makeshift out-feed table or have someone support the opposite end as it comes off the table. Use a push stick to keep your hands clear of the blade as you finish the cut.

Power miter saw

What the circular saw did for rough frame carpentry, the power miter saw did for finish trimwork. Just as the circu­lar saw replaced the handsaw, the power miter saw replaced the miter box. The miter saw (often called a chopsaw) can make fast, accurate cuts in framing lumber, door and window casings, base­board, and crown moldings.

The first miter saws I recall were used almost exclusively by plumbers to cut plastic pipe. Basically a circular saw mounted on a short table, a power miter saw is used to make square and angled cuts and has evolved into a tool that’s used daily by both frame and finish car­penters. Unlike a radial-arm saw, which slides along a track and is notoriously difficult to keep aligned, a power miter saw lowers into the cut with a chopping action from a fixed pivot point. The saw is rugged and easy to use and, when equipped with a high-quality blade, can make glass-smooth cuts. Blade diame­ters range from 8 in. to 16 in. Most carpenters prefer the 10-in. model,

A kickback occurs when the sawblade gets pinched in the kerf (the saw cut) and the power of the motor forces the saw backward. This can be a bit scary, and it is bound to happen to you if you use a circular saw all day.

There are two keys to preventing a kickback. First, always cut in a straight line. Don’t try to force or twist the saw as you cut, which will cause the blade
to bind in the kerf, kicking the saw out. Second, pro­vide solid support for the stock on both sides of the cut. Without proper support, the stock will sag and pinch the blade, as shown in the drawing below.

If a kickback occurs, release the trigger on the saw immediately and allow the saw to stop. As long as the blade guard is working properly, there is little danger of injury.

Not enough support


The stock sags in the middle, pinching the blade.


Portable table saw

Portable table sawThe stock sags on the end, pinching the blade.
Proper support


The stock is supported on both sides of the cut.


Portable table saw

Before using a circular saw, or any power tool, first study its manual, familiarize yourself with its parts, and follow the instructions on using and caring for the tool.

The blade guard of the saw should always move freely. If the guard is stiff, it could have a buildup of wood pitch on it. To remove the pitch, use bleach on the guard and brush off the pitch with a wire brush. Or better yet, try a common cleaner called Oxi-Solve on both (see Sources on p. 198). Before cleaning or testing the guard, be sure the tool is unplugged.

When you’re sure the guard is working properly, set the sawblade to the proper depth. In general, the blade should be set about Ve in. deeper than the thickness of the stock. Again, be sure to unplug the cord when setting the blade depth so that you don’t accidentally start the saw.

The three basic saw cuts used by carpenters are the crosscut, rip cut, and plunge cut. The key to making any of these cuts with a circular saw is being able to make straight cuts. With practice, this will become second nature, so grab some scrap wood—2×4 stock or plywood—and start cutting.

SAWS

Old-time carpenters needed many hand tools to cut and shape raw wood, such as the handsaw, keyhole saw, and miter box. Today’s carpenters use power tools, such as the circular saw, reciprocating saw, jigsaw, and miter saw.

Circular saw

The portable circular saw is as indispens­able to a carpenter as a word processor or computer is to a writer. It is the one tool that you will use over and over again every day.

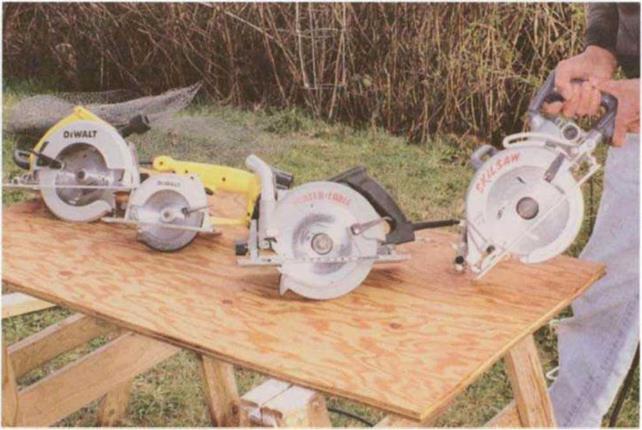
Circular saws come in two basic styles (see the photo below). One is a worm – drive saw with the blade on the left side. Direct-drive saws (also called sidewinders) have the blade on either the right or left side. Like many framers I know, I prefer the worm drive because it’s heavier, more durable, and delivers more power to the blade than the sidewinder.

For most carpenters, the average job can be handled by a heavy-duty 7У4-ІП. circu­lar saw. For big work, such as timber framing, carpenters use a larger circular saw, called a beam saw. Beam saws are available with blade diameters of up to

SAWS

The circular saw is the workhorse of the building industry. Shown here are (from left) a 7У4-ІП. direct-drive sidewinder, a 53/e-in. cordless trim saw, a 7У4-ІП. direct drive, and a 7У4-ІП. worm drive. (Photo by Joe Haun.)


When using power tools at home or on the job, make sure you plug them into quality extension cords. A good cord ensures that adequate electricity will be delivered to the tool you are using. So when shopping for an extension cord, don’t just buy the cheapest one on the shelf. A cheap cord can be dangerous.

In 1948, the year I first helped build a house, I was helping to finish a concrete slab in a basement. It was getting dark, so I asked for a light, and some­one handed me a trouble light. It was trouble all right! I was standing with wet shoes on wet con­crete. The extension cord supplying electricity to the light was frayed and ungrounded. The shock that went through me knocked me over backwards, and as I fell, I pulled the plug out of the outlet. Some­times you get lucky!

BUYING GUIDELINES

When shopping for an extension cord, pay attention to the gauge (the diameter) of the wire. The smaller the gauge number, the larger the diameter of the wire. A 12-gauge wire is larger in diameter (or heav­ier) than a 14-gauge wire.

A corded power tool needs an extension cord with wires heavy enough to deliver adequate power to the tool. Imagine trying to water a lawn with a hose the diameter of a toothpick. Not much water will pass. When using a light-gauge extension cord, a power tool doesn’t get enough electricity. That means the motor will work harder, causing it to over­heat and possibly burn out.

In general, a long cord requires a heavy-gauge wire to deliver the electricity with a minimal drop in volt­age. As a rule of thumb, use 16-gauge wire for a 25-ft. cord. A 50-ft. cord needs at least 14-gauge wire, and a 100-ft. cord needs 12-gauge wire.

For protection against electrical shock while using a power tool, buy an extension cord equipped with a ground-fault circuit interrupter (GFCI). In the event of a short, or ground fault, the GFCI automati­cally shuts off power—and fast. (Many localities re­quire GFCI protection on all job sites, so check your local codes.)

CARE AND STORAGE

Proper care of an extension cord is critical to mak­ing it last. Like a water hose with a hole in it, an ex­tension cord (or a cord on a tool) with exposed wires can allow electricity to leak out, possibly into you. Take time to temporarily repair any cord that is frayed or cut by wrapping the area with electrical tape and by replacing the cord as soon as possible.

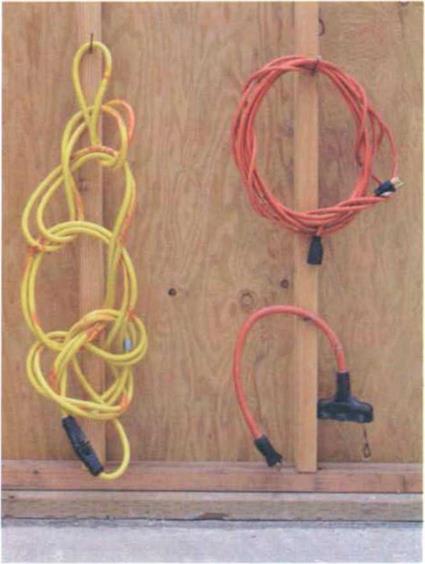
Another thing that will help an extension cord last— and remain tangle free—is proper storage. You can simply loop it into a circle and hang it on a hook. Or you can loop it into a daisy chain—which is a simple crochet stitch—and hang it on a hook.

SAWS

Hang extension cords from hooks when not in use. To help ensure tangle-free cords, loop them into a circle (right) or a daisy-chain (left).

1 б in. and are capable of cutting through б-in.-thick stock. Smaller circu­lar saws for trimwork are available with blade diameters as small as 4Vi in.

While most circular saws come equipped with a steel blade, I recommend replac­ing it as soon as possible with a carbide-tipped blade. These blades stay sharp longer than standard steel blades, which makes cutting faster and safer. Most carpenters use a thin combination blade, which allows you to crosscut and rip wood easily. While not indestructible, most carbide-tipped blades will cut through the occasional nail without too much damage. But be sure to sharpen or replace a dull blade. A dull blade requires more pressure to make a cut, making the saw harder to control and creating more opportunities for acci­dents. Special blades for cutting materials like plastic, masonry, ceramics, tile, and even metal are also available.

POWER TOOLS

POWER TOOLS

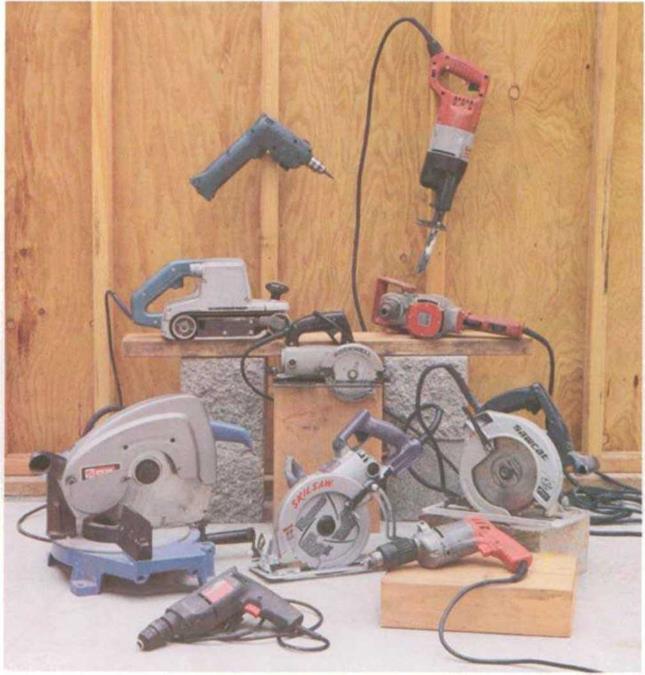
Power tools have revolutionized the way houses are built. Some of the tools common on the job site include (clockwise from bottom) 3/s-in. drills, miter saws, belt sanders, cordless drills, reciprocating saws, У2-ІП. drills, trim saws, and circular saws (worm drive left, sidewinder right).

Tools aren’t like stretch socks where one size fits all. A saw that has the right combination of power, weight, and feel for one carpenter may be the wrong choice for another. But here are a few tips that should help you make an educated choice when it comes time to invest in a power tool.

• The tool should be comfortable to use, so (if pos­sible) try before you buy. Do some homework, and try out a few to see how each one feels.

POWER TOOLS

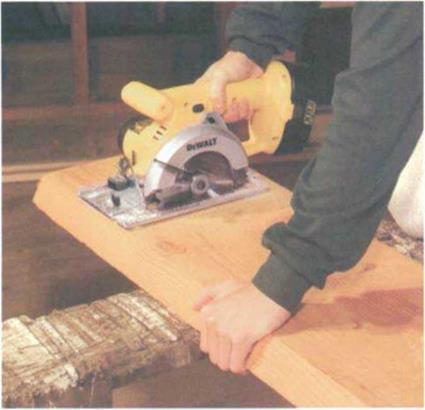
An 18-volt cordless circular saw can make short work of 2x stock.

• I also recommend asking people who use tools daily—like other carpenters or contractors—which models and makes they prefer. For these folks, dura­bility is a big issue, and they won’t mind telling you which tools have lasted and which ones haven’t. It also helps to read magazines that research and evaluate different tools (Fine Homebuilding maga­zine is a good place to start).

• Buy the best quality you can afford. In general, steer away from homeowner-grade tools, which won’t stand up to heavy-duty job site use. Professional-grade tools cost more, but they are more durable, more powerful, and easier and safer to use than homeowner grade.

• Many portable power tools are available in cord­less versions with rechargeable batteries. The first cordless tools I used years ago were actually play­things for those who loved gadgets. This is no longer true. Today’s cordless tools are used by pro­fessional workers in every trade. These tools have plenty of power and allow carpenters to move around the job site without the frustration of having to pull an extension cord around behind them.

• Almost every carpenter I know uses a cordless drill/screwdriver daily. In addition, now there are cordless jigsaws, reciprocating saws, and circular saws that have enough power for daily professional use. The new 18-volt systems have enough juice to power a cordless saw through 2x stock, and with a spare battery and charger on site, the only break you’ll have to take is for lunch.

The first time I had my hands on a circu­lar saw was in 1951, when power tools were first becoming readily available. What a sense of wonder it gave me. That stack of framing lumber that used to take me hours to cut with a handsaw could now be cut in minutes with the circular saw I was holding.

In my lifetime, carpenters have gone from building an entire house in a few months using hand tools to building the same house in a matter of weeks—even days in some cases—using power tools. The power-tool revolution has changed how carpenters work. Today, power tools are used in every aspect of carpen­
try, so one of the tasks of a beginning carpenter is to learn a little bit about these tools, including how to choose them and how to use them safely.

In this chapter I’ll focus on the most common tools used on the job: circular saws, portable table saws, miter saws, reciprocating saws, jigsaws, drills, pneu­matic nailers, routers, and sanders. Because practice is essential to gaining familiarity with any tool, at the end of the chapter I’ll give you plans and instructions for building a workbench using some of the power tools discussed in the chapter.

Plumb bob

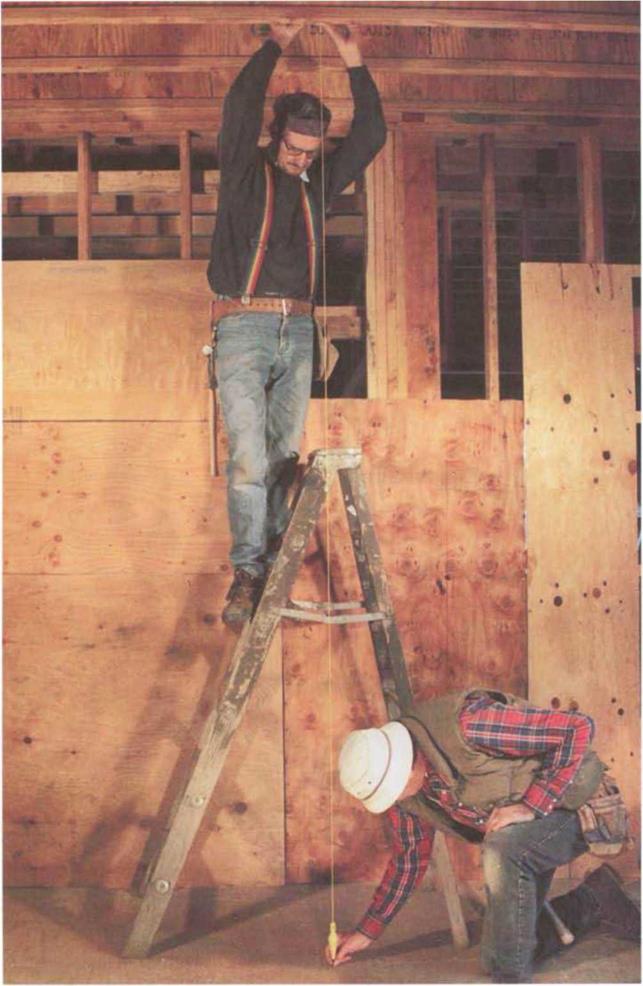
As its name implies, a plumb bob is used to check a vertical surface—-such as a door, wall, or window—-for plumb, or to find a spot directly below any given point. It is a simple but very accurate tool consisting of a tapered weight attached to a string. It’s really easy to use, too. To find plumb below a spot on a ceiling joist, for example, hold the string to a point on a joist and extend the string so that the weight is close to the floor (see the photo on the facing page). Plumb is directly below the point of the weight.

Plumb bob

A plumb bob is a very accurate tool for finding the location of a point that is directly above or below another point.


TOOLS FOR CHECKING LEVEL AND PLUMB

Checking for level and plumb are jobs a carpenter has to do every day. You don’t want floors running downhill or walls that lean. The tools used to check for level and plumb are levels and the plumb bob.

Levels

Although today there are many high- tech leveling devices that rely on lasers or microchips, the old standbys work quite well for most carpentry work.

Many carpenters carry at least two or three different sizes of spirit levels, and some still swear by water levels.

Spirit level The spirit, or carpenter’s, level is the best known of all. It is a sim­ple tool consisting of a straight length of wood or metal with two or three glass vials located on it. Each vial is filled with spirit (like alcohol) so it won’t freeze, has a bubble in it, and is usually protected by a glass lens.

I have two spirit levels: a 2-ft. one and a 6-ft. one. If I need to check a surface that is larger than 6 ft. for plumb or level, I simply attach my 2-ft. level to a long straightedge with duct tape to make a plumbstick (see the sidebar on the facing page). I use an 8-ft. piece of aluminum from an old sliding door, but a 2×4 could be used too, provided that it is straight.

A spirit level needs a bit of loving care. Don’t leave this tool leaning against a wall or on the floor of a work area. Instead, hang it from a nail or place it flat on the ground, away from the work area. I carry each of my spirit levels in a carrying case made from a length of 3-in.-dia. plastic plumbing pipe cut to fit. I simply cap one end of the

Подпись: A plumbstick is useful for checking a wall for plumb. It is made of a straight 2x4 and a 2-ft. level.

Carpenters often make a plumb – stick for checking that walls are straight up and down. What’s great about making a plumbstick is that you can use your old, battered level, even if it’s inaccurate.

Take an 8-ft. 2×4 stud and nail a 16-in. 1×2 strip on each end. Let the 1x overhang the stud ends 3 in. or 4 in. Attach a 2-ft. level to the opposite edge with rubber bands or duct tape. Now you have a long level.

To check this tool for accuracy, hold it flat against a wall. Move the top of the stick back and forth until the bubble is centered exactly in the tube and make a pencil mark on the wall along the 1x exten­sions. Now turn the plumbstick side for side—not end for end—so that the same edge is on the opposite side of the line flat against the wall. Line the extensions up with the marks on the plates. If the bubble returns to the exact center of the vial, the plumbstick is accurate.

If the bubble is not centered in the tube, the level needs to be adjusted. Stick a wooden shim, a folded piece of paper, or even an 8d nail under one end of the level and check the plumbstick again. Keep adjusting the shim until the bubble is centered both ways.

Подпись:

pipe with duct tape and slide the level in. You can also buy carrying cases at most tool centers.

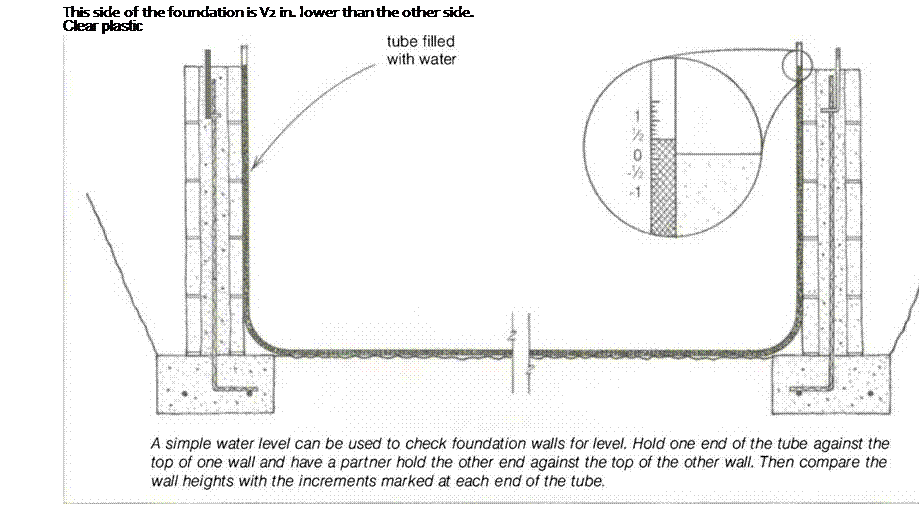
Water level One of the easiest and least expensive ways to determine level over long distances or around corners is with a water level (see the drawing above). This tool, which is simply a plastic tube filled with water, relies on the fact that water seeks its own level. I used to make my own, but now I find it’s easier to buy them. Water levels are available from Zircon (see Sources on p. 198).

MARKING TOOLS

A carpenter uses many different tools to mark all kinds of materials: wood, Formica, drywall, concrete, tile, you name it. Most of this can be done with a few basic marking tools, such as pencils, keel, pens, chalklines, and dryline.

Pencils, keel, and pens

While many lumberyards give away standard pencils, flat-sided carpenter’s pencils are more durable, easier to sharpen with a utility knife, and won’t roll away when set down on a board.

Keel (commonly known as a lumber crayon) is easier to see than a pencil on some surfaces, making it better for some kinds of layout work. Blue and red keel show up well on rough lumber and concrete; white works best on new concrete.

A few specialty pens are also useful on the job site. I use mechanical pens for laying out fine cuts on finish work, no-blot pens on wet wood, and felt-tip pens on dry wood.

Chalklines

Chalklines have been around about as long as carpenters and are used about as often as a saw. Anytime you want to

mark from one point to another—if you wanted to rip 1 ft. from an 8-ft. piece of plywood, for instance—you can do it with a chalkline.

Chalklines are available in lengths of 50 ft. or 1 00 ft. and are wound inside a box filled with powdered chalk. I buy chalk by the gallon and refill the box as needed. Years ago I used a teaspoon to fill the box with chalk, but now I use a plastic squeeze bottle with a nozzle, making the process easier and quicker.

Using a chalkline is pretty simple. To ensure that the snapped line will be straight, stretch the line taut before pulling it up and snapping it. Also, snap perpendicular to the surface to be marked, or you may leave a curved line.

For short distances, hold one end of the line with your foot, stretch out the line to the measuring point, and snap it. Or you can hold one end of the line with one hand and the other end with the little finger of your other hand. Pick up the taut line with the thumb and fore­finger of your second hand and snap it (see the photo on p. 33).

On long runs, secure the line at both ends, go to the center of the line, hold down the line at that point, and snap each side individually.

Dryline

A dryline is simply a stringline without chalk. It is often made of yellow or orange nylon for visibility. I buy dryline in 250-ft. lengths and use it for laying out house foundations. [2]