CEILING JOISTS FOR A GABLE ROOF
The saying, "They don’t build them like they used to," is often true when it comes to ceiling joists. And it’s just as well. I have remodeled many an old house that had ceiling joists that were sagging from the weight of time and heavy plaster. If you live in an old house,
look at your ceilings—especially in large rooms—-and check to see if they sag in the center.
Once the walls have been plumbed and lined, ceiling joists can be nailed to the tops of the walls in preparation for installing roof rafters (see the drawing on p. 132). In factory-built roof trusses, joists are part of the truss (see Chapter б for more information on roof trusses). Joists nail to the top plates of the walls and help tie the house frame together. Roof rafters nail into both the plates and the joists, forming a truss that helps keep the roof from sagging under heavy loads like wet snow.
 |
Lay out the walls for joists just like you laid out the rim joists for the floor (for more on this, see Chapter 4). Hook a long tape on the end of an outside wall and mark 1 б in. o. c. (or 24 in. o. c.) the length of the building. Just like the floor joists, make an X beside the mark to show where the joist will nail.
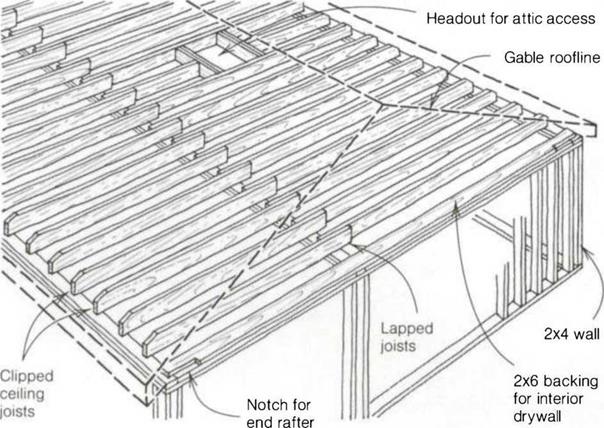
Joists tie into the roof rafters and sometimes need to be trimmed a bit to follow the slope of the roof. If you are using 2×8 joists and 2×6 rafters, for example, the joist ends need to be clipped, as shown in the drawing above. Otherwise, they’ll stick up above the slope of the roof. Remember to mark and cut your ceiling joists with their crown up.
Use a 2×6 for the first ceiling joist, laying it flat on the end wall. If the end wall is built of 2x4s, cut notches 1V2 in. wide and 20 in. long in the ends of the 2×6
and nail it flush to the outside. As shown in the drawing above, the notches leave room for the first set of rafters to be nailed to the plates. If the end wall is of 2×6 construction, nail a 2×4 flat onto the plate, ЗУ2 in. in from the outside. This leaves room for 2×4 gable studs to be nailed under the rafter. The part of the flat 2x that hangs over the inside edge of the plate provides backing for ceiling drywall.
With the crown side up, start nailing the joists on edge at each layout mark with a 16d toenail in each side. Where joists lap over an interior bearing wall, nail them together with two 16d nails and toenail them to the wall with one 16d nail on each side. A joist that passes over any other wall is secured to the plate with a 16d nail on each side. This helps hold the building plumb and strengthens the entire structure.
Catwalks are seldom required by code. They are usually a 1×4 or 1×6 nailed flat to the ceiling joists in the middle of the span (see the photo on p. 140). They help keep joists upright, free from twists, and properly spaced and also make it safer to walk when stacking roof rafters. Mark a layout at either 16 in. o. c. or 24 in. o. c. on the catwalk before securing it with two 8d nails per joist.
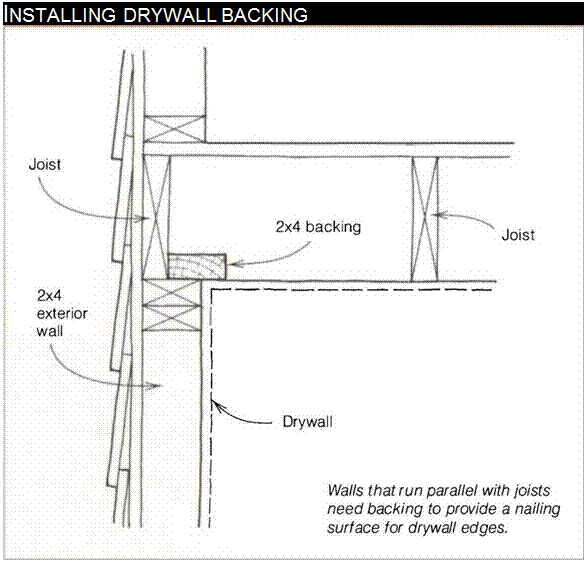
When joisting for a second floor or any ceiling that will be covered with drywall, backing has to be nailed on all walls that run parallel to the joists. Usually this can be accomplished by nailing a 2×6 flat on the top plate of a 2×4 wall and letting 1 in. hang over on both sides. Or you can nail a 2×4 on top of the plate (see the drawing at right). This is a good place to use up shorter pieces of 2x stock, crooked studs, badly crowned joists, and lumber with large knots. Nail the backing down every 16 in. with 16d nails directly over the wall studs.
A joist or two will have to be cut to allow access to the attic. Most codes require this access to be at least 30 in. by 30 in. I like to put these access holes in an out-of-the way place, like in the ceiling of a closet.
Once the ceiling is joisted, lay out the location of the access hole right on the joists, allowing an extra 3 in. to leave room for the 2x header joists (see the drawing at right). Support the joists that will be cut by nailing a flat 2x across several joists, then make the cuts in the ceiling joists and nail in the headers. Cut 141/2-in. blocks to nail to the header between the joists to help support the cut joist.

![]()
 Once the walls and ceiling joists are in, you’re ready to turn your attention to the roof.


Leave a reply