Installing baseboard
Baseboard hides the joint between the drywall and the floor, so most finish floors are installed before the baseboard. On carpeted floors, baseboard can be installed ahead of time, but hold it up about У2 in. so the carpet can tuck underneath.
Baseboard comes in many different styles, ranging from simple flat stock of various widths to milled trim to built-up baseboards composed of two or more pieces (see the drawing above). It’s best to buy long lengths so there will be fewer joints. Start installation on long
walls first, opposite the door, cutting a piece square on each end to fit from wall to wall. Work from this piece toward the door, making the final cut a square one against the casing. Thin, modern trim can be nailed with 6d finish nails directly into the bottom plate about every 1 б in. Wider, thicker trim needs further nailing into studs to draw it tightly against the wall. Mark the location of these studs before nailing.
Unfortunately, walls and floors are seldom totally straight and level. While simple baseboards are thin and bend easily to conform to irregularities, heavier moldings will need to be scribed and planed to fit the wall and floor contours. The use of base caps and base shoes is another solution to this problem. They can be flexed to fittightly against the wall and floor surface without scribing. When the baseboard will be
 |
 |
Coping Joints
 This joint is also useful for other situations where different types of trim, such as a chair rail, meet at a corner.
|
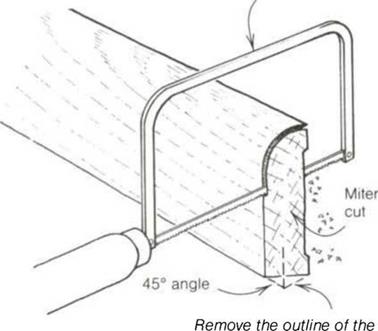
Cutting a coped joint Coping saw
miter with the coping saw. Back-cut slightly. |
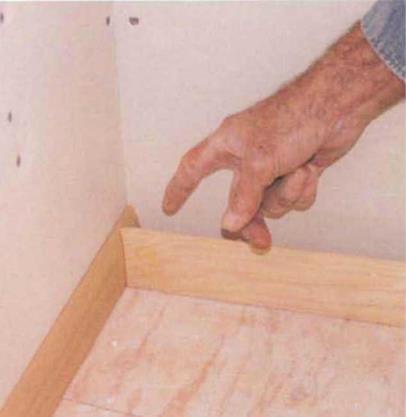
Coping trim at inside corners creates a tight-fitting joint.
painted, builders often fill the gap between the baseboard and the wall with paintable latex caulk. [11]
Some painting needs to be done, cabinets set, closets finished, and electrical, plumbing, and heating work completed, but the end is in sight. You can start thinking about moving in, baking bread in your oven, and planting some roses outside.
[1] often use my combination square to mark stock for ripping. To make a 2У2-ІП. rip cut, for example, set the head at 2У2 in. on the blade. Now set the square on the stock, and you can quickly mark a cut line 2У2 in. from the edge. Place a pencil at the blade end and pull the square down the stock to mark the cut line.
[2] also use dryline to check and straighten framing. Stretched from one end of a wall to the other along the top plate, for example, a dryline can quickly indicate where the wall might need to be straightened.
[3] use spade bits or Forstner bits for drilling large-diameter (3/s in. to 2 in.) holes. Sharp spade bits cut right through wood but leave a fairly rough hole, while Forstner bits leave holes with flat
[4] love my random-orbit sander. It’s small enough to be held with one hand. It has a circular base pad that moves in both circular and back-and-forth motions, which enables it to remove stock quickly yet not leave swirl marks. It is easy to use and is quite powerful for its size.
[5]You can also use 3/4-in. plywood.
[6] Eyes are fragile. Always protect them with safety glasses or goggles when using a power tool or when nailing. Buy a pair that feels comfortable. And so you won’t forget them at home, stuff your safety glasses
Start the nail at a 60° angle, about 3A in. from the end of the board.
[8] find the easiest way to mark the location of wall studs is to use a metal layout stick. The layout stick is made up of four short bars that are 1 Уг in. wide, or the depth of a stud, and spaced 1 б in. (or 24 in.) o. c. These short bars are welded to another bar that’s 49X2 in. long. Forty years ago we made them from 1×2 pine, but now they are available commercially
[9] often support stringers by nailing a 11/2-in.-wide, 18-in.-long metal strap (see Sources on p. 1 98) along the back edge of the stringer on the top end.
I bend this strap around the stringer so the upper end can be nailed to the header joist of the landing, supporting it. On interior stairs, this strap will be hidden by a riser board. Blocks nailed between the stringers help stabilize them. Nail the first block through the side of the first stringer, flush with the top. Pull it up to the line on the header joist and nail it to the header. Then nail the strap to the header joist. Finish by
[10] usually install the stool first. I like to use thicker material for this piece of trim (like 4/4 or 5/4 stock). Oak, pine, or spruce make beautiful stools that can be stained or finished clear, or you can use paint-grade pine or even medium – density fiberboard (MDF). The overall length of the stool is equal to the width of the window opening plus the length of the horns (ears that extend out beyond the casing). The length of these
[11] have a lightweight chopsaw that I use to cut baseboard. I carry it from room to room, set it on the floor, and cut baseboards to length on the spot.


Leave a reply