Soffit-to-Ridge Ventilation
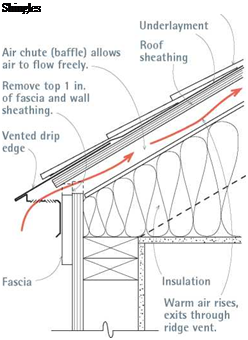
 If sealing holes and insulating attic floors are the first steps in reducing excessive moisture and heat in an attic, increasing ventilation is the second. And nothing exhausts moisture or cools the area under a roof as effectively as passive soffit-to-ridge ventilation, as shown here and in Chapters 5 and 7. (Gable-end vents help but are usually 1 ft. to 2 ft. below the highest and hottest air; power vents require electricity to do a job that soffit-to-ridge vents do for free.)
As a bonus, in winter, cool incoming air can prevent snowmelt and ice dams along eaves. Also, in summer, when unvented roofs can reach 150°F to 160°F, soffit-to-ridge ventilation can prolong shingle life and make upper-floor rooms appreciably cooler.
Keeping vent channels open from soffit to ridge is essential to keeping air flowing. Continuous soffit vents are typically screened to keep critters from blocking the vents with nests or food caches. In snow country, experts recommend baffled ridge vents because they’re less likely to become clogged by wind-driven snow. (Wind passing over baffles creates a negative pressure that sucks air up from under the roof, clearing the vents.). And whenever there’s insulation between rafters or attic floor joists, install air chutes (also called baffles) to hold insulation back from vent channels.
If the roof has no overhang (and thus no soffits), you can still ventilate its lower edges. Trim back the top 1 in. of fascia boards, as shown at right, and install vented drip edges, which have perforated or slotted undersides. Their upper flanges fit under shingle starter courses. Add a ridge vent and you’re set to go.
![]()
![]()
tears. Vapor barriers must never be installed on ceilings, because water vapor should be allowed to rise into and be ventilated out of the attic. And vapor barriers should generally not be installed in moderate or hot climates because buildings in those regions tend to dry toward the interior, where the air is cooler.
Note: The only exception to putting a vapor barrier on the living-space side of the insulation is in the basement. Because moisture can wick through concrete or concrete block walls, apply polyethylene sheeting directly to the interior foundation and crawl space walls, affix furring strips (if needed), and then install rigid insulation panels over the vapor barrier. The barrier must be continuous, without tears or gaps, as explained in "Using Rigid-Foam Panels in Basements,” later in this chapter.
Dissenting opinions. Some builders strongly advise against installing vapor barriers in any climate because, as the builders assert, moisture that enters wall cavities will be trapped there, without enough air circulation to allow drying or
enough wall permeability to allow migration. Further, if insulation gets soaked by driving rains, mold and rotted framing are almost inevitable. Even if the dissenters overstate their case, it’s smart to allow in-wall moisture a way out. If you do install a vapor barrier inside, create a more permeable exterior "skin” by using latex paint rather than oil-based paint on exterior walls. Latex breathes better. You can also increase exfiltration by installing rain-screen walls (see p. 141) or by driving plastic shims (see www. wedgevent. com, for example) under the siding to increase circulation.
Moisture inside a house generally isn’t a problem unless it’s excessive and sustained. (Indoor relative humidity should be 35 percent to 40 percent during the heating season.) Signs of excessive moisture include condensation running down windows, moldy bathrooms or closets, soggy attic insulation, and exterior paint peeling off in
Crawl spaces are well named: They tend to be dark, dank, dirt-floored areas only a few feet high. To disperse moisture, building codes prescribe 1 sq. ft. of ventilation for each 150 sq. ft. of dirt floor or 1 sq. ft. of vents for every 1,500 sq. ft. of floors covered with a moisture barrier.
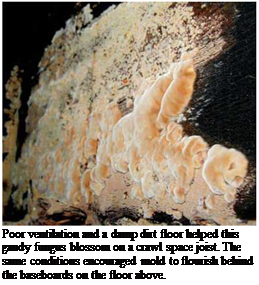
Problem is, open crawl spaces mean cold floors and heat loss in winter; and in summer, warm moist air entering through the vents invariably condenses on the cooler surfaces of the crawl space—leading to mold and worse. So it makes more sense to seal and condition crawl spaces.
Otherwise, mold spores growing in the crawl space will be sucked into living spaces by bath and kitchen exhaust fans and carried all up to the attic by the stack effect of rising heated air.
You’ll start by raking the crawl space to remove debris and sharp rocks, which could puncture plastic moisture barriers. But before stirring up crawl space dust and debris, please read the safety alert on p. 334. Heavy sheeting will last longer: 6-mil polyethylene is minimal, but commercial waterproofing firms, such as Basement Systems®, use 20-mil polyester cord-reinforced sheeting, which can withstand workers crawling and objects stored on it. Seal vent openings by gluing 2-in.-thick foam insulation over them, using a polyurethane sealant such as Vulkem 116, which is also appropriate for sealing moisture barriers to concrete walls.
In a rectangular crawl space without jogs, it typically takes five large sheets of polyethylene to

![]()

![]()


isolate the space: a single floor sheet which runs about 1 ft. up onto walls; and four wall pieces which overlap at the corners and the floor by 1 ft. and run up the walls to a height 2 in. to 3 in. below the mudsills. (Leave mudsills exposed so they can be inspected periodically.) Because the sheets are heavy, cut them outside on a well – swept driveway, roll them up, and then unroll them in the crawl space. Overlap seams roughly 1 ft., caulking each overlap with polyurethane sealant, and then taping the seams with a compatible peel-and-stick tape such as Tyvek tape.
Use polyurethane caulk to attach the tops of sheets to the crawl space walls; if the walls are dirty, wire-brush them first to ensure a good seal.
Because the moisture barrier must be continuous to be effective, sealing the floor sections becomes more difficult if there are masonry piers or wood posts present. In that case, use two pieces of polyethylene to cover the floor, with each piece running roughly from the base of a post to the crawl space perimeter. Slit the plastic and run it up 6 in. to 8 in. onto each pier; caulk and tape the plastic to the pier. If there is metal flashing under the wood posts, wrap the posts with plastic, too. But if the posts rest directly on masonry pads, jack each post enough to slide a piece of metal flashing or heavy plastic underneath; otherwise, moisture will wick up through the post and eventually rot it.
The wall portions of the sheeting will be less likely to pull loose if you mechanically attach them toward the top of crawl space walls. If you use sheeting as heavy as a pool liner (20-mil), you can drill holes through it into the concrete and drive in nylon expansion fasteners. Lighter grades of polyethylene can be wrapped several times around furring strips and then attached to walls with a powder-actuated nailing system. (For this, wear eye and hearing protection.) If condensation persists in a sealed crawl space, insulate the walls with rigid-foam panels over the plastic wall sheeting. Finally, add a dehumidifier to condition damp air that gets into the crawl space.
BELLS AND WHISTLES
Bathrooms add a tremendous amount of moisture to interior spaces. Fortunately, bathroom fans are increasingly powerful and quiet running. And remote inline fans, typically installed in attics some distance above bathrooms, are quieter still. Place the fan near the shower, and vent the ductwork from the fan out the roof or through a gable-end wall. Soffit and sidewall vents aren’t as desirable because expelled moisture could get drawn up into the attic by a soffit to ridge airflow. Keeping moisture out of attics and wall cavities is crucial, and you can achieve it by airtight connections—by caulking the fan housing to the ceiling and sealing each duct joint with aluminum foil tape, not fabric duct tape.
First create a cardboard template of the fan box (housing). Mark the approximate position of the fan by driving a screw or nail through the ceiling before going up into the space above the bathroom and finding the marker. If you have an insulated attic above, take along a dustpan to shovel loose insulation out of the way; wear a dust mask and gloves. After you’ve located the marker, place the fan template next to the nearest joist—most fan boxes mount to ceiling joists— and trace around it. (If the fan box has an adjustable mounting bar, you have more latitude in placing the fan.) Use a jigsaw or reciprocating saw to cut out the opening. To keep the drywall cutout from falling to the floor below, screw to the drywall a piece of scrap wood slightly longer than the cutout.
To mount the fan housing, you may need to remove the fan assembly first. If the housing
 |
 |

![]()
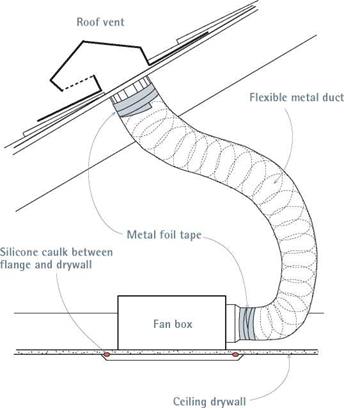
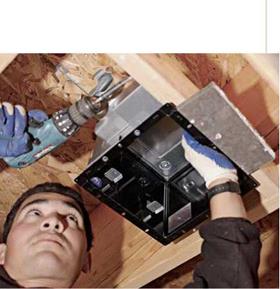
flange mounts flush to the underside of the ceiling, as shown in the photo at left, use a piece of drywall scrap to gauge the depth of the unit relative to the finish ceiling. But whether the housing flange sits above or below the ceiling drywall, caulk the flange well with polyurethane sealant to create an airtight seal between the two materials. To further secure the fan and anchor the edges of the drywall opening, run blocking between the joists—along two sides of the opening—and screw the drywall to the blocking. In some cases, you’ll be screwing through the fan’s housing flanges as well.
Follow the wiring diagrams provided by the manufacturer. In general, it’s easier to run electrical cable through a switch box first because junction boxes inside fan housings tend to be cramped. Bathroom fans should be protected by a GFCI (ground-fault circuit interrupter); see Chapter 11 for more information.
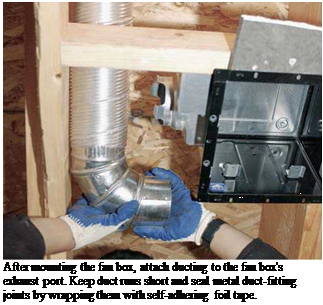
Keep duct runs as short as possible to reduce air resistance. After attaching the lower end of the flexible duct to the fan’s exhaust port and sealing the joint with metal duct tape, hold the free end of the duct to the underside of the roof sheathing (or gable-end wall) and trace its outline onto the sheathing. Drive a screw through the middle of the circle. Then go outside and locate the screw, which represents the middle of the vent hole you need to cut. Sketch that circle onto the roof: If the circle would cut into the tabs of any shingle—roughly the bottom half of a shingle strip—use a shingle ripper (see the left photo on p. 121) to remove those shingles before cutting the vent hole in the sheathing. Be gentle when removing shingles so you can reuse them.
Use a utility knife to cut the circle into any remaining shingles and the roofing paper. Flash the fan’s roof vent as you would any other roof vent: Feed its upper flange under the shingle courses above and over the courses below. Caulk or nail the flange edges per the installation instructions and renail the surrounding shingles. Once the roof vent is flashed, go back under the roof and attach the free end of the duct, also sealing that joint with metal duct tape. Enjoy your shower.



Leave a reply