INSTALLING FIBERGLASS BATTS
All batts are installed in basically the same way, so the following tips for installing fiberglass batts also hold true for cotton and mineral-wool batts, unless otherwise noted.
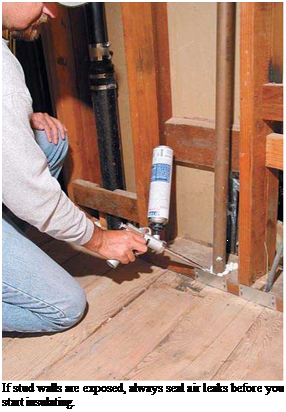
Getting started. Carefully seal air leaks before insulating; air currents can dramatically reduce
an installation’s R-value. Then suit up with the appropriate safety gear to keep fiberglass off your skin and out of your lungs. Wear a respirator mask, eye protection, long-sleeved shirt, long pants tucked into your socks, and work gloves.
To determine how much insulation to buy, measure the square footage of walls, ceilings, and floors and then divide by the number of square feet in an insulation package. Also printed on the packaging is the insulation’s R-value and the width of the batts. Because most joists, studs, and rafters are spaced 16 in. on center, 15-in.-wide batts are the most common size. The fewer cuts you make, the faster the job will go; thus many contractors buy precut 93-in. batts to insulate standard 8-ft. walls. (Although 8 ft. equals 96 in, the 3-in. shortfall in batt length anticipates the space occupied by the top and bottom plates.) Batts that long can be a bit unwieldy, though, so you might want to use precut 4-ft. batts in those stud bays where you must fit insulation around pipes and wiring.
When no vapor barrier is required or a separate vapor barrier will be installed later, most contractors prefer to install unfaced batts.
They’re quicker to install because there’s no facing to cut through, and you can friction fit the batts. By contrast, kraft paper-faced or foil-faced batts,
Recommended Levels of Insulation*
|
.INSULATE TO THESE LEVELS |
|||||
|
IF YOU LIVE IN A CLIMATE THAT IS… |
AND YOUR HEATING SYSTEM ISL.. |
CEILING |
WOOD- FRAME WALL |
FLOOR |
BASEMENT/CRAWI SPACE WALLS* |
|
Warm: cooling and minimal heating needs (FL, HI, coastal CA, U. S. southeast) |
Gas/oil or heat pump Electric resistance |
R-22 to R-38 R-38 to R-49 |
R-11 to R-13 R-13 to R-25 |
R-11 to R-13 R-13 to R-19 |
R-11 to R-19 R-11 to R-19 |
|
Mixed: moderate heating and cooling needs (U. S. |
Gas/oil or heat pump |
R-38 |
R-11 to R-22§ R-11 to R-26§ |
R-13 to R-25 |
R-11 to R-19 |
|
southwest, southern midwest, northwest, mid-Atlantic) |
Electric resistance |
R-49 |
R-25 |
R-11 to R-19 |
|
|
Cold: heating and moderate |
Gas/oil or heat pump |
R-38 to R-49 |
R-11 to R-22§ |
R-25 |
R-11 to R-19 |
|
cooling needs (all of Canada except Pacific coast; mountain- |
Electric resistance |
R-49 |
R-11 to R-28§ |
R-25 |
R-13 to R-19 |
|
ous regions, U. S. northern midwest, New England) |
Table adapted from U. S. Department of Energy (DOE) Energy Star Program table "Cost-Effective Insulation R-Values for Existing Homes" (www. energystar. gov) and 1997 "Insulation Fact Sheet." t Insulation is also effective at reducing cooling bills; levels assume you have electric air-conditioning.
Ї Do not insulate crawl space walls if the crawl space is wet or ventilated with outdoor air.
§ R-values are for insulation only, not the whole wall; R-values may be achieved with a combination of cavity insulation and rigid-board insulation.
Stapling Faced Insulation to Studs or Rafters
|
|
|
|
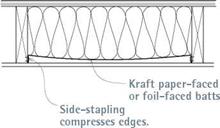
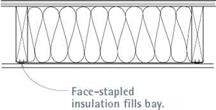
Always staple the insulation’s kraft-paper or foil facing to the edges of the framing. Stapling facing to the sides of the studs or rafters compresses the insulation’s edges and creates voids that air can flow through.
whose facing serves as a vapor barrier, must be cut carefully to avoid tears and face-stapled to the framing edges as shown in the drawing above. In general, place insulation facing toward the side of the building that’s usually warmer—in cold climates, place the facing toward the inside of the building.
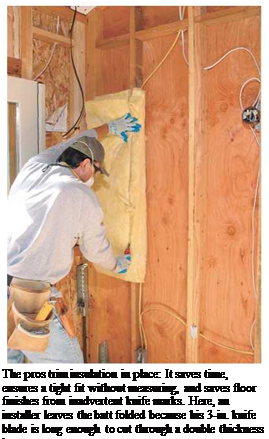
Cutting and placing insulation. Fiberglass insulation cuts easily with a utility knife, although its short blade requires several passes and should be changed as it gums up or gets dulled. Consequently, professional insulators use a long-bladed insulation knife or hone one edge of a putty knife till it’s razor sharp. A common way to cut an insulation batt is to place it on the subfloor, measure off a cut-line, and press a 2×4 into the batt to compress the insulation and guide the knife. If you’re cutting several pieces to the same length, you can save measuring time by marking the batt length on the subfloor with masking tape. To cut faced batts cleanly, place the facing side down on the subfloor.
However, most insulation contractors prefer to insert batts into stud bays and trim them in place. To trim a batt’s width, for example, place one side of the batt into the bay and use the stud on the other side as a cutting guide. To get a tight fit, cut the batt about!4 in. wider than the stud bay.

![]()
![]()
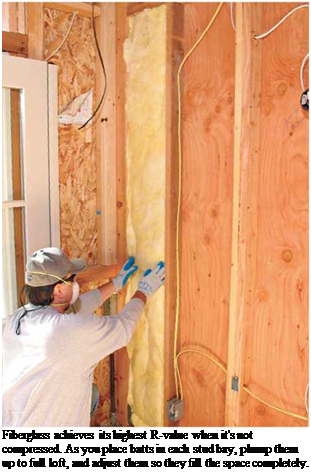
As you place batts, make sure they fill the bays fully. Fiberglass insulates best at “full loft,” so before placing a batt between studs or joists, shake it gently to plump it up to its full thickness. Thus, if you use several batts to fill a bay, butt their ends together rather than overlapping and compressing them. To avoid compressing the edges of faced batts, always staple facing flanges to the edges— not the sides—of studs or rafters. Use a hammer tacker with M-in staples.
Insulating the attic. Start insulating the attic by sealing air leaks (described earlier in this chapter). If attic floor joists are exposed, place planks across them so you can move safely. (Stepping from joist to joist is a good way to misstep and fall through the ceiling.)
If there is a rough floor and you’re not ready to finish the attic, it’s easiest to remove floorboards every 6 ft. to 8 ft. and blow in loose-fill insulation. But batts are easy enough to install if you can pry up floorboards and insulate the floor in sections. Starting at one side of the attic, pry up and stack the floorboards, place batts, and renail the floorboards before moving to the next section.
To allow moisture to migrate, use unfaced batts when first insulating a floor in warm or mixed-climate zones. Use unfaced batts when adding insulation in any climate. When insulating an attic floor for the first time in very cold climates, use kraft paper-faced insulation because it’s permeable; install with the facing down, toward the living spaces. Never use impermeable foil-faced batts or plastic vapor barriers when insulating an attic floor or ceiling because they’d trap moisture.
Fitting batts is straightforward: Cut them to length and place them so they fill the joist bays completely. If there’s diagonal bridging, slit the insulation down the middle, 4 in. to 6 in. from the end, and fit the slit ends around the bridging. As with walls, split batts (see accompanying photos) to feed them over and under wires and pipes. Note: Keep insulation and other combustible materials back at least 3 in. from masonry or metal chimneys, and non-IC-rated recessed light fixtures, as noted in the Safety Alert on p. 330. When adding insulation, place new batts
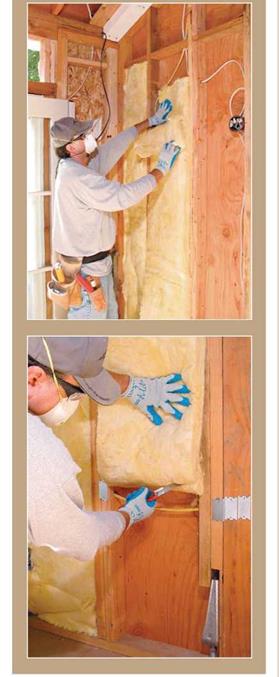
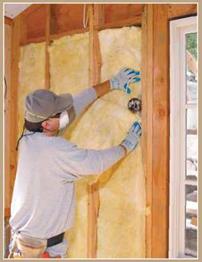
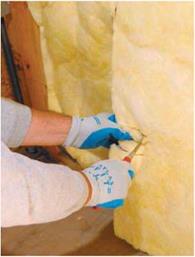
To prevent cold spots behind pipes and wiring, split batts in two-sort of like pulling apart a sandwich—so that each piece is roughly half the batt thickness. Slide one half of the batt behind the wiring or pipes, and place the other half in front. Where it would be tedious to split and slide batt ends behind the obstruction in the middle of the stud bay, instead slice halfway through the batt as shown below; split the fiberglass at the cut-line, and fit the insulation behind the obstruction.

 |
perpendicular atop old ones. Finally, install air chutes (baffles) between rafters, or block off insulation where rafters meet walls, so that air can flow freely from soffit vents to ridge or gable – end vents.
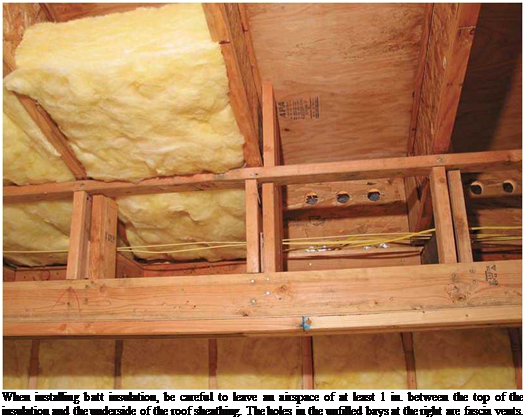
If you want to finish the attic with drywall, you can forego insulating the floor and instead insulate the kneewalls and rafters. But because an insulated floor deadens sound, you may want to insulate it anyhow. Before inserting batts into the rafter bays, staple lightweight rigid-foam air chutes to the underside of the roof sheathing.
The chutes create a 1-in space between the sheathing and the insulation on the attic floor, so that air can keep flowing under the roof. If the rafters are spaced regularly on 16-in. centers, unfaced friction-fit batts will stay in place till the drywall goes up. But if the rafter spacing is wide (24-in. on center or greater) or irregular, friction- fit batts may sag or fall out. Instead, you might use any of these options: (1) staple paper-faced batts to the rafter edges, (2) have foam insulation sprayed to the underside of the roof sheathing after installing air chutes, or (3) trim rigid-foam panels to fit between the rafters and glue them to the underside of the roof sheathing. If there are gaps between the panels and rafters, shoot a compatible foam into the gaps.
When insulating a floor over an unconditioned crawl space or basement, you’re fighting gravity and moisture.
First, let’s deal with gravity. The easiest way to install fiberglass batts without needing three hands is to precut a number of thin wood slats— ‘/4-in. fence lath is light and springy—Yi-in. longer than the distance between the joists.
As you hold the unfaced batts in the joist bays with one hand, use the other to wedge the slats into place, under the insulation. Being slightly long and springy, the slats will bow up and support the insulation; insert them every 16 in. to 24 in.
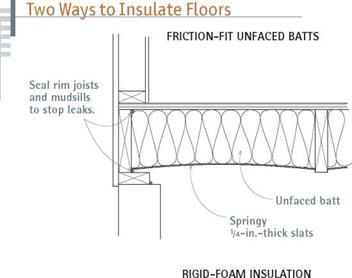
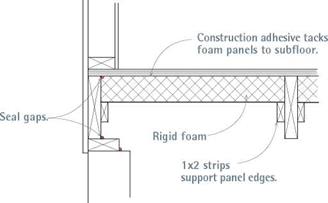 If the subfloor area is damp or if there’s heavy condensation during warm months, rigid-foam panels are a better choice than fiberglass batts. (Mice are also less likely to tunnel through or nest in rigid foam.) Use a compatible construction adhesive to glue the foam panels to the underside of the subfloor. If floor joists are straight and regularly spaced, trim panels so they are in. wider than the distance between the joists. But if the joists are irregular, trim the foam panels a bit smaller and use expanding foam to fill any gaps.




Leave a reply