SMALL REPAIRS
Small cracks or holes in plaster can be filled with patching plaster or a setting-type joint compound such as Durabond 90, which sets in 90 minutes. Because joint compound is softer, sands easily, and sets slower than patching plaster, it’s easier to work with. Setting-type joint compounds (also known as hot mud) are also better for patching than drying-type joint compounds, which just aren’t as strong. Note: To ensure a good bond, strip paint from the surfaces you’re patching and sand the adjacent areas lightly before applying compound.
Small cracks in plaster are repaired by stripping surface paint, cleaning loose plaster, and undercutting the cracks slightly with a knife or a small, sharp-pointed lever-type can opener (also called a "church key”) Undercutting allows the patching material to harden and form a key that won’t fall out. Before patching, wet the exposed plaster well and brush on a PVA (polyvinyl acetate) bonder such as Plasterweld® or Elmer’s White Glue® to bond the patch to the old plaster.
Over the crack, stretch a length of self-adhering fiberglass mesh. Then use a taping knife to spread the patching material into the crack. Leave the first coat of joint compound a little rough so the second adheres better. After lightly sanding the
first coat, apply the second, feathering it out to blend-in the patch’s edges.
When the patch dries, sand it lightly with fine, 220-grit sandpaper, wipe it clean, allow it to dry thoroughly, and prime the patch with an oil – based primer.
Large cracks often accompany sections of bowed or sagging plaster, which have pulled free from the lath behind. If the plaster is sound— not crumbling—you can reattach it to the lath using type-W drywall screws and plaster washers, which fit under the heads of the screws. A screw gun is good for this operation.
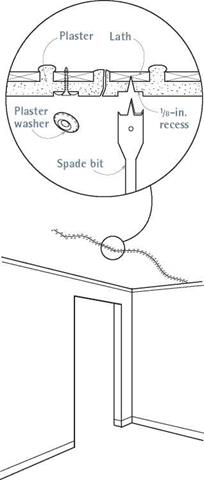
However, before you attach the screws, mark their locations on the plaster, and use a spade bit to countersink a hole ‘/ in. deep for each washer.
Sunk below the surface of the plaster, the screw heads and washers will be easy to cover with patching compound.
Place screws and washers every 8 in. to ‘0 in. on both sides of the crack and anywhere else the plaster seems springy and disconnected from the lath. Once you’ve stabilized the crack in this manner, scrape, tape, and fill it, as described earlier.
Small holes the size of a removed electrical outlet are easy to fill if the lath is still in place. Remove any loose plaster, brush out the debris, wet the lath and the surrounding plaster well, brush on a PVA bonder, and trowel in patching material. Leave the first coat a little rough, let it dry well, and apply bonder again before troweling in a second, smooth coat.
|
|
Cracked plaster often means that it has pulled free from its lath. Use screws and plaster washers to reattach it, countersinking them so they’ll be easier to patch.
|
|
|
|
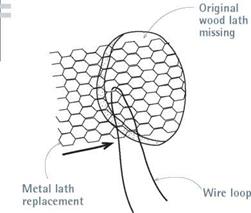
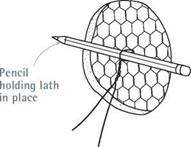
If plaster lath has been cut out, replace it before patching the hole. Insert and secure a small section of wire lath with a wire looped around a pencil, as shown. Twirl the pencil to draw the wire lath tight to the back of the plaster, then fill the hole with two coats of patching plaster. Unwind the wire and snip it when the first coat is hard.
If the hole has no lath behind it, you’ll need to add some. Scrape the loose plaster from the edge of the hole. As shown in "Patching Holes in Plaster,” on p. 373, cut a piece of metal lath larger than the hole and loop a short piece of wire through the middle of the lath. Then, holding the ends of the wire, slide the lath into the hole. To pull the lath tight against the back of the hole, insert a pencil into the front of the loop and turn the pencil like an airplane propeller until the wire is taut. The pencil spanning the hole holds the lath in place.
After wetting the lath and surrounding plaster, spread a rough coat of compound into the hole. When the coat has set, unwind the wire, remove the pencil, and push the wire into the wall cavity. The hardened plaster will hold the metal lath in place. Trowel on the finish coat.
Large holes with lath intact should be partially patched with a piece of drywall slightly smaller than the hole. Because a hole with square corners is easier to patch than an irregular one, square up the edges of plaster, using a chisel or a Dremel tool with an abrasive wheel. (Wear goggles.) Be careful not to cut through the lath. Use type-W drywall screws to attach the drywall to the lath behind, stretch self-adhering fiberglass mesh tape around the perimeter of the patch, and apply joint compound or patching plaster as described earlier. For best results, the drywall should be slightly thinner than the existing plaster, so you have some room to build up and feather out the patch.
As an alternative, pegboard is a dandy substrate for such patches because you can cut it easily with a jigsaw to fit irregular holes. Hold a sheet of!4-in. pegboard over the plaster, eyeball and trace the shape of the patch through the holes in the pegboard, and screw the pegboard to the lath—textured side out. The patching plaster will ooze through the holes in the pegboard and harden in the same manner that plaster keys into the spaces between lath strips.


Leave a reply