ESTIMATING MATERIALS
Start by consulting local building codes. They’ll specify the type, thickness, and number of drywall layers you must install throughout the house.
It’s possible to estimate drywall materials from a set of blueprints, but even the pros prefer to walk the job, measuring walls and ceilings and noting where using longer panels will minimize joints. That way, you get exactly the panel lengths you need.
As you walk through the rooms, record your findings on J4-in. graph paper. Use one sheet of paper per room, letting each square equal 1 ft. Then, when your materials arrive, you’ll know which room gets what.
1. Start by measuring the width and length of each room. In general, think in 2-ft. increments. That is, if a wall is 10 ft. 6 in. long, plan to buy 12-ft. panels and run them horizontally in order to get the fewest joints. If studs aren’t spaced a standard 16 in. on center, note that on your graph paper. (If you’re not sure of stud and joist spacing, use a stud finder.) Calculate the number of panels of each dimension you’ll need for each room.
2. Note door and window locations and dimensions, but don’t deduct their square footage from the room total. Portions of panels cut out for windows and doors will yield a high percentage of nonfactory edges and butt joints, so it’s
easiest to discard such scrap or piece it together in out-of-way places, such as closets.
3. Note the ceiling height. If the ceiling is 8 ft., two standard 4-ft. by 8-ft. wall panels run horizontally will reach it; if they’re 9 ft. high, use two horizontal 54-in.-wide panels. If ceilings are higher than 9 ft., you may want to rent scaffolding and a drywall lift.
4. Note the direction and spacing of ceiling joists. Panels run perpendicular to ceiling joists (or rafters, if a cathedral ceiling) are less likely to sag.
5. Special rooms. Install WR (water-resistant) drywall in laundry rooms, behind kitchen sinks, and in bathrooms other than in tub/shower areas. Cover tub/shower areas with cementitious board if they’ll be tiled. Install 58-in. type-X dry – wall on shared walls between the garage and living space. If existing plaster is in bad shape and you don’t want to tear it out, cover it with /4-in. or 58-in. drywall.
6. Special features include arches, curved stairwells, barrel ceilings, odd nooks, built-in bookcases or cabinets, and the like. For curves, you need flexible /4-in. drywall. Expect a lot of waste around complex areas, such as stairways.
Calculating DrywaU Square Footage
|
Chapter 4). Green or wet lumber will shrink as it dries, causing cracks and nail pops in a new drywall job, so don’t use it.
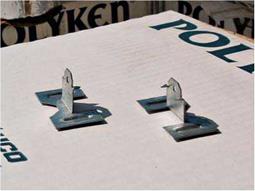
► Use a framing square to determine if * Calculations assume that all panels are 4 ft. wide. corners are square, and make sure there’s blocking in the corners, so you’ll have something to attach the panel edges to. Or you can use drywall clips to "float" the corners. |

► Install steel nail guards to protect plumbing pipes and electrical cables within U4 in. of joist or stud edges. Few things are as frustrating as discovering a leak or an electrical short after the drywall is up. Then make a final check of the electrical outlet boxes. They should be securely attached to the framing with their edges flush with the drywall face (see Chapter 11).
► If appropriate to your climate, plastic vapor barriers or insulation should be in place now, as described in Chapter 14. If you’re drywalling over rigid foam insulation—say, on a cathedral ceiling—first affix 1X2 furring strips so you’ll have something to screw to.
Do not attach drywall directly to the foam because the insulation expands, contracts, and compresses.
9. Finally, make a master list of all the dry – wall you need for the complete renovation.
Here’s a final checklist before installing drywall:
► The building should be dry and relatively warm (between 60°F and 70°F). Keep temperatures constant. If a room becomes too hot (80°F or above), joint compounds may dry too quickly and crack. If the heating system is inoperable, rent a portable heater. Ventilation is also important for drying: Drying-type joint compounds evaporate a lot of water.
► 

 Framing lumber must be dry: 15 percent to 19 percent moisture content is optimal (see


Leave a reply