Materials
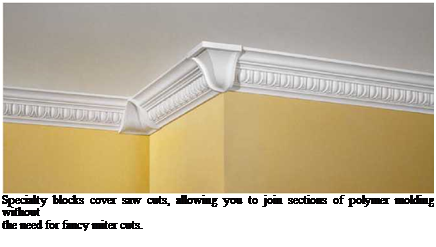
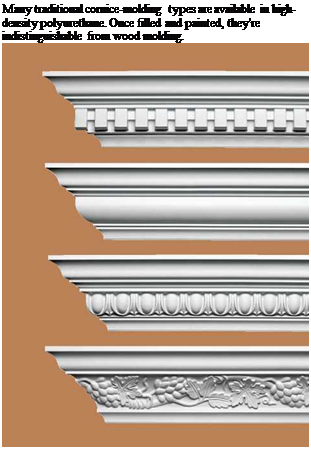
Trim materials include custom-milled hardwoods; softwood boards, molding, and stock caps; MDF (medium-density fiberboard); and polymer moldings that replicate detailed historical styles in lightweight, easy-to-install sections.
Because trim is costly (especially hardwood trim), buy it from a local shop that mills its own. That way, you’ll be more likely to get trim that is straight, knot-free, and stored in humidity – and temperature-controlled warehouses. If you’re trying to match existing trim, a local milling shop is also your best bet. You may pay a setup fee but, all in all, the final cost of a room or two of custom trim may be more reasonable than you think.
Stock trim from a lumberyard or home center is often so warped that you must pick through the racks and eyeball each piece to see if it’s straight. Discard any pieces that are obviously heavier than the rest—usually a sign of excessive moisture. (Trim is typically dried to 7 percent to 10 percent moisture content.) Examine each piece for splits and cupping across the width.
Also sight down the length of each board for excessive twisting. You can force a twisted piece into position by toenailing and clamping it, but the extra stress is likely to open a joint or cause splitting down the road.
If you want the wood grain to show, be even more picky or pay more for a select grade. But if you plan to paint the trim, most surface blemishes can be sanded, filled, or sealed with white pigmented shellac (see Chapter 18) or a primer-sealer to suppress knot or tannin bleed-through. Finger – jointed molding, which joins short sections of clear softwood, is another option. Though usually painted to conceal its glued finger joints, finger- jointed molding is also available with a wood veneer, which can be stained and clear finished.
Standard molding is often milled from 1-in. stock (actual size, % in.). Thus you’ll find it easy to create more complex trim by combining 1-in. boards with stock molding caps. For example, with baseboards, you might start with a 1×8, add a quarter-round shoe at the bottom and a cove- molding cap at the top.
However, if you want to dress up a room with complex crown moldings, consider installing polymer millwork instead—whose monolithic casting greatly simplifies installation. Likewise, though you can build them up by hand, mantels and fireplace surrounds also are sold as pre-
 PRO-TIP
Don’t bring trim stock to a job site till the drywall joints are dry and the building is heated. Otherwise, trim ends will absorb moisture, swell, and become difficult to install. Never store trim in unheated areas or garages.
1111
^^PROnP

![]()

assembled units and as kits requiring minimal assembly.
You can combine stock moldings with relatively inexpensive paneling to make wainscoting and frame-over-panel walls. By cutting a piece of paneling in half, you can use two sections, each 4 ft. by 4 ft., topped with a built-up combination of moldings to form a cap. Paneling with vertical, regularly spaced grooves gives the illusion of individual boards. To change the style and create Craftsman-style wainscoting, you could use!4-in.- thick redwood plywood with the grain running vertically and install redwood strips every foot or two to create detail and cover the seams between sheets. For more, see “Wainscoting,” on p. 430.


Leave a reply