MEASURING AND LAYOUT
Whenever possible, hold a trim piece in place and use a pencil or a utility knife to mark the cut-line. This is usually more accurate than transferring tape-measure readings.
Tape measures are frequently used to measure trim longer than 6 ft. Check your tape measure to be sure that the hook at the tape end isn’t bent and that the rivet slot hasn’t become elongated from the hook’s repeated slamming into the case—either of which will give inaccurate readings. However, for best accuracy, start measurements from the 1-in. mark, remembering to deduct 1 in. when taking readings.
A 6-ft. folding rule with a sliding-brass extension is best for readings less than 6 ft. because the rigid rule won’t flop around as a tape measure will. Unfold the rule to its greatest length
between two points and slide the extension the rest of the way. Then hold the extended rule next to the trim stock and mark the cut-line.
A framing square held against a door or window frame quickly tells if it’s square or not— a good practice when sizing up a trim job.
A combination square is both a square and a 45° miter gauge, so it can be used to mark square and miter cuts. Because its ruler can be extended from the tool body and fixed with a screw, the square can double as a depth or marking gauge. The combo also has a bubble-level insert for leveling small surfaces such as windowsills.
An adjustable (sliding-T) bevel copies and transfers angles accurately. Because frame corners are rarely 90° exactly, use an adjustable bevel to record the angle needed and then make miter cuts that bisect the actual angle.
Levels, 2 ft., 4 ft., and torpedo, should be part of any finish carpenter’s tool chest; use smaller levels in tight spaces.
![]()


Buy or borrow a laser level if you need to set cabinets at the same height or align different trim elements in a room.
Which tool you choose depends on how much trim you’ll cut. Wear safety glasses and hearing protection when operating any of these tools.
A miter box with a backsaw will suffice if you are casing only a doorway or two. A backsaw has a reinforced back so its blade is rigid; it should have 12 teeth per inch (TPI) or 13 TPI, with minimal offset (splay), so it cuts a thin kerf. Also useful: a dovetail saw (a small backsaw with 20+ TPI) and a slotting saw, whose kerf is even finer because its teeth are not offset.
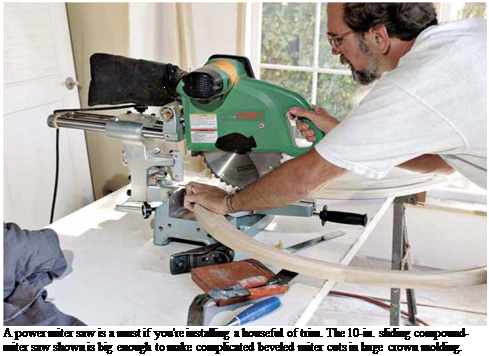
Buy a power miter saw if you’ll trim at least one room or several casings. Well worth the cost, a power miter adjusts to any angle for miters (angles cut across the face of a board, with the blade perpendicular to the stock). A sliding compound-miter saw, though more expensive, is more versatile. In one stroke, this saw will cut a miter and a bevel (an angle cut across a board, in which the sawblade is tilted)—hence the name compound miter. It will also cut through wider stock such as wide baseboards or crown molding.
A table saw may be the only table tool you need if you are cutting only miter or butt joints. Table – saw guides are generally not as accurate or as easily to re-adjust as the guides on power miter saws, so recutting miter joints will be a bit more work. With a power miter saw, you clamp the stock steady and move the blade, whereas cutting a miter on a table saw requires feeding long pieces of trim at an odd angle to the blade.
Still, table saws be can a good choice for tight budgets because they can also cut stock to length (crosscut) and width (rip cut), prepare edges for joining, and cut dadoes (slots) easily.
A sliding miter trimmer (also known as a Lion Miter-Trimmer™) looks like a horizontal guillotine and bolts to a bench. Because its blade is razor sharp, it slices wood rather than sawing through it. Although it can shave off paper-thin amounts of wood till joints fit exactly, it’s been eclipsed by power miter saws for on-site trim installations.
A quality power jigsaw (sometimes called a saber saw) is indispensable for fitting and notching wood, such as fitting thresholds around integral door stops.
Use a coping saw to cut along molding profile lines, ensuring a tight fit where molding meets in inside corners. For more, see p. 414.
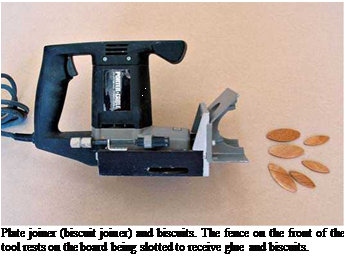
A plate joiner (biscuit joiner) is a specialized saw with a small, horizontal circular blade that cuts slots into board edges. After slotting boards to be joined, inject glue and insert a footballshaped wooden wafer, called a biscuit, which will swell to create a strong joint with no need for nails or screws.
A block plane and a palm sander are probably all you’ll need unless you plan to shape board edges to create complex molding, in which case, get a router.
Block planes are most often used to trim miter joints for a tight fit. If you slightly back-bevel

![]() miters, the edges of the face will make contact first. Block planes can also shave down a door or window jamb that is too proud (too high above the wall plane), thereby allowing the trim to lie flat. A power plane (see the photo on p. 167) can do everything a handplane can but more aggressively, so practice on a piece of scrap and check your progress after each pass. Caution: Before planing existing trim, first use a magnet to scan the wood for nails or screws, setting them well below the surface before planing.
miters, the edges of the face will make contact first. Block planes can also shave down a door or window jamb that is too proud (too high above the wall plane), thereby allowing the trim to lie flat. A power plane (see the photo on p. 167) can do everything a handplane can but more aggressively, so practice on a piece of scrap and check your progress after each pass. Caution: Before planing existing trim, first use a magnet to scan the wood for nails or screws, setting them well below the surface before planing.
Rat-tail files and 4-in-1 rasps (see the bottom photo on p. 40) remove small amounts of wood from curved surfaces, so that coped joints fit tightly.
Routers are reasonably priced and invaluable for edge-joining, template cutting, mortising, and flush trimming when used with a table. Router tables vary, but on most you mount the router
When handplaning, clamp the wood securely, and push the tool in the direction of the grain. While holding the shoe of the tool flat against the edge of the wood, angle the tool’s body 20° to the line of the board, so that the plane seen from above looks like half of a V. At this angle, the plane blade encounters less resistance and clears shavings better.
upside-down, to the table’s underside, so the router bit protrudes above the tabletop. A guide fence enables you to feed stock so that the router bit shapes its edges uniformly—much as a large shaper in a lumber mill would.
Before setting up a router table, however, read up. Fine Woodworking magazine’s Web site (www. taunton. com/finewoodworking) has hundreds of references on routers and router tables. Above all, heed all safety warnings about routers: Their razor-sharp blades spin 10,000 rpm to 30,000 rpm.
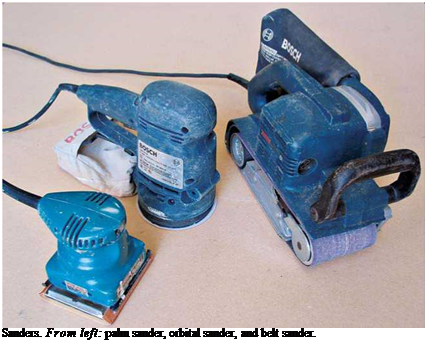
Sanders are needed for a variety of jobs. A palm sander (or block sander), is useful for shaping contours and sanding in tight places and for light sanding between finish coats. Orbitalsanders are intermediate in cost, weight, and power. Random orbital sanders sand back-and-forth and orbitally (the center of the sander’s pad shifts constantly); they cut faster and leave fewer sanding marks.
If you buy only one sander, this is the one to get. Belt sanders are great for preparing stock and stripping old finishes, but they are so powerful that they tend to obliterate details, so use them sparingly. A belt sander is particularly useful for fitting scribed cabinet panels, as shown in the top right photo on p. 311. Whatever the size of the sander, change the paper often; you shouldn’t need to lean on a sander to make it cut.


Leave a reply