TOOLS FOR CHECKING LEVEL AND PLUMB
Checking for level and plumb are jobs a carpenter has to do every day. You don’t want floors running downhill or walls that lean. The tools used to check for level and plumb are levels and the plumb bob.
Although today there are many high- tech leveling devices that rely on lasers or microchips, the old standbys work quite well for most carpentry work.
Many carpenters carry at least two or three different sizes of spirit levels, and some still swear by water levels.
Spirit level The spirit, or carpenter’s, level is the best known of all. It is a simple tool consisting of a straight length of wood or metal with two or three glass vials located on it. Each vial is filled with spirit (like alcohol) so it won’t freeze, has a bubble in it, and is usually protected by a glass lens.
I have two spirit levels: a 2-ft. one and a 6-ft. one. If I need to check a surface that is larger than 6 ft. for plumb or level, I simply attach my 2-ft. level to a long straightedge with duct tape to make a plumbstick (see the sidebar on the facing page). I use an 8-ft. piece of aluminum from an old sliding door, but a 2×4 could be used too, provided that it is straight.
A spirit level needs a bit of loving care. Don’t leave this tool leaning against a wall or on the floor of a work area. Instead, hang it from a nail or place it flat on the ground, away from the work area. I carry each of my spirit levels in a carrying case made from a length of 3-in.-dia. plastic plumbing pipe cut to fit. I simply cap one end of the

Carpenters often make a plumb – stick for checking that walls are straight up and down. What’s great about making a plumbstick is that you can use your old, battered level, even if it’s inaccurate.
Take an 8-ft. 2×4 stud and nail a 16-in. 1×2 strip on each end. Let the 1x overhang the stud ends 3 in. or 4 in. Attach a 2-ft. level to the opposite edge with rubber bands or duct tape. Now you have a long level.
To check this tool for accuracy, hold it flat against a wall. Move the top of the stick back and forth until the bubble is centered exactly in the tube and make a pencil mark on the wall along the 1x extensions. Now turn the plumbstick side for side—not end for end—so that the same edge is on the opposite side of the line flat against the wall. Line the extensions up with the marks on the plates. If the bubble returns to the exact center of the vial, the plumbstick is accurate.
If the bubble is not centered in the tube, the level needs to be adjusted. Stick a wooden shim, a folded piece of paper, or even an 8d nail under one end of the level and check the plumbstick again. Keep adjusting the shim until the bubble is centered both ways.

pipe with duct tape and slide the level in. You can also buy carrying cases at most tool centers.
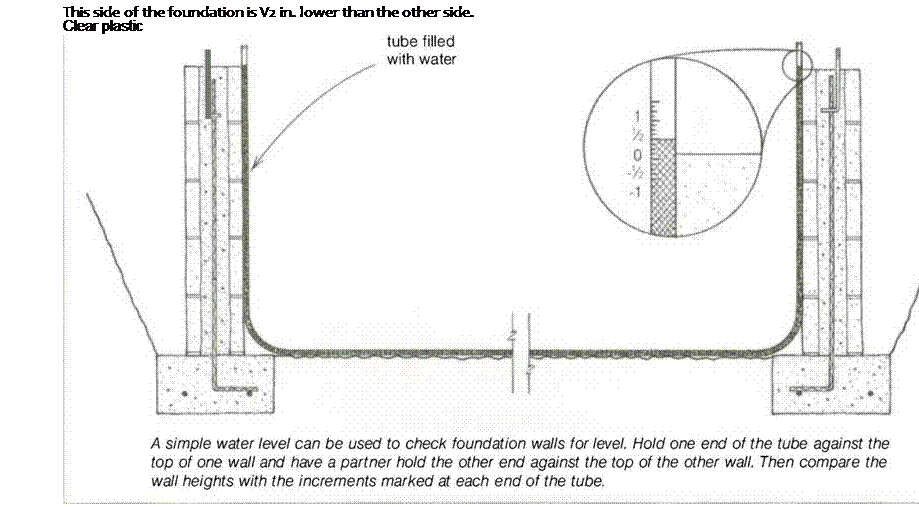
Water level One of the easiest and least expensive ways to determine level over long distances or around corners is with a water level (see the drawing above). This tool, which is simply a plastic tube filled with water, relies on the fact that water seeks its own level. I used to make my own, but now I find it’s easier to buy them. Water levels are available from Zircon (see Sources on p. 198).


Leave a reply