Blog Archives

SIZING WITH THE UNIFORM PLUMBING CODE

Sizing with data from the Uniform Plumbing Code is not too difficult. Allow me to give you some illustrations that are direct excerpts from the Uniform Plumbing Code. Look at the illustrations and try working through the sizing example that is provided (Fig. 3.1 through Fig. 3.17).

APPENDIX A


Because of the variable conditions encountered, it is impractical to lay down definite detailed rules of procedure for determining the sizes of water supply pipes in an appendix which must necessarily be limited in length...

read more

STAGE 3

This time, let us add that 20% removed from 2/5.6 mm chippings to 8/11.2 mm chippings (that makes 25% + 20% = 45%), leaving the content of fraction 5.6/8 the same as in Stage I (25%). The composition of the new mix is shown in Table 6.8, while its gradation curve is shown in Figure 6.6.

The achieved mix falls between the upper and lower gradation limits. Obviously it still needs some refining within the sand fraction, but at the moment the main topic is the coarse aggregate. Perfectionists would say that a bit of "messing about" with the coarse fraction could be useful, by lowering the grada­tion curve even more on the 8 mm sieve, for example. But the question is, is it worth it?

After all, lowering the gradation curve on the 8 mm sieve will increase the share of particles larger than 8 m...

read more

Bending and Bending Failure

Yes, a good beam is a thing of beauty, but the main quality we are looking for in a beam is that it will not fail under the load we are asking it to carry. So we had better know a bit about the kinds of failures that can happen.

The failure in beams that people seem to grasp most easily is that of bending failure. If we keep loading a beam, particularly towards the middle of the span, we are placing ever greater bending stresses upon it. When we exceed the bending
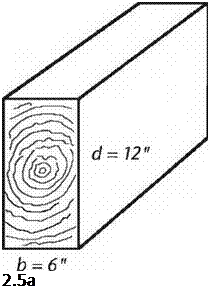
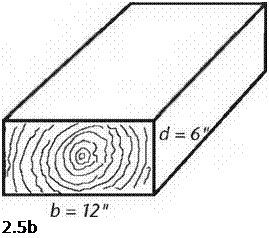
Подпись: 2.5a Подпись: 2.5b strength of the beam, it will break, usually somewhere in the middle third of the span. This seems logical and natural, just as it seems natural that the two-by-eight plank described above is far more likely to break under a bending load if it is laid flat than if it is installed, properly, on edge...

read more

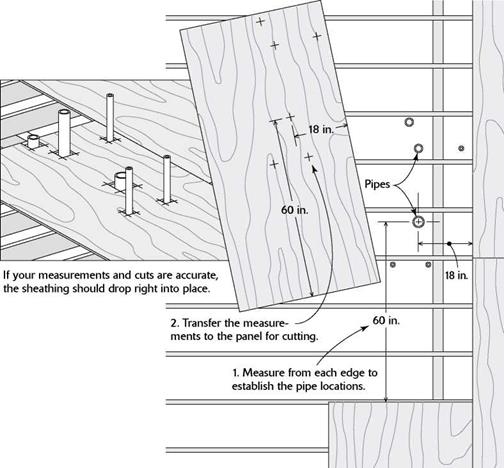
LOCATING CUTOUTS IN SHEATHING

LOCATING CUTOUTS IN SHEATHING

Подпись: You can use ring shank or hot- dipped galvanized nails when nailing off subfloor. These nails, along with the adhesive, will hold the sheathing to the joists and help prevent squeaky floors.

on my lower legs from breaking through subfloors while working on job sites decades ago. The sheathing panels we use today are much better than 1×6 boards—yet another improvement over how houses were built in “the good old days.”

Sheathing with 4×8 sheets of tongue-and – groove plywood or OSB is not difficult, though the sheets can be awkward to handle. Carry them with a partner, if necessary, and take care not to damage the tongues or the grooves, which can make it more difficult to fit the sheets together. Be sure to use exterior-grade, 5/s-in.- or 3/4-in.-thick sheathing.

Snap a line to lay out the first sheathing course

When laying out long rows of 4×8 sheathing, it’s best to start from a control, or reference, line. On one side of the building, measure in 48/4 in...

read more

ASPHALT SHINGLE REPAIR

Most roofs are repaired in response to leaks caused by a missing shingle or, more often, worn – out or missing flashing. Or, in some cases, it’s necessary to disturb shingles to install a roof vent or a plumbing vent.

When removing a shingle, or a course of shin­gles, disturb surrounding shingles as little as pos­sible. First break the adhesive seal between courses, by sliding a mason’s trowel or a shingle ripper (see the left photo on p. 121) under the shingles and gently slicing through the adhesive strips. It’s best to do this when shingles are cool and the adhesive is somewhat brittle and easier to break. If you attempt this when the roof is hot, you’re more likely to tear the shingles...

read more

INTELLIGENT VEHICLE HIGHWAY SYSTEMS

Intelligent vehicle highway systems (IVHS) refers to transportation systems that involve integrated applications of advanced surveillance, communications, computer, display, and control process technologies, both in the vehicle and on the highway (Ref. 5).

In 1991, Congress passed the Intermodal Surface Transportation Efficiency Act (ISTEA), which included an authorization of $660 million to create an IVHS program for the nation. The goals for IVHS were defined as follows: to improve safety, to reduce congestion, to enhance mobility, to minimize environmental impact, to save energy, and to promote economic productivity. Research studies and demonstration projects to accomplish these goals are in progress...

read more

DRILLS

I remember making hole after hole with a hand-powered brace and bit in the early ’50s. I still have one hanging on the wall of my shop. Drilling bolt holes by hand in 2×6 sill plates was easy. But drilling a 1-in. bolt hole in a thick, solid beam took effort. Even with sharp bits, hand drilling was time-consuming. Today, a power drill fitted with the proper bit can drill the toughest hole in seconds. The power drill is a versatile tool. It makes holes in all sorts of mater­ial and can even be used for driving screws and for mixing paint and drywall compound.

DRILLS

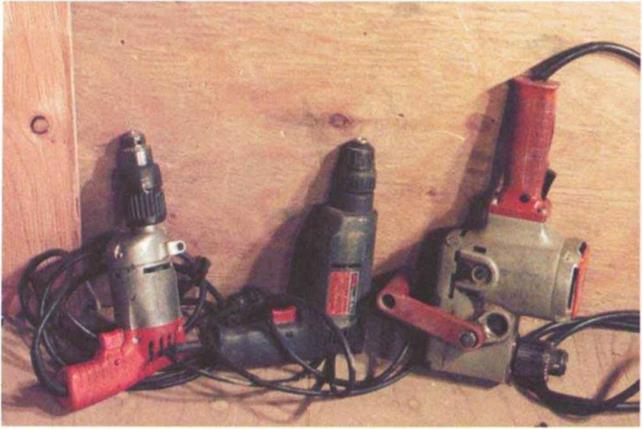
Every carpenter owns a power drill or two. Shown here are (from left to right) two 3/s-in. pistol-grip drills and a Уг-іп. right-angle drill.


Drill safety

• For clean, easy cuts, use sharp bits.

• Don’t force the...

read more

Part II: Gradation within the Coarse Aggregate Fraction

When designing the shape of a gradation curve in the coarse aggregate fraction (larger than 2 mm), it is worthwhile to pay attention not only to the percentage of grains larger than 2 mm (retained on a 2 mm sieve) but also to the ratios of contents of various coarse aggregate fractions. According to many recommendations (i. e.,

Schroeder and Kluge, 1992; Voskuilen, 2000), mixtures characterized by a certain deficiency of smaller coarse aggregates, or even a lack of them, should be preferred. So, let us proceed to Example II to discuss changes in the gradation within the coarse aggregates’ fraction. This example is not complicated, therefore we will not encounter any difficulties in its interpretation; this is especially for anyone who often designs using the gradation limits method.

Exam...

read more

Using Pneumatic Nailers

Because pneumatic nailers can easily blow nails through shingles, some codes specify hand nailing. And it’s safer to hand nail the first five or six courses along the eaves, where stepping on a pneumatic hose could roll you right off the roof. Wear goggles when using nailers. Those concerns aside, pneumatic nailers are great tools if used correctly. Here’s how:

► Don’t bounce-fire a nailer till you’re skilled with it. (To bounce- fire, you hold the trigger down and press the nailer’s nose to the roof to fire the nail.) Shingles must be nailed within a small zone—below the sealer strip but above the cutouts, if any—and it’s hard to hit that zone if the nailer is bouncing around. Instead, position the nailer nose where you want it, and then pull the trigger.

► Trigger-fire the first nail...

read more

CROSSCUTTING

A cut across the grain is called a crosscut. To make one, first scribe a cut line on the stock using a square to draw the line straight. Make sure that the stock is adequately supported either by sawhorses or by 2x blocks placed on the floor so that the cutoff can fall free. Then place the saw base on the stock with the blade about 1 in. from the edge of the wood and align the blade with the cut line. Hold the saw with both hands, pull the switch, and slowly push the blade into the wood, following the cut line. Going slowly and cutting straight helps prevent kickback (for more on preventing kickbacks, see the sidebar on p. 43).

To make a square cut without scribing a cut line in 2x4s and other narrow stock, align the front edge of the saw base parallel to the edge of the stock and make the...

read more