LOCATING CUTOUTS IN SHEATHING


on my lower legs from breaking through subfloors while working on job sites decades ago. The sheathing panels we use today are much better than 1×6 boards—yet another improvement over how houses were built in “the good old days.”
Sheathing with 4×8 sheets of tongue-and – groove plywood or OSB is not difficult, though the sheets can be awkward to handle. Carry them with a partner, if necessary, and take care not to damage the tongues or the grooves, which can make it more difficult to fit the sheets together. Be sure to use exterior-grade, 5/s-in.- or 3/4-in.-thick sheathing.
Snap a line to lay out the first sheathing course
When laying out long rows of 4×8 sheathing, it’s best to start from a control, or reference, line. On one side of the building, measure in 48/4 in. at each end and snap a chalkline across the joists. The first row of sheathing is laid and nailed directly on that line. Getting this first row straight makes it easier to lay all subsequent rows.
Lay down a full M-in. bead of construction adhesive on the joists beneath each sheet just before setting it in place (see the photo on p. 71). This makes the floor structurally stronger and cuts down on squeaks in the future. Lay the first sheet with its grooved edge right along the


control line, with one end on the center of a rim joist and the other end landing mid-joist—8 ft. to the left or the right. If a sheet doesn’t fall on the center of a joist, try pushing the joist over a bit. If this can’t be done, mark the sheet to length so the edge will land mid-joist, then snap a chalkline and cut the sheet. Finish sheathing the first row before moving on to the second one.
The second row of sheathing is installed much like the first, except that you begin with half a sheet (a 4-ft. by 4-ft. piece). This staggers
the joints, which makes for a stronger floor. If you’re building in a humid climate, leave about XA in. between the ends and the edges of the sheets to allow for expansion. This gap can be gauged by eye or by using an 8d nail as a spacer. The !/8-in. gap between sheets means that you will have to trim an end now and then so that each sheet lands squarely in the middle of a joist.
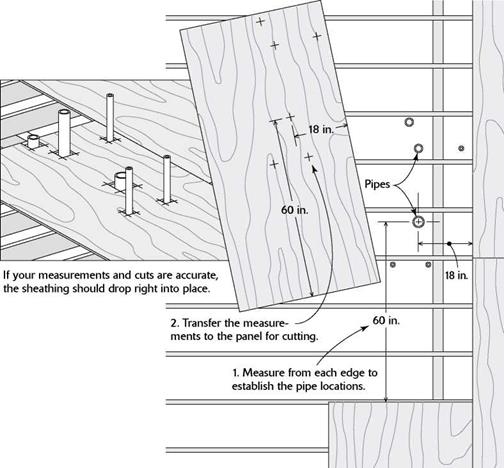
When plumbing pipes are installed before the sheathing, you must lay out and cut holes in the sheathing. The easiest way to lay out these cuts is to measure from the edges of sheathing already in place to the center of the pipe, then transfer those measurements to the sheet that the pipe will go through (see the illustration on p. 72). Cut the holes somewhat larger than the pipes, using a circular saw to make a plunge cut, as shown in Chapter 2. This makes it easier to lift the sheet and set it in place over the pipes. Later, seal the holes well to keep cold or moist air from entering the living space from below.
Secure the sheathing to the joists with 8d nails
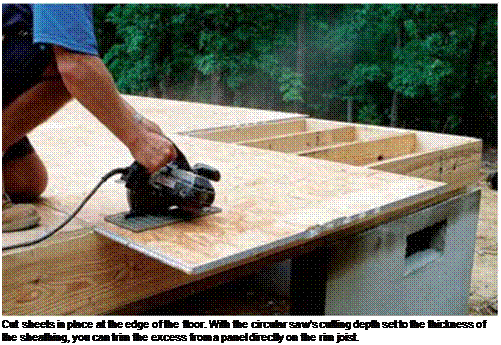
When the last panel in a course of sheathing extends beyond the rim joist, cut it flush with the rim joist before nailing it down (see the photo at left). The typical nailing schedule for sheathing is 8d nails 6 in. o. c. around the


Leave a reply