ASPHALT SHINGLE REPAIR
Most roofs are repaired in response to leaks caused by a missing shingle or, more often, worn – out or missing flashing. Or, in some cases, it’s necessary to disturb shingles to install a roof vent or a plumbing vent.
When removing a shingle, or a course of shingles, disturb surrounding shingles as little as possible. First break the adhesive seal between courses, by sliding a mason’s trowel or a shingle ripper (see the left photo on p. 121) under the shingles and gently slicing through the adhesive strips. It’s best to do this when shingles are cool and the adhesive is somewhat brittle and easier to break. If you attempt this when the roof is hot, you’re more likely to tear the shingles. However, actually working with the shingles—lifting them to remove nails or slide in new shingles—is best done when the shingle is warm and flexible.
To remove a damaged shingle, raise the shingles above and tear the old one out. If it doesn’t tear easily, use a utility knife to cut it out.
Remove the nails that held the damaged shingle by inserting a shingle ripper against the nail shafts and prying up. Keep in mind that those nails are actually going through two shingle courses—the one you’re trying to remove and the top of the course below. If you extricate the shingle and the nails don’t come up with a reasonable amount of trying, just knock them down with your hammer and a flat bar.
Fill old nail holes with roofing cement, and slide the new shingle into place. Gently lift the course above and position nails so they’ll be overlapped by that course. Once you’ve inserted a new shingle, use the flat bar to help drive them down, placing the flat bar atop the nail head and striking the bar with a hammer.
There’s romance in wood shingles. Despite wood’s tendency to mold, grow moss, and catch fire and despite the diversity and durability of laminated asphalt shingles, wood remains popular.
Be sure to read the earlier sections on sheathing, underlayment, and flashing. And review the methods of asphalt-shingle installation, for they have much in common with wood shingling.
If the old roof was once covered with wood shingles, they were likely nailed to skip-sheathing, which consists of widely spaced 1-in. boards that allow air to circulate under the shingles and dry them. These days, most roofers cover skipsheathing with plywood because it stiffens the roof and is safer to walk on. But nailing shingles directly to plywood or building paper impedes air circulation and may lead to cupping (shingles’ undersides will dry much more slowly than the tops), rotting, and shortened shingle life.
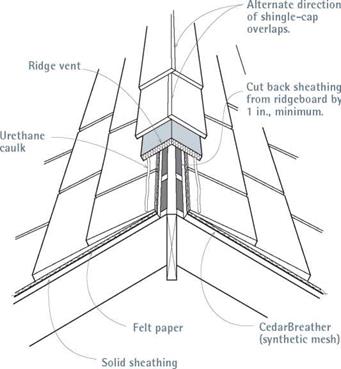
The answer to this dilemma is a layer of %-in.-thick synthetic mesh between the building paper and the shingles. CedarBreather is one brand, which comes in 39-in.-wide rolls. Roll the mesh out over 30-lb. building paper, tack or staple it down, and you’re ready to shingle. The mesh retains enough loft to allow air to circulate freely around the shingles, so they can dry. To attach shingles over the mesh, you’ll need longer nails: 6d shingle nails should do, but check the product’s literature to be sure.
Flash a wood shingle roof as you would an asphalt roof, including WSU along the eaves, rakes, and valleys and metal drip-edge along the eaves and rakes.
Use only No. 1 (blue-label) shingles on roofs because they’re free of sapwood and knots.
Lesser grades are fine for siding but may leak on

![]()

![]()
![]()


![]()

![]()

![]()

![]() a roof. Shingles come 16 in., 18 in., and 24 in. long, with recommended exposures of 5 in.,
a roof. Shingles come 16 in., 18 in., and 24 in. long, with recommended exposures of 5 in.,
5h in., and 7h in., respectively, on roofs with a
4- in-12 slope or steeper. Ultimately, slope determines exposure and thus the number of bundles per square (100 sq. ft.).
In general, four bundles will cover a square.
To calculate the number of squares you’ll need, calculate the square footage of the roof and divide by 100. Because shingles are doubled along eaves and rakes, add an extra bundle for each 60 lin. ft. of eaves or rake. For valleys, add an extra bundle for each 25 lin. ft. For ridges and roof hips, buy preassembled ridge caps, sold in bundles that cover 16 lin. ft. One Canadian supplier, WoodRoof™ (www. woodroof. com) offers information about hip and ridge caps, precut "fancy butt” shingles, specialty tools, and more.
You’ll need 2 lb. of 4d or 5d galvanized shingle nails per square of shingles. For shingle caps along ridges and hips, use 6d shingle nails to accommodate the greater thickness of materials. Have your supplier deliver the materials in a lift – bed truck, so that you can unload the shingles right onto the roof.
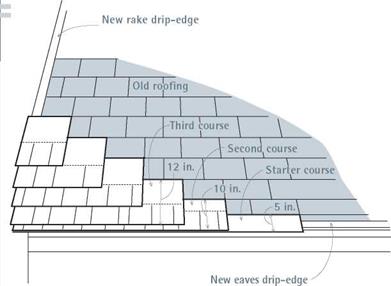
Double the first courses of shingles along the eaves, extending them beyond the drip-edge by 1 in.; and double shingles along rakes, overhanging rake trim by 1 in. In addition, install metal drip-edge along eaves and rakes. When nailing the bottom course of doubled shingles along the eaves, nail them about 1 in. up from the butt edges; if possible, sink the nails into the edge of the fascia board. Those two nails will be covered by the top course of doubled shingles. Nail that course with two nails placed 1 h in. above the exposure line.
wood Shingle i
No matter how wide the shingle, use only two nails—placed 3/ in. in from the edge, and 11/ in. above the exposure line. To allow for expansion, leave a 1/4-in. gap between shingles, unless they are wet, in which case you can place them snug against each other because they’ll shrink. Offset joints between successive courses at least 11/! in. Shingle joints that line up must be separated by two courses—in other words, shingle joints can line up every fourth course, but not sooner. Finally, nail heads should touch but not crush shingle surfaces; deeper, they may split the wood.
You could snap chalklines to indicate exposures for successive courses, but chalk can be unsightly and slow to fade. Instead, get a straight board as wide as the shingle exposure (5 in., for example), place its bottom edge flush to the bottom of the last shingle course, and position the next course of shingles by simply placing them atop the board. Move loose shingles around till all their joints are correctly offset to the courses below. Then nail them down.
When you start stretching to install courses above, install roof jacks as described on p. 81. Because wood shingles do not have fixed lengths as asphalt shingles do—just the same bottom line—several workers can work on a course at the same time. As you get within 6 ft. of the top, measure up to the ridge. If the ridge is not parallel to the eaves, there may be a discrepancy of several inches between measurements at one end of the roof and the other. If so, start adjusting exposures so that the final course of shingles will be more or less parallel to the ridge. If there’s a discrepancy of 2 in., for example, you should reduce exposures on the narrow end of the roof by ‘/a in. per course.
Open valleys. Refer to previous sections in this chapter on underlayment and valley flashing before you start. For most renovations, an open valley is the way to go: The exposed metal flashing of an open valley clears water well and is not likely to clog with debris and to dam up water. In addition, shingles running alongside an open valley require less fitting and cutting than those in closed valleys.
You can shingle out from a valley or into a valley from roof planes on either side. In either case, start by snapping parallel chalklines along both sides of the metal valley flashing, each line should be at least 3 in. from the center fold of the flashing. As each course approaches the valley, don’t nail the last four or five shingles immediately; just arrange them so that wide shingles end in the valley. Where shingles cross a chalkline, use a utility knife to notch the shingle at those points.
Keep nails as far as possible from the valley center: 5 in. away is minimum. A bead of urethane caulk under the leading shingles should keep the edges from lifting.
Closed valleys. Run shingles into the valley until they meet oncoming shingles from the other side. At that juncture, rough cut each shingle about 14 in. wide to establish the correct angle. Then use a block plane to back-bevel its leading edge. By cutting and planing, you create a compound angle so that the shingles fit tightly; this can be done only on the roof, shingle by shingle—a slow job. For best weathering, alternate miters right
and left, from course to course. Build up several courses in the valley and shingle out to the rest of the field.
Ridge treatments. Be sure to read the comments on venting a ridge on p. 76. In brief, cut back sheathing at least 1 in. on either side of the ridgeboard. Then run underlayment and shingles to the edge of the sheathing before nailing a ridge vent over the opening.
► Shingle caps. Use a pneumatic nailer to attach preassembled shingle caps over the vent. Because the mesh underlayment and the ridge vent are compressible, they would move if you tried to hand nail them. Shoot 2-in. to 2/4- in. galvanized shingle nails through the shingle caps; nails should penetrate the roof sheathing at least /2 in.
► Ridgeboards. These butt to each other; for a weather-tight fit, they should be mitered. To establish the miter angle, lap two pieces of scrap at the peak and, using an adjustable bevel, transfer this angle to your table saw.

![]()
 Use a pneumatic nailer to attach preassembled ridge caps over the ridge vents because hand nailing the caps could split them.
Test-cut several pieces of scrap till the fit is tight; then rip down the ridgeboards on the table saw. Because ridgeboards should be as long as possible, get help nailing them down.
If it takes several boards to achieve the length of the ridge, bevel joints 60° and caulk each with urethane caulk.
Using 8d galvanized ring-shank roofing nails, nail the ridgeboards to the rafters; use two nails per rafter. Then go back and draw the beveled joint together by nailing it with 6d galvanized box nails spaced every 12 in. As you work, push down on the ridgeboards to force them together. To avoid splitting boards, predrill them or use a pneumatic nailer to shoot nails through the roofing layers into the rafters.


Leave a reply