Using Pneumatic Nailers
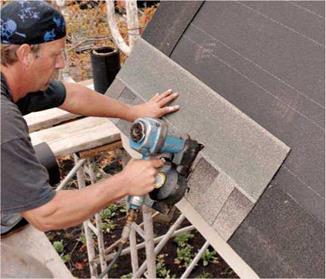
Because pneumatic nailers can easily blow nails through shingles, some codes specify hand nailing. And it’s safer to hand nail the first five or six courses along the eaves, where stepping on a pneumatic hose could roll you right off the roof. Wear goggles when using nailers. Those concerns aside, pneumatic nailers are great tools if used correctly. Here’s how:
► Don’t bounce-fire a nailer till you’re skilled with it. (To bounce- fire, you hold the trigger down and press the nailer’s nose to the roof to fire the nail.) Shingles must be nailed within a small zone—below the sealer strip but above the cutouts, if any—and it’s hard to hit that zone if the nailer is bouncing around. Instead, position the nailer nose where you want it, and then pull the trigger.
► Trigger-fire the first nail of every shingle. Do this to keep shingles from slipping, even if you’re skilled with pneumatic nailers. Once the first nail is in, you can bounce-fire the remaining ones.
► Hold the nailer perpendicular to the roof so nails go in straight, and keep an eye on nail depth as the day wears on. Nail heads should be flush to the shingle; if they’re underdriven or overdriven, adjust the nailer pressure.
|
|
► Nailing schedule: four nails per shingle is standard; six nails for high-wind areas. Trimmed-down shingles must have at least two nails. Place the first and last nails in from the edges at least 1 in. All nails must be covered by the shingle above.
INSTALLING SHINGLES IN A PYRAMID PATTERN
|
|||
|
|||
|
|
||


There are many ways to lay out and install shingles. If you’re installing laminated shingles, a pyramid pattern is best. With this method, you precut a series of progressively shorter shingles, based on some multiple of the offset dimension. Because each successive course is, say, 5 in. or 6 in. shorter, the stepped pattern looks like a pyramid. Typically, pyramids start along a roof edge, with the first shingle in each course flush to the rake starter strip.
Once the pyramid is in place, the job goes fast. Just place a full shingle against each step in the pyramid and keep going. Because the offset is established by those first shingles, you can install full shingles till you reach the other end of the roof. But most roofers prefer to work up and out, maintaining the diagonal. If there are color variations among bundles, they’ll be less noticeable if the shingles are dispersed diagonally.
The frequency of a pyramid pattern’s repeating itself depends on how random you want shingles to look. Traditionally, patterns repeat every fourth course, that is, every forth course begins with a full shingle. Whatever pattern you choose, trimmed pyramid shingles should be at least 8 in. wide; otherwise they’ll look flimsy.
Keeping things lined up. As you work up the roof, align the top of each shingle to a horizontal exposure line. Chalklines wear off quickly, so don’t snap them too far in advance; snapping chalklines each time you roll out a new course of building paper is about right. However, to get the measuring done all at once, you can measure up from that original 12-in. line and use a crayon to mark off exposure intervals along the rake edges on both ends of the roof, and then snap chalklines through those marks later.
Alternatively, if you snap chalklines only every second, third, or fourth course, use the gauge on the underside of your pneumatic nailer or on your shingle hatchet to set exposures for intervening courses. If your shingling field is interrupted by dormers or such, always measure down to that original 12-in. line to reestablish exposure lines above the obstruction. Finally, if the ridge is out of parallel with the eaves by more than % in., stop shingling 3 ft. shy of the ridge and start adjusting exposures so that the final shingle course will be virtually parallel with the ridge.
For example, if there’s a discrepancy of 112 in., then at 3 ft. below the ridge, you’ll need to reduce exposures on the narrow end of the roof by % in. in each of six courses.
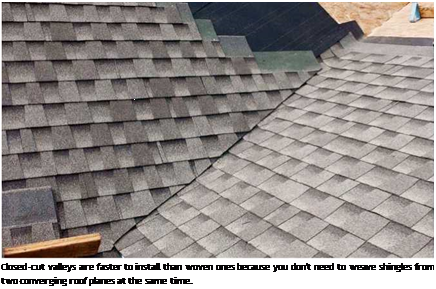
Valleys. Both open valleys (in which metal valley flashing is exposed) and closed valleys should be lined, as described in “Underlayment,” on p. 69. Closed valleys are more weathertight but slower

 to install, so they’ve become less popular. Open valleys are faster to install and better suited to laminated shingles, which are too bulky and stiff to interweave in a closed valley.
Once you’ve installed valley flashing, snap chalklines along both sides to show where to trim overlying shingles. Locate chalklines at least 3 in. back from the center of the valley; oncoming shingles cover valley flashing at least 6 in. When nailing shingles, keep the nails back at least 6 in. from the valley centerline—in other words, 3 in. back from the shingle trim line—so nails can be covered by shingles above. To seal shingle ends to the metal flashing, run a bead of roofing cement under the leading edge of each shingle, and put dabs of cement between shingles. Ideally, you should not nail through the metal at all, but that could leave an inordinately wide area of shingles unnailed. Besides, self-adhering waterproofing membranes beneath the metal flashing will selfseal around the nail shanks.
As a shingle from each course crosses a chalkline, use a utility knife to notch the shingle top and bottom. Then flip the shingle over and, using a straightedge, score the back of the shingle from notch to notch. Or, to speed installation, run shingles into the valley, and then, when the roof section is complete, snap a chalkline along their ends to indicate a cut line. To avoid cutting the metal flashing underneath, put a piece of scrap metal beneath shingle ends as you cut, use a hooked blade in the utility knife, or use snips.
Finally, codes in wet or snowy regions may require that valleys grow wider at the bottom. In that case, move the bottom of each chalkline away from the valley center, at a rate of Z in. per ft.
To install a ridge vent, cut sheathing back at least 1 in. on either side of the ridgeboard. Run underlayment and shingles to the edge of the sheathing. Then nail the ridge vent over the opening, straddling the shingles on both sides. In most cases, the ridge vent is covered by cap shingles. Because shingles folded in this manner tend to split over time, it’s wise to double them.
Chapter 14 offers more information on ventilation. But, in brief, you need a minimum of 1 sq. ft. of ventilation per 300 sq. ft. of roof surface. Install half the vent area as soffit vents on the underside of the eaves, and half as ridge vents. For example, if the roof surfaces total 2,500 sq. ft., vent surfaces should be 2,500^300, or 8.33 sq. ft. Ridge vents would therefore be half that, or 4.16 sq. ft. Your building supplier can explain the calculations, but 4.16 sq. ft. corresponds roughly to 33 lin. ft. of ridge vents, based on net free vent area (NFVA) charts.


Leave a reply