Category A HOUSE

Installing panels around windows, doors, outlets, and vents

Strips of undersill trim must be installed beneath windowsills. This special trim covers the horizontal edge of a siding panel and locks the panel in place. Cut each trim piece to fit between the two side J-channels, then nail it flush against the underside of the window. If the panel beneath a window needs to be notched

STEP 6 INSTALL THE SIDING PANELS

Thanks to the work you did in the previous step, panel installation can go quickly, especially when you have a good-size crew, as we did on this job. The first panel course is always the bottom-most course. Start against the corner on one side of the house (preferably the back corner). Pull up the first panel, snap it into the starter strip, and slide the end of the panel under the corner trim’s top edge. Keep the panel seated in the starter strip as you drive nails into each stud. The nail heads should be Мб in. proud of the flange. Don’t drive nails at the edge of a slot or through the vinyl itself. If the prepunched slot is not centered over a stud, lengthen the slot with a utility knife or a slot-punch tool.

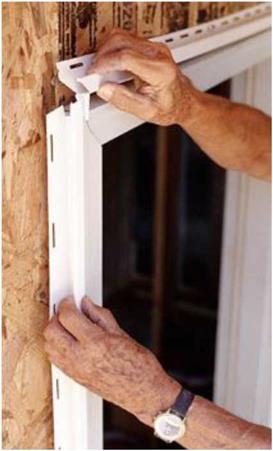
STEP 6 INSTALL THE SIDING PANELSПодпись: Trim around a door. J-channel trim is nailed around the window and door frames, with a tab in the top piece bent to fit around the corner.Подпись: The work goes quickly. With a Habitat-size crew, this siding job moves along at a good pace. Short offcuts from one side of the house can often be used elsewhere to minimize waste. Once the panel is nailed in position, check whether you can slide it back and forth manu­ally. If the panel won’t slide, find out where it’s getting hung up and fix the problem. After you’ve checked that the panel is free to move, you can, if you like, nail it fast near the middle. Some builders prefer this technique, which

Some volunteers prefer contrast between the white cor­ner trim and the brown siding, whereas others aren’t sure whether it looks attractive.

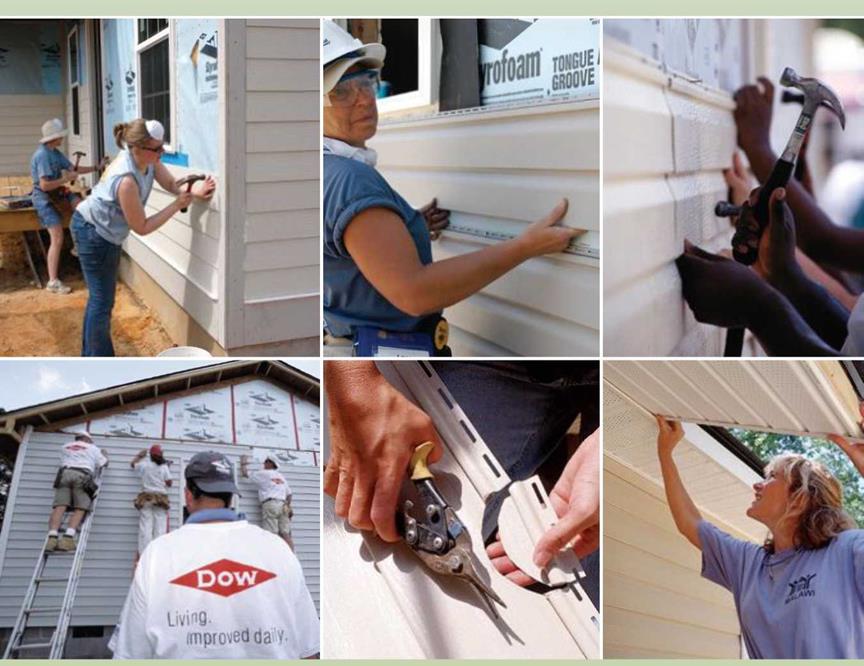
We install siding panels from the bottom up.

Each new course of panels snaps onto the one below.

You can’t drive the nails hard against the vinyl because it needs to move.

With snips and utility knives, we measure, trim, and cut to fit around windows, doors, outlets, and vents.

The vinyl soffit panels are filled with small holes so that air can pass into the attic space.

They finish off the eaves nicely.

STEP 6 INSTALL THE SIDING PANELS

Photos top row and bottom left courtesy HFHI


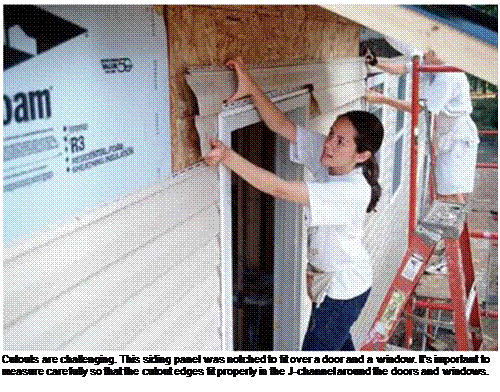
Подпись: Turn the blade backward! For smoother, shatter-free cuts in vinyl siding, use a fine-tooth paneling blade in a circular saw and turn the blade so that the teeth face backward. The same backward rule applies if you're using a chopsaw or radial-arm saw to cut vinyl siding.Подпись: Cutouts are challenging. This siding panel was notched to fit over a door and a window. It's important to measure carefully so that the cutout edges fit properly in the J-channel around the doors and windows.

encourages the panel to expand and contract equally in both directions.

The clearance between the end of a panel and the inside edges of the trim pieces depends on the temperature. If it’s over 90°F when you install the siding, leave the panel end about 14 in. away from the trim piece’s inside edge. If it’s less than 30°F, leave a good Vi in. of clearance at each end so there’s room for heat-induced expansion. For temperatures between these two extremes, gauge accordingly.

Cutting and lapping panels

When you come to an opening or reach the end of a wall, cut a panel to fit. Remember always to leave room for expansion. Cut panels to length with a tablesaw, as described earlier using a circular saw with the blade in back­ward. You can also crosscut with a radial-arm saw, a sliding compound-miter saw, a utility knife, a hacksaw, or even tinsnips. Plan each siding cut so that the cut ends are hidden in the corner posts, in the J-channel trim, or by the factory edge of an overlapping panel. Panels that join within a course should overlap by at least 1 in.

You’ll notice that the nailing flange on a siding panel is cut back about 1 in. from the end of the panel. When two panels join each other in the same course, their nailing flanges should never butt together on the wall. When necessary, cut back the nailing flanges so that those in the same course are separated by at least 1 in.

It’s best to lap the panels between—not on— the studs. Try not to install pieces shorter than 3 ft. long, especially in high-wind areas. And don’t let the overlaps where siding panels meet stack over one another in subsequent courses. Rather, randomly separate these overlaps by two or three studs, so that you don’t create a staircase pattern. The pattern created by the installed vinyl panels should be pleasing to the eye.

Pull each panel up snugly against the lock­ing hem of the previous panel, but don’t stretch it. Panels that were stretched tightly when they
were installed (especially in warm weather) can tear when cold weather causes them to contract. Before moving on to the next row, make sure each panel is free to move back and forth horizontally.

As you proceed upward, measure down from the underside of the trusses to each row to ensure that the siding is remaining level around the building. Vinyl siding can stretch upward and easily become out of level. Some builders snap level chalklines every 2 ft. or so around the building to serve as reference points while they install rows of siding.

TOOLS FOR VINYL SIDING

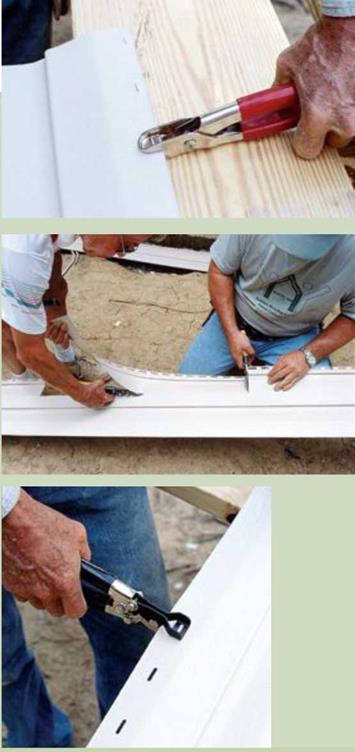
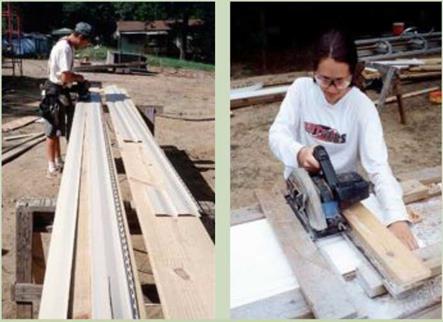
TOOLS FOR VINYL SIDINGA long, flat work surface is essential for vinyl siding and sheet-metal work. A couple of 2×12 boards on sawhorses work fine. For precise 90- degree-angle cuts and angled rake cuts, I suggest making a cutting jig for a circular saw (see the bottom center photo).The jig, which sits on a long worktable, is essentially a wooden cradle that guides the base of the circular saw. The cradle can be positioned at a right angle, or at other angles, to the siding.

Use both right – and left-handed aviation snips to make straight and curved cutouts (see the center right photo); tinsnips are also helpful. Other specialty tools you’ll need include a slot punch, to make nailing slots in siding (see the top right photo); a snap-lock punch, to create crimps or tabs that lock into the finish trim (see the bottom right photo); and a zip tool, in case you need to remove a damaged panel from a wall.

TOOLS FOR VINYL SIDING

Подпись: Don't nail IIP it—hang it. If you remember that most vinyl siding is hung rather than nailed, you'll avoid the common error of driving nails tightly against the siding.

as you install it around the building, and drive your first nail in each piece no less than 4 in. from an end. Remember: The strip must be able to move beneath the nail heads. At a wall’s outside corner, the starter strip must be 1 in. or more from the vinyl corner trim, as shown in the right photo on p. 165. Keep the strip ІУ2 in. to 2 in. from the inside corners.

Corner trim, J-channel, and undersill trim

The corner trim pieces, which receive the ends of the vinyl siding panels, must be installed straight and plumb or they won’t look attractive. Hold a short, cutoff piece of vinyl corner post against the sheathed corner of the house and mark the edge of the flange on both sides of the
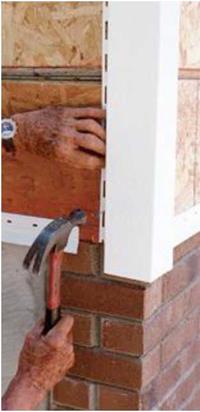
corner at the top and bottom of the wall. Snap a chalkline between the marks. Set a corner post /4 in. to У2 in. down from the soffit, and drive a Р/2-in.-long nail at the top of a slot on both sides of the corner. The corner post hangs from these nails, allowing the vinyl to move. Hold the posts directly on the chalklines and drive nails about every 12 in. in both flanges, down to the bottom of the wall. Keep each nail in the center of its slot. The corner posts should extend /’2 in. to 1 in. below the starter strip.

Most doors and windows have factory-made siding channels. If yours do not, install J-chan – nel along the top and sides of the window to hide the ends of the siding. You can use a miter or a square cut at the top corners. Either way, at the ends of the top piece, leave l-in.-long drain tabs that can be folded down over the window sides. This helps channel water down around the window (see the photo at right).

Starter strips

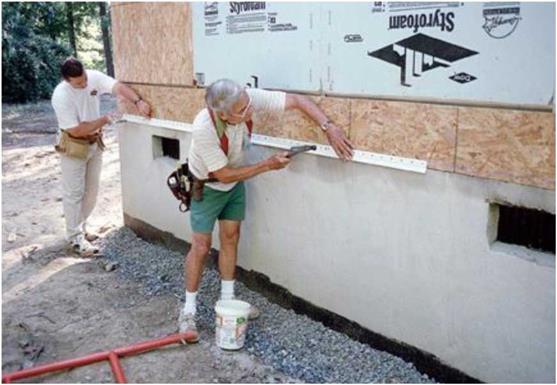
The installation of vinyl siding begins with different trim elements: starter strips, inside corners, outside corners, J-channel, and so on. The various trim details are designed to hide or interlock with siding ends and edges. As with other homebuilding phases, if you get started right, the next steps follow more smoothly. The critical first step is to put on a straight and level
starter strip right above the top of the concrete foundation wall or slab (see the photo above). This strip can usually be installed by nailing through the sheathing and into the bottom of the mudsill or sole plate. The strip’s bot­tom edge can then extend about 1 in. over the concrete.

With a house that is covered with housewrap, it is not always easy to see where to nail the starter strip. One way to establish the exact height of the strip is to measure down from the underside of the joist chords on the roof trusses and mark the proper height at various points around the house. This will ensure that the starter strip is level and equidistant from the top plates. Connect these points with a chalkline all around the house.

On long walls, keep the line from sagging in the middle by having someone hold the line to a height mark near the middle of the wall, then snap the chalkline from the center to both corners.

Starter stripsTo secure the starter strip, drive nails in the center of the installation slots, spacing them ev­ery 12 in. to 14 in. Leave at least /4 in. to lA in. of expansion room between sections of starter strip

STEP 5 INSTALL THE STARTER STRIPS AND THE TRIM FOR VINYL SIDING

The most important thing to keep in mind as you’re installing vinyl siding is that it expands and contracts significantly with tem­perature changes. All siding components and installation details are designed to cope with this temperature-induced movement. Review the installation information discussed through­out this chapter. Make sure you comply with the manufacturer’s instructions that come with the siding. It’s also smart to check with builders

Подпись: Install vinyl trim. Attached along edges and corners, vinyl molding helps secure siding panels and contributes to a nice, finished appearance. Starter strips are installed along the bottom edge of the wall (left). To allow for heat-induced expansion, the end of a starter strip should be at least 1 in. away from the outside corner trim (below).
STEP 5 INSTALL THE STARTER STRIPS AND THE TRIM FOR VINYL SIDING

in your area for any local wisdom. This is the best way to avoid the bulges, buckles, and tears that can result from incorrect installation. Most vinyl siding should not be nailed firmly against sheathing. The installation slots in the siding, starter strips, and other vinyl components are there for a reason. Keep the nail heads proud of the vinyl so that the vinyl can move.

The tools you need to install vinyl siding are mostly tools you probably already own, but there are a few others you’ll need to either buy or make (see the sidebar on p. 166). These tools are also handy for the sheet-metal work we’ll tackle later in the chapter.

STEP 4 COMPLETE VENTILATION AND ELECTRICAL WORK

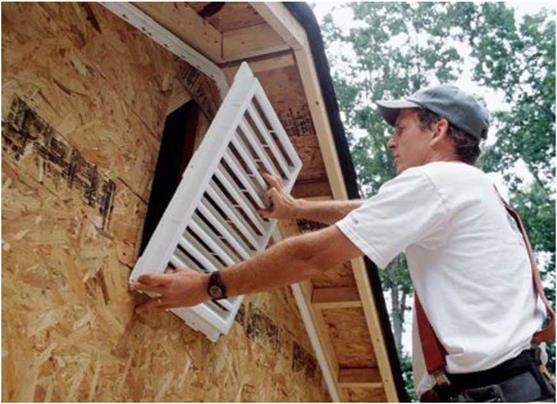
Before you install the siding, soffits, and exterior trim, it’s important to resolve some ventilation and electrical details. For example, this house has a rectangular attic vent centered beneath the ridge in each gable-end wall. If you chose to sheathe the gable-end truss on the ground, this is the logical place to cut the hole for the vent.

If the hole hasn’t been cut yet, do so now, then install the vent (see the photo on p. 161).

Referring to your house plans, an electrician will be able to locate any outlet boxes that need to be installed in the exterior walls. Outdoor receptacles are placed at convenient locations; the same is true for outdoor lights.

This is also the time to cut the hole for the dryer vent. A standard dryer vent requires a 4-in. hole; it’s usually placed in the laundry room, at the back of the dryer near the floor. There are several ways to cut a vent hole.

The easiest way is to use a 4-in.-dia. hole saw (borrow one from the plumber, if possible). Otherwise, mark the vent location with a 4-in.-dia. circle, drill a 3/4-in. hole along one edge, then cut out the circle with a keyhole saw, a jigsaw, or a reciprocating saw. Just make sure you are above the bottom plate and baseboard and away from the end stud. There shouldn’t be any electrical wires down this low, but check to make sure. Insert the vent pipe through the wall, then attach the vinyl trim cover.

Be sure to seal around the vent on both the inside and the outside to keep cold air and moisture from entering the house. Vent pipes can become plugged with lint after years of use. I unplug ours by cleaning out the pipe with a broom handle and then using the vacuum cleaner.

Passive and active air vents

After all our efforts to ensure that our houses are tight and energy efficient, you need to ask yourself this question: Is there enough fresh air in the house? The answer is, well, maybe. If you
live in the sunny south where windows can be kept open year round, then lots of fresh air can enter into your living spaces. I was born in west­ern Nebraska, where Wyoming winter winds coming out of the north blew right through our house. No problem having sufficient air under those conditions. The problem is that open windows or poorly insulated houses mean high energy costs.

There are both passive and active ways to bring outside air into a closed house (see Resources on p. 279). A passive vent can be installed through the wall. Every time a bath or kitchen exhaust fan is turned on, fresh air is drawn in through this vent and into the house.

Active vents can also be placed through the walls. They come equipped with a fan that draws in fresh air from the outside. It’s a good idea to place these vents away from the kitchen or bath exhaust fan unless you want the odors from these rooms wafting throughout the house.

These devices can also be set on a timer to operate only when occupants are at home. No need to run them when you are away breathing someone else’s air.

Fresh air in the house is a serious matter.

To explore more solutions to this problem, I encourage you to consult with your local HVAC contractor to make sure your home maintains good quality air at all times.

MORE SIDING OPTIONS

Подпись: The exterior of the house can be closed in rapidly with sheets of textured plywood or OSB. [Photo by Don Charles Blom] Подпись:MORE SIDING OPTIONS

In addition to vinyl siding, there are three more exterior finishes to consider if you’re interested in affordability, low maintenance, and attractive appearance:

COMPOSITE WOOD. These planks are made the same way as OSB sheathing panels, but they look like solid – wood clapboards or horizontal lap siding when installed. This siding comes with a factory-applied primer coat, and it needs to be painted after installation. Composite-wood planks don’t split, crack, or warp like solid-wood siding does, but they may not be a wise choice in extremely wet climates. These clapboards nail on walls much like cement fiber boards.

STUCCO. Two types of stucco finishes can be applied to house exteriors. Lightweight acrylic-type stucco treatments are available for application over specially prepared foam insulation board. Old-fashioned Portland cement-based stucco can be applied to masonry walls and to wire or stucco lath that’s been fastened to wall sheathing or directly to studs. It’s best to hire experienced professional
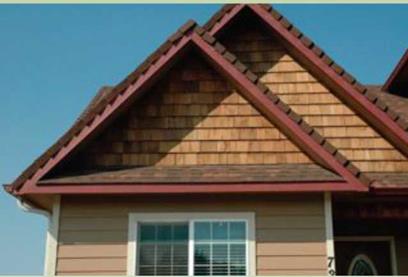
crews to do these treatments. In hot, sunny climates, stucco stands up better than most other siding treatments. SHINGLES. Many houses, especially in coastal areas, have cedar shingles on their exterior walls. Sometimes in Oregon we will shingle the gable ends of a house just to give it a distinctive look. I think it is safe to say that if you can nail composite shingles on a roof you can learn how to nail wood shingles on a wall. You can also buy cement fiber shingle panels that make it easier to cover a gable end or even an entire house

When you use shingles, start by covering the exterior walls with OSB panels and a good housewrap. The courses of shingles can be laid out with a story pole. The first course is doubled just as if they were roof shingles. Check with a local contractor to make sure you are using the right fasteners to nail each shingle in place. In coastal areas you will want to use a nail that doesn’t rust easily.

PLYWOOD OR OSB SIDING. I have been sheathing houses with plywood panels for years. In the past, some of these products didn’t hold up well over time. In wet

Подпись: Windows can be trimmed in a number of ways. Here we are using 1x3s to trim and seal this window. [Photo by Don Charles Blom] Подпись:MORE SIDING OPTIONSclimates, the plywood delaminated. In dry climates, the surface cracked easily and paint peeled off. Houses began to look like the prairie house I lived in during the 1930s.

Pretty shabby.

Texture 1-11, orT1-11, plywood panels come in different sizes and textures. The standard size of these plywood sheets is 4 ft. by 8 ft., with 1/4-in.-wide grooves cut into the face every 4 in., 8 in., or 12 in. These sheets can be purchased with a tex­tured face without grooves and even come in 9-ft. and 10-ft. lengths. These longer lengths allow you to sheathe both an 8-ft. wall and the rim joist with one piece. The same patterns and sizes are available as an OSB product. I actually prefer the OSB panels, called Smartside®, because they come paint-primed on the front side.

I have been using these panels in wet, coastal Oregon on some of the small houses we have built. You can rapidly close in the exterior walls with this material. I always prime the backside and edges before installation.

Installation is straightforward. The panels can usually be nailed directly to the studs once the housewrap is on and the windows are in place. Some people square up the framed
walls on the floor and nail on sheathing before standing the walls upright.

The siding needs to extend down over the foundation 1 in.

I begin by snapping a chalkline 1 in. below the bottom sill plate all the way around the house. Start from the corner that has a 4 ft. o. c. stud layout. Use a level to make sure this first panel is nailed on plumb and level directly on the chalkline. Get this first one right and all the following panels will install easily. I like to nail off the sheets with 7d or 8d galvanized ringshank nails. Nail each panel every 6 in. around the perim­eter and every 12 in. out in the field.

Make your measurements and cuts within 1/8 in. to 1/4 in. around windows, doors, electrical outlets, or dryer vent. Before nailing these panels in place, run a bead of good exte­rior caulk around the openings and under the sheathing. Once the sheets are nailed in place, fill any gap between the panel and the window or door frame with caulk to help prevent wa­ter from entering at these points.

Trim forT1-11 or OSB sheeting is rather simple. Use roughsawn 1x4s to cover the outside corners and full 1-in.-sq. stock ripped from a 2×4 on the inside corners. Use frieze blocks between rafters when they are exposed, and 1x3s or 1x4s to trim around the windows and doors.

Подпись: Take care when cutting cement- fiber boards. They no longer have asbestos in them, but they do have silica. You definitely don't want to inhale that stuff, so get yourself a pair of electric shears that won't create dust (see Resources on p. 279)You can also buy circular saws that have dust catchers. These saws can be hooked to a shop vacuum that will catch almost all of the dust.

STEP 3 SET THE WINDOWS AND DOORS

The setting process anchors the windows and doors in their final positions. Complete instal­lation happens later, when we move inside the house and work on the interior trim. The windows and doors used in affordable hous­ing are mainly vinyl and vinyl clad, though aluminum-clad frames are still installed in some areas. Some codes require that window frames be clad with white vinyl; check with your local building department. Dark-colored vinyl absorbs more solar heat and, as a result, tends to deteriorate faster. On the other hand, dark-colored aluminum cladding holds up well in sunny areas.

Both vinyl and aluminum-clad windows come with a nailing flange on the outside of the window frame; the flange greatly simplifies the installation process. The most popular styles are single hung (the bottom sash moves up and down), double hung (both sashes move up and down), and sliding (one sash slides to the side). Windows with a built-in J-channel, or channel surround, make it easy to hide the ends of vinyl and other siding without the use of extra trim.

Windows in affordable houses should defi­nitely be double-glazed. The heat loss and gain through single-glazed windows is considerable. In very cold or very hot climates, windows with low-E coatings offer even more energy savings. For more information on energy-efficient glaz­ing, see Resources on p. 279.

Setting a window

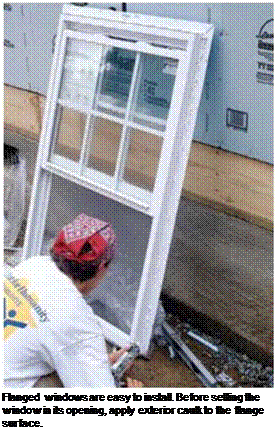
Flanged windows are the easiest windows to in­stall, but windows that come with exterior trim instead of flanges are fairly easy as well. The main difference is that you nail through the exterior trim instead of through the flanges. No matter which type of window you use, it’s good to have two people for this job—one inside the house and one outside. There are three basic steps involved in setting a window:

not to damage the vinyl frame by hitting it with your hammer. When I’m building in rainy climates, I make one more seal all around the windows by running a strip of waterproof tape over the flange and onto the housewrap. It may be overkill, but who wants to tear off siding to repair a leaky window in the middle of a rainstorm?

Setting a prehung exterior door

Подпись:Подпись: Plumb the frame with a level. Before nailing the flange to the wall, fine-tune the window's position so the side of the frame is plumb.STEP 3 SET THE WINDOWS AND DOORSПодпись:Exterior doors are often prehung units that include jambs, a threshold, and wood exterior trim. I buy doors predrilled for both the house lockset and the deadbolt. Given the option, I also choose a door with a double-glazed glass window to bring more light into the house.

1. Make sure there is a [2]/8-in. gap between the door and the door frame.

If you live in a high-wind area, help protect your home by cutting pieces of plywood to fit over every window and store them in your garage. When the big blow comes you can screw these pieces in place over the windows.


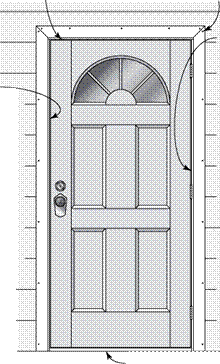
Take note of which way the plans say the door should open, and make sure the door you or­dered swings the right way (see the illustration at right). Most exterior doors open inward. Also, make sure the door jamb is the proper width for the wall. A 2×6 wall takes a wider jamb than a 2×4 wall does. There are four basic steps involved in setting a prehung door:


WHICH WAY DOES THE
DOOR SWING?


Stand here with your back to the door hinges.


1. Flash the doorsill. The sides and top of the rough opening can be flashed in the same way as a window. With an exterior door, sill flashing is essential if you want to prevent rot beneath the threshold. I prefer to use 12-in.- wide aluminum flashing for this application, though heavy tar paper also works well.

Cut the flashing about 6 in. longer than the width of the rough opening so it can cover


Most suppliers use the above method to determine which way a door opens.


the threshold area completely and extend several inches up each trimmer stud. Cut the flashing as necessary to create ears that fold onto the subfloor and over the exterior wall sheathing. You can keep the flashing in place with a few galvanized roofing nails.

2. Test-fit the door. When working with a prehung door, your primary concern is to set it so that it opens and closes with ease. Fortunately, this is pretty easy to do. Once you’ve removed any materials used to protect the door during shipping and any device used to hold the door secure in its jamb, check the fit of the door in its opening. It should fit easily (see the top photo on the facing page).

3. Set the door in place. Run a bead of sealant on the back of the door trim and a couple of heavy beads across the bottom of the rough opening on the flashing where the threshold will sit. Then set the frame in its opening. From the inside, adjust the frame so that there’s a gap of about ‘/s in. all the way around the door. This will allow the weatherstripping on the door frame to seal properly. Secure the door in the opening by


STEP 3 SET THE WINDOWS AND DOORS

Exterior wall


3. Nail through the jamb into the trimmers above and below the hinge locations. Insert shims as necessary to keep the jamb straight. Use 8d finish nails or 2-in.


4. Nail through the jamb on the lock side, using shims to keep the jamb straight. Keep nails out of the lock and deadbolt area.

Set all nails or countersink screws, then fill recesses with wood putty.


screws


5. Drive long screws (provided with the door) through the hinges and jamb and into the trimmer.


Threshold


Keep checking as you work to make sure the door opens and closes with ease.


STEP 3 SET THE WINDOWS AND DOORSSTEP 3 SET THE WINDOWS AND DOORSSTEP 3 SET THE WINDOWS AND DOORSSTEP 3 SET THE WINDOWS AND DOORS

Подпись: Test the door. Prehung doors come with jambs, a threshold, and exterior trim. Before installing the unit, I tilt the frame into the opening to make sure the fit is right.

driving a 16d finish nail through each corner of the exterior trim and into the sheathing and studs. (Alternatively, you can drive 3-in.- long trim-head screws.)

4. Finish fastening the door. Check the door again to see that it opens and closes with ease. If it does, then drive more 16d finish nails (or screws) 2 ft. o. c. all the way around the trim. Set all nails or screws about У) in. below the surface of the wood so they can be hidden by putty and covered with paint. Drive 8d finish nails or 2-in.-long screws through the hinge side of the jamb and into the trimmer near each hinge. If the jamb is not tight against the trimmer, slip in a shim to prevent the jamb from bowing. Shim and nail through the jamb on the lock side next, but be sure to keep nails away from the lock and deadbolt area. Finally, drive the long screws that are included with the door frame through the hinges and the jamb and into the trimmer. These help hold the entire assembly in place.

STEP 3 SET THE WINDOWS AND DOORSInstall the attic vent. Vinyl siding panels can’t be installed until the vents, outlet boxes, and other wall elements are in place. This vent has flanges for easy installation. House – wrap and flashing go on before final installation.

STEP 2 INSTALL THE HOUSEWRAP AND FLASH OPENINGS

Covering the wood house frame with house – wrap, a thin protective layer, is the next step be­fore finish siding is applied. You can use the old, reliable housewrap—rolls of 30-lb. felt paper, or you can try one of the modern housewraps, such as Tyvek®, Barricade®, and Typar®. These are lightweight, fabric-like materials that come in rolls and are literally wrapped around the walls of a house. The main purpose of this treatment is to form a drainage plane behind the siding to stop wind-driven water from penetrating into the wall cavity. No siding is completely water­tight, so in areas where hard, wind-driven rain is common, housewrap can help protect the walls from moisture damage. However, house – wrap is not a replacement for good flashing around doors, windows, and decks. Rather, it adds to those flashing systems, with upper layers

2 x scaffolding planks need to be strong

and safe to use. Try reinforcing these boards by drilling a %-in. hole through the plank edge about 8 in. from each end. Insert and tighten a %-in. bolt with a washer on each end through the holes. This will help keep the plank from splitting.
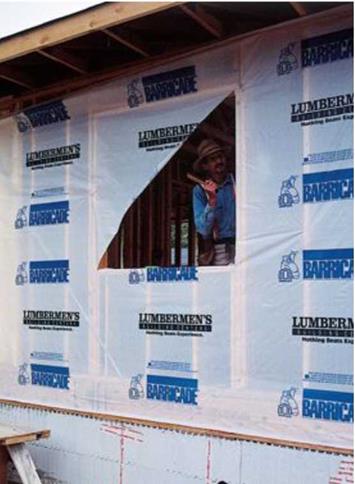
STEP 2 INSTALL THE HOUSEWRAP AND FLASH OPENINGSalways overlapping lower layers like shingles on a house. In addition to helping keep water out, housewrap reduces air leakage but is porous enough to allow water vapor to escape from inside the house.

Climate plays a huge role in determining how housewraps are used. We live in a coun­try with an astonishing diversity of climates, and these varied conditions require different solutions for protecting a house and its inhabit­ants from the elements. Even the type of wall covering you use can affect your wrapping strategy. Talk to builders in your area (and to the building inspector) to find out what’s used locally and why.

Installing housewrap

Housewrap may be attached directly to studs, on top of wall sheathing, or over rigid foam. Modern plastic housewrap is usually white or gray and comes in different widths and lengths. Don’t plan to install housewrap on your own; this is definitely a two – or three – person job. The only installation tools required
are a staple gun and a sharp utility knife. Here are the basic steps:

1. Cover the inside and outside corners. This is an optional step, but one that I routinely take to provide extra protection in these critical areas, especially if the siding will be installed directly over the studs. Fold a 2-ft.-wide wall-high length of wrap in half and staple

it vertically over the outside corners and into the inside corners.

2. Wrap the house from corner to corner. A 9-ft.-high roll usually fits just right on houses with 8-ft. studs. Staple the free end of the roll near a corner of the house and unroll it over the entire side of the house, with one

or two helpers stapling as you go. Cover the window and door openings. When you’ve finished one side, simply keep rolling onto the next one until you’ve made your way all around the house.

3. Seal joints and repair tears, if necessary. Hopefully, you can skip this step. But if you can’t create a continuous wrap around the house, make sure you overlap the wrap by at least 16 in. or one stud space. Seal the seam with the sticky, self-adhering tape made for this purpose. Be sure to get some when you pick up (or take delivery of) your housewrap. Repair a tear in the housewrap by applying a patch from the top of the wall down over the tear, so that water will drain properly. Seal the tear with tape.

4. Cut and wrap the window and door openings. To finish the installation, cut an “X”-slice in the housewrap over each window and door opening, then pull the cut ends inside the house and staple them around the trimmers, header, and rough sill. Staple the flaps right away so they don’t get caught by the wind and torn.

Подпись: Housewrap is shiny and slick. When installing house- wrap on a bright day, wear sunglasses to protect your eyes from the glare. When leaning a ladder against a wall covered with house- wrap, use rubber pads on top of the ladder and take care to position the ladder securely, because house- wrap can be slippery.Подпись:Housewrap helps to keep wind and water out. Modern housewraps can be applied over sheathing or directly over framing, as was done here. After wrapping the walls completely, make “X” cuts at the window and door openings, then fold and staple the flaps inside. [Photo © Memo Jasso]

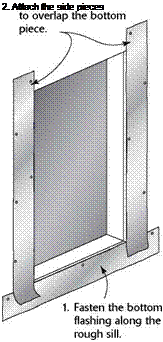
Подпись: old fashioned housewrap is easy to install. Asphalt- impregnated paper, known as builder's felt or felt paper, has been around for generations. If you use felt paper instead of plastic, buy a heavy, quality product and apply it starting at the bottom of the house and working upward. Make sure each successive course laps over the previous one by 4 in. horizontally and 6 in. or more vertically (where the ends meet).Подпись: FLASHING A WINDOWПодпись: 2. Attach the side pieces Подпись:Simple flashing details

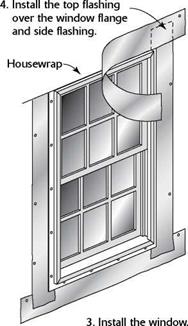
Whether or not you wrap the house, it’s impor­tant to flash around the window and door open­ings. Especially with windows, proper flashing can prevent the water that runs down both sides of the window from entering the wall cavity through the sill area. To flash window and door openings, I generally use 6-in.- to 8-in.-wide strips of felt paper, installing the strips as shown in the illustration below. Don’t forget to install the top piece of flashing after the window has been set in its opening. If housewrap is used, you can still install a top piece of flashing. Cut a horizontal slit in the housewrap above the win­dow, then slip the top edge of the top flashing piece into the slit.

STEP 2 INSTALL THE HOUSEWRAP AND FLASH OPENINGS

HOW TO ORDER VINYL SIDING

Horizontal siding panels are usually 12 ft. 6 in. long, though some companies make longer panels. Siding is sold by the square, or the number of panels needed to cover 100 sq. ft. To estimate how many squares of siding you’ll need, calculate how many square feet of wall surface you need to cover, add 10 percent for waste, then divide by 100.

Order enough starter strips to go around the entire building; these typically come in 10-ft. lengths. You’ll also need trim for each inside and outside corner. You can order trim pieces that are the same color as the siding or use a contrasting color, as we did on this house.

If the windows didn’t come with an integral J-channel, or chan­nel surround, then order enough J-channel to cover the top and the sides of all the windows and doors. J-channel is also used along the rake and soffit, as shown on p. 152.You also need to order enough undersill trim to go below each window and to cap the top edge of the last piece of wall siding on the eave walls, which is how they are often finished.

Large-head, 11/2-in. to 2-in. galvanized nails are used to attach both the siding and the trim. A 50-lb. box should be adequate for a small house. Finally, don’t forget about the vinyl soffit panels for closing in the area under the eaves. As shown in the following pages, soffit panels may require J – or F-channel trim.

SAFE SCAFFOLDING KEEPS YOU OUT OF HARM’S WAY

On single-story construction, most scaffold work can be done with good sawhorses and good planks. Make sure the planks you choose have a solid, even grain and small, tight knots. If a plank breaks, a fall of only a cou­ple of feet can put you out of commission for a while. And just because you buy good scaffold planks today doesn’t mean that they will be safe to use a year from now, especially if they’re left out in the elements. I pre­fer to use manufactured decking planks made of steel and aluminum. They are more expensive, but they make a more secure working platform.

When you have to work higher up, you’re better off buying or renting solid-pipe scaffolding. These 6-ft.-high units are easy to set up, and they create a 5-ft. by 8-ft. working platform. Make sure the legs are set on a firm foundation and not just on bare earth. Pipe-scaffolding units can be stacked on top of each other for working on a two-story building. If you will be working more than


10 ft. high, ask for guardrails, which are easy to install and help protect you from an accidental fall.

Some builders like to use pump jacks and ladder jacks as an alternative to pipe scaffolding. Available at most sup­ply houses, these jacks are useful when installing sheath­ing, housewrap, or siding. Used in pairs, pump jacks attach to double 2×4 or single 4×4 (31/2-in.) posts that are held upright with braces temporarily nailed to the roof or to the wall framing. Each pump jack can move up and down on its post to adjust the elevation of the work platform.

If you’re using pump jacks, make sure the units come with a built-in guardrail that protects you from falling backward. Make sure the uprights rest on a solid base and not on bare earth. Ladder jacks are steel brackets that hook on the rungs of ladders. Once the brackets are se­cured to a pair of ladders, you can set planks on the brack­ets. If you want to move up and work at a higher level, you must remove the planks and reposition the brackets.


The walls look strange covered with foam boards and wood panels.

Vinyl siding will be a big improvement.

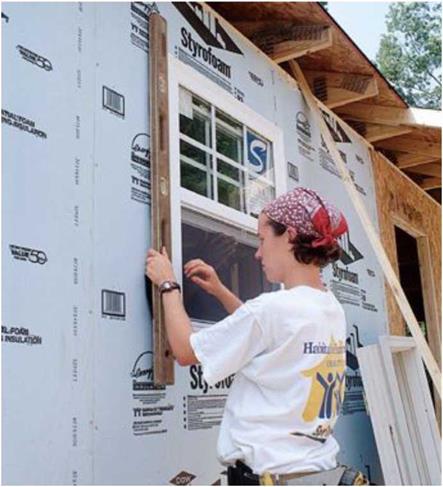
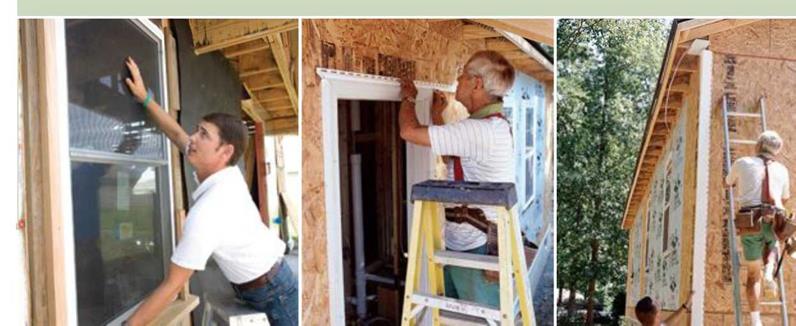
All the windows must be installed before the siding goes on.

It takes teamwork to get the window frame into its opening and centered properly.

Vinyl starter strips and different kinds of trim must be nailed in place before we install the siding panels.


HOW TO ORDER VINYL SIDING

Подпись: ІШІШІШШІІШШШІІШШШШШШШІШШШШШШІІШШШШШІШІШШІШШШШШШШІШІШШШІІШШШШІШІШІШШІІІ Подпись: HABITAT HELPS NEW HOMEOWNERS CONTINUE LEARNING Providing a family with four walls and a roof is just the first step in helping them get established. Here at the Twin Cities' affiliate, we also aim to equip families with knowledge, so that they become successful homeowners. Because Habitat families are first-time homebuyers, most are unfamiliar with the basic maintenance, repair, and budgeting responsibilities that come with homeownership. To bridge this information gap, we provide more than a dozen different classes. Many classes emphasize that “an ounce of prevention" helps protect a family's investment and reduces long-term costs. Basic maintenance classes describe how a house works from top to bottom and explain how (and why) to turn off outdoor faucets, clean out window wells, drain sediment from the water heater, test fire alarms, and check for excessive moisture in the attic. Habitat homebuyer classes cover more than just caring for the physical house, however. Three money-management classes cover everything from basic budgeting to the pitfalls of credit cards to teaching children how to use money wisely. Other classes cover topics such as poisonous household products, city ordinances that affect property, block clubs, safety, and crime prevention. Because Habitat has a commitment to environmental stewardship, our classes also cover recycling; ecologically friendly (and economical) practices, such as making cleaning products from natural ingredients; and energy and resource conservation. These practices often seem like common sense to homebuyers who have come from countries without the wealth of natural resources we enjoy here. And while they learn new ways of doing things in class, Habitat families often share old traditions as well. —Cheryl Winget і и їм їм MI и їм їм MI и їм їм MI и їм їм їм MI и їм їм MI и їм їм MI и їм їм їм MI и їм їм MI и їм їм MI и їм їм MI и їм їм їм MI и їм їм MI и їм їм MI и їм їм MI

Exterior trim

Aluminum-clad exterior trim goes well with vinyl siding because, like vinyl, it’s also a no­maintenance finish treatment. Aluminum sheets have a factory-applied finish and come on large rolls in various widths. Often referred to as coil aluminum, this sheet material is bent at the job site to fit around exterior trim boards.

To prep for this treatment, rough fascia boards (also called gutter boards) are nailed to the ends of the roof trusses and to the rafter tails on the roof extension above the side door (see the photo on p. 154). Some of these trim details are covered in Chapter 5 and should be com­pleted before the roof is sheathed and shingled. Other trim details, such as the boxed gable-end return shown on p. 173, can be done as the alu­minum cladding goes on.