STEP 2 INSTALL THE HOUSEWRAP AND FLASH OPENINGS
Covering the wood house frame with house – wrap, a thin protective layer, is the next step before finish siding is applied. You can use the old, reliable housewrap—rolls of 30-lb. felt paper, or you can try one of the modern housewraps, such as Tyvek®, Barricade®, and Typar®. These are lightweight, fabric-like materials that come in rolls and are literally wrapped around the walls of a house. The main purpose of this treatment is to form a drainage plane behind the siding to stop wind-driven water from penetrating into the wall cavity. No siding is completely watertight, so in areas where hard, wind-driven rain is common, housewrap can help protect the walls from moisture damage. However, house – wrap is not a replacement for good flashing around doors, windows, and decks. Rather, it adds to those flashing systems, with upper layers
2 x scaffolding planks need to be strong
and safe to use. Try reinforcing these boards by drilling a %-in. hole through the plank edge about 8 in. from each end. Insert and tighten a %-in. bolt with a washer on each end through the holes. This will help keep the plank from splitting.
 always overlapping lower layers like shingles on a house. In addition to helping keep water out, housewrap reduces air leakage but is porous enough to allow water vapor to escape from inside the house.
Climate plays a huge role in determining how housewraps are used. We live in a country with an astonishing diversity of climates, and these varied conditions require different solutions for protecting a house and its inhabitants from the elements. Even the type of wall covering you use can affect your wrapping strategy. Talk to builders in your area (and to the building inspector) to find out what’s used locally and why.
Housewrap may be attached directly to studs, on top of wall sheathing, or over rigid foam. Modern plastic housewrap is usually white or gray and comes in different widths and lengths. Don’t plan to install housewrap on your own; this is definitely a two – or three – person job. The only installation tools required
are a staple gun and a sharp utility knife. Here are the basic steps:
1. Cover the inside and outside corners. This is an optional step, but one that I routinely take to provide extra protection in these critical areas, especially if the siding will be installed directly over the studs. Fold a 2-ft.-wide wall-high length of wrap in half and staple
it vertically over the outside corners and into the inside corners.
2. Wrap the house from corner to corner. A 9-ft.-high roll usually fits just right on houses with 8-ft. studs. Staple the free end of the roll near a corner of the house and unroll it over the entire side of the house, with one
or two helpers stapling as you go. Cover the window and door openings. When you’ve finished one side, simply keep rolling onto the next one until you’ve made your way all around the house.
3. Seal joints and repair tears, if necessary. Hopefully, you can skip this step. But if you can’t create a continuous wrap around the house, make sure you overlap the wrap by at least 16 in. or one stud space. Seal the seam with the sticky, self-adhering tape made for this purpose. Be sure to get some when you pick up (or take delivery of) your housewrap. Repair a tear in the housewrap by applying a patch from the top of the wall down over the tear, so that water will drain properly. Seal the tear with tape.
4. Cut and wrap the window and door openings. To finish the installation, cut an “X”-slice in the housewrap over each window and door opening, then pull the cut ends inside the house and staple them around the trimmers, header, and rough sill. Staple the flaps right away so they don’t get caught by the wind and torn.
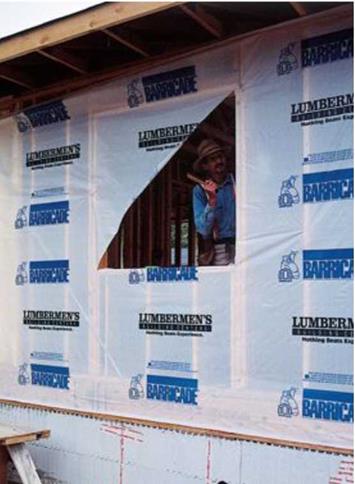
 Housewrap helps to keep wind and water out. Modern housewraps can be applied over sheathing or directly over framing, as was done here. After wrapping the walls completely, make “X” cuts at the window and door openings, then fold and staple the flaps inside. [Photo © Memo Jasso]
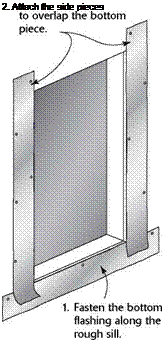
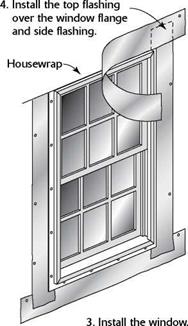
Whether or not you wrap the house, it’s important to flash around the window and door openings. Especially with windows, proper flashing can prevent the water that runs down both sides of the window from entering the wall cavity through the sill area. To flash window and door openings, I generally use 6-in.- to 8-in.-wide strips of felt paper, installing the strips as shown in the illustration below. Don’t forget to install the top piece of flashing after the window has been set in its opening. If housewrap is used, you can still install a top piece of flashing. Cut a horizontal slit in the housewrap above the window, then slip the top edge of the top flashing piece into the slit.
|
|


Leave a reply