Posted by admin on 12/ 11/ 15
While the cost of fixing wet basements and adding bathrooms can add up quickly, energy upgrades can be folded in without putting projects out of reach. In fact, they don’t really cost that much more because they’re integral to the decisions and choices made in the renovation process.
If you consider your renovation from a whole-house approach, you might find that you can add modern conveniences (an extra bathroom, bedroom, or office space) and comfort without building an addition, and reduce energy costs in the process. The basement and attic are already built; you just need to use them. By adding rooms in the basement and attic, you often can reconfigure the floor plan to accommodate an extra bathroom, a larger kitchen, or a master suite.
Replacing the furnace, the boiler, or the HVAC system might cost $10,000 before you are done. But the upgrade could easily save $1,000 a year in heating and cooling costs. Even in simple payback terms, this new system would pay for itself after 10 years. Amortized into a 30-year mortgage, it costs $27 per month; the savings works out to $83 per month for a net gain of $56 per month. Because we know energy costs are rising, these numbers will only get better.
Case Studies Illustrate Real-World Challenges
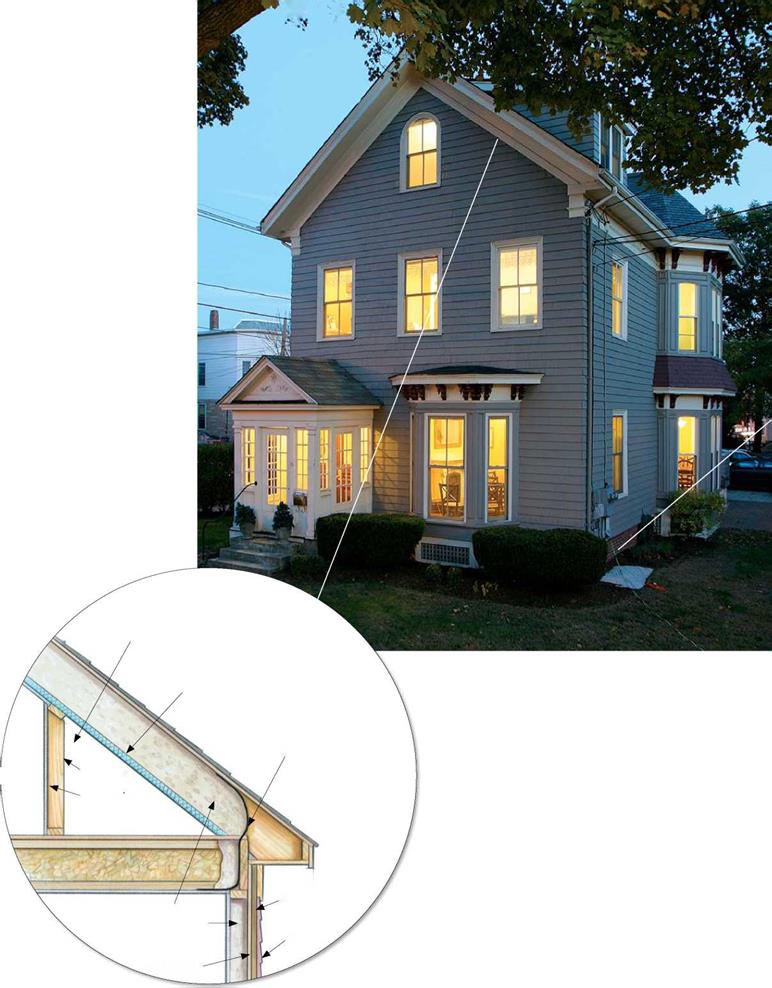
The three homes featured in this chapter have several things in common. First, they are all more than 90 years old. Two of them were built in 1860 and the third in 1916. Second, they all had their major systems totally replaced: new wiring, light fixtures, plumbing, and mechanical systems, including the addition of central air-conditioning. Third, they all had attic spaces that were incorporated into the living space of the house by moving the insulation from over the second-floor ceiling to under the roof. Fourth, they all had insulation added under
Seven Steps to Net-Zero Energy Use
n renovating old homes into superefficient ones, there is a definite path to success: Start where you can get the most bang, and work your way down the list. After you get past item 5, the house will be efficient enough to downsize the mechanical equipment, which you replaced in step
1. If you’re planning to go at least through step 5, keep that in mind before buying a new boiler or HVAC unit.
1. Upgrade the mechanical systems
An old furnace or boiler is often the worst energy user in an old house. Many houses built prior to 1920 still have old coal-fired boilers that were converted to gas or oil. These units are workhorses, but use a lot of energy. A new furnace or boiler can save energy dollars right away. Replacing window air conditioners, which we did in all these houses, with a central system also can save energy right away, as long as the ductwork has been placed in the conditioned space. Solar water heating is a good option to add here if you can afford it, but at the very least, upgrade the efficiency of hot-water production by coupling the tank to the boiler.
2. Bring the basement and crawlspace inside the house
Warm, dry basements and crawlspaces can extend living and storage space. Wet basements are the source of high humidity levels and discomfort in the summertime in old houses. They also can be the source of mold growth that gets distributed around the house. Spray foam is a fast, effective way to bring these areas into the conditioned space while sealing the leaks between foundation and floor framing.
3. Superinsulate and air-seal the roof
If air leaks in at the bottom of the house, it leaks out at the top, which makes a house cold and drafty in winter. A poorly insulated roof also can make a house hot in summer. Airsealing is a by-product of good insulating, so it’s really a one – step process. Using spray foam under a roof also can eliminate the need for roof venting, which is tricky in complicated roofs.
4. Replace the windows
With the bottom and top of the house sealed and insulated,
a new basement slab, as well as insulation applied to the inside of the exterior foundation wall. Fifth, they all had at least some windows replaced, and all had new window openings added in critical areas to provide better views of the yard and better daylighting to the home. Sixth, all the homes had bathrooms and bedrooms added. Finally, we replaced inefficient window A/C units with central A/C systems in each house.
Because of the work in the basements and attics, all the homes had increased living area without increasing the footprint of the home. And while the living space increased by 30% to 100%, all of them saw a reduction of energy use that ranged from 30% to more than 100%. While the renovations cost more than $100 per sq. ft. for each home, all were appraised at values exceeding that cost after the renovations were complete.
Some things are different in each case, too. The two oldest homes had major structural issues that needed to be repaired before other work could be done. Foundations needed to be rebuilt, and additional columns and beams were added for support. One house, the Greek revival, had frequent basement flooding that had to be stopped, and its attached barn was leaning enough to fall down. The Victorian was in a historic
the next opportunity is the walls. Old windows are like big holes in the walls. They often leak both air and water into the house while functioning poorly. They might not open and close properly, and can be obscured with storm windows and screens that diminish the amount of light that can enter. Properly installed, Energy Star (or better) windows seal the holes in the walls to keep out water and weather extremes. (For more, see “A Buyer’s Guide to Windows” on pp. 91-103.)
5. Insulate the walls
Filling empty wall cavities with cellulose is a cheap, easy, effective way to warm up an old house. Blowing cellulose into existing wall cavities is an art, to be sure, but there are many contractors who have been doing it for years. In fact, there are now inexpensive ways to check with infrared cameras to make sure that all voids have been filled without disturbing the existing plaster or sheathing on outside walls.
Because siding or shingles on old houses might also have worn out, we take the opportunity to install foam sheathing on the outside of the house before re-siding.[1]
6. Buy Energy Star (or better) fixtures, appliances, and lighting
Once you have reduced your space-conditioning and waterheating loads, the lighting, appliance, and plug load will be your next big energy item.
A new Energy Star refrigerator will use 20% less energy than a standard model. Replacing old light fixtures with pin-based
compact-fluorescent fixtures ensures that your electric bill will stay lower (up to 30%).
7. Add a renewable – energy source
Once your energy consumption has been reduced significantly, it becomes reasonable to produce your own energy with systems such as photo – voltaics, wind power, or hydro, if you happen to have a stream nearby.
Until you slash the energy usage, though, it’s not worth the investment in renewable power sources. Conservation is still the cheapest game in town.
district, so even though the chimneys were structurally unsound and the old slate roof was beyond its useful service life, they had to be repaired (at a great cost) rather than replaced.
Posted by admin on 12/ 11/ 15
■ BY BETSY PETTIT
 In America, there are around 58 million houses that were built before the last energy crisis. Because these pre-1970s houses have little or no insulation, they are all ripe for energy-efficiency improvements. Houses eat up 20% of the energy used in this country and account for 21% of the carbon dioxide that contributes to global warming. This adds up to a huge opportunity. In America, there are around 58 million houses that were built before the last energy crisis. Because these pre-1970s houses have little or no insulation, they are all ripe for energy-efficiency improvements. Houses eat up 20% of the energy used in this country and account for 21% of the carbon dioxide that contributes to global warming. This adds up to a huge opportunity.
America’s old houses can be made much tighter and can even approach net-zero energy use. Here, I’ll highlight three houses that my company, Building Science Corp., has renovated. Each house had different limitations and learning curves. I share one of the houses with my husband and business partner, Joe Lstiburek, and two of them have been used as our office space.
Renovating an old house is an expensive process. It’s also a delicate process because the end product must retain its charm. Most old houses are still around because people love their timeless form, floor plan, trim, details, and historical significance. Renovating an old house is a surprising and challenging

another bathroom, bedroom, office, or better views. Then they spend money building an addition, only to spend all their time in this new space because the rest of the house is uncomfortable. They don’t really get more space in this deal; they get a smaller space that’s comfortable.
Posted by admin on 12/ 11/ 15
Oversize air-conditioning systems are the norm, not the exception. It’s easier to pick a huge system based on erroneous rules of thumb than to spend time designing a more suitable but smaller system. Oversize systems have the added problem of masking many
of the problems I’ve discussed here. Poor insulation, duct leaks, and more can be covered up by blasting twice as much cold air through the ductwork as would be necessary if things were done correctly.
If you double the size of the AC unit, you can lose 50% of the performance and still provide enough comfort so that the homeowner won’t call you back. But a behemoth AC unit short-cycles (turns on and off too
|
1
|
Oversize HVAC Is Overkill
|
|
hen it comes to air-conditioning units, oversize air handlers waste energy, burn out faster, and leave the house cold and clammy. Unfortunately, many HVAC contractors still rely on rules of thumb to determine system size. The best way to get the right-size HVAC unit is to model your home’s energy features with one of the many software programs available (such as the one at www. hvaccomputer. com; $49 for homeowner version).
To calculate whether an existing AC unit is too big, measure the number of minutes per hour that the AC unit runs on the hottest afternoons in the summer. Then divide 60 by the number of minutes to determine the amount that the unit is oversize. For example, 60 f 30 = 2x oversize; 60 f 20 =
3x oversize.
|
quickly), which hurts its energy efficiency, degrades its ability to dehumidify the air, and shortens its life. A larger unit is also noisier and costs more to install (both system and ducts). The solution is simple: Pay for the load calculations, and size the unit correctly. In fact, according to the Air Conditioning Contractors of America (ACCA), it’s often better to undersize an AC system a little bit.
Water Heaters and Windows Are the Next Savings Opportunities
Water heaters store hot water all day long. They keep it hot on the off chance that you’ll need it. Tankless, or on-demand, water heaters, on the other hand, convert cold water into hot water when you turn on the tap.
You’ll notice that windows aren’t on this list. Only after you correct all the things I’ve mentioned will your windows start to look bad. If you’re building a home, upgrading the windows at the design stage to at least Energy Star (preferably beyond) is a lot less expensive than buying substandard windows now and replacing them later. Even so, windows are not usually the first place to start looking for big savings, because the other nosebleeds are running hard.
Bruce Harley is technical director of Conservation Services Group (www. csgrp. com) in Westborough, Mass.
Posted by admin on 12/ 11/ 15
From 20% to 40% of the air that comes out of furnaces and air conditioners never gets to the rooms it’s supposed to heat or cool. When you consider that most of the ducts are in attics, garages, and vented crawlspaces, the effect of that loss is huge: We’re heating and cooling the outdoors. Sometimes whole rooms are disconnected, as when the ductwork isn’t connected to the register and the duct spews conditioned air into the attic or crawlspace. Return ducts often leak more than supply ducts; although they cause less energy loss, these leaks lead to moisture problems and pressure imbalances that pose health and durability risks by contributing to mold, ice dams, and even carbon – monoxide poisoning.
Required by code, duct-sealing is rarely completed and even more rarely tested. Houses more than 10 years old didn’t have this code requirement. Every connection in every duct run should be sealed with mastic (not tape), and the system should be pressure-tested, just like your plumbing. Holes in the air handler can be sealed with aluminum-foil tape because mastic would render the cabinet unserviceable. After you seal the ducts and the cabinet, insulate them carefully.
Retrofits can be more difficult. If you can access the ducts, you can use mastic under the insulation (put the insulation back when you’re done). If the ducts are inaccessible, they can be sealed from the inside with a product like Aeroseal® (see www. aeroseal .com for local contractors), or you can move the insulation and the air barrier to bring the ducts inside the thermal boundary.
Putting the Air Handler Outside the House Is Not a Good Idea
Many air handlers and ducts are in attics. This location is a lot more costly than people realize. Putting an air handler and ductwork in the attic, garage, or crawlspace is like putting it outside the house. In winter, attics are almost as cold as the outdoors; in the summer, attics are much hotter than the outside temperature.
If you must place the air handler and ductwork in the attic, you can do a few things to minimize energy losses: Seal everything with mastic; insulate the air handler carefully; and keep the ducts low and covered with blown insulation. Even better, use spray foam on the whole roof and gable ends so that the attic space is within the house’s thermal envelope.
The best idea, though, is to run the mechanical system inside the house. You can use smaller mechanical equipment with smaller ducts in shorter runs; it’s easier to design space for them within the house. The payoff is a much more efficient HVAC system that increases comfort while decreasing operating costs. For more information, go to www. toolbase. org/Design-Construction- Guides/HVAC/forced-air-system.
How Durable Is Spray Foam?
  Q: Spray foam is touted as a “superior” insulation material. I’ve been building for nearly 20 years, however, and I’ve occasionally found spray foam that has settled in the wall cavity and/or disintegrated enough to lose all its effectiveness. How do we know today’s spray foams won’t do the same thing in 30 years? Q: Spray foam is touted as a “superior” insulation material. I’ve been building for nearly 20 years, however, and I’ve occasionally found spray foam that has settled in the wall cavity and/or disintegrated enough to lose all its effectiveness. How do we know today’s spray foams won’t do the same thing in 30 years?
—Mike Connors, Beacon, N. Y.
A: The failed foam you’re describing is likely urea-formaldehyde foam insulation (UFFI). It was installed in many homes in the 1970s, but eventually was banned in Canada and the United States due to concerns about chemical off-gassing. UFFI also tended to become brittle, shrink, and crumble over time, affecting durability and performance.
The current generation of spray-polyurethane foams is based on a different chemistry, so the cured foam is much more stable. This quality suggests that spray-polyurethane foams will last much longer than UFFI and will retain their flexibility and mechanical integrity.
I wouldn’t worry about the durability of the foams that are currently available. In fact,
I believe that in some applications today’s spray foams add to the durability of the overall structure by reducing air leakage and vapor diffusion.
—Bruce Harley
Posted by admin on 12/ 11/ 15
People naturally think that if you cover 98% of a surface with insulation, you’ll get 98% of the performance. This thinking is horribly wrong. Gaps and missing insulation create a hugely disproportionate performance penalty. If you install R-38 batts in an attic but leave 0.5% of the surface area uncovered, you end up with R-32 (16% reduction in R-value). Leave 2% uncovered, and you drop to R-22 (42% reduction). So with 98% coverage, you get 58% of the performance.
If you run across information saying it’s not cost-effective to add insulation, it probably assumes the initial R-value is what you say it is. In all likelihood, the R-value is less than half what you think, and the upgrade is worth much more—provided it’s done right.
TWO BIG HOLES CAN COST YOU MONEY.
 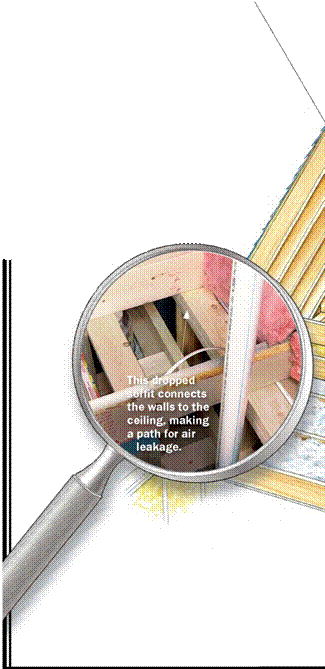 Directly above a bathroom, this attic view reveals a dropped soffit and a large plumbing chase for the vent stack. The soffit connects the attic with the walls; the plumbing chase is a direct hole running through the house. These two leaks are like leaving a window open. The Fix: Cover the open framing with rigid foam or plywood, and seal small openings with spray foam. Finally, cover them with insulation. Loose-fill insulation such as cellulose is cheap and easy to install. Directly above a bathroom, this attic view reveals a dropped soffit and a large plumbing chase for the vent stack. The soffit connects the attic with the walls; the plumbing chase is a direct hole running through the house. These two leaks are like leaving a window open. The Fix: Cover the open framing with rigid foam or plywood, and seal small openings with spray foam. Finally, cover them with insulation. Loose-fill insulation such as cellulose is cheap and easy to install.
|
SOME HOLES ARE RK HIDDEN BEHIND DUCT TAPE.
і I Poorly sealed V/ I ducts lose up to Aj І 40% of the air Шшу f theytransport. lt / they’re in the attic, W?’/ this can cause ice y*f dams in winter. In the summer, it wastes money. The Fix: Instead of relying on duct tape, seal joints with RCD Corporation®’s latex duct mastic ($20/gal. at www. efi. org). To apply, wear two pairs of gloves (cotton over vinyl). Bridge gaps larger than %4 in. with fiberglass tape, followed by mastic.
|
|
Balloon-framed rake (gable-end) walls create a series of large holes into the attic; they should be sealed.
|
|
|
Remember to seal all joints.
|
|
|
SOME HOLES ARE CODE-REQUIRED.
Extending from basement to attic, code-required chimney-clearance space (see the photo at left) can be a major escape route for conditioned air. If the clearance is supersized to accommodate ductwork, then the losses multiply. The Fix: The code also requires noncombustible fire-stops; close off the opening with sheet metal or cementboard and fire-rated sealant (available at most hardware stores and home centers).
|
|
|
The clearance around this chimney’ is big enough to serve as a chase for heating ducts.
|
|
|
Wiring holes in top plates allow air to leak into the attic.
|
|
|
Heat from recessed lights drives air into the attic faster than the air would move on its own.
|
|
|
Cut sheet metal or cementboard to bridge the gap between the framing and the chimney. Seal the gaps with a fire-rated sealant.
|
|

Where " ‘ cold air is supposed to go…
Solid blocking can stop cold air.
Kneewalls and vented roofs mean cold bonus rooms.
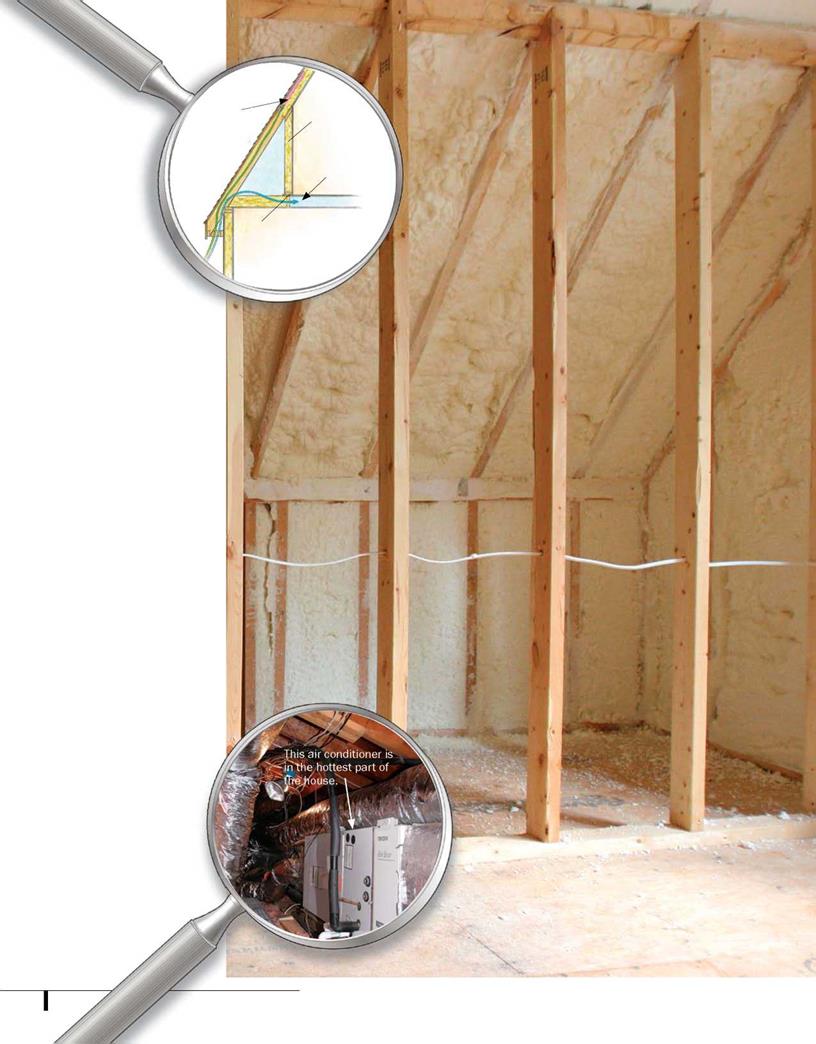
Insulation can’t stop chilly air. Consider the size of this leak: Each joist bay (the space between joists) is roughly a square foot times the number of joist bays, twice. For a 40-ft.- long cape, this amounts to a 57-sq.-ft. hole in the thermal boundary that nobody notices. The Fix: Two options work. use solid blocking (foam board or plywood) in each joist bay (seal the edges with canned foam), or insulate the roof with spray foam.
Putting an HVAC system in the attic is like putting it outside. in the winter, uninsulated attics are almost as cold as the outdoors; in the summer, they’re much hotter. if R-30 insulation is required in the attic floor, does R-6 make sense for the air handler and ducts? No.
The Fix: Move the HVAc out of the attic, or insulate the attic at the roof. Spray foam is a good choice. calculating the correct size (see above) and optimizing duct layout make it easier to find room within the home’s conditioned space.
Posted by admin on 12/ 11/ 15
It’s not only insulation and HVAC contractors who are inadvertently sabotaging our houses. Framers often construct large holes that extend from the basement to the attic in the form of chimney, plumbing, and duct chases. These chases are hidden behind drywall or are covered by fiberglass-batt insulation. But insulation alone won’t prevent conditioned interior air from escaping. Big holes should be sealed with plywood, rigid foam, or drywall and caulk or spray foam.
Kneewalls and rim joists are two more often-missed ex-
j
amples. Think of them as long holes in a house. Kneewalls are the short walls found in finished attics and in bonus rooms above the garage. Insulation is usually put in the kneewall and under the floorboards, but this insulation doesn’t keep a room warm unless you block each
joist cavity or, better yet, insulate under the roof deck (see p. 16).
Rim joists also have multiple holes cut in them for dryer vents and outdoor water faucets. Rim joists are best sealed when the house is built. The top and bottom edges should be sealed with construction adhesive during framing and insulated with spray foam afterward.
Architectural Massing Can Often Mean Massive Leaking
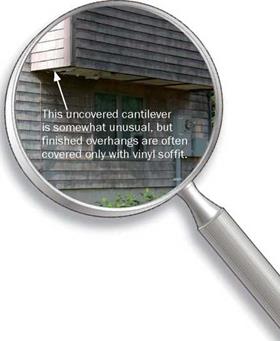
Architects use features such as cantilevers and wraparound porches to break up the massing of a mundane facade. I have nothing against great-looking houses, but these architecturally interesting details can create giant energy nosebleeds.
 Insulation and air-barrier details are often missed in cantilevered areas. The underside of a cantilever should be covered with solid sheathing (caulked in place) before finish materials are installed. Roof and wall sheathing is frequently left off below intersecting porch and garage roofs. The spaces below these roofs often connect to vented attics; they are just big air vents to the outdoors. Fancy details like tray ceilings and curved walls also can create big holes that open to attics. Insulation and air-barrier details are often missed in cantilevered areas. The underside of a cantilever should be covered with solid sheathing (caulked in place) before finish materials are installed. Roof and wall sheathing is frequently left off below intersecting porch and garage roofs. The spaces below these roofs often connect to vented attics; they are just big air vents to the outdoors. Fancy details like tray ceilings and curved walls also can create big holes that open to attics.
Great-looking houses should also perform well. Architects should draw a line between inside and out on the blueprints, and make sure the house is built that way.
Posted by admin on 12/ 11/ 15
■ BY BRUCE HARLEY
y friend Terry Brennan told me that on his first job as a mason’s tender he learned two things: "Whatever I did was wrong," and "If the work wasn’t going to show, don’t strike the joints" because it didn’t have to be pretty. Now, not taking the time to smooth out a mortar joint that no one will see may not rank as a great offense. But the fact is, many things that go wrong in home building go wrong where sloppy work is done because "it’s not going to show, so it doesn’t matter." I know this because as an energy consultant, I plug the same nosebleeds in new and old homes alike. We’re good at cutting construction costs but bad at building houses that serve their owners well, minimize operating costs, and also reduce pollution.
Gaps in the Construction Sequence Cause Many Problems
People think windows and doors are the biggest leaks in a house because windows and doors are the most visible holes. But even old windows and doors are relatively small holes. In reality, the majority of energy leaks happen in places you can’t see, where one subcontractor’s work ends and another’s begins: behind the drywall, up in the attic, or down in the crawlspace. Even when each trade does its job well, problems can occur because nobody sees the big picture. The way the work fits together is as significant as the work itself.
The gaps between subs’ responsibilities usually translate into gaps in a house’s thermal boundary. These gaps are addressed in current building codes, but building inspec
tors can’t always offer protection. Sometimes they don’t understand; sometimes they just don’t enforce energy codes. The architect, the general contractor, or the homeowner must take the responsibility for understanding and closing these gaps.
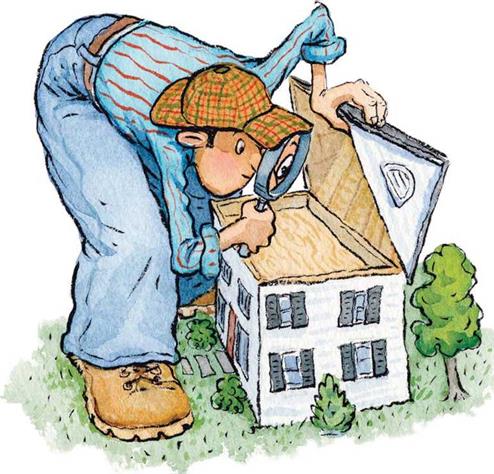 Amazingly, the two trades most concerned with energy efficiency—HVAC (heating, ventilation, air-conditioning) and insulation— rarely follow the minimum industry standards for their work. The reasons differ, but they share one common element: Their work is hidden behind drywall. The only feedback they get is when these systems fail, when our homes are uncomfortable (an issue that’s often misdiagnosed) and high energy bills mount. Pressure to keep upfront costs low and underestimating the magnitude of these problems are also common to both trades. This standard of care isn’t reasonable. Just because it has always been done this way doesn’t make it right. Amazingly, the two trades most concerned with energy efficiency—HVAC (heating, ventilation, air-conditioning) and insulation— rarely follow the minimum industry standards for their work. The reasons differ, but they share one common element: Their work is hidden behind drywall. The only feedback they get is when these systems fail, when our homes are uncomfortable (an issue that’s often misdiagnosed) and high energy bills mount. Pressure to keep upfront costs low and underestimating the magnitude of these problems are also common to both trades. This standard of care isn’t reasonable. Just because it has always been done this way doesn’t make it right.
Posted by admin on 11/ 11/ 15
Whether a basic inspection or an in-depth scientific test, an auditor’s findings will likely be output from software that not only takes into account the physical data about the structure but also data about utility bills, the local climate, and, possibly, comparative information from other houses.
A CMC-trained auditor will generate a report about the existing house’s needed improvements, including a cost-benefit analysis and payback time in years. CMC doesn’t control what its inspectors charge, but Luxton says audits cost from $200 to $400, depending on the size of the house.
RESNET auditors are licensed to use company software that produces a HERS-index report. An audit with a HERS report (report fees can run around $150) costs from $1,000 to $1,500. While BPI doesn’t supply its own software, there are independent programs available that auditors can choose.
An audit from BPI-accredited TerraLogos® in Baltimore costs $495, and though it is thorough in its assessment of and recommendations for the house’s existing systems, it does not predict energy savings if the suggested upgrades are carried out.
On the other end of the scale is a soup – to-nuts audit done by a company such as Steven Winter Associates. Along with a basic inspection of a house up to 4,000 sq. ft., which includes no scientific testing, the a-la-carte audit menu could include a blower-door test, a duct-leakage test,

appliance-combustion testing, infrared – imaging, energy-modeling, and a HERS rating. All this adds up to an audit that costs upward of $2,000.
What’s Next for Energy Audits
The business of energy-auditing is getting huge. "It’s at a tipping point," says Courtney Moriarta, senior engineer at Steven Winter Associates. "Not only do homeowners think it’s a cool thing to do, but it’s also being driven more and more by energy-efficient mortgages and potential tax credits." Both Massachusetts and California are working on legislation that will require house sellers to divulge energy-audit information to prospective buyers.
Also on the horizon is a joint energyauditing standard between RESNET and BPI (which could be adopted by Energy Star, too). Currently in draft form and open to
public comment, the new standard is intended to clear up confusion among homeowners, but the reciprocity between the two organizations will also help auditors, many of whom have previously felt the need to get accreditation from both nonprofit groups. Steve Baden, executive director of RESNET, says that the standard will recognize the efficacy of all types of energy audits and auditors from "the DIY type to the guy with the clipboard and flashlight to the guy who also uses a blower door and an infrared camera."
Jefferson Kolle is a former editor at Fine Homebuilding.
Posted by admin on 11/ 11/ 15
There are two schools of thought about whom to hire to perform a home-energy audit. One says that a disinterested third party is the most trustworthy opinion, while the other argues for the convenience of hiring someone who can pinpoint the improvements needed and then perform the work.
Brian Smith of Energy Saving Comfort Systems (www. escs1.com) prides himself on the fact that his company isn’t selling anything other than testing services. When he sits down with customers to review what his blower door and infrared camera have detected, they know that "I’m not then going to try to sell them new windows or a furnace." CMC’s Luxton concurs: "We feel strongly that an audit should be performed by an unbiased person."
John Jennings is an energy auditor with Steven Winter Associates, an architecture/ engineering research and consulting firm in Norwalk, Conn. He favors the idea of independent auditors who can provide a list of vetted contractors that can make the recommended improvements.
Mike Rogers, senior vice president of business development for GreenHomes® America, a Syracuse, N. Y., firm that tests homes and then does improvement work, disagrees. "Would you take your car to one guy to tell you what’s wrong with it and then to another to do the repairs?" he asks. Some companies, including GreenHomes, even have a financing program for energy-performance upgrades.
| |
 3-in. closed-cell spray foam (R-21)
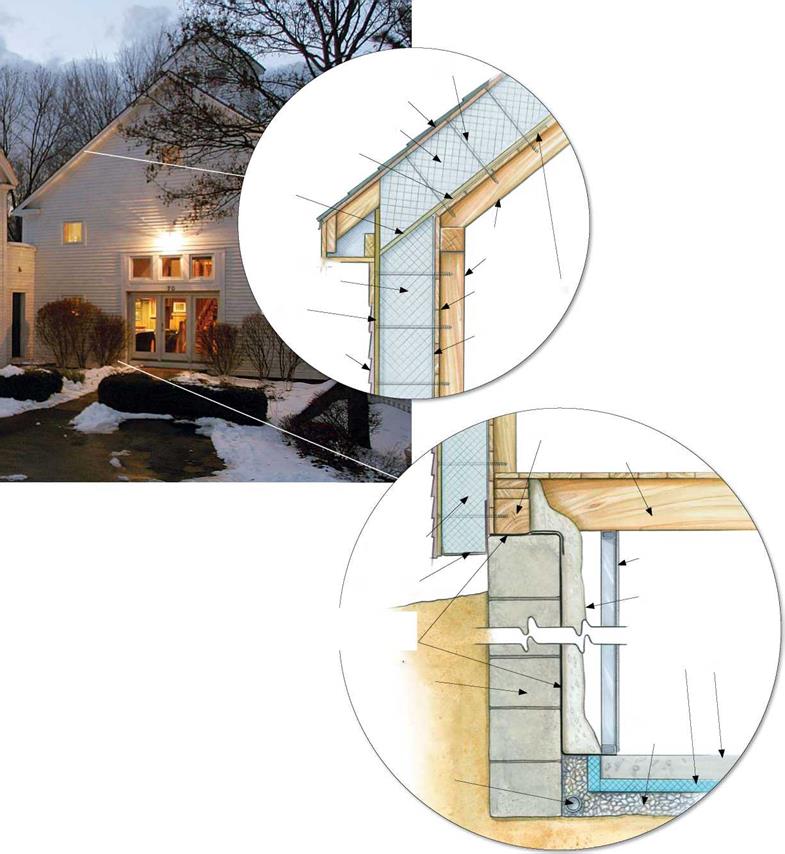
 To get a high R-value (R-40) without disrupting the roof or increasing the 2×6 rafter size, we combined insulation types. We could have used only closed-cell spray foam to fill the rafters, but at the time, it was too expensive. Instead, we used 3 in. of spray foam to create an air barrier and fiberglass batts to fill the rest of the rafter bay. A layer of rigid foam under the rafters is a thermal break.




 In America, there are around 58 million houses that were built before the last energy crisis. Because these pre-1970s houses have little or no insulation, they are all ripe for energy-efficiency improvements. Houses eat up 20% of the energy used in this country and account for 21% of the carbon dioxide that contributes to global warming. This adds up to a huge opportunity.

 Q: Spray foam is touted as a “superior” insulation material. I’ve been building for nearly 20 years, however, and I’ve occasionally found spray foam that has settled in the wall cavity and/or disintegrated enough to lose all its effectiveness. How do we know today’s spray foams won’t do the same thing in 30 years?
 Directly above a bathroom, this attic view reveals a dropped soffit and a large plumbing chase for the vent stack. The soffit connects the attic with the walls; the plumbing chase is a direct hole running through the house. These two leaks are like leaving a window open. The Fix: Cover the open framing with rigid foam or plywood, and seal small openings with spray foam. Finally, cover them with insulation. Loose-fill insulation such as cellulose is cheap and easy to install.


 Amazingly, the two trades most concerned with energy efficiency—HVAC (heating, ventilation, air-conditioning) and insulation— rarely follow the minimum industry standards for their work. The reasons differ, but they share one common element: Their work is hidden behind drywall. The only feedback they get is when these systems fail, when our homes are uncomfortable (an issue that’s often misdiagnosed) and high energy bills mount. Pressure to keep upfront costs low and underestimating the magnitude of these problems are also common to both trades. This standard of care isn’t reasonable. Just because it has always been done this way doesn’t make it right.
