Category THE ENERGY-SMART HOUSETHE

Retrofit Results

construction Basement: Ceiling sprayed with open-cell spray polyure­thane foam (adds thickness and R-value)

Walls: 2×4 construction filled with cellulose; 4 in. of foil­faced polyisocyanurate foam outside of sheathing for a total of R-39

Roof: 6 in. of polyisocyanurate insulation installed above the existing roof sheathing, topped with a layer of ply­wood; 8 in. of open-cell spray polyurethane foam (Icynene) installed between the existing rafters for a total of R-59

Windows: Double-pane (U-0.33) windows by Pella®

Location:

Arlington, Mass. Size: 3,000 sq. ft. (duplex)

Renovation cost: $47 per sq. ft.; $140,000 total

Mechanicals

Heating: Oil-fired steam boiler in each unit

Water: Main boiler in unit 1; on-demand gas water heater in unit 2

Ventilation: Heat-recovery ventilators (one for each apartment)

Results

Energy reduction: 65% (heat­ing fuel)

Annual savings: $2,300 per year

Payback period: 61 years. If the cost of the roofing and siding are subtracted, pay­back is reduced to a little over 35 years.

Подпись: Air-seal, then insulate. If you can't afford to add insulation to your walls, address simple air-sealing measures such as filling the gaps around windows, electrical boxes, doors, and recessed lights in the ceilings.

Retrofit Results

WALL INSULATION

Deep-energy retrofit A typical 2×4 wall insulated with fiberglass batts has a whole – wall R-value of about 10. Many deep-energy retrofits aim to insulate walls to R-40, which typically requires all of the siding to be re­moved and the addition of 4 in. to 5 in. of polyisocyanurate rigid insulation or spray polyurethane foam.

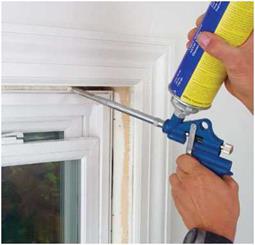
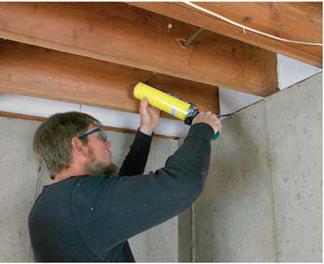
Practical takeaway Unless your home’s existing siding is in bad shape, it’s hard to justify the cost of installing exterior wall foam. If your existing siding is sound, your best retrofit option is careful air-sealing work from the interior with canned spray foam. Typical leakage areas include the gap be­tween the baseboard and the finished floor; electrical boxes; and cracks behind window and door casing.

Performance comparison Above-grade walls represent most of a typical house’s thermal envelope, and an R-10 wall leaks heat at four times the rate of an R-40 wall. Although air-sealing an R-10 wall will surely increase its performance, it will not rival an R-40 wall.

Cost comparison Installing thick exterior – wall foam and new siding on a typical house costs tens of thousands of dollars. Blower- door-directed air-sealing work might cost $700 to $1,000 per house.

WINDOWS

Deep-energy retrofit Single- or double­glazed windows are usually replaced with new triple-glazed windows with full­thickness (13/8 in.) glazing. This glazing is better than thin 7/8-in. or 1-in. glazing.

Practical takeaway The cost of installing high-quality replacement windows can be staggering; as a less expensive alternative, consider installing low-e storm windows over tuned-up windows in good working order and that have been weatherstripped.

Performance comparison Good triple­glazed windows have a U-factor of 0.17 to

0. 20. A low-e storm window won’t achieve the same performance. Installed over a single-pane wood window, a low-e storm window provides a total U-factor of 0.40, while a low-e storm window installed over a double-pane wood window provides a total U-factor of 0.34. (The lower the U-factor, the better.)

Cost comparison The cost to install a low-e storm window ranges from $120 to $160. The installed cost of a new triple-glazed win­dow is about $800 to $1,200.

HVAC

Deep-energy retrofit Most deep-energy ret­rofits include air-sealing measures. Once in­filtration rates have been reduced, an older house requires a good mechanical ventila­tion system. Options range from low-sone bathroom exhaust fans controlled by timers to heat-recovery ventilation systems with dedicated ductwork.

A new heating unit is also a quintessen­tial upgrade in many deep-energy retrofits. New furnaces or boilers are most often ef­ficient sealed-combustion models. The fuel type is relatively unimportant, because the fuel demands of the newly renovated home will be low.

Practical takeaway If you’ve done any air-sealing work, a mechanical ventilation system is essential. Exhaust-only systems are

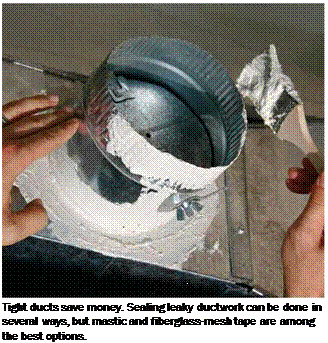
much less expensive than a system with a heat-recovery ventilator. If you can’t afford an HVAC overhaul, you should at least have ducts tested for leakage and sealed.

Performance comparison Replacing an 80% AFUE (annual fuel utilization efficien­cy) furnace with a 92% AFUE furnace will cut energy use 13%. Sealing ducts may save an additional 5% to 20% of your energy use.

Cost comparison The installed cost of a new 92% AFUE furnace ranges from $3,000 to $6,000. Duct sealing and repair costs be­tween $250 and $500 per house.


Retrofit Results


Retrofit Results

Retrofit Results

Martin Holladay is a contributing editor to Fine Homebuilding.
Подпись: Tight ducts save money. Sealing leaky ductwork can be done in several ways, but mastic and fiberglass-mesh tape are among the best options. Подпись: cost: $148K Annual savings: $2,490 Alarmed by the implications of the global climate-change crisis, Cador Price-Jones embarked on a major retrofit of his Massa-chusetts duplex (also pictured on p. 40).

construction

Basement: 3 in. of closed-cell spray foam (R-18) applied be­tween the studs of a 2×4 wall built against an 8-in. block foundation

Walls: Existing 2×4 walls filled with dense-pack cellulose; new 2×2 frame installed on exterior and filled with 4 in. of closed-cell spray foam for a total of R-37

Roof: Attic floor air-sealed and filled with 17 in. of loose-fill cellulose for an R-value of 60; 2 in. of spray foam used to air-seal the eaves

Windows: Main house win­dows are double-glazed, low-e, argon-filled units by Jeld – Wen®; basement windows are double-glazed hopper units by Harvey Industries

Mechanicals

Heating: Modulating condens­ing gas boiler, 22,700- to 75,200-Btu rated output,

95% AFUE

Water: 60-gal. Superstor® indirect hot-water tank

Ventilation: Heat-recovery ventilators (one for each apartment)

Photovoltaic: 5.25kw pack­age system by Nexamp™

Results

Energy reduction: From $5,650 per year to $3,160 per year

Annual savings: $2,490

Payback period: 60 years
Подпись: го
Подпись: INSULATION

Retrofit Results

s

S

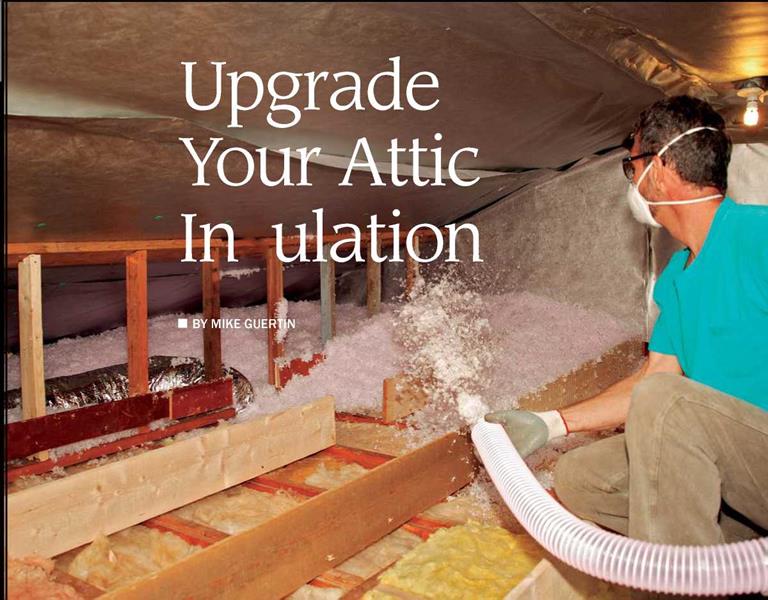
aving money on heating-fuel costs is a lot simpler than negotiating with OPEC or your local utility. Here’s how: On a recent upgrade in the attic of a 1950s-era house (one of two projects that is featured here), I air-sealed and spread a 12-in.-deep layer of cellulose throughout 1,500 sq. ft. of space in about a day. As a result of this and other energy-saving improvements that were made to the home, the owner saw his heating and cooling costs reduced by half compared to the previous year, even in the face of higher electricity and heating-fuel costs.

I typically focus my efforts to improve the energy efficiency of an attic in two areas: sealing air leaks in the ceiling and increasing the amount of insulation in the attic itself.

The payback period for tightening a leaky ceiling can be as short as a month. Add­ing insulation might take a few heating or cooling seasons to pay off, but the wait is relatively brief. I estimate the payback for air-sealing and upgrading attic insulation to be realized in three years.

On these projects, I often chose to install a radiant reflective membrane. Besides

Подпись:reducing radiant-heat gain from the roof, the membrane makes the attic more attractive and dust-free for storage use, and it keeps the blown-in insulation I use from blocking the rafter bays. While radiant bar­riers can reduce peak attic temperatures by 10°F to 30°F, they haven’t proved to be cost effective in all geographic regions or in at­tics that are adequately insulated, that are air-sealed, and that have well-insulated, wrapped air-handling equipment and ductwork. In these cases, you may be better off spending the money on more insulation and air-sealing than on a radiant barrier.

Energy Retrofits of All Levels

Paul Eldrenkamp is a Massachusetts remod­eler who has performed several deep-energy retrofits. When his clients balk at the high cost of a full retrofit, he sometimes advises them to work in phases. Although it is com­mon to perform energy improvements over time as finances permit, it’s also important to take advantage of upgrade opportunities even if they seem to fall out of sequence. For example, if you have to install new siding or roofing and you do so without installing thick rigid foam underneath, you may regret your shortsighted decision in time. Here’s a general overview of the work to be done, the order in which it should be completed, and the practical alternatives to going deep.

ROOF INSULATION

Deep-energy retrofit Many deep-energy retrofits call for insulating a roof to R-60, which can most easily be done by adding 4 in. of rigid polyisocyanurate foam on top of the roof deck and then filling each rafter bay with loose fill or batt insulation. Exte­rior foam sheathing has the added benefit of reducing thermal bridging through the rafters.

Practical approach It’s much less expensive to install cellulose on an attic floor than to install rigid foam and new roofing. Address air leakage before dragging a cellulose hose into the attic. Seal all ceiling leaks under the existing insulation (for example, at electrical and plumbing penetrations, at utility chases, and at the gaps between partition drywall and partition top plates). It’s also important to be sure that there are no air leaks at the perimeter of the attic, where the ceiling air barrier meets the wall air barrier.

Performance comparison While there is no upper limit on the R-value that can be achieved when installing foam on top of the roof sheathing, the maximum R-value of attic-floor insulation depends on the available height at the perimeter of the attic. Achieving R-60 requires about 16 in. of cellulose.

Cost comparison Attics with easy access are easier and cheaper to retrofit than cluttered attics with lots of penetrations that need to be sealed. From a material standpoint, the practical approach is almost always more economical. For any given R-value, poly- isocyanurate costs from three to five times as much as cellulose insulation. Needless to say, adding rigid foam on top of the roof sheathing includes significant expenses for roof demolition, new roof sheathing, and new roofing—costing between $3 and $5.80 per sq. ft.

BASEMENT INSULATION

Deep-energy retrofit After addressing any moisture issues in the basement, many deep – energy retrofits call for basement walls to be insulated to R-20, requiring the addition of 4 in. of XPS insulation or about 3 in. of

Pile it on. If adding rigid foam on top of the roof sheathing isn’t an option, a less expen­sive option is blowing cellulose on an air-sealed attic floor. The more insulation, the better.

Energy Retrofits of All LevelsПодпись:
Energy Retrofits of All LevelsПодпись: closed-cell spray polyurethane foam. The rim joists are also insulated with either spray foam or rigid foam. The basement floor is insulated with 2 in. to 4 in. of XPS foam over the slab. A new subfloor is applied over the foam. Practical approach Adding insulation to the basement walls and rim joists is cost effective in all northern climates. However, the payback period for basement-floor insulation is much longer than for basement- wall and rim-joist insulation, so it's often eliminated in projects with a limited budget. Performance comparison Since the tem-perature of the soil under a below-grade slab is higher than the average outdoor-air temperature in winter, heat loss through a basement slab is much less than through a basement wall. In many homes, basement slabs are responsible for less than 1% of a home's total heat loss. Cost comparison Not insulating your base-ment floor saves you from $1.80 to $2.50 per sq. ft. in materials. Подпись: cost: $140K annual savings: $2,300 While planning a deep-energy retrofit of his 3,000-sq.-ft. two- story duplex in Arlington, Mass., owner Alex Cheimets got a lucky break: He was eligible to participate in a pilot superinsulation program sponsored by the Massachusetts Department of Energy Resources and his local utility.

The Payback

Homeowners who undertake deep-energy retrofits are usually motivated by environ­mental or energy-security concerns rather than a desire to save money on their energy bills. These jobs are so expensive—in the range of $50,000 to $150,000 per house— that a homeowner would have to wait decades before the investment could be recouped. "In a retrofit situation, it can cost a lot of money to save a small amount of en­ergy," says energy consultant Michael Blas – nik. "Going from R-19 to R-40 walls or R-30 to R-60 ceilings doesn’t save a whole lot of Btu—and the cost of that work is potentially tremendous."

There’s no easy way to calculate the payback period for many deep-energy ret­rofits, in part because a major overhaul of a building’s shell inevitably includes many measures (for example, adding new siding or roofing) that aren’t energy-related. Although these elements don’t make a significant con-

tribution to a home’s energy performance, they may greatly enhance the home’s aes­thetics and value.

Those of us without a Midas budget will need to settle on a less ambitious approach to energy savings than a full-blown deep – energy retrofit, and that’s OK. Less expensive and less invasive retrofit measures, typically referred to in the industry as weatherization, have payback periods of 15 years or less.

A Practical Look at Deep-Energy Retrofits

Подпись: ENERGY EFFICIENCY■ BY MARTIN HOLLADAY

I

f you pay any attention to building sci­ence, you have probably seen the term "deep-energy retrofit"—a phrase being thrown around with the colloquiality of "sustainability" and "green." Like the word "green," the term "deep-energy retrofit" is poorly defined and somewhat ambiguous. In most cases, though, "deep-energy retro­fit" is used to describe remodeling projects designed to reduce a house’s energy use by 50% to 90%.

Remodelers have been performing deep – energy retrofits—originally called "superin­sulation retrofits"—since the 1980s. Most deep-energy retrofit projects are predomi­nantly focused on reducing heating and cooling loads, not on the upgrade of appli­ances, lighting, or finish materials.

While a deep-energy retrofit yields a home that is more comfortable and healthy to live in, the cost of such renovation work can be astronomical, making this type of retrofit work impossible for many people. Those of us who can’t afford a deep-energy retrofit can still study the deep-energy ap­proach, using it to shed light on more prac­
tical and cost-effective measures to make any home tighter and more efficient.

How Deep?

No standard-setting agency has established a legal definition of a deep-energy retrofit, but the term generally refers to retrofit measures that reduce a home’s energy use by 50% to 90% below that of a code-minimum house— or, according to a more lenient definition, below preretrofit levels. Probably fewer than 100 homes in North America have completed deep-energy retrofits that conform to the strictest definition of the term.

A house that has undergone a deep – energy retrofit typically ends up with R-20 basement walls, R-40 above-grade walls, R-60 roofs, and U-0.20 windows. A typical air­tightness goal, determined by a blower-door test, is 1.2 ACH (air changes per hour) at 50 pascals.

A deep-energy retrofit doesn’t make sense in all climates, and not every home is a good candidate for the work. Cold-climate homes often have higher energy bills than homes in more moderate climates, so a cold-climate

A Practical Look at Deep-Energy Retrofits
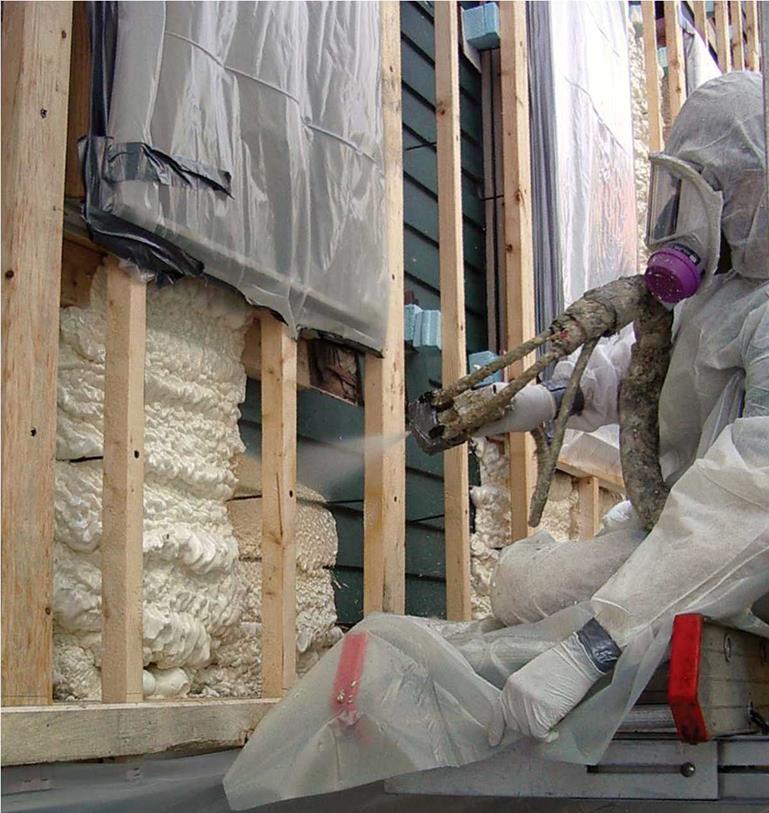
An old house with a new shell. This deep-energy retrofit in Somerville, Mass., received 4 in. of spray polyurethane foam on its exterior. (For more information, see the case study on p. 45.) However, not all energy upgrades have to be so elaborate.

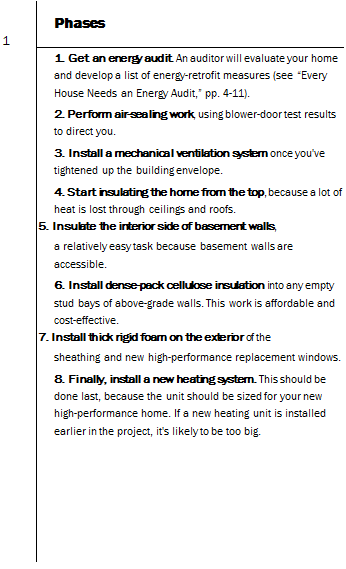
Подпись: 1 Phases 1. Get an energy audit. An auditor will evaluate your home and develop a list of energy-retrofit measures (see “Every House Needs an Energy Audit,” pp. 4-11). 2. Perform air-sealing work, using blower-door test results to direct you. 3. Install a mechanical ventilation system once you've tightened up the building envelope. 4. Start insulating the home from the top, because a lot of heat is lost through ceilings and roofs. 5. Insulate the interior side of basement walls, a relatively easy task because basement walls are accessible. 6. Install dense-pack cellulose insulation into any empty stud bays of above-grade walls. This work is affordable and cost-effective. 7. Install thick rigid foam on the exterior of the sheathing and new high-performance replacement windows. 8. Finally, install a new heating system. This should be done last, because the unit should be sized for your new high-performance home. If a new heating unit is installed earlier in the project, it's likely to be too big.

home may be a better candidate than a home in a moderate climate or a home that already has low energy bills. A house with a simple rectangular shape and a simple gable roof is easier and less expensive to retrofit than a house with complicated exterior ele­vations, bay windows, dormers, or a roof full of hips and valleys. Most of the deep-energy retrofits include the installation of a new layer of exterior insulation. Intricate archi­tectural details add to the difficulty of such retrofit work, driving up costs. Homes with simple exterior trim and uncomplicated cor­nice details are much easier to work on than Victorian homes with gingerbread trim. Be­cause many deep-energy retrofits require ex­isting roofing and siding to be replaced, the best candidates for deep-energy retrofit work are houses that are in need of new roofing and siding.

Balanced Ventilation Brings in the Good Air, Banishes the Bad, and Conserves Energy

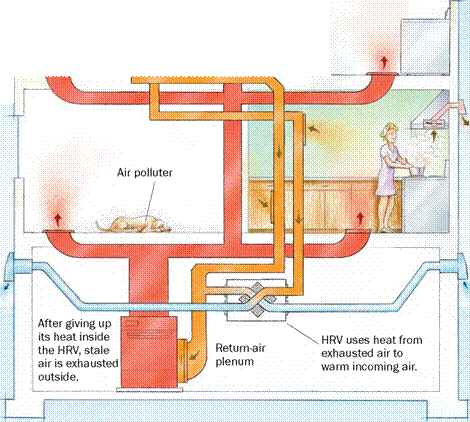
The best way to temper incoming air while reducing HVAC energy consumption is to use a heat-recovery ventilator (HRV) or an energy-recovery ventilator (ERV). These systems (see the drawing on the facing page) are balanced approaches that use the temperature and humidity of an exhaust-air stream (which otherwise would have been wasted) to temper the air of a supply stream, thereby reducing the HVAC energy cost. An HRV heats or cools incoming fresh air and can recapture up to 80% of the energy that would be lost without it. ERVs are better suited for hot, humid climates because they dry incoming air, thus reducing the work that the air conditioner has to do.

You Still Need to Clean Up

Ventilation is good at diluting gaseous com­pounds and small particles because small particles act like gases. They mix quickly in the air and follow air currents when air is

Подпись: Tempered Air Outdoor air mixed with indoor air has a tem-perature that is not objectionable (but not necessarily comfortable). For example, a dedicated outdoor-air system might temper 1 part of the incoming outdoor air with 3 parts interior air in the supply plenum before supplying it to a home’s occupied zones. expelled. But large particles such as pollen, pet dander, and dust mites must be cleaned up or vacuumed rather than exhausted or diluted because they’re too heavy to mix with air. Other large particles, called semi-VOCs, are solids or liquids at room tempera – ■* ture. While they’re not gaseous, as with VOCs, they are volatile enough to emit lots of gaseous vapor. This is important, be­cause if you filter out SVOC particulates you haven’t really done anything until you clean the filter; the SVOCs keep emitting gaseous vapor from the filter. If you don’t replace fil­ters on your HVAC system regularly, the sys­tem itself becomes a contamination source.
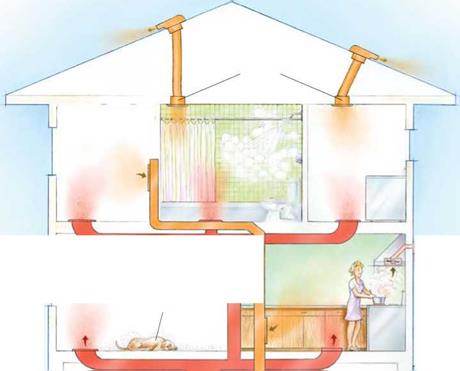
The three ventilation systems discussed here are by no means comprehensive; they can be combined in various recipes to meet particular conditions. In addition to climate and house tightness, cost can be a big con­sideration, but it shouldn’t be the major one. Be sure to consider long-term durabil­ity and maintenance requirements. Systems with heat recovery (HRV/ERV) require a lot more maintenance than those without. Sys­tems with multiple filters or requiring sea­sonal adjustment can be confusing.

Tight Houses Are Good, and They Should Breathe

Excessive leaks are one way for a house to breathe, but not the best. While there’s a lot of ongoing research and a robust scholarly debate on the best way to achieve accept­able indoor-air quality, building scientists all agree that houses need to breathe.

As houses become higher and higher per­formance, they need to breathe in a steady, reasonably controllable way. We cannot afford to let them breathe at the whim of the weather or with windows only. We also sometimes need to be able to have them hold their breath when conditions outside are exceptionally bad. Only with designed ventilation systems can we make sure that indoor-air quality and energy efficiency advance hand in hand.

Dr. Max H. Sherman is a consulting building scientist and physicist at Lawrence Berkeley National Laboratory in Berkeley, Calif.

Supply Ventilation Dilutes Pollutants Throughout the House

A supply system has the advantage of allowing you to select where the air comes from and how it is distributed throughout your home. For example, fresh air can come from a duct run connected to the return plenum of an HVAC system (see the draw­ing on the facing page). This way, outdoor air is pulled into the house through the air handler whenever it operates. Such an air intake must have controls (such as a timer or cycler) to turn on the air handler to make sure there is enough ventilation air. This sys­tem also should have a damper to prevent overventilating when the heating or cooling system is operating most of the time (very hot or very cold weather). Without these controls, this supply system is just a hole in the return duct, worse than a leaky house.

Supply systems must temper ventilated air to moderate temperatures in all but the mildest climates. When there is no heating or cooling call, the system above does this by running the air handler and mixing un­conditioned outside air with large volumes of conditioned indoor air. While this process tempers the outside air, it uses a lot of elec­tricity because the air-handler fan is over­kill for the amount of ventilation air being sucked in.

Supply Ventilation Dilutes Pollutants Throughout the HouseA Supply System Removes Bad Air and Brings in Fresh

Houses with a forced-air heating system or with central air-conditioning have a built-in air-distribution network. A supply system uses it to distribute fresh out­side air through the existing ductwork. But you still need exhaust fans in wet rooms. The best approach is a quiet, continuously running multiport vent fan in the attic that draws from several rooms (see p. 36).

Exhaust fan

Подпись: Air polluterSupply Ventilation Dilutes Pollutants Throughout the HouseПодпись:A separate range-hood vent fan is the simplest, best way to deal with contaminants from cooking.

Fresh air is brought in through a separate duct running from the outside to the return-air plenum of the HVAC unit.

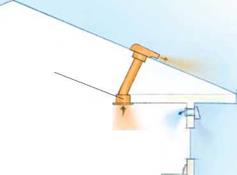
Supply Ventilation Dilutes Pollutants Throughout the HouseACTIVE INTAKE

With a duct from outside the house to the furnace’s return-air plenum, fresh makeup air is drawn into the house by the furnace fan. A temperature – and humidity-sensing damper system (pic­tured at left) installed in the duct curtails airflow during very hot and humid or very cold weather.

A Balanced System Removes Bad Air, Brings in Fresh, and Can Save Heat (or Cold)

Supply Ventilation Dilutes Pollutants Throughout the HouseПодпись: lit Ф r*. T -1 І J МТ1 Подпись: A separate range-hood vent fan is the simplest, best way to deal with contaminants from cooking.Подпись: Outside-air intake sucks fresh air into the HRV, where it is tempered before it enters the return-air plenum.Подпись: Return air for furnaceSupply Ventilation Dilutes Pollutants Throughout the House

The problem with exhausting stale air from your house is that you’ve likely paid good money to heat or cool that air, and venting it directly outside is like throwing away money. A balanced system with a multiport vent fan (from $185 at www. sheltersupply. com

or www. iaqsource. com) channeling all exhaust through some type of heat

exchanger can mitigate the energy loss.

Supply Ventilation Dilutes Pollutants Throughout the House

Supply Ventilation Dilutes Pollutants Throughout the HouseACTIVE EXHAUST AND INTAKE WITH ENERGY RECOVERY

The best approach to whole-house ventilation employs either a heat-recovery venti­lator (HRV, from $700; see the photo at left) in cold climates or an energy-recovery ventilator (ERV, from $800) in hot climates. These units, which can be incorporated into a house with or without existing ductwork, bring in fresh air and exhaust stale air. In addition, an HRV tempers incoming air with outgoing air, thus lowering the amount of energy necessary to condition the fresh air. An ERV looks and functions similarly, but it dehumidifies and cools hot, humid air, which reduces the load on the air conditioner.

America’s First Residential Ventilation Standard

U

ntil recently, not much had changed since 1631, when England’s King Charles I passed the first ventilation code (your dwelling had to have operable windows taller than they were wide). Because today’s houses aren’t leaky enough to provide fresh air, the American Society of Heating, Refrigerating and Air-Conditioning Engineers wrote a ventilation standard. ASHRAE 62.2 is a minimum standard applicable to both new and existing homes (including small multifamily ones). Keep in mind that 62.2 is a standard, not a code. Think of it as a recommendation that might lead to a new code requirement.

THE MAJOR REQUIREMENTS OF 62.2:

•WHOLE-HOuSE MECHANICAL VENTILATION

Ventilation can be achieved with an exhaust, supply, or balanced ventilation system. Ventilation airflow, mea­sured in cubic feet per minute (cfm), must increase with the size of the house and the number of occupants. The 62.2 standard recommends minimum ventilation rates of 45 cfm for 2- to 3-bedroom houses up to 1,500 sq. ft.;

60 cfm for 2- to 3-bedroom houses between 1,500 and

3,0 sq. ft.; and 75 cfm for 4- to 5-bedroom houses between 1,500 and 3,000 sq. ft.

• mechanical exhaust in kitchens

AND BATHROOMS

In addition to the whole-house ventilation requirement: Kitchen: a user-operable vented range hood of at least 100 cfm; or a fan giving 5 kitchen air changes per hour of continuous or intermittent exhaust.

Bathroom: a user-operable fan of at least 50 cfm; or a continuously operating 20-cfm exhaust fan.

• minimum performance standards for fans

Volume: Fan’s airflow rates must be rated by a third party. Noise: Continuously operating fans should be 1 sone or less; intermittent-use kitchen and bath fans cannot exceed 3 sones.

•AIRTIGHT GARAGE DucT SYSTEMS

Air handlers or return ducts in an attached garage must be tested for tightness. While tight ducts save energy, 62.2 sets only minimum requirements to protect indoor-air quality.

• particle FILTRATION upSTREAM OF AIR HANDLERS

Dirty ducts and coils can become a pollution source, so 62.2 requires pleated furnace filters (MERV 6 or better). To clean the air inside a house, more-aggressive filtration is needed.

Good Ventilation: Different Paths to the Same Place

When ventilation removes contaminants, it’s your friend, but in doing so, it usually brings in outdoor air that must be heated, cooled, or dehumidified, which costs money. Just because it costs money, though, doesn’t mean ventilation is your foe. The energy savings of a tight house more than offset the operating cost of a small fan, not to mention the costs of asthma and allergy medications. The trick is to design a ventilation system that provides acceptable indoor air as efficiently as possible. The system’s design depends on where you live, but the ASHRAE ventilation standard can guide you through alternatives. Every ventilation system likely will be a little different. In general, though, there are three approaches to whole-house ventilation—exhaust, supply, and balanced systems—each a little more involved and more expensive than the last.

Exhaust Ventilation Clears Pollutants at Their Source

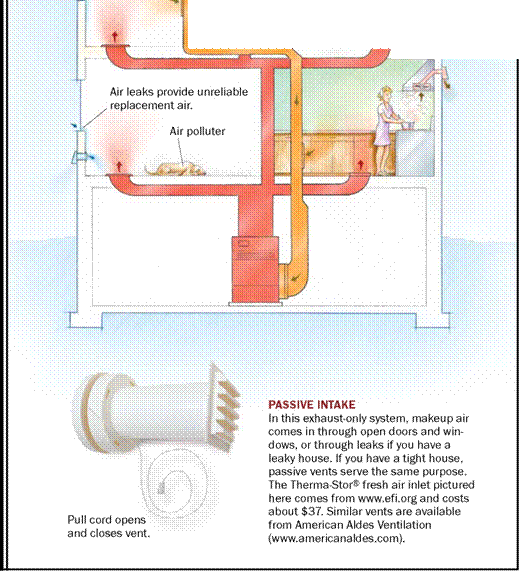
The simplest system, exhaust only, provides mechanical ventilation with a continuously operating exhaust fan (see the drawing on the facing page). This fan can be as simple as upgrading your bath fan or as complex as installing a multi-room exhaust fan. The exhausted air is replaced by air infiltrating through leaks (in humid climates, this can cause moisture problems). But rather than doing so at the whim of the weather, it is being done at a steady level with the fan. With the quiet, energy-efficient fans avail­able today, this option is cheap and easy. Be­cause its makeup-air requirements are small, a low-volume exhaust fan won’t depressurize your house enough to cause backdrafting. This system also has the advantage that it can be used in homes without ductwork.

The simplest way to make sure contaminants don’t build up in a house is to suck them out with one or more continuously running exhaust fans. This ap­proach is the least expensive, is the least invasive, and has the advantage of working in houses without existing ductwork. For whole-house ventilation, ex­isting kitchen and bath fans must be left running, a noisy prospect unless you have super-quiet models. A better solution is to use a multiport fan (see the drawing on p. 36) in the attic to exhaust many rooms simultaneously.

Exhaust fan


Ґ.


Good Ventilation: Different Paths to the Same Place

t

1 I • jr*

II ‘1

————- J

Щ

П

‘–

t

ШІ


Laundry

room


Good Ventilation: Different Paths to the Same PlaceGood Ventilation: Different Paths to the Same Place

Good Ventilation: Different Paths to the Same Place

Three Design Choices for Hot, Humid Climates

I

n a hot, humid climate, drawing fresh air into a house can be a problem. You can inad­vertently introduce 8 gal. of water a day from ventilation air. When combined with internally generated moisture sources, this is way too much. There are three design options to con­sider or combine.

1. Tolerate

You can accept periods of high moisture levels if you use moisture-tolerant materials. Hard, cleanable surfaces are better choices than fuzzy ones. Use hardwood floors instead of car­pet, or tile, plaster, or brick rather than paper­faced drywall.

2. Desiccate

Get the extra moisture out of the air by con­densing it and draining it. Air conditioners can remove moisture, but they usually are sized and designed for controlling temperature.

In some climates, they won’t dehumid – ify enough under normal use. A better option is a standalone dehumidifier or enhanced dehumidification gear.

3. Procrastinate

Some humid climates have dry seasons. It might be possible to use reservoir-type buffer materials that store moisture during hot, humid pe­riods, then release it during dry ones. Examples of such materials are brick interior walls, cellulose insulation, and solid-wood exposed beams.

A downside is that this system blows out heated (or cooled) air and, therefore, wastes energy. Another downside is that you don’t know where the ventilation air being sucked in is coming from (or where it has been).

Air from a garage or other polluted space shouldn’t be inadvertently brought into a house. Passive-intake vents are a simple way to offset this problem (see the photo on p. 33).

Indoor Air Usually Is Dirtier Than Outdoor Air

Because indoor air starts as outdoor air, then grows more polluted from contaminants in a house (see "Indoor Air Pollutants," p. 32),
indoor air needs to be cleaned.

Flushing a house with fresh air removes much of the indoor pollution.

Indoor Air Usually Is Dirtier Than Outdoor Air
The most obvious way to control some contaminants is to isolate them. Paint thinner and other poisons can be stored in a garden shed. Another way to control contaminants is to eliminate them from the construction process: Use low-VOC paint, low-emitting carpet, and solid wood, rather than particleboard, in furniture and cabinetry. A third way to control the pol­lution level in a house is to exhaust spaces where contaminants are produced, such as kitchens, laundries, utility/storage rooms, and bathrooms. But even after you’ve iso­lated, eliminated, and exhausted, there are still pollutant sources that are most practi­cally diluted with controlled whole-house ventilation.

Efficient Houses Need Fresh Air

■ BY MAX H. SHERMAN

I

hear it all the time: "Houses are too tight." "Houses didn’t used to make people sick." These assertions seem well founded: The most serious chronic illness of American children is asthma, and the Environmental Protection Agency lists poor indoor-air quality among its top five environmental threats. Are tight houses poisoning us?

There’s no disputing the cause-and-effect relationship between tight houses and indoor-air pollution. In theory, the solu­tion is simple: If you build tight, you must ventilate right. In practice, though, ventilat­ing right is complicated and controversial.

In 2003, I chaired an American Society of Heating, Refrigerating and Air-Conditioning Engineers (ASHRAE) committee that passed the country’s first residential ventilation standard. It gives builders and designers guidelines for providing good indoor air while keeping utility costs low (see the sidebar on p. 37).

Houses Require Ventilation

Before I go farther, let me define ventilation. The word ventilate comes from the Latin ven – tuilare, and it means to expose to the wind. Although this might sound like some creep in a raincoat, the real story is more complex. Ventilation is used many ways when describ­ing how a house works: There’s crawlspace ventilation (often bad), ventilated siding assemblies (good), and roof ventilation (sometimes bad, sometimes good). We’re not talking about that stuff. Here, we’re talking about mechanical ventilation, using fans to blow out old air (exhaust), suck in new air (supply), or both (balanced ventilation).

Leaky Houses Are Not the Answer

On average, the air in older homes is re­placed once every hour (1 ACH, or air change per hour) because older homes have a built-in ventilating method that’s simple and reliable: leaks (or infiltration). The aver­age house in the United States has about 3 sq. ft. of holes in it, but infiltration is a pretty bad way to ventilate because it wastes

Подпись: Tight houses are energy efficient, but they X4 need to breathe ^D[ to be healthful — and comfortable Efficient Houses Need Fresh Aira tremendous amount of energy. You could plaster that 3 ft. of holes with $20 bills, and the work would pay for itself in less than a season.

Since the oil shock of the 1970s, houses are tighter and better insulated. Even conventionally framed new houses can be 5 times tighter than the general stock. Many builders and designers are tempted to take the Goldilocks approach and to look for a level of leakage that is just right, neither too little nor too much. Unfortunately, there is no hole for all seasons. The best a leaky house can do is waste energy much of the year and be underventilated the rest of the year.

Won’t open windows provide the ven­tilation we need? In principle, yes, but in practice, no. People are pretty bad at sensing exactly how much, how often, and for how long to open a window to provide optimal ventilation. Furthermore, noise, dirt, drafts, and creeps in raincoats dissuade people from opening windows.

A Tricky Victorian

This two-family Victorian house (circa 1860) was difficult to upgrade because we weren’t allowed to remove siding, replace the win­dows, or dig into the slate roof.

The historic commission did, however, allow us to remove and replace the siding and windows on one wall where the siding was damaged and needed replacement, so we injected open-cell foam, added house – wrap and furring strips, and replaced the siding on that wall.

Historic commissions all over the country favor historical authenticity over durability and energy efficiency with regard


Tar-paper baffle connects wall and roof insulation.


Kneewall


Drywall is a code-required fire block.


3/4-in. furring strips

Wood

siding


Open-cell spray foam (R-40 in the rafters; – R-14 in the walls)


Housewrap


Подпись: A DRY BASEMENT TO BEGiN WiTH This house had no standing water in the basement, nor was there evidence of previous flooding. Because the basement had historically been dry, we didn't install a perimeter drain and sump pump. Rather, we installed a drainage mat on top of the existing slab (to trap errant seepage) and placed 2 in. of rigid- foam insulation on top of that. We then topped the assembly with a new slab to make a warm, dry storage area. Подпись: ВПодпись:How Much Insulation Do You Need?

ecause the earth is such a great buffer to heat loss and gain, the insulation needs in a house grow as you get farther from the ground. Naturally, they’re greatest at the roof, which is baked by the sun all day and chilled by the sky at night.

We specify significantly higher levels of insulation than are required by the International Energy Conservation Code, and we think it is money well spent. When you’re attempting to approach net-zero energy use in homes, energy that isn’t used is always the cheapest energy.

R-10 under the Basement Slab

It is easy to add 2 in. or 3 in. of extruded (or expanded) polysty­rene under a new slab before pouring the concrete. This could cut into headroom a bit, but the benefits outweigh the cost.

R-20 Basement Walls

Warming basement walls is often the best protection you can get from mold growth. Additional living space is an added ben­efit. Energy codes in most cold climates call for at least R-10, but if you can afford the additional insulation at this time, it is well worth it. Both closed-cell spray foam and rigid-foam insula­tion are good choices.

R-40 in the Walls

By warming above-grade walls, you eliminate chilly convection currents inside a room, which can increase your actual living space because furniture no longer needs to be moved away from exterior walls. While the building code asks for at least R-19 in most cold climates, it is worthwhile to use as much insulation as you can afford.

R-60 in the Roof

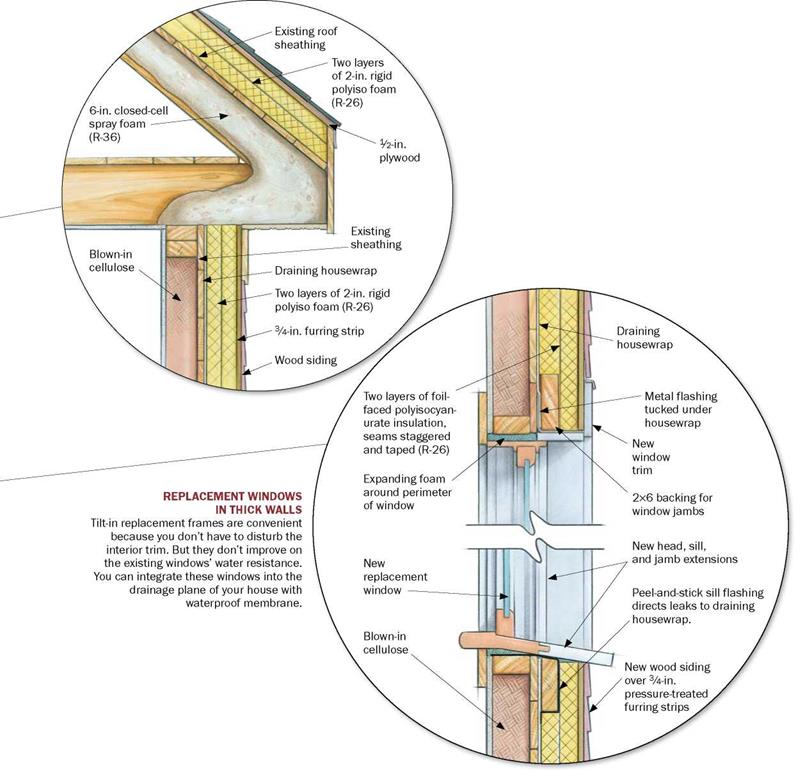
Adding insulation to the roof (rather than the attic floor) brings extra living and storage space into the home at little cost. It also reduces summer cooling loads. It’s often easy to provide more than the code minimums because of deep rafter cavities. If you’re reroofing the house, consider putting rigid-foam board insulation on top of the sheathing as we did in two of the case studies here. After judging the performance of the first two houses, we increased our recommendation from R-40 to R-60.

n— 1 ■

П.

■1

wm

1

І

ji

і

в


»

– ~


A Tricky Victorian

A Tricky Victorian

Подпись: iNSULATE OVER AND UNDER THE ROOF DECK To get the most insulation into the shallow 7-in. rafters, we used closed-cell foam. On top of the roof, we added 4 in. of polyisocyanurate foam board, which has the highest R-value per inch of the rigid- foam boards. This yielded an R-60 roof without reframing. We didn't want to disrupt the interior plaster to spray foam into the wall cavities, so we filled the walls with cellulose and covered them with rigid foam.

Third Time Is a Charm

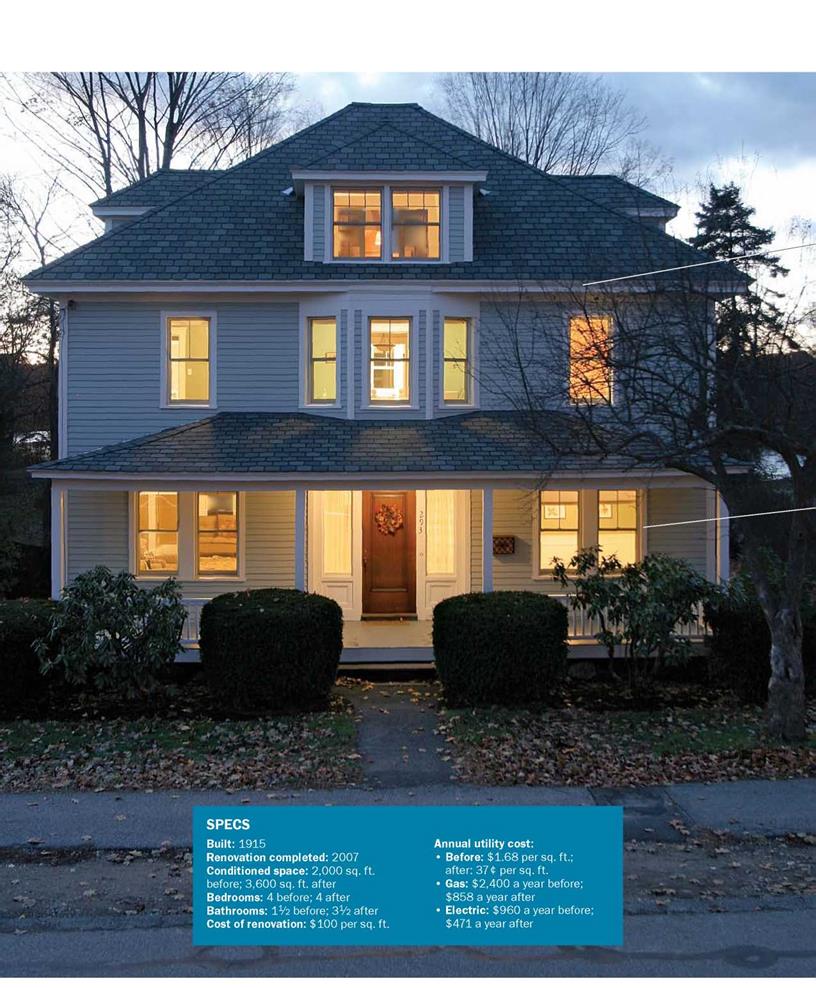
This 1915 foursquare is an American classic found in almost every town in the country. Interior plaster was in great shape, the lay­out was excellent, and there was no struc­tural damage to speak of. Other than adding a few new windows to the back (for better views to a pond) and updating the kitchen, we didn’t disrupt the interior too much. By insulating the basement and roof, we almost doubled the living space of this house with­out adding an inch to the footprint. And the utility bills were cut by 60%.

Better windows would be the next place to reduce energy loads in this house. A triple-glazed unit with heat-mirror technol­ogy might further reduce the heating load, allowing us to get closer to zero.

Betsy Pettit, FAIA, is an architect and a principal of Building Science Corp., now located in the Victorian house featured here.