Cross-sighting a door jamb

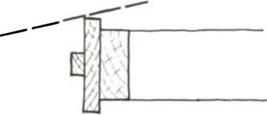
Cross-sighting ensures that a door fits accurately in its frame because the jambs are parallel to each other. You can cross-sight with strings, pulling two from corner to corner diagonally across the frame. If the strings just touch in the middle, the jamb sides are parallel. A faster way to do this is by eye­balling. Stand beside the wall about 3 ft. from the frame and sight along the side jambs to see if they line up with each other from top to bottom (see the drawing below).

When a house frame has been well plumbed and lined, jambs cross-sight easily. If the jambs aren’t parallel, place a 2x block against the bottom plate near the frame and hammer it until the wall moves enough so that both jamb sides line up. Then drive a 16d toenail into the bottom plate to hold it in place. If the jambs are terribly out of parallel, check to see what the problem is—the wall might be badly out of plumb and need correction.

Cross-sighting a door jambCross-sighting a door jambCross-sighting a door jambCross-sighting a door jamb

Installing door hardware

Most prehung doors and their jambs are predrilled and premortised to accept the door lockset and dead bolt. Even then, you might need to whittle and adjust to install the lockset accurately. Although every lockset comes with installation instructions, here are the basic steps that I follow.

If the door is predrilled, insert the spring – bolt latch into its hole and mark around the outside of the face plate. I do this with a utility knife or sharp pencil to get a close fit. Remove the latch and care­fully mortise with a sharp chisel to a depth equal to the thickness of the face­plate (about Ve in.). Then reinsert the latch into the hole, fit the faceplate into the mortise, and screw it flush with the door edge. If the door edge is pre­
mortised, chisel out the corners so they are square before installing the latch. The knob assembly slips through the spring-bolt latch, and two longer bolts hold the knobs together (see the photo on the facing page).

Next install the strike plate. If it’s pre­mortised, fit it in place just like the latch. It’s best to predrill the screw holes here so you don’t split the jamb. If the jamb isn’t premortised, place the strike plate over the hole and trace around it as you did for the latch bolt, then carefully mortise within the traced lines to a depth of about!/?6 in.—the thickness of the strike plate.
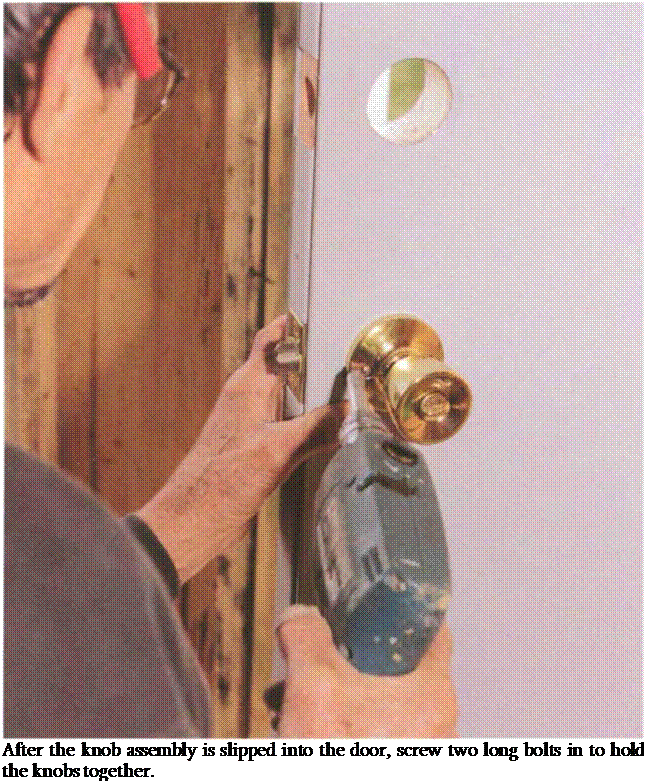
Подпись: After the knob assembly is slipped into the door, screw two long bolts in to hold the knobs together.
It’s often hard to get the strike plate to set correctly. When things are right, the door shuts and locks and is held firmly against the door stop or weatherstrip­ping. Many strike plates have a lip that protrudes down into the jamb hole. So if the door rattles back and forth, you can bend this lip outward a bit until the latch fits firmly against it. If the latch won’t quite drop into the strike hole, try using a flat file to remove a bit of the metal along the front edge of the metal plate.

If this doesn’t work, the strike plate itself may have to be moved. Measure in on the door edge (door-stop side) to the flat side of the latch. On the jamb, place the tape measure against the stop and transfer the measurement taken above to locate the front inside of the strike plate. If the strike plate is remounted, the extra holes will have to be filled so that they can be sanded and painted.
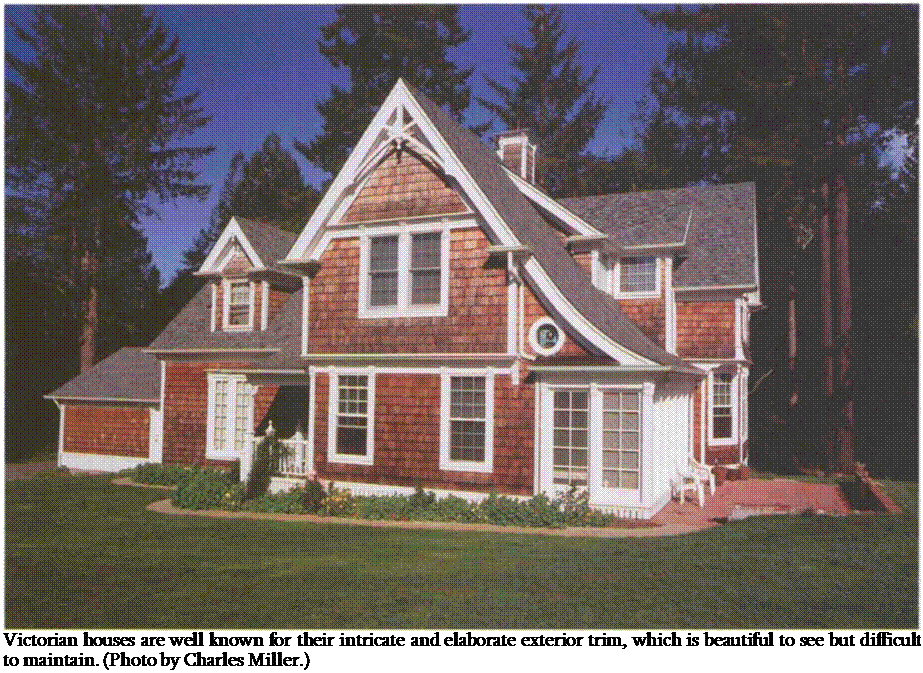
Подпись: Victorian houses are well known for their intricate and elaborate exterior trim, which is beautiful to see but difficult to maintain. (Photo by Charles Miller.)
EXTERIOR TRIM

I live near several Victorian houses, which are notable for their intricate and extensive exterior trim. While I admire the craftsmanship on these houses, I’m always thankful that I’m not the one responsible for their upkeep.

In this section, I’ll talk about cutting and installing basic exterior trim. While it may not be as ornate as the trim on a Victorian beauty, it’s far less time – consuming to install and maintain, which is an important consideration in our fast-paced world. There are many ways to trim a house, and a house that

looks quite ordinary can suddenly take on a whole new character just by using another style of trim.

Building soffits

Soffits are used to cover exposed rafter tails and roof overhangs. West of the Mississippi, the tendency is to leave the eaves open with rafters exposed. In the East, houses often have a soffit that fills the gap between the fascia and the wall. Many of these soffits are quite elaborate and ornate, but the trend in house building is toward simplicity. Elaborate soffits require a lot of material, special moldings, and considerable labor and cost to build.

SELECTING A FLOOR FINISH

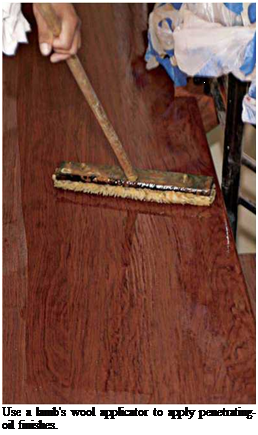
Floor finishes are often divided into two cate­gories: penetrating sealers (penetrants) and surface finishes. Penetrating sealers usually contain plant-based oils, such as tung oil or modified lin­seed oil, and soak into wood fiber. In time, they harden to seal and protect the wood. Because penetrating sealers form a hard outer shell, they can be easier to touch up by sanding lightly and adding more sealer if wood becomes scuffed or scratches—touched-up areas won’t be obvious. Wood stains penetrate and don’t really seal.

When they have dried, penetrating sealers are often waxed to make them more durable. But waxed floors are durable only if they’re regularly maintained, which takes time. Thus most floors today are sealed with surface finishes, which don’t require waxing.

Surface finishes, as their name implies, form a tough exterior shell to resist scuffs, scratches, and moisture. The earliest surface finishes were shellac and varnish, which have been largely replaced by oil-based and water-based poly­urethanes. Shellac has poor water resistance and chips easily, and varnishes tend to be strong smelling and slow to dry. Besides, both are extremely flammable. Although surface finishes require less maintenance, their disadvantage is that they can’t be touched up when they become worn, so you must refinish the whole floor. Surface-finish sheens range from matte (little shine) to satin to semigloss to gloss. In general, glossier finishes are harder, more durable, and more water resistant.

As you’ll see, polyurethanes vary greatly in ease of installation, drying time, and durability. Water-based polyurethanes are the stars of the show these days: tough, nonyellowing, relatively mild smelling, and fast drying (2 hours to 6 hours). And brush cleanup is easy with soap and water. Because they contain lower levels of
volatile organic compounds (VOCs), water based polyurethanes are also safer to use. Despite their volatility, oil-based polyurethanes are often applied by professional refinishers because they’re slower to dry and thus allow more time to even out coats. Though solvent based and stronger smelling, oil-based polys are more durable and water resistant, and they turn a handsome amber with age. Let them dry for 24 hours before recoating or walking on them. Moisture-cure polyurethanes are the most durable of the lot; but because they must absorb moisture from the air, they’re temperamental to apply, slow to dry, and best left to professionals.

Finally, there are surface finishes that require highly controlled environments and thus are factory applied to prefinished flooring. This group of finishes may include aluminum-oxide, titanium, or ceramic additives to resist abrasion and may require UV curing, rather than heat cur-

Подпись:image1006
ing. Some of the toughest of these finishes infuse acrylic into the wood cells in a modern version of a penetrating sealer.

. EXAMPLES FROM THE DEMONSTRATION PROJECTS

The city of Lacey requires a 10-foot separation between public water and public sewer, a state and local code provision. When a sewer lateral crosses a water main or vice-versa, a З-foot vertical separation must be maintained. This occurred in The Park, but Phillips was unable to make the З-foot vertical separation.

Подпись: Lacey, Washington. EXAMPLES FROM THE DEMONSTRATION PROJECTSBecause of this, the city required a heavy gauge metal sleeve around the water pipe within 10 feet of the sewer. This apparently is a carryover requirement from the time of cast iron and concrete soil pipe, when joints often broke and leaked. However, with longer lengths of seamless PVC pipe available, the separation require­ments and the need for a metal sleeve appear to be unnecessary.

Подпись: Portland, OregonBuilders in Portland frequently install gas, electric, telephone, and TV lines in a common trench. In addition to allowing this practice, the city of Portland permitted Robinson to install his common trench and water line trench outside the right-of-way. The city also allowed the use of less expensive native backfill instead of off-site granular backfill. The city would not waive their normal require­ment that sanitary sewer mains be placed in a separate trench in the right-of-way. Robinson saved $5,040 by installing his common trench and water line trench outside the right-of – way and using backfill from the site.

in


112

Creativity Phase

Objective. The objective is to generate, by creative techniques such as brainstorm­ing, numerous alternative means for accomplishing the basic function(s) identified.

Key Question. Accomplishing this phase should result in answering the question “What else will do the job, that is, perform the basic function(s)?” The completeness and comprehensiveness of the answer to this question determine to a very high degree the effectiveness and caliber of value work. The greater the number and quality of alterna­tives identified, the greater the likelihood of developing an outstanding solution. Additional alternatives that have not been considered will usually exist regardless of the skill and proficiency of the study team.

Procedure. Consideration of alternative solutions should not formally begin until the problem is thoroughly understood. All members of the VE study team should partici­pate, for the greater the number of ideas conceived, the more likely that really effective, less costly alternatives will be among them. A proper frame of mind is important at this stage of the study; creative thinking should replace the conventional. It should be a unique flight of the imagination, undertaken to generate numerous alternative methods of providing the necessary function(s).

Judicial thinking does not belong in this phase. As an aid to speculative thought, the techniques of creative thinking, such as brainstorming, should be employed. Every attempt should be made during this phase to depart from ordinary patterns, typical solu­tions, and habitual methods. Experience indicates that it is often the new, fresh, and radically different approach that uncovers the best-value solution. The individual or group members may supplement their ideas with those of others—everyone is expected to make a contribution.

The best solution may be complete elimination of the present function or item. This possibility should not be overlooked during the initial phases of this step. Perhaps some aspect can be modified which will permit elimination of the function under study. Only after determining that the function must remain should the study group look for alterna­tive ways to perform the same function at the lowest conceivable cost. Free use of imagination is encouraged so that all possible solutions are considered.

A partial list of questions that can be used to stimulate and trigger ideas is given in Table 10.2. The questions shown can be rephrased by substituting terms like project, system, item, or procedure for the words it or part when appropriate.

Techniques

1. Blast, create, and refine. This theme has often been used by value engineers. Blast—get off the beaten path. Create—rally for an unusual idea; reach way out for another approach. Refine—strengthen or add to develop an idea to perform basic functions in a new or unique manner.

2. Functional comparison. Conduct a creative problem-solving session (brainstorming) in which new and unusual contributions of known things or processes are com­bined and/or rearranged to provide different ways to perform basic functions.

3. Simple comparison. Conduct a thorough search for other items that are similar in at least one significant characteristic to the study item. Determine whether they can be modified to satisfy basic functions.

4. Scientific search. Conduct a search for other scientific disciplines capable of per­forming the same basic function. This often involves interviewing specialists in disciplines that did not previously contribute to solving the problem. An industry (or its representatives) that specializes in some highly skilled technique can often make a substantial contribution when called upon for technical assistance.

TEMPERATURES OF ASPHALT MIXTURES

The recommended temperatures of SMA mixtures with road bitumens accord­ing to EN 12591 are given in the standard EN 13108-5. The minimum tempera­ture of delivery to a laydown site and the maximum production temperature in an asphalt plant are provided there. When using a modified or special binder, one should follow the information passed on by its producer or as determined in other documents.

Example temperatures for two of the most common road bitumens (EN 12591) used for SMA are as follows:

• 50/70— minimum temperature 150°C, maximum temperature 190°C

• 70/100— minimum temperature 140°C, maximum temperature 180°C

Wildf lower

The Wildflower is like my house on the outside with a single, open room inside. Add closet(s), a loft, utilities, furniture and entire rooms as you see fit.

Square feet: 117

House width: 8’

House length: 19’

Road Height: 13’-5” Dry Weight: 5100 lbs

Porch: 3’x 7%’

Ceiling height: 6’-3” – sizes are approximate

Prudent Avoidance Strategies

There are many simple and inexpensive ways to make the bedroom a sanctuary that is free from these stressful fields. Here are five suggestions:

1. Use battery-powered clocks near the bed. Re­search has shown that exposure to high mag­netic fields during sleep can cause severe long-term illness. Many electric clocks pro­duce high magnetic fields.

2. Turn off circuit breakers affecting the bedroom while you sleep. A restful sleep is necessary for health and a strong immune system. Electric fields affect the biocommunication system, keeping you from sleeping soundly.

3. Use beds without metal. Metal frames and metal box springs can amplify and distort the Earth’s natural magnetic field, leading to a non-restful sleep.

4. Make sure there are no elevated magnetic fields. Magnetic fields from appliances and building wiring can penetrate walls into a bed­room and disrupt the body’s communication system.

5. Eliminate or shield from RF. Radio frequency signalsfrom portable phones, cell phones, and wireless devices have been shown to inter­fere with the body’s immune system. External sources need to be shielded. In today’s world of

ubiquitous cell phone towers and radio com­munications, there are many things you can do when building to block RF that will be bom­barding your home. The first line of defense, of course, to measure the site before purchasing it and reject it if there are unacceptable levels of RF. If RFs cannot be avoided or are antici­pated, the following should be considered:

• Use solid, dense building materials such as stucco, stone, brick, or concrete.

• Use low-emissive (Low-E) dual-pane windows with metal frames or frames painted with RF – reflective paint.

• Use foil or RF-reflective netting under the roof­ing or a grounded metal roof.

If you are not able to make major structural changes to the home, another option is to buy special shielding fabric that can be tented around you while you sleep. A source for this fabric is safe livingtechnologies. com. Beware of the multitude of devices on the market that claim to be effective against RF. The vast majority of these are gimmicks with limited or no measurable effect.

Dishwashers Are Shaping Up

Dishwashers have changed quite a bit in recent years. They use a lot less water, which translates into lower energy use for water heating. In 1978, water use by dishwashers ranged from 11 gal. to 15 gal. for a normal dishwashing cycle. By 2000, that usage had dropped to 6 gal. to 10 gal.

As water use has gone down, total energy use has also dropped, while the proportion of energy use for processes other than water heating has risen. In 1978, 83% of the total energy use for dishwasher operation was for heating water; 10% was for motor opera­tions, and 7% for drying. By 1994, energy use for water heating had dropped to 56%, according to a 2003 Virginia Tech report.

However, that does not mean most dish­washers are as energy efficient as they could be. Nearly all dishwashers today have boost­er heaters that increase the temperature of incoming water to about 140°F to improve wash performance. An integral electric ele­ment provides this heat, and it can use a lot of electricity. Recent independent testing shows that booster heaters operate through­out the dishwashing cycle, resulting in total electricity use per cycle of 2.0 to 3.5 kwh. Used an average of 215 times per year (the frequency DOE assumes), a dish­washer could easily consume more elec­tricity annually than a refrigerator. More research is needed to determine the signifi­cance of this electricity use.

Dishwashers Are Shaping UpПодпись: Drawerful of savings. Compact dishwasher drawers can be highly efficient (both of these models from New Zealand manufacturer Fisher & paykel® are Energy Star compli-ant). An added bonus is that the integrated models, like the one pictured above, blend seamlessly into kitchen cabinetry. Dishwashers Are Shaping UpDishwashers vary considerably in their energy use, much more so than refrigerators. For comparison, dishwashers are rated by the federal government according to their energy factor (EF), a measurement based on the energy usage for an average number of cycles (a completely different formula than the one used to rate cooking appliances).
The higher the EF, the more efficient the dishwasher: The current federal standard mandates a minimum EF of 0.46; Energy Star dishwashers must meet a minimum EF of 0.65. The most-efficient dishwashers have an EF that approaches or slightly exceeds 1.0. Although the EF is used to compute the annual energy consumption and cost estimates found on the EnergyGuide label on many appliances, the EF itself might not appear there.

Closing In

With the timber framing completed, it was time to fill in the wall panels. We used the small lower panels beneath the windows as training panels for students at the building school, but, as we got higher, Jaki and I pandered to a dream which we
have had for a long time: to make the most beautiful and artistic cordwood panels that we’ve ever done. The motif would be our Pacific Rim Journey of 2001, especially our one-week visit to Rapa Nui (Easter Island). The results of our efforts appear in the pictures at the end of this chapter. See my previous book, Cordwood Building: The State of the Art for more about cordwood masonry

Windows and doors. I don’t want to spend a lot of time on windows and doors. There are myriad choices. The most important consideration with respect to the subject matter of this book is that you may wish to frame the windows — and doors — with your heavy-timber posts and beams. This must be worked out carefully at the design stage. Know the rough opening (R. O.) of the windows and doors you plan to use, but don’t trust figures in a catalog. There are such things as printer’s errors, and Murphy’s Law says that they will occur with the window that you intend to buy. Have the unit on site so that you can check the R. O.; then try it in place after you’ve done the framing.

We hired our friend John Light, a skilled builder, to help us install the five windows and our Therma-Tru™ exterior door. With John’s help and experience, the job was done, and done right, in a day. I spent another day on the trim.

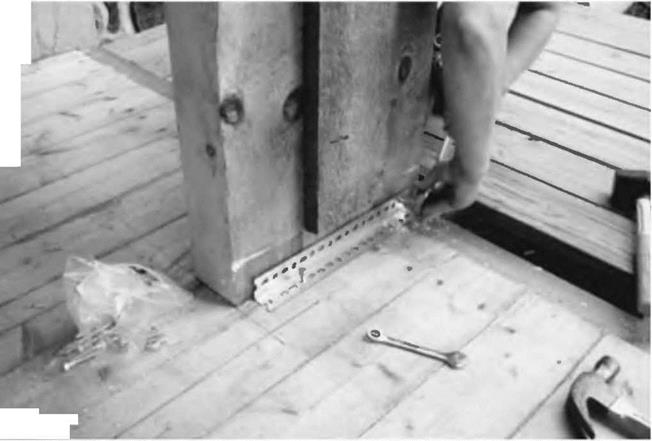
We have an exterior door in the sunroom, and an internal doorway connecting the new room with the dining room in the house. Both are framed to accommodate three-foot-wide (91-centimeter-wide) doors and both are located in 16-inch-wide cordwood walls, one 22 years old and one brand new. In each case, our doorframes consist of double-wide four-by-eight doorposts, with a similar lintel overhead. To join the two four-by-eights together into a single four-by – sixteen doorpost, I installed a vertical one-by-six “key,” as seen in Fig. 5.40. Cordwood walls can be built right up to this key piece, and the log-ends can even touch it in the middle of the wall. Both the inner and outer mortar joints (each 5 inches wide) are laid up right against the doorpost, effectively locking the cordwood panel against the post. We use a similar detail at all post locations. Note also in Fig. 5.40 how a piece of angle iron is used to fasten the doorpost to the wooden deck. The angle iron, like the key piece, will wind up hidden in the cordwood wall.

The window on the west side is installed within a frame made from double­wide two-by-eight cedar planks, planed to 1 Vs inches (4.8 centimeters). The inner and outer components of the frame are scabbed together with a one-by-six (2.5- by-15.2 centimeter) key piece, similar to the one seen in Fig. 5.40. The frame “floats” in the cordwood wall, but is carefully centered. A strong lintel, seen in

Fig. 5.42 below, carries the load of the rafters down onto the cordwood wall.

Подпись: Fig. 5.40: The one-by-six key piece locks the doorframe to the cordwood wall. The angle iron ties the doorpost to the floor.image148Wood finishing. We sanded and varnished the window surrounds, and the posts and girders, but not the five – by-ten rafters. I used my trusty Makita 5"disk sander, #80 grit paper, to finish the timbers, some before construction, and some, as an afterthought, in situ. In retrospect, it would have been easier and more pleasant to do this sanding before installation. A belt sander is another option, but use a dust mask in either case. And listen to Mark Powers, one last time:
My new favorite tool is a Bosch portable 4" planer. It does a wonderful and relatively quick job of finishing the timbers before they’re installed. My posts are sugar maple and the various beams are white ash, maple and beech. Once the grain is exposed, they are absolutely beautiful. I’ve used both a belt sander, and, now, the planer to finish timbers. Hands down, the planer is the way to go, yielding a beautiful almost glassy finish and removing only the bare minimum of wood. Besides revealing the natural beauty of the grain, finishing the timbers eliminates a lot of dust catching in the home.

We sanded the spruce floor and applied three coats of floor oil, which we had used successfully in the main part of the house. Something was different about the wood in the new room, though, and we found that shoes easily marked the oiled floor, and the marks were a real pain to clean. We finally broke down and, over the oil, applied two coats of Gym Seal, a hard clear surface used on gymnasium floors. Now the floor looks great and does not scuff.

Finishes, Cleaning Solvents, and Applicators

FINISH

CLEANS WITH

APPLICATOR

COMMENTS

Water-based

polyurethane

Soap and water

Synthetic brush; pad; round applicator

Probably best all-around finish for nonpro; tough, water-resistant finish; easy cleanup, low smell; work fast, overlapping edged areas before they dry

Oil-based

polyurethane

Mineral spirits

Natural-bristle brush; round solvent-resistant applicator

Tough, durable finish; favored by pros because dries slower than water-based; slightly stronger smell while drying

Penetrating sealers (tung and modified linseed oils )

Mineral spirits

Lamb’s wool applicator, natural-bristle brush

Slow to dry; strong odor; scratches easily but can be touched up with new finish over old; usually waxed

Stain-sealers

Mineral spirits

Varies: natural-bristle brush to clean rags

Same profile as penetrating sealer; finish must be waxed to protect wood

Varnish

Turpentine

or paint thinner

Natural-bristle brush; lamb’s wool pads

Volatile; strong smelling; slow to dry; hard, amber finish gives historical appearance; often used to match older finish

Shellac

Denatured alcohol

Natural-bristle brush; lamb’s wool applicator

Poor water resistance; flammable; chips; rarely used for floors anymore

Various (acrylic – impregnated; acrylic – urethane; UV cured)

Proprietary solvents

Computer-monitored

sprayer

Factory applied in highly controlled environment; durable; water resistant coatings on prefinished wood flooring

Подпись: Filling HOLES AND GAPS Flooring stores carry color-matched spot fillers and trowel fillers. Spot filler is basically woodworker's putty, applied with a spackling knife to fill nail holes and obvious cracks. Trowel filler, which is thinner, is pored onto the floor in small amounts and worked into the narrow gaps between floorboards, using a large squeegee or a smooth-edge trowel. Done on your knees, applying trowel filler is hard work, requiring pressure to force the filler into gaps and to scrape off excess. Consequently, though spot-filling is common, trowel-filling is not. Note: If you've got wide pine planks, which expand and contract seasonally, don't fill the gaps between them. Brag about their rustic charm instead.

and sanding the floor a second time. If you need to fill holes or gaps in the floor, do it before the second sanding.

SCREENING FLOORS

After you’ve drum-sanded and edged the floor with 100-grit sandpaper and vacuumed it well, use a buffer with an abrasive screen to smooth out any remaining marks. Use a 100-grit or 120-grit buffer screen, which is held onto the buffer pad by friction. Because the buffer rotates slowly and the screen is flexible, you can buff
right next to the base of the wall. Start along a wall, moving the buffer from side to side (it rotates in a counterclockwise direction). As you did with the drum sander, overlap passes about one-half the width of the buffer pad. Buffer screens wear out quickly, so replace them when you’ve screened one-third to one-half the floor. Save at least one used screen, so you can fold it and use it to hand-screen the corners where the buffer couldn’t reach.

To achieve an even smoother finish, vacuum the floor and wet-sponge it with clear water the night before screening it (the moisture will raise the grain slightly). The next day, when the wood flooring is dry, screen it smooth. Wetting the wood and then screening it is called popping the grain. Popping is optional, but strongly recom­mended if you’ll be applying a water-based finish. After screening the floor and touching up corners by hand, vacuum the room thoroughly and use clean tack rags to remove dust from any horizon­tal surface. (A tack rag is a slightly sticky cheese­cloth pad that adheres dust.) Finally, dry-mop the floor, wrapping the mop in a clean cloth lightly dampened with the same solvent you used to thin the floor finish.

Подпись: Stirred, Don't shake clear floor NOTSHAKEN

finishes to mix them, as you do paint. Shaking will entrap air bubbles and leave blemishes—popped bubbles—when the finish dries. Instead, stir finishes thor­oughly from the bottom of the can. Don’t thin finishes. If stirring doesn’t dissolve the finish "skin” or other solids, strain the finish through a paint strainer.