Closing In
With the timber framing completed, it was time to fill in the wall panels. We used the small lower panels beneath the windows as training panels for students at the building school, but, as we got higher, Jaki and I pandered to a dream which we
have had for a long time: to make the most beautiful and artistic cordwood panels that we’ve ever done. The motif would be our Pacific Rim Journey of 2001, especially our one-week visit to Rapa Nui (Easter Island). The results of our efforts appear in the pictures at the end of this chapter. See my previous book, Cordwood Building: The State of the Art for more about cordwood masonry
Windows and doors. I don’t want to spend a lot of time on windows and doors. There are myriad choices. The most important consideration with respect to the subject matter of this book is that you may wish to frame the windows — and doors — with your heavy-timber posts and beams. This must be worked out carefully at the design stage. Know the rough opening (R. O.) of the windows and doors you plan to use, but don’t trust figures in a catalog. There are such things as printer’s errors, and Murphy’s Law says that they will occur with the window that you intend to buy. Have the unit on site so that you can check the R. O.; then try it in place after you’ve done the framing.
We hired our friend John Light, a skilled builder, to help us install the five windows and our Therma-Tru™ exterior door. With John’s help and experience, the job was done, and done right, in a day. I spent another day on the trim.
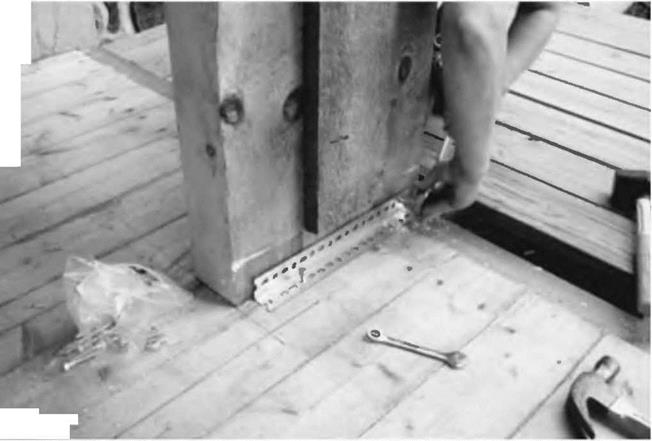
We have an exterior door in the sunroom, and an internal doorway connecting the new room with the dining room in the house. Both are framed to accommodate three-foot-wide (91-centimeter-wide) doors and both are located in 16-inch-wide cordwood walls, one 22 years old and one brand new. In each case, our doorframes consist of double-wide four-by-eight doorposts, with a similar lintel overhead. To join the two four-by-eights together into a single four-by – sixteen doorpost, I installed a vertical one-by-six “key,” as seen in Fig. 5.40. Cordwood walls can be built right up to this key piece, and the log-ends can even touch it in the middle of the wall. Both the inner and outer mortar joints (each 5 inches wide) are laid up right against the doorpost, effectively locking the cordwood panel against the post. We use a similar detail at all post locations. Note also in Fig. 5.40 how a piece of angle iron is used to fasten the doorpost to the wooden deck. The angle iron, like the key piece, will wind up hidden in the cordwood wall.
The window on the west side is installed within a frame made from doublewide two-by-eight cedar planks, planed to 1 Vs inches (4.8 centimeters). The inner and outer components of the frame are scabbed together with a one-by-six (2.5- by-15.2 centimeter) key piece, similar to the one seen in Fig. 5.40. The frame “floats” in the cordwood wall, but is carefully centered. A strong lintel, seen in
Fig. 5.42 below, carries the load of the rafters down onto the cordwood wall.

 Wood finishing. We sanded and varnished the window surrounds, and the posts and girders, but not the five – by-ten rafters. I used my trusty Makita 5"disk sander, #80 grit paper, to finish the timbers, some before construction, and some, as an afterthought, in situ. In retrospect, it would have been easier and more pleasant to do this sanding before installation. A belt sander is another option, but use a dust mask in either case. And listen to Mark Powers, one last time:
My new favorite tool is a Bosch portable 4" planer. It does a wonderful and relatively quick job of finishing the timbers before they’re installed. My posts are sugar maple and the various beams are white ash, maple and beech. Once the grain is exposed, they are absolutely beautiful. I’ve used both a belt sander, and, now, the planer to finish timbers. Hands down, the planer is the way to go, yielding a beautiful almost glassy finish and removing only the bare minimum of wood. Besides revealing the natural beauty of the grain, finishing the timbers eliminates a lot of dust catching in the home.
We sanded the spruce floor and applied three coats of floor oil, which we had used successfully in the main part of the house. Something was different about the wood in the new room, though, and we found that shoes easily marked the oiled floor, and the marks were a real pain to clean. We finally broke down and, over the oil, applied two coats of Gym Seal, a hard clear surface used on gymnasium floors. Now the floor looks great and does not scuff.


Leave a reply