Wall-to-Wall Carpeting

Basically, there are two types of wall-to-wall car­peting. Conventional carpeting is laid over a sep­arate rubber or foam padding and must be stretched and attached to tackless strips around the perimeter of the room. Cushion-backed car­peting, which has foam bonded to its backing, doesn’t need to be stretched—it’s usually glued down—so it’s generally easier to install. However, it must be destroyed to remove it. Consequently, better-quality carpeting is almost always conven­tional, and that’s the focus here.

Carpeting doesn’t ask much of subflooring, which can be slightly irregular as long as it is dry, solid, and adequately sized (58-in. plywood is typical). Carpeting can be installed over existing wood, tile, resilient flooring, or concrete floors; but check the manufacturer’s recommendations regarding subgrade installations, acceptable gaps in the substrate, padding thickness and type, and so on. Don’t scrimp on padding; buy the densest foam or heaviest rubber padding you can.

CARPETING TOOLS

You can rent most of the specialized tools. To install conventional carpeting you’ll need the following:

► A power stretcher stretches carpeting taut across a room, so it can be secured to tackless strips along opposite walls. Cross­room stretching eliminates sags in the middle of a room. You simply add and adjust stretcher sections to extend the tool.

► A knee-kicker is used in tandem with the power stretcher to lift the carpet edges onto strips, to stretch the carpet in a closet, or to draw the seams closer together before you hot-glue them.
Подпись: should slant toward a person ascending the stairs. Try to carpet stairs with a single piece 3 in. wider than the stair treads, to allow for tucking along both sides of the tread. If the carpet has a repeating pattern, determine how often it repeats and add that amount plus 2 in. to the lengths of smaller pieces that must be seam-matched to the large piece of carpet covering most of the room. Given a detailed layout sketch, a flooring supplier can refine the estimate and order the correct amount of padding, tackless strips, and so on. INSTALLING TACKLESS STRIPS Wear heavy gloves when handling tackless strips. Nail the strips around the perimeter of the room, leaving 14-in. gaps between the strips and the base of walls so you can tuck the carpet edges into those gaps. As you nail down each strip, try not to hit the angled tack points sticking out of the strip. (The tacks should always slant toward walls, away from the center of the room, so the carpet will stay impaled on the tacks.) Because it's difficult to grasp the strips without pricking a finger, use aviation snips to shorten them. Each strip must be nailed down with at least two nails. Nail the strips in front of radiators or built-in cabinets, because it would be difficult to I Carpet Layout 1 ^ Pretrimmed size / of carpet image1029

► The stair tool drives carpeting into the spaces between tackless strips and walls and between stair risers and treads.

► A seam iron heats the hot-melt carpet seam tape that joins the carpet sections.

► The row runner, or row-running knife, cuts between the rows of loop-pile carpeting. Many installers use a large, flat-bladed screwdriver to separate the rows first.

► An edge trimmer trims the carpet edges so they can be tucked behind tackless strips; under baseboards; or under transition pieces such as metal carpet doors, which are used in doorways or where dissimilar flooring materials meet.

► Seam rollers can be either star wheeled (spiked) or smooth; they press the carpet edges onto the hot-melt seam tape to ensure a strong bond. Use a smooth roller for cut-pile carpets and a star roller for loop-pile carpets.

► Miscellaneous tools include a utility knife with extra blades, aviation snips to cut tackless strips, a hammer, a stapler if you’re applying padding over plywood, a notched trowel if you’re installing padding over concrete, heavy shears, a chalkline, a tape measure, and a metal straightedge to guide utility-knife cuts.

ESTIMATING CARPET

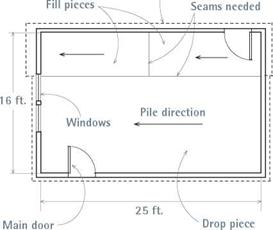
Carpeting comes on factory rolls whose standard width is 12 ft.; a handful of carpet manufacturers offer widths of 13 ft. 6 in. or 15-ft. Plan on cover­ing most of the room with a large piece of carpet 12 ft. wide, then covering the remaining spaces with smaller pieces joined to the large piece with hot-melt seam tape. Professional installers call the full-width piece of carpet the drop; the smaller pieces are called the fill. Joining carpet seams is time consuming so choose a layout that mini­mizes seams.

Start by measuring the room’s width and length at several points; then make a sketch of the room on a piece of graph paper. A 14 in. to 1 ft. scale is a good size to work with. On the sketch, include closets, alcoves, base cabinets, floor registers or radiators, stairs, doorways, and so on. Also note the location of doors and windows, particularly the main entrance into the room. Carpet pile should slant toward the main entrance, so that a person entering the room looks into the carpet pile.

Carpet seams and edges must be trimmed, so

factor that into your estimate. Add 3 in. for seamed edges, and allow 6 in. extra for each car­pet edge that runs along a wall. Stair carpet pile

An ideal layout minimizes waste and seams, positions seams away from traffic, and orients carpet pile so that someone entering through the main entrance looks into the pile. Carpet comes in 12 ft.-wide rolls (also called bolts), so 41 RF (running feet) of carpet would allow enough extra for trimming edges in this 16 ft. by 25 ft. room.

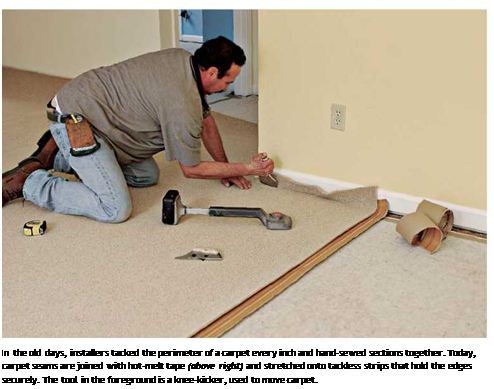
Подпись: LAYING WALL-TO-WALL CARPETINGПодпись: In the old days, installers tacked the perimeter of a carpet every inch and hand-sewed sections together. Today, carpet seams are joined with hot-melt tape (above right) and stretched onto tackless strips that hold the edges securely. The tool in the foreground is a knee-kicker, used to move carpet.

nail the strips or to stretch carpeting behind or under such obstacles. To anchor carpet edges in doorways, you can use a metal carpet bar, which has angled barbs like a tackless strip, as shown in "Carpet Transitions,” on the facing page. Or you can install a hardwood threshold to provide a clean edge to butt the carpet to, after first anchoring it to a tackless strip, or folding the car­pet under about 1 in. and nailing down that hem.

Chance-Constrained Water-Quality Management

Water-quality management is the practice of protecting the physical, chemi­cal, and biologic characteristics of various water resources. Historically, such efforts have been guided toward the goal of assessing and controlling the im­pacts of human activities on the quality of water. To implement water-quality management measures in a conscientious manner, one must acknowledge both the activities of the society and the inherently random nature of the stream environment itself (Ward and Loftis, 1983). In particular, the environments in which decisions are to be made concerning in-stream water-quality manage­ment are inherently subject to many uncertainties. The stream system itself, through nature, is an environment abundant with ever-changing and complex processes, both physically and biologically.

Public Law 92-500 (PL 92-500) in the United States provided impetus for three essential tasks, one of which is to regulate waste-water discharge from point sources from industrial plants, municipal sewage treatment facilities, and livestock feedlots. It also requires treatment levels based on the best available technology. However, if a stream segment is water-quality-limited, in which the waste assimilative capacity is below the total waste discharge authorized by PL 92-500, more stringent controls may be required.

For streams under water-quality-limited conditions or where effluent stan­dards are not implemented, the waste-load-allocation (WLA) problem is con­cerned with how to effectively allocate the existing assimilative capacity of the receiving water body among several waste dischargers without detrimen­tal effects to the aquatic environment. As an integral part of water-quality management, WLA is an important but complex decision-making task. The results of WLA have profound implications on regional environmental protec­tion. A successful WLA decision requires sound understanding of the physi­cal, biologic, and chemical processes of the aquatic environment and good ap­preciation for legal, social, economical, and environmental impacts of such a decision.

Much of the research in developing predictive water-quality models has been based on a deterministic evaluation of the stream environment. Attempts to manage such an environment deterministically imply that the compliance with water-quality standards at all control points in the stream system can be en­sured with absolute certainty. This, of course, is unrealistic. The existence of the uncertainties associated with stream environments should not be ignored. Thus it is more appropriate in such an environment to examine the performance of the constraints of a mathematical programming model in a probabilistic con­text. The random nature of the stream environment has been recognized in the WLA process. Representative WLA using a chance-constrained formulation can be found elsewhere (Lohani and Thanh, 1979; Yaron, 1979; Burn and McBean, 1985; Fujiwara et al., 1986, 1987; Ellis, 1987; Tung and Hathhorn, 1990).

In the context of stochastic management, the left-hand-side (LHS) coefficients of the water-quality constraints in a WLA model are functions of various ran­dom water-quality parameters. As a result, these LHS coefficients are random
variables as well. Furthermore, correlation exists among these LHS coeffi­cients because (1) they are functions of the same water-quality parameters and (2) some water-quality parameters are correlated with each other. Moreover, the water-quality parameters along a stream are spatially correlated. There­fore, to reflect the reality of a stream system, a stochastic WLA model should account for the randomness of the water-quality parameters, including spatial and cross-correlations of each parameter.

The main objective of this section is to present methodologies to solve a stochastic WLA problem in a chance-constrained framework. The randomness of the water-quality parameters and their spatial and cross-correlations also are taken into account. A six-reach example is used to demonstrate these method­ologies. Factors affecting the model solution to be examined are (1) the distri­bution of the LHS coefficients in water-quality constraints and (2) the spatial correlation of water-quality parameters.

ADHERING AND SEAMING THE FLOORING

Some flooring materials are adhered only along the edges (perimeter bond), whereas others are completely glued down (full-spread adhesion). Flooring secured by full-spread adhesion is less likely to migrate or stretch and hence is more durable. Follow the installation instructions that come with your flooring. Be sure your supplier provides the manufacturer’s instructions on adhesion and seaming methods that may be unique to your resilient flooring.

Full-spread adhesion. After the resilient floor­ing is final-trimmed in place, it is typically lapped back halfway, exposing roughly half the area underneath. Using a square-notched trowel, spread a compatible adhesive on about half the floor. Unroll the lapped portion down into the adhesive, and immediately use a 100-lb. roller on the material to spread the adhesive and drive out bubbles. Roll across the material’s width first, then along its length. Next to the walls, use a

image1027
Подпись: PROnP Both knee-kickers and power stretchers have a dial on their head, which adjusts the depth of the tool's teeth. Adjust the teeth so they grab the carpet backing, but not the padding. 1111 Подпись:image1028hand seam-roller to seat the material in the adhe­sive. Repeat the process with the second half of the sheet. If you get adhesive on the face of the flooring, clean it off at once, using a cleaner recommended by the manufacturer. (Most glues clean up with water.)
Seaming edges. If one sheet of flooring doesn’t cover the entire floor, you’ll have at least one seam edge. Here, be sure to follow the manufac­turer’s instructions on seam spacing and adhesive applications between individual sections, called drops. For example, manufacturers indicate how far back from the edges to apply adhesive and whether the seams should be butted together or overlapped and double-cut through both layers.

Although manufacturers tell you to butt vinyl seams tightly, you’ll need to leave a hairline gap between the sections of Marmoleum, which con­tracts along its length and expands across its width. Also, linoleums tend to expand slightly because of the moisture in the adhesive.

Determination of Compliance of a Tested Sample with a Recipe

After extraction, the result of each sample is compared with admissible deviations on test sieves and soluble binder content. A mix may be regarded as compatible with a recipe when all its components are within admissible tolerances.

Table 14.2 depicts an excerpt of Table A.1 of Annex A of the standard demon­strating admissible deviations from a target appropriate for producing SMA mixes with D less than 16mm (e. g., the group of small aggregate mixtures using the single result method). Using admissible deviations, the accuracy of measuring methods has already been taken into account.

14.8.3.4 reaching the ocL Assessment

After assessing the mixture extraction results (the set of 32 results), one can deter­mine the OCL level. According to the standard, there are three OCL level—A, B, and C. They can be roughly interpreted as follows:

• OCL A proves a high rate of compliance with the target for manufactured mixtures.

• OCL B is an intermediate assessment and is still good.

• OCL C is a warning assessment for asphalt plant personnel (and their customers) that the composition of produced mixtures fluctuates considerably.

The OCL assessment is established after 32 consecutive analyses, but it should be kept in mind that they do not have to be samples of only one mixture type; the standard stipulates taking into consideration 32 consecutive results of any produced mixture. The selection of an appropriate OCL then follows, considering the total number of samples that do not conform with requirements

Number of

OCL

nonconformances

2 or less

Level A

3-6

Level B

7 or more

Level C

In the event that more than 8 of the latest 32 results are nonconforming, the plant’s equipment and procedures should be subject to an immediate and thorough review.

The OCL assessment is a dynamic process because the latest 32 results are always used for calculations. After startup at the beginning of the construction sea­son, the test frequency at the starting level should correspond to the lowest OCL-C of a designated level of requirements (X, Y, or Z). Sampling frequency is subject to change weekly based on the lowest OCL achieved during the previous calendar week.

Minimum frequencies of testing samples in relation to the achieved OCL from the previous week are valid for the next calendar week. The following are OCL sample testing frequencies for the single result method:

OCL-A Level X: 600 tons Level Y: 1000 tons Level Z: 2000 tons

OCL-B Level X: 300 tons Level Y: 500 tons Level Z: 1000 tons

OCL-C Level X: 150 tons Level Y: 250 tons Level Z: 500 tons

Interestingly, the better the OCL, the lower the test frequency. These data also show that for each category (X, Y, or Z), when the OCL advances by one level, the test frequency decreases by half (or twice as much material can be produced between tests).

The startup of a new plant means an operational startup with the OCL-C assessment. A shutdown of longer than 3 months during the season or a major repair of the asphalt plant results in the OCL being reduced by one level from where it was before the stoppage. The OCL level cannot be changed until 32 results have been obtained and the first new OCL assessment is available. In the case of an asphalt plant with a low rate of production, the standard stipulates testing the composition of a mix at least every 5 operating days. Mobile coating plants, after relocation, are treated like plants shut down for 3 months or restarted after a major repair.

THE PROBLEM IS IN THE TANK

There are times, even with new systems, when the problem causing a whole – house backup is in the septic tank. These occasions are rare, but they do ex­ist. When this is the case, the top of the septic tank must be uncovered. Some tanks, like the one at my house, are only a few inches beneath the surface. Other tanks can be buried several feet below the finished grade.

Once a septic tank is in full operation, it works on a balance basis. The in­let opening of a septic tank is slightly higher than the outlet opening. When water enters a working septic tank, an equal amount of effluent leaves the
tank. This maintains the needed balance. But, if the outlet opening is blocked by an obstruction, water can’t get out. This will cause a backup.

Strange things sometimes happen on construction sites, so don’t rule out any possibilities. It may not seem logical that a relatively new septic tank could be full or clogged, but don’t bet on it. I can give you all kinds of things to think about. Suppose a septic installer was using up old scraps of pipe for drops and short pieces, and one of the pieces had a plastic test cap glued into the end of it that was not noticed? This could certainly render the septic sys­tem inoperative once the liquid rose to a point where it would be attempting to enter the outlet drain. Could this really happen? I’ve seen the same type of situation happen with interior plumbing, so it could happen with the piping at a septic tank.

What else could block the outlet of a new septic tank? Maybe a piece of scrap wood found its way into the septic tank during construction and is now blocking the outlet. If the wood floated in the tank and became aligned with the outlet drop, pressure could hold it in place and create a blockage. The point is that almost anything could be happening in the outlet opening, so take a snake and see if it is clear.

If the outlet opening is free of obstructions, and all drainage to the septic tank has been ruled out as a potential problem, you must look further down the line. Expose the distribution box and check it. Run a snake from the tank to the box. If it comes through without a hitch, the problem is somewhere in the leach field. In many cases, a leach field problem will cause the distribution box to flood. so, if you have liquid come rushing of the distribution box, you should be alerted to a probable field problem.

Site-built versus prefabricated stairs

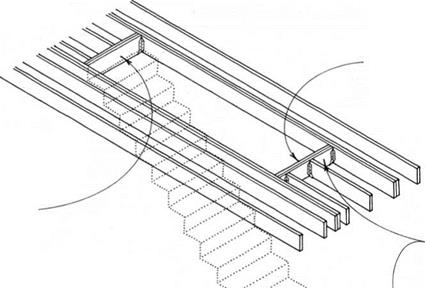
Most stairs are site-built because it is economical and because the process provides a temporary stair for construction. But in some cases, stairs prefabricated in a shop are more practical. Prefabricated stairs (see 213C), whether simple or complex, can be made more solidly and precisely than site-built stairs because they are made in the controlled environment of a shop.

additional decisions

There are several other design decisions to make regarding both interior and exterior stairs. The primary decisions concern whether the risers are open (see 214A) or closed (see 216) and the design of the balus­trade (see 218-220) and the handrail (see 221).

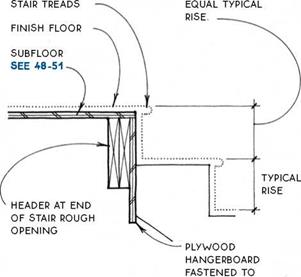
Подпись: FRAMING OF ROUGH OPENING IN FLOOR SEE 38BПодпись:Подпись: THIS HEADER CAN SLOPE IN TIGHT SITUATIONS.Site-built versus prefabricated stairsDOUBLE 2X HEADER AT TOP OF STAiR (DASHED); POSiTiON DETERMiNED ВУ METHOD OF CARRiAGE CONNECTiON SEE 212
NOTE

wiDTH Of ROuGH OpENiNG DEpENDs ON wiDTH OF sTAiR; FOR sTAiR wiDTH, sEE 207. cODE REQuIREMENTs FOR wiDTH ARE FOR

clear openings, so allow for thickness of wall finish when dimensioning a rough opening.

д STAIR ROUGH OPENING

HEADER AT END OF STAiR ROuGH opening SEE 211A & 212

Top OF carriage/

FLOOR

SEE 212A, В & c

FOR FREESpANNING STAiR FRAMING,

SEE 213A & B.

FOR cARRiAGE FRAMING

at open balustrade, SEE 219 carriage framing/ side wall SEE 212D

NOTE

Top OF BASE OF STAiR MAy TERMINATE AT A FLOOR LEvEL OR A LANDING. THE STAiR FRAMING cAN BE THE SAME IN EITHER cASE.

CARRIAGE FRAMING

Continuously Supported Stair

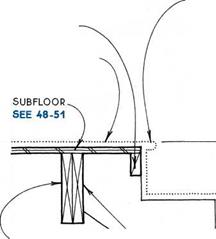
NOSiNG OF FiNiSH FLOOR SAME DEpTH AS NOSiNG ON STAiR TREADS

RiSE From FiNiSH TREAD TO FiNiSH FLOOR SHOuLD EQuAL TypicAL RiSE


BLOCKiNG BETWEEN CARRiAGES SUPPORTS SUBFLOOR.


NOSiNG OF FiNiSH FLOOR SAME DEpTH AS NOSiNG ON


RiSE FROM FiNiSH TREAD TO FiNiSH FLOOR SHOuLD


FiNiSH FLOOR


TypicAL

RiSE


HEADER AT END OF STAiR ROUGH OPENiNG


NOTE

SiDE cARRiERS ARE SuppORTED cONTiNuOuSLy ON wALL FRAMiNG.

SEE 212D


LEDGER, BLOCKiNG, JOiST HANGERS ATTAcH EAcH STAiR cARRiAGE TO HEADER; SEE 211B For LEDGER.


cARRiAGES &

TO HEADER (AND/OR wALL)


Site-built versus prefabricated stairsSite-built versus prefabricated stairsSite-built versus prefabricated stairsSite-built versus prefabricated stairs

Site-built versus prefabricated stairs

TOP OF CARRIAGE/FLOOR

Floor Supports Top of Stair

CUTTING AND FITTING RESILIENT SHEETS

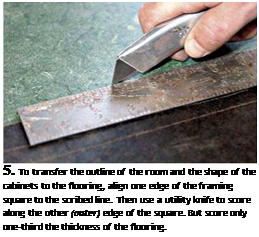
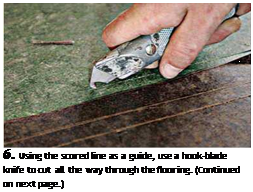
To transfer the outline of the room to the resilient flooring, place a blade of the framing square on the scribed line and run a utility knife along the outside edge of the blade, as shown in the photo on the facing page. The mark made by the utility knife—112 in. beyond the scribed line—represents the cut-line you’ll make in the resilient flooring. But the utility knife should score the flooring
only about one-third deep. After you’ve scored with the utility knife, use a hooked knife to cut all the way through, with the scored line guiding the hooked knife. Hold the hooked knife at a slight angle, so it undercuts the edge. At some point, you’ll also trim off the flooring’s factory edge, which protects the material in transit.

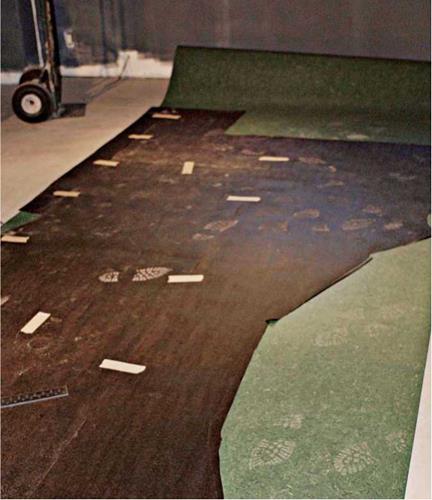
Once you’ve cut the outline, remove the paper template and loosely roll the flooring with its back facing out. Carry it to the room to test its fit. If you need to retrim the flooring to make it fit exactly, you’re in good company. Professional installers always assume they’ll trim because no template measurement is ever 100 percent accu-

Подпись: 5. To transfer the outline of the room and the shape of the cabinets to the flooring, align one edge of the framing square to the scribed line. Then use a utility knife to score along the other (outer) edge of the square. But score only one-third the thickness of the flooring. Подпись: 6. Using the scored line as a guide, use a hook-blade knife to cut all the way through the flooring. (Continued on next page.)

Подпись: 4. After scribing the template, carefully lift it off the underlayment, roll it loosely, and unroll it onto the resilient flooring. Press the taped “boats" onto the flooring so the template won't move.
image1026

rate. When you’re satisfied with the flooring’s fit and final position, use a pencil to draw set marks on the underlayment, so you’ll know exactly where the sheet edge should be when you lap the sheet (roll it back on itself) to apply adhesive.

CREATING A TEMPLATE

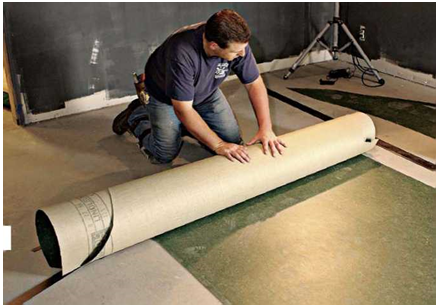
Bring resilient flooring sheets onto the job site at least 24 hours before working with it, so it has time to acclimate to room temperatures (at least 68°F) Resilient materials are more pliable when they have warmed and less likely to crimp or crease. As you roll and unroll resilient sheets, be careful not to crimp the material, which could crease its surface and be visible forever after.

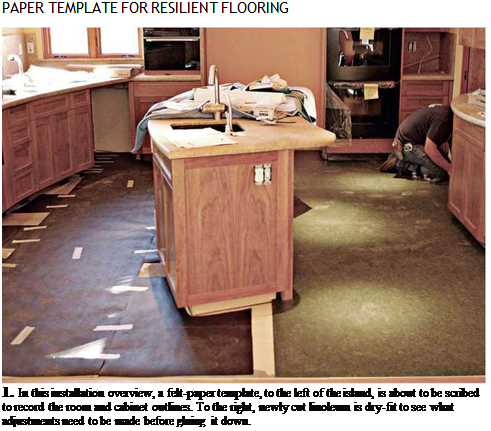
There are several ways to transfer a room’s dimensions to resilient flooring sheets, but none so accurate as creating a template, especially if there are refrigerator alcoves or base cabinets to work around. Create the template with 15-lb. felt paper, which is inexpensive and, being stiffer than rosin paper, is not likely to tear as you trans­fer the room’s outline to the resilient flooring. Using a utility knife, rough-cut pieces of the paper so they approach within 1 in. of all walls, cabinet bases and the like. Beyond that, don’t agonize about fitting the paper too accurately. That is, the paper doesn’t need to butt against walls and cabinets because the scribing tools will span small gaps between the edge of the paper and the perimeter of the room. If the jaws of the scribing tool are 1 ‘A in. wide, they will scribe a guideline onto the paper that is uniformly 112 in. away from the base of walls, cabinets, etc.

As you roll out individual pieces of paper, overlap their edges about 2 in. and use duct tape to join them. Once you’ve covered the floor with felt paper, use a utility knife to cut small (2-in. by

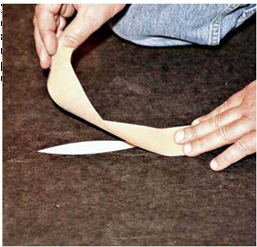
5- in.) boat-shaped holes in the paper every 3 ft. to 4 ft., as shown in the top right photo on p. 504.

As you cut each boat-shaped hole, cover it with duct tape, which adheres through the holes to the subfloor. This will keep the paper from moving as you scribe the perimeter of the room.

Many installers use a scribing tool or a com­pass set at about 112 in. to trace the shape of the
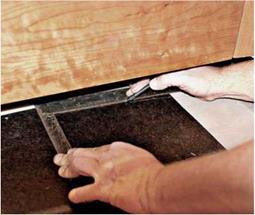
room and cabinets onto the paper to create a template that they will later transfer. But the installer shown on the following pages preferred a small framing square and a pin scribe. The 112-in. width of a framing square’s blades (legs) ensured a uniform scribing distance, and the square fit easily under the cabinet toekicks. Holding one edge of the square flush to the wall, he ran the point of the pin scribe along the other edge— scribing a light line in the felt paper 1 ‘A in. away from the wall. Because the square’s blades are straight, along curved surfaces he moved the square often, making a number of scribe marks to indicate the arc of the curve.

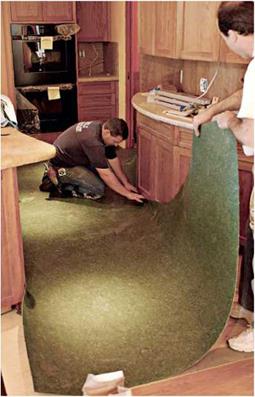
Подпись: PAPER TEMPLATE FOR RESILIENT FLOORING 1. In this installation overview, a felt-paper template, to the left of the island, is about to be scribed to record the room and cabinet outlines. To the right, newly cut linoleum is dry-fit to see what adjustments need to be made before gluing it down.
image1022

Подпись: PROnP Except for butt edges where two flooring sheets meet, linoleum edges are usually cut slightly shy because slight gaps can be concealed by baseboard trim, a finish toekick, or a threshold—or hidden by an appliance. Never force the material. In general, pros avoid cutting linoleum edges proud (too generously) because the material doesn't compress. 1111 Подпись:image1023It’s okay to use several sections of felt paper if a room is large or unusually complex. In this case, be fastidious about marking section edges so you can reassemble and tape them to the resilient sheeting before transcribing the room outline. On a room of any size, you’ll probably need to use several sheets of resilient flooring as well. (Sheet widths vary from 6 ft. to 12 ft.) Important: When you’re done scribing, gently lift the template—but leave the duct tape stuck to the paper. Loosely roll up the template and carry it to the room where the resilient sheet has lain unrolled on the floor, face up, to warm and flat­ten. Line up template edges to trimmed flooring edges. Then carefully unroll the template so it lies flat atop the resilient material (Step 4). Press down the “boats” so the duct tape sticks to the resilient flooring, anchoring the template.
Choose and install exterior-door locksets and deadbolts

These days, security is a concern in many areas. When a house is first closed in, it’s a good idea to buy an inexpensive door lock to seal it off. That way, you can have a bunch of keys made and give a key to any contractor who needs to get in. There is no need to install the finished locks until after the painting is done and just before the final inspection.

With door locksets, you’ll find a wide range of prices for different products. The quality range is just as broad. You don’t need to buy the best lock on the shelf, but you shouldn’t buy the cheapest, either. The exte­rior lock-set is used many times every day, and a bargain-basement lock won’t hold up over the long haul.

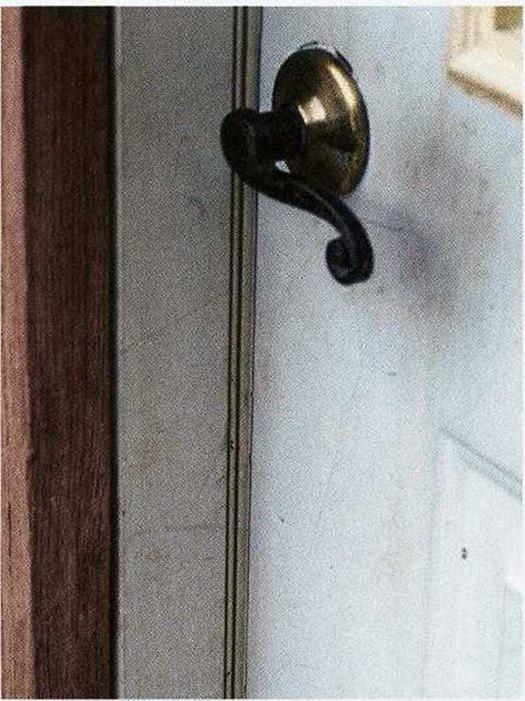
LEVERS, KNOBS, AND KEYS. Instead of buying a lockset that opens with a round knob, con­sider one that opens with a lever, as shown in the left photo below. This type of lockset and handle is much easier on the hands of older folks and people with arthritis. Also, be sure to buy exterior locks and deadbolts that open with the same key. If a supplier doesn’t have enough identical key locksets in stock, order them. This will eliminate the hassle of having different keys for all the exterior doors.

For good reason, fire-safety code requires that deadbolts open with a lever (not a key) from the inside. You wouldn’t want to look for a key with fire licking at your heels.

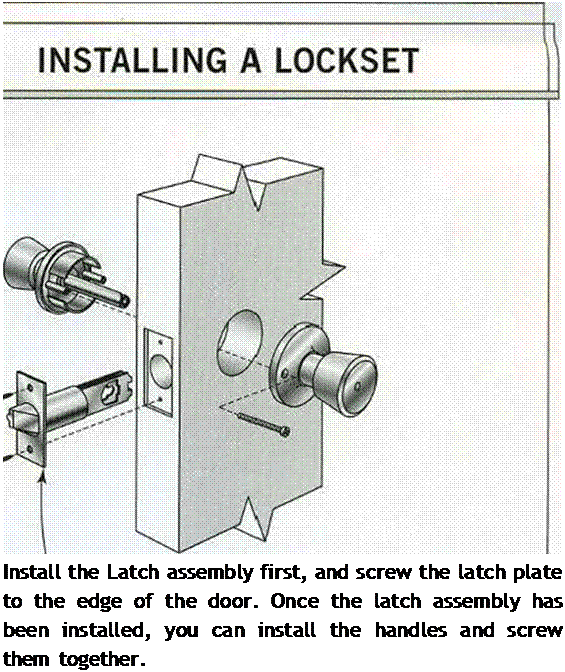
INSTALLATION DETAILS. Prehung exterior doors are drilled at the factory to receive both a lockset and a deadbolt. If you buy your doors this way, you should have an easy time installing the lockset. The installa­tion instructions that come with each unit aren’t difficult to follow (see the illustration on the facing page). When installing locksets,

USE AN EASIER HANDLE.

A lever-type door handle is easier to open than a round knob is, especially for older folks and those with arthritis or carpal-tunnel pain. [Photo € Rex Cauldwell. j

FIND A COMFORTABLE SEAT. A small workbench comes in handy when installing latches and locksetS. [Photo

Choose and install exterior-door locksets and deadboltsChoose and install exterior-door locksets and deadbolts– Larry Haun.]

270 I FINAL DETAILS


Подпись: Install the Latch assembly first, and screw the latch plate to the edge of the door. Once the latch assembly has been installed, you can install the handles and screw them together.

I like to sit on my workbench with my tools and hardware on the shelf below. This is easier and more comfortable than kneeling or bending over (see the photo at right on the facing page).

The spring-loaded latch assembly and deadbolt are installed first. The factory-cut mortises for the latch and deadbolt plates, as well as those in the door jamb for the strike plates, all have rounded corners. If the plates in your hardware set aren’t rounded also, you’ll need to cut the mortised corners square with a sharp chisel to make the plates fit.

Once the latch and deadbolt plates have been screwed to the door edge and the strike plates have been screwed to the jamb, you can install the knobs or handles. On exterior doors, standard practice is to orient the key­hole so that the key can be inserted with the smooth side down. Most folks find that this makes it easier to fit the key in the lock when unlocking a door in the dark.

Analysis of Mixture Composition

Each sample is subjected to extraction testing, resulting in a gradation of the aggre­gate mix and a content of soluble binder. The sieving operation should be conducted using a set of sieves as in Table 14.2. The standard stipulates testing the aggregate gradation through five sieves (plus possibly a sieve for oversize particles 1.4D). The small number of test sieves speeds up the control analysis but at the same time increases the responsibility of the mix producer to achieve other final SMA proper­ties determined by a recipe. It appears that the proper selection of optional sieves for the coarse aggregates that control the skeleton is of great significance.

14.8.3.3 selection of a method for Estimation of Extraction Results

Prior to the comparison of extraction results with admissible deviations, the method for assessment of extraction results should be selected. The choice should be made between the following two methods:

• Single result method—test results of individual samples are treated inde­pendently and assessed in comparison with admissible deviations from a target in accordance with Table A.1 of the standard; the sets of the previous 32 results form the basis for the OCL assessment (classified as conforming or nonconforming).

• Mean of four results method—test results of individual samples are treated in groups of four analyses of the same mixture, and the mean result of each group is compared with admissible deviations from a target (classified as conforming or nonconforming); after a comparison of results of the eight mean results (e. g., eight groups, each with four results for a total of 32), they are classified as conforming or nonconforming and form the basis for the OCL assessment.

Thus in the single result method, we assess 32 individual results; in the mean of four results method, we assess eight results (means) calculated for groups of four single results.

TABLE 14.2

Comments on Requirements for Permitted Deviations from the Target for Mixtures Produced Using EN 13108-21, for Small Aggregate Mixtures with D <16mm—the Single Result Method

Small Aggregate Mixes (D <16 mm)

Percentage Passing

(Single Result Method for

(Control of Production

(% m/m)

OCL Calculation)

Variability)

Comment

1.4 D

The sieve 1.4D—additional sieve on which requirements for passing 98-100% have been established

D

-8/+5

±4

The sieve determining maximum particle size in a mix (without oversize particles), (e. g., the record SMA 11 means D = 11.2 mm [at the same time the boundary sieve for oversize particles])

D/2 or characteristic coarse sieve

±7

±4

The sieve indicated in an NAD for the standard EN 13108-5 for each SMA mixture

2.0 mm

±6

±3

Characteristic fine sieve

±4

±2

The characteristic sieve has not been determined in EN 13108-21; it should be established in an NAD for EN 13108-5 for each SMA mixture; the choice has been limited to one of the sieves: 0.125, 0.25, 0.5, or 1.0 mm

0.063 mm

±2

±1

Sieve of filler fraction

Soluble binder content

±0.5

±0.3

Soluble binder content with extraction after EN 12697-1

Individual Samples

Tolerance about Target Permitted Mean Deviation Composition from Target

Подпись: European Standards Concerning SMASource: Modified from EN 13108-21. Bituminous Mixtures—Material specifications—Part 21: Factory Production Control. Note: NAD = National application document; SMA = stone matrix asphalt.

These two methods may not be applied in parallel. In other words, only one method can be used at the same time in the same asphalt plant.

Analyses of deviations using only the single result method will be discussed later.