Design to Traffic/Resistance to Fatigue

Fatigue design is made using either methods based on Odemark’s formula or on analytical calculation methods (e. g. a multi-layer linear elastic design program). In both, the seasonal variation can only be considered by choosing the material proper­ties for each (especially the unbound) layer so as to represent weighted mean values for the whole year. The “worst” thawing and moist period of the year (the so-called spring bearing capacity period) has a very large influence on the mean value us­ing this weighting approach. Calculations are also made using a single temperature (+20 °C).

A.2.3 Rutting

The obligatory use of winter tyres (most of them studded) during four to five months each winter causes most of the rutting in Finnish medium and high volume roads. The design against rutting is based on empirical information between rutting speed and amount of traffic, asphalt type, binder and aggregate properties. No seasonal variation is considered, but it is well known that moist/wet conditions at the road surface will increase the rate of rutting.

At the moment only discussions about the possibility of using several, varying – length, time periods (each associated with individual material parameters – depend­ing on moisture, temperature and density) have been carried out. During the analyses mentioned above the vertical deformation (the elastic recoverable strain) is also checked to to ensure that it remains less than the maximum allowable limit for each layer material.

As a brief summary it can be said that seasonal variation is only taken in to account by choosing parameter values based on the most dominating period, the spring thaw period.

A.3 USA

The new AASHTO Mechanistic-Empirical Pavement Design Guide (MEPDG) (AASHTO, 1998 & 2004) integrates climatic factors, materials properties, and traf­fic loadings to predict pavement performance. The Enhanced Integrated Climatic Model (EICM) that is used in the new AASHTO MEPDG integrates three models:

• The two-dimensional drainage infiltration model (ID Model), developed at Texas A&M University, that evaluates the destination of the rainfall on the pavement.

• The Climatic-Materials-Structure Model (CMS Model) developed at the Univer­sity of Illinois. A one dimensional finite difference engine is used to calculate coupled heat-moisture flows in pavement structures and predict pavement tem­perature.

• The CRREL frost heave and thaw settlement model developed at the United States Army Cold Region Research and Engineering Laboratory (US Army CR – REL) which computes temperature and moisture flow at different temperatures and predicts the depth of frost and thaw penetration.

The EICM is based on the Integrated Climatic Model, developed for the Federal Highway Administration in 1989, containing several improvements. It replaced the Gardner equation for the soil-water characteristic curve (SWCC) with the equations proposed by Fredlund and Xing (1994). It also provides better estimates of the sat­urated permeability and specific gravity of soils, given known soil index properties such as grain-size distribution (percent passing sieve no. 200 sieve (75 ^m) and effective grain size with 60% passing by weight) and Plasticity Index (PI). The unsaturated permeability prediction based on the SWCC and proposed by Fredlund et al. is also incorporated in the model (Fredlund et al., 1994).

The model uses actual climatic data (hourly or monthly) and predicts the follow­ing parameters throughout the entire pavement/subgrade profile:

• Temperature

• Resilient modulus adjustment factors

• Pore water pressure

• Water content

• Frost and thaw depths

• Frost heave and

• Drainage performance.

The model evaluates the expected changes in moisture condition from the initial or reference condition (generally, near optimum moisture condition and maximum dry density) as the subgrade and unbound materials reach equilibrium moisture con­dition. The model also evaluates the seasonal changes in moisture condition, and consequently the changes in resilient modulus, Mr. In addition the model calculates the effect of freezing, and thawing and recovery of Mr and uses these Mr values for calculation of critical pavement response parameters and damage at various points within the pavement system.

Wood and plastic laminate floorings are very durable

When my family moved into our present home, the living room floor was covered with an ancient yellow shag carpet. There were things growing in that carpet that even our dog didn’t like. I replaced the carpeting with a nice, prefinished floor made from bamboo. The cost for the floor, not counting my labor, was less than the cost for a decent carpet.

We have a couple of area rugs that can be taken outside and given a good shaking now and then.

PREFINISHED WOOD FLOORING. In the old

Подпись: VINYL FLOORING OFFERS BEAUTY, DURABILITY, AND EASY MAINTENANCE. Available in roll or tile form, vinyl flooring offers all three advantages, making it a wise choice for kitchens. [Photo by Reese Hamilton, courtesy Fine Homebuilding magazine, ® The Taunton Press, Inc.] days, wood flooring was installed “in the raw,” one tongue-and-groove strip at a time. Then it was sanded and finished. T he sanding process covered everything with fine sawdust, and the oil-varnish finish filled the air with unpleasant (and often hazardous) fumes. While it’s still possible to install wood floors that way, more and more people are choosing prefinished wood flooring. The installed cost is about the same for both flooring treatments, but you don’t have to deal with dust or fumes. You also don’t have to wait for the multiple coats of

Wood and plastic laminate floorings are very durableENGINEERED WOOD FLOORING IS

Wood and plastic laminate floorings are very durableEASY TO INSTALL. Plied construc­tion, tongue-and-groove joints, and a factory-applied finish make engineered wood flooring easy to install and very durable. Different plank widths and a wide range of wood species are available. [Photo by Scott Phillips, courtesy Fine Homebuilding magazine, E The Taunton Press, Inc.)

Подпись: INSTALL A "FLOATING" FLOOR. Both plastic- laminate flooring (shown here) and engineered wood flooring can be installed without nails. Instead, the tongue-and-groove joints between planks or pieces are simply glued together. The finished floor "floats" on a resilient pad laid over the SUbfloor. [Photo by Charles Bickford, courtesy Fine Homebuilding magazine, ® The Taunton Press, Inc.)

Ly*‘-. * * I F

….. Щ

finish to be applied. In addition, the factory – applied finishes on better-quality flooring are very durable.

I love wood floors, and it’s great to see such a wide selection of wood flooring available at home-improvement centers and flooring deal­ers. Good instructions are also available from manufacturers and in-store experts for installing prefinished flooring. As with tradi­tional solid wood floors, prefinished flooring is made to fit together with tongue-and – groove joints.

Prefinished hardwood floors come in many styles and woods. Some of the more popular choices are oak, maple, cherry, ash, and fir. You can also select the the stain or clear finish and the edge detail. Most prefin­ished wood flooring is made by gluing wood plies together. Referred to as engineered wood flooring, prefinished wood flooring is manu­factured in strip, plank, and parquet form. Strip flooring can be up to ЗА in. wide; planks are wider; and parquet flooring comes in square pieces. The overall thickness is usually ‘A in. or less. Some prefinished strips and planks have slightly eased or beveled edges to make handling and installation easier. Basic, square-edged flooring is also available.

Wood flooring can be installed with a pneumatic nailer, attached to the subfloor with adhesive, or glued together and allowed to “float” on a resilient pad. Manufacturers have even developed flooring that simply snaps together without glue. If you want to do the installation vourself, check with the manufacturer or with your flooring supplier to determine which type of installation is appropriate.

PLASTIC-LAMINATE FLOORING. Like engi­neered wood flooring, plastic-laminate floor­ing is a plywood construction, but the top, or

“show,” layer is man-made rather than natural. Different colors and patterns are available, including some very realistic wood tones. The surface is extremely durable, though it can’t be sanded and refinished like some types of wood flooring. Shop around and you’ll find plastic laminate flooring for about the same price as good-quality vinyl flooring. It’s easy to install, too. T his type of flooring works well in kitchens and bathrooms. I have it in my writing room. The supplier taught me how to lay it by gluing the edges, and I installed about 100 sq. ft. without driving a single nail.

BUSINESS/MARKETING

An important means of achieving affordable housing is by running an efficient business. Good business planning, organization, and control are essential to keeping costs as low as possible.

Because affordable housing construc­tion may require regulatory changes and relief from the community, it becomes very important that resultant
cost reductions are not offset by business and job site inefficiencies.

Production planning and control combine, in the best possible way, the resources available. This will assure that management, money, manpower, machines, materials, and marketing are integrated in the best way possible to produce affordable housing when the market wants it.

Подпись: PlanningHitting the right market at the right time, with the right product, can save thousands of dollars in carrying costs on land, infrastructure, sales centers, model homes, advertising, office overhead, etc. So careful market research is important.

All JVAH builders realized that the primary reason for building affordable homes was that they were priced for the largest unserved market segment in their respective communities. Some found they grossly underestimated the demand. Their buyers included those who could afford more expensive homes but preferred the JVAH units.

But, even if market potential for affordable housing may appear to be obvious, there are still many decisions that must be made and, when possible, contingencies planned for. Therefore, long – and short-range goals should be developed. Questions that may be

helpful in formulating company goals include:

• What markets are not being served today?

• What can be done if inflation increases building costs?

• What features will produce significant market advantage?

• What expensive features are unnecessary for the target market?

• What if interest rates increase? ..decrease?

• What related business could be entered successfully?

• If the firm were to redesign its construction methods from scratch, what techniques would be adopted?

In an affordable housing market, faster turnover will reduce land and infrastructure finance carrying costs. Land should be zoned for higher densities than in upper-end housing. Designs will be smaller, simpler, and more production-oriented with fewer options. High-speed production equipment and techniques are appro­priate. Less skilled, less knowl­edgeable employees of all types can perform high-quality work on the simpler tasks required in lower-cost houses. Mass media advertising, open houses, and sales centers may be appropriate to this market.

Подпись: Organization and ControlSubstantial savings can be gained by organization and control of direct costs – material, land, labor – and indirect costs – marketing and sales, finance, equipment depreciation and maintenance, and management.

Labor costs can be controlled by preplanning and scheduling of work,

using properly-sized crews, good supervision, and instilling high-quality standards in workers. See the "Production Planning and Control" and "Labor Cost Control and Reduction" sections in Construction Cost Control, available from NAHB, 15th and M Streets, NW, Washington, DC 20005.

Methodical preplanning of work reduces lost time. For example, a carpentry crew can frame a wall faster if the crew leader has detailed pull lists, cutting lists, component lists, and wall layout drawings, than if the leader has to do all the thinking on the site while his crew awaits orders.

Efficient scheduling saves time, and "time is money." The longer it takes to build a house, the greater the time-related costs which are incurred – construction loan interest, insur­ance, security, overhead per unit, maintenance and rate of capital utilization.

The optimum schedule is one that is reasonably attainable with some effort. The complexity of the scheduling sys­tem should not exceed that required for adequate control.

The most efficient construction crews usually have three members, although larger crews can be efficient if they form smaller work groups to do the majority of their tasks. One skilled worker on each small crew is usually enough. Having too many skilled people usually means the crew is being overpaid. Specialization improves productivity; workers who are assigned a specific task to do over and over become much more efficient at that task than a general "all-around" worker who might do the task only once every few weeks.

This is why in many cases a sub­contractor, although he adds overhead and profit to his labor cost, still costs the builder less for a particular task than the builder’s own crew; the subcontractor is faster because he specializes in one task.

Good supervision saves money. A crew leader must be able to provide clear directions and keep his men working when he himself is planning, thinking, or doing his own task.

Higher level supervisors should make scheduled inspections from inspection checklists.

At each level, a supervisor should be knowledgeable enough to instruct his workers on how to accomplish any of his assigned tasks. He should consistently demand the highest quality work so that workers learn to "do it right the first time" in order to reduce expensive callbacks and rework, and to enhance the company’s reputation. He should praise good work and effort, but make the employees redo all substandard work.

Material costs can be controlled by accurate estimating, source selection, ordering, expediting, receiving, handling, and inventory control.

Careful estimating reduces waste and delays due to material shortages. Effective source selection techniques are important, such as requests for bids which evaluate payment terms, lead times, and delivery service, as well as price.

Maintaining histories of supplier performance – price, quality, service, willingness to expedite late shipments, and response to claims for shortages and damages — is useful.

Purchase orders should be used to ensure that the price, terms, and conditions are explicit so that suppliers can be held to every condition later. Invoices received from suppliers and subs should be checked against purchase orders.

To evaluate suppliers for future purchases, records should be kept of all past purchases, including quantities, prices, delivery time, quality, and any problems encountered. Suppliers should load material in such a way that when unloaded, that which is to be used first is on top. They should place it on the construction site where it will minimize handling labor. They should deliver the right amount of material to the right place at the right time. They should protect the material from weather, and, at the builder’s request, band it together for security.

On stocked items, economic order quantities and reorder points based on past usage and predicted future demand, should be calculated to minimize inventory carrying cost.

Estimated quantities and prices should be compared with actual quantities used and prices charged with variances calculated for quantities, prices, and total material costs. Positive quantity variances may mean too much material is being sent to the site which fre­quently results in extra waste, pil­ferage, and handling costs. Negative quantity variances mean there have been shortages which may have de­layed production and required expen­sive emergency orders.

Land costs should be controlled as carefully as those of labor and material. A "quantity discount" — low price per lot – often can be gained by purchasing a large tract of land, and if not used immediately, the land may increase in value. On the other hand, it may depreciate if adjacent land is used for an industrial or commercial purpose. In addition, the longer the land is held, the greater the interest carrying cost, especially if some investment has been made in roads and utilities, etc.

Similarly, if a developer installs the infrastructure for an entire develop­ment at one time, he may receive lower prices from his subcontractors. However, he will also have to carry the interest on a large investment during the entire construction period. For this reason, and to reduce the investment required, many developers phase infrastructure installation. Also, if conditions stall sales, the developer is more likely to survive until sales pickup. Because of this risk, many builders stay out of land development entirely and buy developed lots as they need them.

Подпись: IndirectControl of indirect expenses can reduce the overhead allocation applied to each housing unit.

Marketing and sales expenses must be carefully budgeted and controlled. Advertising must be aimed at the particular market segment that fits the product, and the proper advertising channels used to reach potential buyers. In some developments, a sales center which later becomes a community building is an effective marketing tool. In other develop­ments, low unit prices are most impor­tant, and amenities such as pools, community buildings, parks, etc., raise costs beyond the reach of the target market. Often there are too few units in the development over which to spread the cost.

For some developments, demand is strong enough to justify large newspaper display ads, open houses, and full-time sales personnel. In others, classified ads and the sub­contracting of sales to realtors makes sense.

Computers are making an increasing impact on the efficient flow of information used to control sales and production. For more information on computer systems, see Data Processing for Builders. National Association of Home Builders, 15th and M Streets, NW, Washington, DC 20005.

As much integration as feasible should be achieved. It should be possible to use quantities developed in the estimating procedure to automatically print requests for bids and purchase orders when accepted prices and terms are entered. Labor, material, and subcontract estimates should feed into the standard job cost system as budgeted costs against which actual costs are compared in variance reports.

For greatest timeliness, posting to the job cost system should be done when purchase orders are placed; any changes can be recorded later with change orders.

When payroll, subcontractor and material invoices are paid, the system should automatically post the general ledger and update other accounting reports.

Подпись:
Although no systematic effort was made to determine or document cost savings due to business and market efficiency, some examples came to light

John Crosland Company sought land zoned for low-density development which they thought they could get zoned for higher-density development. They were successful in this strategy at Lynton Place and were able to increase density and reduce their land cost per unit.

Подпись: Charlotte, North CarolinaCrosland did extensive market research which indicated that a mixed develop­ment with condos and medium-priced single-family homes would be success­ful. They generated early traffic by putting a sales trailer on the site. TV and newspaper display advertising invited people to put on their "muddy boots" and come see the plans and site.

Later, they built a sales center -­future community building with two swimming pools — and seven model homes. Company personnel performed the sales duties at both the trailer and sales center. Crosland subcon­tracted all construction and bought wall panels for the condominium portion of the construction; the remainder was "stick-built."

Подпись:In contrast, "Pup" Robertson of Robertson-Tomberlin Homes used a low-budget strategy to market his low-cost high-value brick ramblers.

His only advertising was one-column one-inch newspaper classified ads. He built two homes "on spec" and sold them. Thereafter, he and a realtor sold the remaining homes from plans.

Robertson bought all material himself, since in his area, subcontractors were small, and his buying power exceeded theirs. In his rural locale where subs were few and not as highly specialized as in urban areas, he found it cheaper to hire employees by the hour than to pay subcontractor markup and profit.

BUSINESS/MARKETING
Santa Fe, Mike Chapman used the exterior shell New Mexico of the first home built as an on-site shop, which was used for fabricating balcony and stair railings, cutting and finishing trim, and general storage of high-value materials. When the project neared completion, he closed down the shop, installed partitions and fixtures, and sold the home.

INSTALLING PADDING

Padding, which is usually 6 ft. wide, should run perpendicular to the carpet to prevent padding and carpet seams from lining up. If the padding has a slippery side, face it up so carpet can slide over it as you position it. Once you’ve rough-cut the padding, carefully position the pieces so they butt to each other. Do not overlap padding sec­tions, which could create a raised welt under the carpet; likewise, padding should not overlap tack­less strips. Trim the padding so it butts to the edge of the strips. Then use duct tape, or some­thing as strong, to tape the padding seams together so they can’t drift.

If there’s a plywood subfloor, staple the padding every 6 in. around the perimeter of the

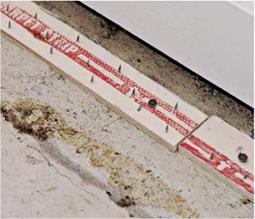
Подпись: Tackless strips come in 4-ft. lengths, with nails suitable for the substrate. This strip has short, case-hardened masonry nails for attaching strips to a concrete slab. Wear goggles driving such nails down.
image1031
image1032

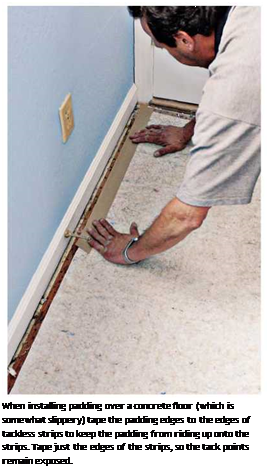
Подпись: When installing padding over a concrete floor (which is somewhat slippery) tape the padding edges to the edges of tackless strips to keep the padding from riding up onto the strips. Tape just the edges of the strips, so the tack points remain exposed.

You may wonder why strips with dozens of tack points sticking up are called tackless. In the old days, carpet installers had to hem (fold over) and tack down carpet edges every inch or so, which took thousands of tacks. When someone finally realized that it would be much quicker to hook carpeting onto strips containing slanted, inverted tacks, a generation of installers gave thanks. By and large, the strips did away with edge tacking, hence the name tackless strips.

Подпись: Adjust the row-runner blade so it cuts just through the carpet backing and not into the padding. Change blades often so they cut cleanly. Подпись: This row runner is cutting a looped-pile carpet. Note that the padding seams run perpendicular to the carpet seams, to prevent their ever lining up.

Подпись: Carpet Pile and Layout Most carpeting consists of yarn loops stitched through a backing material. The upper face of the carpet is called the pile. When those yarn loops are uncut, the carpeting is called loop pile. When the loops are cut, it is called cut pile. Sculpted pile usually is a mixture of looped and cut, which frequently creates a pattern. Because carpeting is stored and transported on a roll, its pile gets pressed down in a direction that it retains thereafter. By stroking a carpet's pile, you can determine its pile direction. When you look into the pile, the carpet color looks richer and when the pile direction points away from you, the carpet appears lighter. Thus when you install carpet, the main entryway of the room should look into the carpet pile, so that it appears as rich and luxuriant as possible. Also, where it's necessary to join two pieces of carpet, the pile of at least one piece should lean into the seam, thus overlapping and concealing it to some degree. Finally, if you have to use more than one piece of carpet in a room, all pile should point in the same direction. Otherwise, the sections will appear to have different hues.

floor, and every 12 in. in the field, using 18-in. staples. If the substrate is concrete, sprinkle a latex-based carpet adhesive such as Parabond® M-4259 Solv-Free around the perimeter of the room and spread it out with a notched trowel; it’s not necessary to adhere the entire padding. Finally, because concrete is slippery, tape the padding edges so they can’t ride up onto tackless strips.

STEP 4 PREPARE FOR THE WORST

Earthquakes, tornadoes, and hurricanes don’t come our way very often, but their brute force can be devastating—even fatal—if we’re not prepared. Look at what Katrina did to Louisiana and Mississippi. Disasters don’t just strike “other people.” Sometimes they happen to us.

I remember inspecting a house in California after the 6.8 Northridge earthquake. The house hadn’t collapsed, but the hot-water heater had been thrown 20 ft. out into the street. Other heavy appliances were scattered throughout the house. A good HVAC contractor knows which measures are required for securing equipment in areas where the risk of natural disasters is higher than normal. Steel strapping and other hold­down hardware are available at most home cen­ters. Check with your building department to see whether there are special requirements in your area for securing heaters and other appliances.

Smoke detectors and fire extinguishers save lives

Smoke detectors can and often do save lives, especially when a fire breaks out while you are sleeping. Most codes require that smoke detec­tors be installed in every bedroom and hallway. Some detectors are designed to be wired into your electrical system (with battery backup in case of power outages), whereas others work on battery power alone. You need to know the location of these units so you can check them every three to four months by pressing the test button that’s clearly visible on each detector.

If the unit is operating properly, it will emit a high-pitched sound.

A while back, a friend was visiting and left a small towel on top of the stove, not realizing that one of the burners was on. In just a min­ute or two, the towel was ablaze. A handy fire extinguisher quickly put an end to what could have been a major disaster. Fire extinguishers are inexpensive and have been put in all the Habitat houses I have worked on. Install one in the kitchen where it is easily visible and acces­sible so that anyone can locate it quickly. Drive the mounting screws into a stud so the fire extinguisher is securely attached.

Подпись: Rather than a lawn, try growing a garden in a few raised beds. Not only will you have veggies and flowers for your family, but there will be plenty to share with your neighbors. [Photo by Don Charles Blom] Подпись: Leave the lawn cutting to the parks and recreation department.Yards can be made attractive by using bark, chips, and a few native plants. [Photo by Don Charles Blom]

Подпись: No one wants a lawn that looks like a junkyard, but who wants to spend half a lifetime

STEP 5 LANDSCAPING

STEP 4 PREPARE FOR THE WORSTПодпись: DID YOU KNOW? According to a survey in Builder Magazine, Habitat for Humanity is the 16th largest house builder in the United States. ■ Since its founding in 1976, Habitat for Humanity has built or rehabilitated more than 60,000 houses throughout the United States. ■ More than 1,200 Habitat houses have been built by allwomen crews. ■ According to the Chronicle of Philanthropy, Habitat for Humanity is the 17th largest nonprofit organization in the United States. ■ The average Habitat house built in the United States costs just over $64,500, encompasses 1,100 sq. ft. of living space, is held together with 40,790 nails, contains 600 pieces of lumber, and is finished with 50 gal. of paint. ■ Habitat for Humanity has more than 1,700 affiliates in the United States (including Guam and Puerto Rico) and 600 international affiliates in more than 90 countries. Подпись: 4 f Photo courtesy HFHI Подпись:landscaping a yard to look like a city park? A well-tended yard can play a key role in making a house look and feel like a home, so what are

we to do?

For many homeowners the answer has been to think beyond a traditional lawn. Lawns are high maintenance. To avoid a visit from the homeowners association, you have to own, operate, and store a lawn mower. Watering a lawn is costly, and care of one often involves pesticides and chemical fertilizers, some of which can pollute our water systems and may affect our children’s health.

I have to admit that I’m not a big fan of lawns for the front or back yard. This may come from growing up in a place where my “lawn” was hundreds of miles of the open prairie. Lawn maintenance was the responsi­bility of grazing cows, horses, buffaloes, and prairie dogs.

There are many ways to make a yard at­tractive and welcoming. Something as simple as a curved sidewalk is a good place to start. Many people like to put down a liner that keeps weeds from growing and cover this with tree bark, mulch, or different kinds of rock. Native trees and shrubs can be planted to add greenery.

It makes sense to landscape with native plants. They flourish with little care and are truly a natural part of the landscape. Better to use plants that call the land around you home.

For me, the solution has been to remove the sod lawns on my property and replant native plants and an organic vegetable and flower garden. That way I can grow all kinds of deli­cious foods (see Resources on p. 279), and if I feel the need to walk on manicured grass, I can visit a golf course.

Also think about creating a special place in your yard where you can read or meditate. Try placing a bench under a tree where you can kick off your shoes, rest, and watch your children play. Even a few well-placed rocks can turn a common corner into an area of interest. Enjoy your new home!

[1] helped build my first house in 1948. It was a mail-order house brought to our small town by the Chicago and Northwestern Railroad, then to the site by horse and wagon. Every piece of the house frame was precut and tied in bundles. My job was to untie the bundles and bring the pieces to the carpenters who nailed them together.

Today, the same house pieces are needed, but most of them are cut to length on site. Headers are needed over door and window openings to transfer roof loads down to the subfloor and foundation. Rough sills support windows. Cripples or jack studs either support a rough sill or transfer weight from a top plate to a header. Trimmers extend on both sides of door and window openings to support headers (see the illustration on p. 87).

Before you can begin cutting or marking framing members, you need some basic infor­mation, including the standard stud length, the height at which headers will be set, the size and location of door and window openings, and

[2] Caulk the flange. Squeeze a generous bead of exterior caulk or sealant on the back of each window flange (see the photo above).

[3] started doing finish work as a helper to a cabi­netmaker. In the 1950s, there were few factory – made cabinets available. Every cabinet that we installed in every house was built piece by piece on the job.

Today, there is no need to build cabinets on site. Home centers and cabinet shops carry many cabinet styles that are built to order. The price depends on a number of factors, includ­ing the amount of solid wood used in the construction; the style of doors and drawer fronts; and the quality of the hinges, handles, drawer slides, and other hardware. Most base cabinets are sized to provide a countertop height of 36 in. But other sizes and styles are avail­able to accommodate wheelchair access and

Install an apron. This piece of trim is nailed below a windowsill; it covers a gap in the drywall and gives the sill some visual weight.

Multiobjective stochastic waste-load allocation

The WLA problem, by nature, is a multiobjective problem involving several conflicting objectives. The treatment-equity constraint (Eq. 8.59c) is incorpo­rated for the purpose of fairness. Without it, any attempt to maximize waste discharge (or to minimize treatment cost) could result in allocating large quan­tities ofwaste to the upstream users, whereas the downstream discharges could be required to treat their effluent at levels of maximum possible efficiency. This is especially true for slow-moving streams. Several articles have discussed the importance of equity considerations in WLA problems (Gross, 1965; Loucks et al., 1967; Miller and Gill, 1976; Brill et al., 1976).

In general, as the requirement for an equity measure (or fairness) is raised, the total waste discharge to the stream system would be reduced. This will be in direct conflict with the maximization of waste discharge associated with the minimization of treatment cost. Furthermore, from the preserving stream water-quality viewpoint, setting a higher water-quality standard is more desir­able. However, such an objective cannot be achieved without increasing waste treatment cost. Therefore, the objectives of preserving water quality and of
enhancing economic efficiency are in conflict each other. Lastly, as the require­ment of reliability in complying with the water-quality standard is raised, the total waste load that can be discharged expectedly would have to be reduced. Therefore, the task of solving WLA problems is multiobjective.

From the preceding discussions, four objective functions can be considered in WLA modeling: (1) maximization of the total waste load, (2) minimization of differences in treatment levels among waste dischargers, (3) maximization of allowable in-stream DO concentration, and (4) maximization of the water – quality standard compliance reliability. The first objective Z1 can be formulated as Eq. (8.59a), which is repeated here as

N

Maximize Z1 = (Bj + Dj)

j=i

For a stream system involving multiple waste dischargers, the difference in required treatment levels generally would vary. To collapse different values of equity measure into a single representative indicator, the worst case associated with the largest differences can be used. With that, the second objective can be expressed as

Bj


Bj


Minimize Z2 = 5max = max

j =j’


(8.69)


I


I


Multiobjective stochastic waste-load allocation

where 5max is a new decision variable for the equity measure representing the largest difference in treatment levels among waste dischargers.

The third objective considered is the maximization of the lowest allowable DO concentration level that should be maintained in the stream environment. This objective can be expressed as

Подпись: (8.70)Maximize Z3 = DO^

in which the new decision variable DOsmtdin is the minimum required DO standard in the stream.

Similar to the differences in treatment levels, the water-quality compliance reliability at different control points will not be uniform. To use a single repre­sentative measure of compliance reliability for the entire system, a conservative view of looking at the lowest reliability was applied. The objective is to maximize this lowest compliance reliability amin as

Maximize Z4 = amin = min[a1, a2,…, aM ] (8.71)

Multiobjective stochastic waste-load allocation Multiobjective stochastic waste-load allocation Подпись: for i = 1, 2,..., M

By the definitions of DO^^in and amin, the chance constraints for water-quality compliance (Eq. 8.59b) can be modified as

(8.72)

The corresponding deterministic equivalent of Eq. (8.72) can be expressed as

П ni

(®ij) Bj + E E (Vj Dj + DOmtdn j=1 j=1

+ Fz-1(amin)V(B, D)C (&i, П)(B, D) < Ri (8.73)

in which R i = DOsat – E (aoi).

Note that the original objective given in Eq. (8.71) is to maximize amin. How­ever, under the assumption that the standardized left-hand sides of the water – quality constraints are continuous and unimodal random variables, the deci­sion variable amin would have a strictly increasing relationship with Fz_1(amin). Therefore, maximization of amin is then equivalent to maximizing Fz_1(amin). By letting zmin = Fz_1(amin), Eq. (8.71) can be written as

Maximize Z4 = zmin (8.74)

Note that the decision variable zmin is unrestricted in sign. The objective of maximizing the lowest compliance reliability is equivalent to minimizing the highest water-quality violation risk.

The preceding multiobjective WLA problem can be solved by various tech­niques described in the references cited in Sec. 8.1.2. In the following, the con­straint method is used by which the preceding multiobjective WLA problem is expressed as

Подпись: (8.75a)Maximize zmin

Multiobjective stochastic waste-load allocation Подпись: for i = 1,2,. . . , M (8.75b) (8.75c) (8.75d) (8.75e) (8.75f) (8.75g)

subject to

and nonnegativity constraints for the decision variables, except for zmin. In Eqs. (8.75e-g), the right-hand sides Z, ZO, and Z3 are the values of the objective functions 1, 2, and 3, respectively, which are to be varied parametrically.

Multiobjective stochastic waste-load allocation

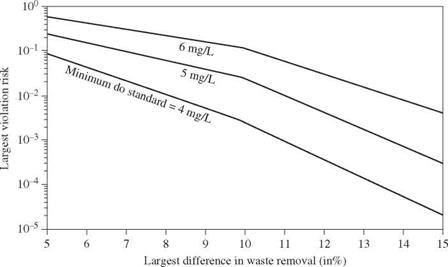
Figure 8.22 Tradeoff curves of various objectives in stochastic WLA problem with 4 mg/L minimum DO standard. (After Tung and Hathhorn, 1989.)

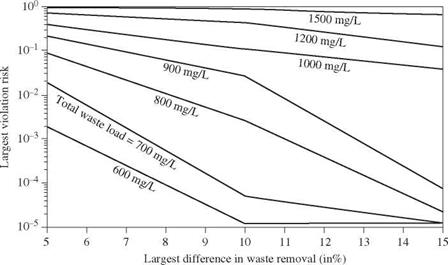
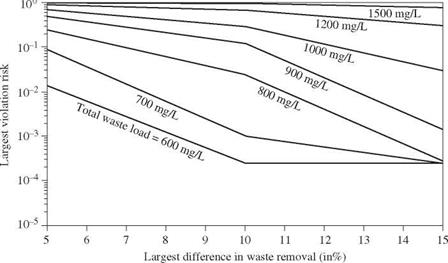
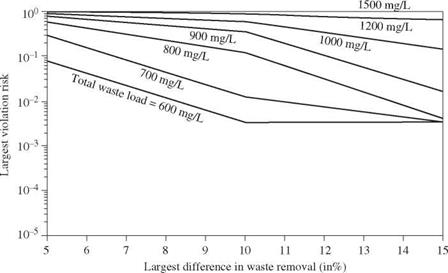
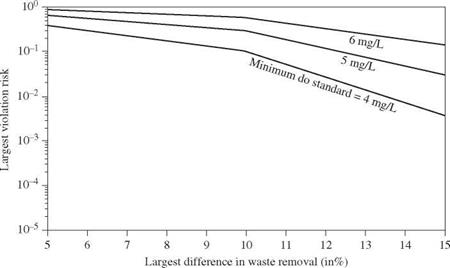
Using the same hypothetical stream system as shown in Fig. 8.21 and the corresponding data, the solution to this multiobjective WLA model by the con­straint method yields a series of tradeoff curves among the various objectives. Figures 8.22 through 8.24 show the tradeoffs among three objectives for a given

Multiobjective stochastic waste-load allocation

Figure 8.23 Tradeoff curves of various objectives in stochastic WLA problem with 5 mg/L minimum DO standard. (After Tung and Hathhorn, 1989.)

Multiobjective stochastic waste-load allocation

Figure 8.24 Tradeoff curves of various objectives in stochastic WLA problem with 6 mg/L minimum DO standard. (After Tung and Hathhorn, 1989.)

minimum DO standard concentration. As can be seen for a specified minimum DO standard and total waste load, the largest water-quality violation risk de­creases as the maximum difference in treatment equity increases. An increase in the treatment equity measure by 5max implies a larger tolerance for the

Multiobjective stochastic waste-load allocation

Figure 8.25 Tradeoff curves of the various objectives in stochastic WLA problem with total waste load fixed at 800 mg/L. (After Tung and Hathhorn, 1989.)

Multiobjective stochastic waste-load allocation

Multiobjective stochastic waste-load allocation

Figure 8.26 Tradeoff curves of the various objectives in stochastic WLA problem with total waste load fixed at 1000 mg/L. (After Tung and Hathhorn, 1989.)


unfairness in the treatment requirement among waste dischargers. As the level of the minimum required DO standard is raised, the set of tradeoff curves moves upward. To show the tradeoffs for different minimum DO standard, Figs. 8.25 and 8.26 are plotted for the risk of water-quality standard violation, treatment equity, and water-quality standard while the total waste load to the stream system is fixed at some specified levels.

Thermostats

■ BY SEAN GROOM

I

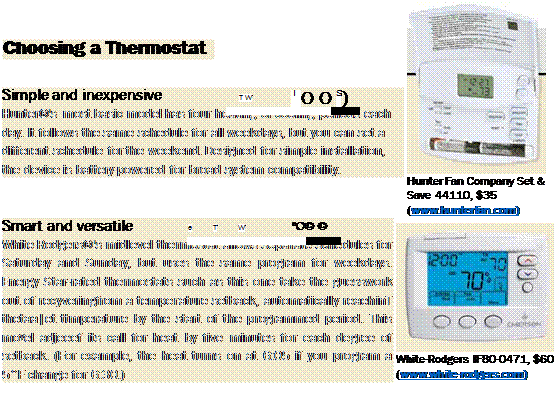
nstead of turning down the thermostat on the way to bed and again on the way out the door, you can cut home-heating costs and count on a reliable, comfortable temperature with one of today’s program­mable thermostats. Basic models ($30 and up) store different settings for weekdays and weekends. More advanced models ($90 and up) store a different program for each day of the week.

Minimize Operating Time to Save Money

Whether a thermostat is manual or program­mable, your savings result from the setback, or the reduction in temperature from the typical occupied setting. Studies by the U. S. Department of Energy have found that the energy required to raise a home’s tempera­ture to its normal level approximately equals the energy saved as the temperature falls to the lower setting. For each degree of setback over an eight-hour period, you’ll reduce energy consumption by 1%; the longer the setback, the more energy savings you enjoy.

During the heating season, utility compa­nies recommend a 68°F setting in the morn­ing and evening and 55°F overnight and when you’re not home. You can economize
on cooling costs with a setting of 78°F to 85°F when you’re out or sleeping.

Check for Compatibility

A programmable thermostat has to be com­patible with your HVAC system. Be especially careful when choosing one for use with heat pumps or radiant floors. A temperature setback in heating mode can cause a heat pump to operate inefficiently. And because high-mass radiant floors are slow to lose and gain heat, temperature setbacks have to be timed differently.

Finally, look for an Energy Star rating, which ensures the thermostat is capable of four daily temperature settings and is pre­programmed for efficient operation.

Installing a

Programmable

Thermostat

Replacing a standard thermostat with a pro­grammable one is easy on most HVAC sys­tems, but there are a few things you need to pay attention to that usually aren’t included in the instructions. Hydronic (boiler) sys-

Thermostats

Thermostats

ThermostatsThermostatsEasy, flexible programming

Подпись: Honeywell Vision Touch Screen RTH8500D, $109 (www.yourhome.honeywell.com)The flexibility of a high-end model like Honeywell®’s Vision Touch Screen allows you to enter a different sched­ule for each day. The touch screen relies on a menu-driven program similar to an ATM. A feature called “adaptive intelligent recovery sys­tem” tracks heating and cooling periods over time to “learn” how long it takes to bring your house to the programmed temperature, minimizing the system’s run time. The “auto changeover” setting of thermostats in this price range switches between heating and cooling modes automatically.

tems are wired differently; a professional can advise you on the best approach for your setup.

FOR A RETROFIT

• First, cut power to the HVAC unit. That’s usually done by shutting off one or more circuit breakers: one if the unit is a heat pump, two if it’s an air conditioner and furnace. The breaker for a heat pump or AC compressor is a two-pole breaker, usu­ally two breakers with a handle tie. Most thermostats operate at low voltage (24v), which comes from the unit, and you want the power off to protect both the
transformer in the unit and the new ther­mostat. Remote thermostats for electric baseboards are typically line voltage (either 120v or 240v). In that case, be sure the thermostat you’re installing is made for line voltage, and be sure the power is off to protect yourself.

• Remove the old thermostat body from its base. It will either be a press-fit unit or be held together with screws. The leads from the thermostat cable usually are at­tached to terminal screws on the base.

Each screw has a letter next to it; often, they’re molded into the plastic base and are not easy to see. If standard thermostat

Energy-Saving Thermostats 183

Подпись: Don’t Toss Your Old ThermostatПодпись: Old mercury-switch thermostats contain enough mercury to poison a 60-acre lake. They should be recycled so that they don't end up in a landfill, where the silvery element could leach into the water table. Manufacturers have established the Thermostat Recycling Corporation (TRC) for suppliers to collect old thermostats from contractors for recycling. (Visit www.thermostat-recycle.org for a list of participating wholesalers.) If a TRC participant won't accept thermostats from homeowners, contact your local municipality's hazardous- material recycling program. Подпись: Mercury switch ThermostatsThermostats

cable was used, the colors usually match up: red lead (wire) to the terminal marked "R," green lead to "G," yellow to "Y," and white to "W." By convention, the red lead is the power supply, green controls the air mover or blower, yellow controls cooling/ air-conditioning, and white controls heat. The simplest programmable thermostat typically has two R-terminals: RC for power from the cool transformer, and RH from the heat transformer. If your cable has only one R lead, connect it to one of the two R terminals, and leave or install the provided jumper wire between the two. If the color of the wires doesn’t match the terminal designation, use masking tape to label each wire before you disconnect it.

• Pull out a few inches of cable, and put a
clothespin or binder clip on the wire to

keep it from slipping back into the wall. If there isn’t any slack, I wrap some electrical or masking tape around the cable, leaving a tail long enough to stick to the wall. If you’re lucky, there’ll be enough slack in the cable to cut off the bare copper and to restrip. For a clamp-type terminal, strip

about 3/8 in. For a screw terminal, I usually strip about 11/2 in. off each wire and cut off the excess after I’ve tightened the screw.

• Run the cable through the hole in the

new base, and fix the base to the wall with a suitable anchor. Insert each wire into the terminal clamp, or wrap each wire around its terminal clockwise so that tightening the screw closes the loop. Make sure there’s no insulation caught under the clamp or screw. If the cable is so short that I can’t make the new connections or if I want to relocate the thermostat, I splice on a length of new cable. For low-voltage wir­ing like this, no junction box is needed. I use a crimp connector or small wire nuts, and I tape or cable-tie the two cables to­gether to take the strain off the splices.

• Before you complete the installation, plug the cable’s hole in the wall with caulk or non-hardening putty. This keeps drafts inside the wall from influencing the thermostat.

FOR A NEW INSTALLATION

• Run the thermostat cable to an interior wall close to the return-air location and out of direct sun.

• Keep runs of low-voltage cable at least 2 in. away from line-voltage cables. Use 6-conductor, 20-gauge standard thermostat wire unless you are sure that your HVAC unit and thermostat need fewer wires.

• Run the cable into the stud bay and

through a 3/8-in.-dia. hole in a 1×6 block affixed to adjacent studs, flush to their faces. Make a service loop by leaving 2 ft. of cable in the stud bay, taped to the side of a stud.

• Wrap 6 in. of cable around a nail driven partway into the block. This helps to keep it from being buried under drywall.

Sean Groom is a freelance writer in Bloomfield, Conn. Mark Eatherton, a heating contractor in Denver, provided technical information. “Installing a Programmable Thermostat” is written by Clifford A. Popejoy, a California electrical contractor.

[1]Go back to step 1 and reduce the size of the mechanicals. An airtight house with insulation on all six sides of the cube and good windows provides predictable performance, so the mechanical contractor won’t have to guess at the quality of the en­closure. Downsized mechanical equipment can defray the cost of steps 2-5.

Rough Terrain Forklift Safety

To operate a forklift, you need to be certified. To obtain certification, you need to be trained and actually operate a forklift. The points below are intended as a refresher for those who are already certified, and as an introduction to those intending to be certified.

• It is the weight of the forklift and the position of the tires that keep a forklift from turning over. There is an imaginary triangle between the front two tires and the space between the back two tires. This is called the stability triangle. The center of gravity for the forklift lies within this triangle. As the forks with weight extend out, the center of gravity moves. If the center of gravity goes outside the stability triangle, the forklift will tip. Getting the feel for the location of the center of gravity and the stability triangle is important to safe operation before you start working with a forklift. A good way to start is to lift a load of lumber and

extend it out next to the ground until the back wheels start to come off the ground.

The center of gravity is also changed when the forklift is on sloped ground. The situation is exaggerated greatly if there is a load on the forks and they are extended. (See “Forklift Center of Gravity" illustrations.)

If you are using a forklift and it starts to tip over, stay in the seat; do not jump out of the forklift.

Before you operate any machine, be sure you are familiar with all the controls.

Before you operate the forklift, do an inspection. Walk around the forklift checking for anything that does not look right, such as leaking fluids. Then get in the cab, start the engine, and check the gages and other controls.

Never leave the forklift while the engine is running.

Know the forklift hand signals. (See “Forklift Hand Signals" illustration.)

Load chart

Crane or Boom Truck Safety

When working with a crane or boom truck, the most important thing for a framer is to have good communication with the operator. Because you are typically out of audible range, you will need to use hand signals. You should use the industry-accepted standards shown in the “Crane and Boom Truck Hand Signals" illustration.

Installing baseboard

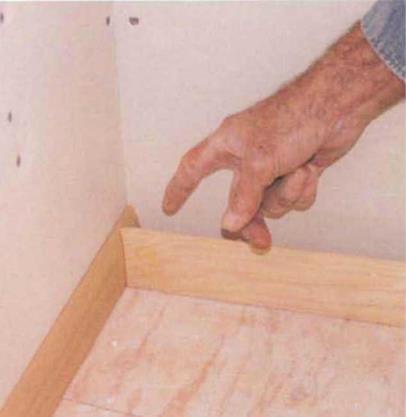
Baseboard hides the joint between the drywall and the floor, so most finish floors are installed before the baseboard. On carpeted floors, baseboard can be installed ahead of time, but hold it up about У2 in. so the carpet can tuck underneath.

Baseboard comes in many different styles, ranging from simple flat stock of various widths to milled trim to built-up baseboards composed of two or more pieces (see the drawing above). It’s best to buy long lengths so there will be fewer joints. Start installation on long
walls first, opposite the door, cutting a piece square on each end to fit from wall to wall. Work from this piece toward the door, making the final cut a square one against the casing. Thin, modern trim can be nailed with 6d finish nails directly into the bottom plate about every 1 б in. Wider, thicker trim needs further nailing into studs to draw it tightly against the wall. Mark the loca­tion of these studs before nailing.

Unfortunately, walls and floors are seldom totally straight and level. While simple baseboards are thin and bend easily to conform to irregularities, heavier moldings will need to be scribed and planed to fit the wall and floor contours. The use of base caps and base shoes is another solution to this problem. They can be flexed to fittightly against the wall and floor surface without scribing. When the baseboard will be

Подпись: Nowadays, baseboards are usually fitted together at outside corners by using regular 45° miter cuts on each piece. And many carpenters do inside corners the same way. But traditionally, inside corners have been joined, particularly with detailed baseboards, with what is called a coped joint (see the photo below). While these joints may look tricky, they aren’t hard to do. In fact, I find cutting these joints to be kind of fun. Подпись: First, cut a 45° miter on the end of a piece of trim that will fit in the corner against the baseboard that is already nailed in place. Then, with a coping saw, cut along the outline of the exposed end grain, tipping the saw back a few degrees to give the wood a slight back cut (see the drawing below). This allows the leading edge of the coped cut to fit crisply and cleanly against the installed baseboard, making a tight-fitting joint that won’t open up.

Coping Joints

Installing baseboardThis joint is also useful for other situations where different types of trim, such as a chair rail, meet at a corner.
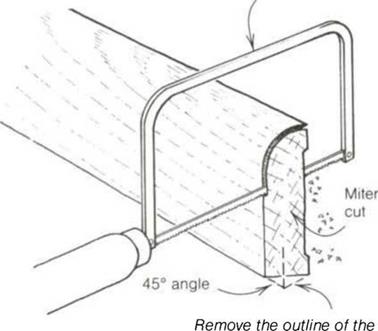
Cutting a coped joint

Coping saw

Installing baseboard

miter with the coping saw. Back-cut slightly.

Coping trim at inside corners creates a tight-fitting joint.

painted, builders often fill the gap between the baseboard and the wall with paintable latex caulk. [11]

Some painting needs to be done, cabi­nets set, closets finished, and electrical, plumbing, and heating work completed, but the end is in sight. You can start thinking about moving in, baking bread in your oven, and planting some roses outside.

[1] often use my combination square to mark stock for ripping. To make a 2У2-ІП. rip cut, for example, set the head at 2У2 in. on the blade. Now set the square on the stock, and you can quickly mark a cut line 2У2 in. from the edge. Place a pencil at the blade end and pull the square down the stock to mark the cut line.

[2] also use dryline to check and straighten framing. Stretched from one end of a wall to the other along the top plate, for example, a dryline can quickly indicate where the wall might need to be straightened.

[3] use spade bits or Forstner bits for drilling large-diameter (3/s in. to 2 in.) holes. Sharp spade bits cut right through wood but leave a fairly rough hole, while Forstner bits leave holes with flat

[4] love my random-orbit sander. It’s small enough to be held with one hand. It has a circular base pad that moves in both circular and back-and-forth motions, which enables it to remove stock quickly yet not leave swirl marks. It is easy to use and is quite powerful for its size.

[5]You can also use 3/4-in. plywood.

[6] Eyes are fragile. Always protect them with safety glasses or goggles when using a power tool or when nailing. Buy a pair that feels comfortable. And so you won’t forget them at home, stuff your safety glasses

Start the nail at a 60° angle, about 3A in. from the end of the board.

[8] find the easiest way to mark the loca­tion of wall studs is to use a metal layout stick. The layout stick is made up of four short bars that are 1 Уг in. wide, or the depth of a stud, and spaced 1 б in. (or 24 in.) o. c. These short bars are welded to another bar that’s 49X2 in. long. Forty years ago we made them from 1×2 pine, but now they are available commercially

[9] often support stringers by nailing a 11/2-in.-wide, 18-in.-long metal strap (see Sources on p. 1 98) along the back edge of the stringer on the top end.

I bend this strap around the stringer so the upper end can be nailed to the header joist of the landing, supporting it. On interior stairs, this strap will be hidden by a riser board. Blocks nailed between the stringers help stabilize them. Nail the first block through the side of the first stringer, flush with the top. Pull it up to the line on the header joist and nail it to the header. Then nail the strap to the header joist. Finish by

[10] usually install the stool first. I like to use thicker material for this piece of trim (like 4/4 or 5/4 stock). Oak, pine, or spruce make beautiful stools that can be stained or finished clear, or you can use paint-grade pine or even medium – density fiberboard (MDF). The overall length of the stool is equal to the width of the window opening plus the length of the horns (ears that extend out beyond the casing). The length of these

[11] have a lightweight chopsaw that I use to cut baseboard. I carry it from room to room, set it on the floor, and cut base­boards to length on the spot.

STEP 3 GET TO KNOW ELECTRICAL AND MECHANICAL SYSTEMS

Houses are a lot like automobiles. Both work well if they’re cared for and maintained. In order to maintain your car, you need to know simple things, such as where and how to add oil or brake fluid, how to put air in the tires, and how to check the radiator. Sure, you could have

STEP 3 GET TO KNOW ELECTRICAL AND MECHANICAL SYSTEMS

a mechanic take care of this routine mainte­nance, but it can quickly get expensive—and besides, it’s satisfying to understand the basics of your daily transportation. The same goes for a house. There’s no need to call a plumber every time you have a leaky faucet or an electrician every time a circuit breaker needs to be reset. Now that you’ve finished building an affordable house, you can maintain it affordably with a little basic know-how.

Do electrical checks

For safety’s sake, one of the first things you should check is that all switch, outlet, doorbell, and exhaust fan covers are securely in place.

Подпись:Подпись: Store a wrench near the gas line's shutoff valve. Shutting off the main gas line quickly can save lives during an earthquake or a hurricane. Buy a wrench that fits the gas line shutoff valve, and store the wrench right next to the valve so that it's immedi-ately accessible should an emergency occur.As a homeowner, you should also know the location of the main electrical circuit box. It contains wires leading to every part of the house and the circuit breakers, which are the switches that control the electricity on individual circuits. Open the box door covering the circuit break­ers and make sure the electrical contractor has labeled what each breaker controls. This circuit map should be on the inside of the door. You should be able to identify the separate breakers for the stove, refrigerator, and furnace, as well as lighting and receptacle circuits for different parts of the house. There will also be a large single breaker that completely shuts down the current throughout the house. With well – labeled breakers, you’ll be able to shut off power when you need to do wiring work on a specific switch or outlet.
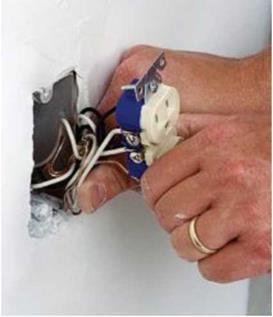
Подпись:Подпись: Change smoke detector batteries. Incorporate this main-tenance task into your NewYear's Day routine to make sure that all smoke detectors in the house receive fresh batteries at least once a year.If an outlet doesn’t work, one of the first things to check is whether it’s a ground-fault circuit interrupter (GFCI) outlet. GFCI pro­tection is required for outdoor receptacles (out­lets) and electrical outlets in the kitchen and bathroom—places where the presence of mois­ture might pose an electrical shock hazard. If overloading or an electrical short is detected, a GFCI circuit breaker will shut down at the main service panel, cutting off power to all outlets on the circuit. GFCI protection can also be provided by a GFCI receptacle that’s wired to other receptacles. Both GFCI devices have test and reset buttons. Find out which type of GFCI protection you have, where the devices are located, and which outlets they control.

By pressing the test and reset buttons, you’ll see how they work.

Many electrical codes also protect houses us­ing AFCIs (arc-fault circuit interrupters). Fires sometimes start when electricity arcs between two points. If an arc occurs, an AFCI automati­cally cuts off the flow of electricity. Power can be restored by resetting the breaker in the main control box in the house once the problem has been fixed.

Know the water and gas lines

In the same way that there’s a main electrical shutoff switch in the electrical circuit box, there are also shutoff valves for the water and, in some places, the natural gas supplies that come into a home. Find out from your plumber and heat­ing contractor where these valves are, and label them clearly. Water and gas lines can break, and being able to shut off the flow of water or gas could mean the difference between a minor problem and a catastrophe.

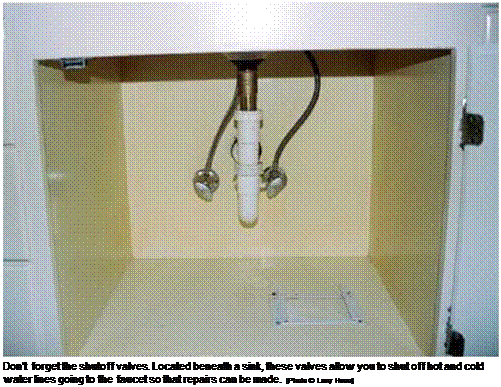
Turning a valve on the gas meter with a crescent wrench can often shut it off. There is a shutoff valve on the main water pipe com­ing into the house. There are also localized shutoff valves under sinks and toilets and near washer-dryer units (see the photo at left). These allow you to turn off the water to a particular appliance so that you can fix a dripping faucet or make other repairs.

Be familiar with heating and air­conditioning components

The filter is an inexpensive but very important part of most forced-air heating systems. A central air-conditioning system also relies on a filter to trap dust and dirt that may otherwise be blown into living spaces when the system is operat­ing. Make sure you know where these filters are located and how to change them. Replacing a furnace or central AC filter usually takes no more than a minute or two. Always have one or two new replacement filters on hand. Check your working filter against a new one, and replace the old filter once it’s discolored by trapped material. A well-functioning filter is good for your health and the health of your HVAC system.