Blog Archives

TURNING CORNERS IS TRICKY WORK

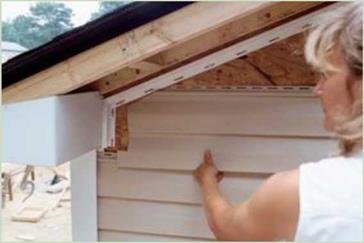
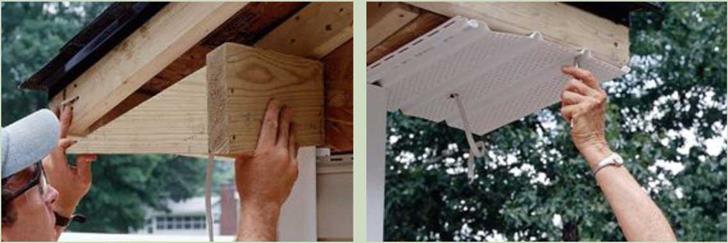
Combining an enclosed soffit with a gable-end roof overhang means that you need to con­struct a boxed return. The return creates the nailing surfaces required to bring the soffit and fascia trim around the corner of the house. Here’s how to do the job:
TURNING CORNERS IS TRICKY WORK

1. Use 2x lumber to make the framing for the boxed return, which consists of a triangular piece cut to match the roof’s pitch and a straight board that vertically extends to the gable wall.

2. Fasten this assembly to the bottom edge of the barge raf­ter and the back wall. The soffit paneling must be attached prior to the aluminum cladding.
TURNING CORNERS IS TRICKY WORKTURNING CORNERS IS TRICKY WORK

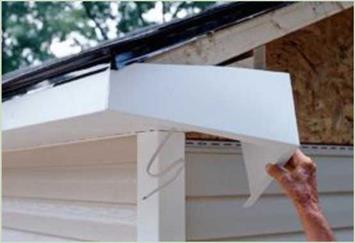
3. Run electric cable through the corner soffit for an outdoor light. Slip the gutter board cladding under the roof’s drip edge trim, then bend it at a 90-degree angle to cover the end of the soffit...

read more

Median Barrier Transitions

Transition sections are used between adjoining median barriers having significantly different deflection characteristics, between a semirigid median barrier and a rigid barrier (such as a bridge rail), and in similar situations. The transition sections should provide impact performance similar to standard sections, and emphasis should be placed on designs to avoiding vehicle snagging. Structural details of special impor­tance include the following:

• Rail splices should develop the tensile strength of the weaker rail.

• Use a flared or sloped connection if the connection could snag an opposite-direction vehicle. Use a standard terminal connector to attach a W-beam or thrie-beam rail to a rigid bridge railing or parapet, or provide a recessed area in the parapet wall to receive the rail...

read more

STEP 7 FINISH THE SOFFITS

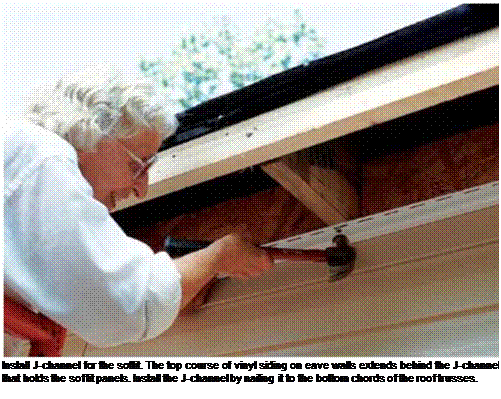
Vinyl soffit material has small holes to allow air to enter freely. Before attaching this material along eave walls, make sure that all the baffles between rafters are in place to keep insulation out of the eaves and allow airflow into the attic. On this house, we cut the vinyl soffit sections into short lengths that overlap each other and ran them perpendicular to the siding. Insert the ends of each soffit panel into vinyl J-channel trim nailed to the wall and nail the other end to the bottom edge of the gutter board.

Gable-end soffit details

Soffit work is also required to finish off the un­derside of the roof overhang on the gable ends of a house...

read more

Building Code Load

Conventional and nonconventional codes regulate the strength needed in the walls, floors, roofs, and connections to resist the forces on buildings. The conventional code describes a prescriptive standard to resist the forces. The standard applies to simple buildings using common construction methods. The nonconventional code is a performance-rated system and provides non-prescriptive engineering
guidelines that can be applied to more unusual or more difficult buildings.

Prescriptive Format

The prescriptive format has specific requirements, such as the size of studs needed or the type of wall bracing. If you build the structure following these requirements, then the building meets the minimum code standards for a safe building. The prescriptive codes are covered in more detail in Chapter 10.

read more

A Very Hot Bed

Prior to purchasing a home, a family contacted John to conduct radon testing with electronic monitors, following the EPA’s protocol. Closed – house conditions were established 12 hours prior to testing and were maintained throughout the tests. During the testing, one of the electronic monitors located in the dining room indicated 12.5 picocuries of radon per liter of air, while a monitor elsewhere showed close to normal levels. The client was advised that the electronic read­ings were suspicious and that additional testing was necessary. As the investigation proceeded, it became clear that there was a radon source at one end of the home. In fact, the radon result for a test conducted on a night table in the guest bedroom was 27...

read more

Installing the top piece of eave-wall siding

The last piece of siding at the top of an eave wall can be fastened in different ways. If the eaves will be left open, use strips of undersill trim and cut and fasten the final panel in the same way as the one under the window. If the eaves will be closed with soffit material (as was done on this house), then the uppermost siding panel can simply be nailed in place above the level of the soffit. The

J-channel trim for the soffit, and then the soffit itself, will cover the top siding panel.

Siding gable-end walls

Begin by nailing 2×2 blocking between the lookouts and along the barge rafter. This allows J-channel to be nailed up the rake, where it can receive the angled ends of the siding panels. Some builders prefer to hold the J-channel /4 in...

read more

MAKING AN OUTLET-BOX CUTOUT

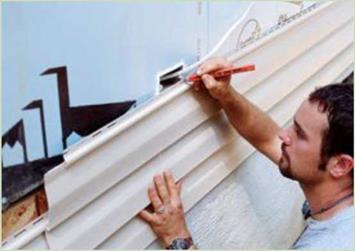
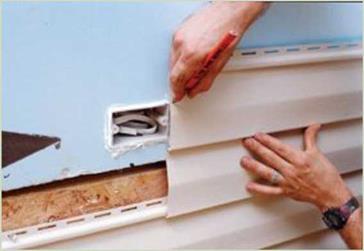
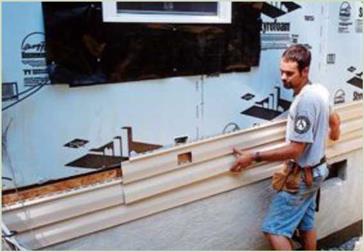
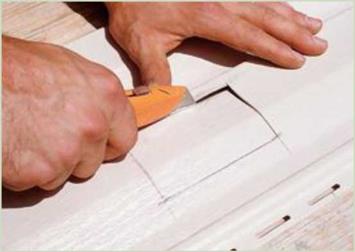
Precise cutouts are sometimes required for certain situations, such as fitting siding panels over vents or electrical outlet boxes. Careful layout is the key here.

MAKING AN OUTLET-BOX CUTOUTMAKING AN OUTLET-BOX CUTOUT

1. Place the siding panel directly below where it will be in­stalled. Mark where the sides of the box hit the panel.

2. Reposition the panel to one side of the box, clipping it into the panel just below the box. Mark where the top and bottom of the box hit the panel.

MAKING AN OUTLET-BOX CUTOUT

4. The panel is now ready to install.


MAKING AN OUTLET-BOX CUTOUT

3. Outline the cutout where the horizontal and vertical lines intersect, then cut the opening with a sharp utility knife.

Подпись: Install J-channel for the soffit. The top course of vinyl siding on eave walls extends behind the J-channel that holds the soffit panels. Install the J-channel by nailing it to the bottom chords of the roof trusses.

more than 1 in. to fit, you must fur out or shim the undersill trim. The deeper the notch in the siding, the thicker the shim you’ll need...

read more

FRAMING

Buildings are naturally affected by the forces of nature, and also by artificial forces. Elements such as gravity, wind, snow, earthquakes, retained soil, water, impact by an object, and mudslides can all have negative effects on a building.

This chapter will give you a basic understanding of the forces that affect buildings, and some helpful information on the framing methods used to resist those forces.

Although you may not be responsible for designing structural requirements for buildings, it is important to have some understanding of a building’s structural loads. When you are aware of the reasons behind the decisions engineers and architects make, it is easier to interpret the plans, and to make sure that the structure is built accordingly.

The Strength of Good Framing

The forces of ...

read more

STEP3 Set the Windows and Doors

The setting process anchors the windows and doors in their final positions. Complete installation happens later, when we move inside the house and work on the interior trim. The windows and doors used in afford­able housing are mainly vinyl and vinyl clad, though aluminum-clad frames are still installed in some areas. Some codes require that window frames be clad with white vinyl; check with your local building department. Dark-colored vinyl absorbs more solar heat and, as a result, tends to deteriorate faster. On the other hand, dark-colored aluminum cladding holds up well in sunny areas.

Both vinyl and aluminum-clad windows come with a nailing flange on the outside of the window frame; the flange greatly simplifies the installation process...

read more

Installing panels around windows, doors, outlets, and vents

Strips of undersill trim must be installed beneath windowsills. This special trim covers the horizontal edge of a siding panel and locks the panel in place. Cut each trim piece to fit between the two side J-channels, then nail it flush against the underside of the window. If the panel beneath a window needs to be notched

read more