Blog Archives

Copper Pipe: Disconnecting, Reconnecting, and Repairing

To disconnect a soldered fitting, apply heat till the solder melts. Then gently tap the fitting off the pipe. When the metal is cool, clean the pipe end, reflux, reheat, and solder on a new fitting. Unless the fitting is an expensive one, such as a gate valve, don’t reuse fittings that have already been soldered.

When disconnecting a fitting on an existing supply line, drain the pipe first; otherwise, the solder won’t melt. Draining and reconnecting will be much easier if the pipe section can be isolated with a shutoff valve, but sometimes old valves don’t shut perfectly. In that event, ball up a piece of white bread and stick it in the pipe to block the trickle while you solder. Once the water runs again, the bread will dissolve and flush out.

Finally, here’s a fix for split pipes that do...

read more

DORMITORIES

Dormitories require the use of one laundry tray for each 50 people and one slop sink for each 100 people. However, washing machines can be used in lieu of laundry trays. This information is found in Figure 9.14 and Figure 9.2. It is also required that dormitories which are for the exclusive use of one sex or the other shall have double the number of fixtures listed under the gender-spe­cific restrooms in the table. There are also rulings in Figure 9.14 pertaining to bathtubs and showers. You will find that sizing dormitories is not difficult, but that it does involve some rules that we have not previously used.

GATHERING PLACES

Gathering places, such as churches, theaters, auditoriums, and similar places can be sized for plumbing fixtures by using the information in Figure 9.15...

read more

Tying off double top plates

To tie the two double top plates together, nail the overlapping double top plate of the butt walls to the double top plates of the through walls with two 16d nails (see the photo on p. 122). Do this job accurately, and it will make it
easier to plumb and straighten the walls. When there are lots of wall plates to nail off, skilled carpenters usually hop right up on the walls to do the job. I have a gymnast daughter who once worked with me during summers. She was great at walking on plates. The plates were wider than her balance beam. But for inexperienced carpenters, it’s easier— and safer—to work from a ladder (to learn about working on a ladder safely, see the sidebar on p. 123).

The corner marks you drew on the plates earlier act as guides when nailing off the top plates...

read more

Transitions to Bridge Railings

Most of the principles previously discussed for median transitions (Art. 6.9.3) apply

here as well. Transition designs should gradually stiffen the approach system to avoid

vehicle pocketing, snagging, or penetration. Some considerations of importance follow.

The concepts are appropriate for both new construction and retrofits.

• The splice between the rail of the approach barrier and the bridge rail should develop the tensile strength of the approach rail.

• Strong-post systems, or combination normal-post and strong-beam systems, can be used for transitions. These systems normally should be blocked out to avoid snagging. Also, a rub rail may be desirable with W-beam or tube-type transitions. Tapering the rigid bridge railing end behind the transition members may also be desirable...

read more

EXAMPLES FROM THE DEMONSTRATION PROJECTS

Подпись: Lacey, Washington Подпись: Portland, OregonEXAMPLES FROM THE DEMONSTRATION PROJECTSTypical parking areas in Lacey are built on a 6-inch subbase and a 2- inch crushed stone base. After conducting soil-bearing tests, the developer of The Park requested and received approval to construct parking areas with a 2-inch crushed stone base and a 2-inch asphalt cover.
Lacey standards also require concrete wheel stops to be located 2 feet in front of an asphalt curb. At The Park, the city approved use of wheel stops without curbs, thereby elimi­nating the need for 4,936 linear feet of curbing.

These modifications resulted in cost savings of $38,000, or $215 per unit.

Black Bull Enterprises, builder/developer of North Meadow Village, received permission to install parking bays along streets in lieu of driveways, thereby saving land that would have been required for full driveways.

read more

Crash-Tested Bridge Railings

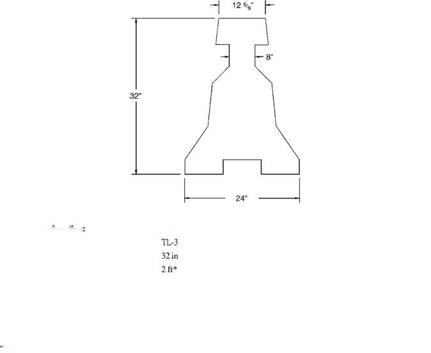
Testing criteria and test levels for bridge railings are the same as previously discussed for roadside barriers (Art. 6.4). The FHWA maintains a list of designs that have been tested to NCHRP Report 350 levels, as well as designs that were tested to earlier guidelines and have been assigned an equivalent Report 350 test level. Railings are seldom evaluated for TL-1. Examples of railings designs that meet higher levels are as follows:

TL-2. Thrie-beam bridge railing, side mounted. Consists of a thrie-beam rail cen­tered 22 in (550 mm) above the deck, supported on steel or wood posts mounted on the side of the bridge. It is intended for use on lower-volume secondary roads. Actually tested only to NCHRP 230 criteria, it is considered to meet TL-2.

TL-3. Wyoming Two-Tube bridge railing...

read more

Upgrading Bridge Railing Systems

The first step in an upgrading project is to identify potentially deficient systems. Bridge railing designs prior to 1964 are particularly suspect. Strength and performance should be documented. Verify critical details such as base plate connections, anchor bolts, material (strength, toughness, and condition), welding details, reinforcement development, etc. Open-faced railings may cause snagging. Curbs or sidewalks adjacent to a railing may cause an impacting vehicle to vault or roll over. Approach transitions may be inadequate.

Retrofits can be developed to address inadequacies. When possible, use crash-tested designs in such updating...

read more

Placement Considerations

Bridges should provide a full, continuous shoulder that maintains uniform clearance with approaching roadside elements. However, if the bridge is narrower than the

Placement ConsiderationsAASHTO Designation

Подпись: SWC01Test Level:

Nominal Barrier Height: Maximum Dynamic Deflection:

Remarks: This proprietary portable barrier system is suitable for both permanent (unbalanced traffic flow) and temporary applications. It is composed of a chain of safety-shape concrete barrier segments 37 in long which can be shifted laterally. Even though the cost is relatively high, the system becomes cost-effective when frequent lateral movement of the temporary barrier is required while maintaining traffic.

‘Deflections may be reduced by using CRTS or SRTS.

FIGURE 6.35 Movable concrete median barrier. Conversion: 1 in = 25.4 mm...

read more

FINISHING THE LAYER

Some countries require special finishing techniques for SMA surfaces. Those requirements are described here.

10.7.1 G ritting

Applying a layer of grit to the finished surface is often specified. Why has gritting been applied? Soon after placement, the SMA layer is characterized by relatively low friction (the so-called postconstruction slipperiness) caused by a thick film of binder on particles of aggregate. Spreading additional aggregate on the surface of the hot SMA, followed by rolling (to embed the grits) is aimed at breaking the binder film on the coarse particles. Due to its microtexture, well-embedded grit breaks the water film, hence increases the skid resistance of SMA.

Without gritting, the process of rubbing the binder film off the aggregate particles that provide the SMA macrot...

read more

Measuring and Fitting Pipe

When measuring water-supply or dwv pipe runs, keep in mind that most pipe slides into fitting sockets. The depth of the socket is its seating distance (seating depth), which you must add to the face-to-face measurements between pipe fittings. When running pipe between copper fittings with a seating depth of VI in., for example, add 1 in. to the overall measurement. Rigid 3/4-in. copper fittings have a 3/4-in. seating depth.

As important, after you dry-fit pipes so fit­tings point in the correct direction, use a grease pencil or a builder’s crayon to create alignment marks on the pipes and fittings. That way you’ll be sure the fittings are pointing in the right direction when you make the final connections...

read more