Copper Pipe: Disconnecting, Reconnecting, and Repairing
To disconnect a soldered fitting, apply heat till the solder melts. Then gently tap the fitting off the pipe. When the metal is cool, clean the pipe end, reflux, reheat, and solder on a new fitting. Unless the fitting is an expensive one, such as a gate valve, don’t reuse fittings that have already been soldered.
When disconnecting a fitting on an existing supply line, drain the pipe first; otherwise, the solder won’t melt. Draining and reconnecting will be much easier if the pipe section can be isolated with a shutoff valve, but sometimes old valves don’t shut perfectly. In that event, ball up a piece of white bread and stick it in the pipe to block the trickle while you solder. Once the water runs again, the bread will dissolve and flush out.
Finally, here’s a fix for split pipes that doesn’t require soldering at all: Cut out the damaged section of pipe and slide a compression repair coupling over the cut pipe ends. (The coupling’s inner diameter is the same as the Vl-in. rigid copper’s outer diameter.) Use a pair of adjustable wrenches to tighten the compression fittings on both ends of the coupling, and you’re done.


![]()
 Repairing pipes split by freezing water is no big deal with a compression repair coupling. Each end of the coupling compresses a brass ferrule to create a watertight seal without soldering.
|
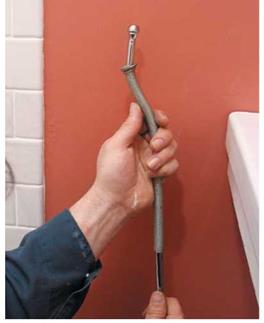
Use a tubing bender to shape chrome supply risers; the wire coils of the bender support the soft tubing and keep it from buckling as you gradually shape it. |
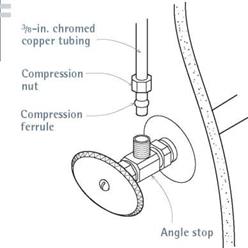
soft metal that is compressed between a set of matched nuts. A flared fitting requires that you flare the tubing ends with a special tool. When using either type of connector, remember to slide nuts onto the tubing before attaching a ferrule or flaring an end. Both types of connection are easy to disconnect, and so are used where repairs may be expected, such as the supply line to a toilet. Don’t reuse ferrules, however; replace them if you need to disconnect fittings.
In most situations, braided stainless-steel supply lines are a better choice than flexible copper tubing: Braided lines are strong, look good, and can be connected and disconnected as often as needed.
Galvanized pipe corrodes and constricts, reducing flow and water pressure, so it is no longer installed as water-supply pipe. If your existing system is galvanized and the water flow is weak, replace it as soon as possible. If you’re not quite ready to rip out and replace all of your galvanized pipe, you can replace or extend sections with rigid copper. However, you must use a dielectric union (see the photo on p. 272) to join copper sections to steel. Otherwise, electrolysis will take place between the two metals, and corrosion will accelerate.
Today, galvanized pipe is largely limited to gas-supply service. Because of safety considerations and the difficulty of threading pipe without a power threader, have a licensed plumber install gas-supply service pipes. A plumber will install gas shutoff valves to gas-supply stubs; short lengths of flexible gas-supply pipe run from there to a fixture.
Most plumbing codes allow CPVC for hot – and cold-water applications, but check with local authorities to be sure. CPVC is a good choice for hard-water areas, because—unlike copper— CPVC won’t be corroded by chemicals in the water. Note: CPVC is a different material from PVC, which is widely used as drain and waste pipe; PVC may not be used as supply pipe, however, because it releases carcinogens.
That noted, working with CPVC supply pipe is much like cutting and joining plastic DWV pipes, explained at some length later in this chapter.
The main difference is that waste pipes are larger. Briefly, here’s how to join CPVC: Cut the pipe ends square using a plastic-pipe saw or plastic – pipe cutting shears. Clean the pipe ends as well as the inside of the fitting. Next, apply solvent – based cement to each. Insert the pipe into the fitting, turning either the pipe or the fitting a quarter turn in one direction only to spread the cement. Finally, allow the glued joints to set adequately before putting pressure on the line.
Before installing CPVC, make sure that you have the adapters needed to join the new plastic pipes to existing metal pipes and fixtures.


Leave a reply