Category Timber Framing for the Rest of Us Rob Roy

Grading of Lumber: The Good, the Bad and the Ugly

Serious organic flaws such as large knots at the edge of a timber can greatly diminish both shear and bending strength. (I will explain the difference in Chapter 2, when the differentiation is more important.) Other defects are checks (shrinkage gaps), splits, and shake (separation of annual growth layers.) Shake weakens a timber considerably. This is where lumber grading becomes important. Trained lumber graders can certify a particular timber as being of a certain structural grade. However, the buyer must still be aware. At a meeting of sawyers I attended in December of 2002, an example was shown of a graded two-by-four stud purchased from a large building supplier. The grade stamp was clearly printed right on the stud. Because of poor quality, it took little effort to break the two-by-four in half by hand. The issue of using graded or non-graded lumber is a serious one and affects the owner-builder profoundly. Listen:

As I write, in early 2003, 48 of the 50 American states (including New York, where I live) have adopted the so-called International Building Code. (I say so- called because I cannot imagine that this 3-pound volume of codes would be of much use outside of North America.) One of the code requirements in this hefty volume is that all structural lumber be graded. Paragraph R502.1 says, “Load- bearing dimension lumber for joists, beams and girders shall be identified by a

grade mark of a lumber grading or inspection agency that has been approved by an accreditation body that complies with DOC PS 20. In lieu of a grade mark, a certificate of inspection issued by a lumber grading or inspection agency meeting the requirements of this section shall be accepted.” Paragraph R602.1 says the same thing with regard to “studs, plates and headers” and Paragraph R802.1 includes “rafters, trusses and ceiling joists.” In short, all structural wooden components in residential structures in 48 states must be graded.

On December 3, 2002, an emergency meeting of small sawmill owners came together near Lake Placid, New York, to discuss this provision, which was due to take effect on January 1, 2003. Most of the 200-odd attendees were rural sawyers, who, rightly, saw this new code as threatening their livelihood.

What happened next was a lesson of democracy in action. From all over the state, representatives of various sawmill and rural associations, supported by state senators and assemblymen, went to Albany to attend and speak at the December nth meeting of the New York State Code Council. The code council unanimously adopted a proposal by the Empire State Forest Products Association in concert with the Department of State and the New York State Department of Conservation to reinstate a “local option” regarding grade stamping for structural lumber.

Hundreds of letters and thousands of signatures on petitions helped turn the tide on this issue. According to a press release sent to me as a petitioner, the upshot is that now, as before, “Rough cut lumber can be used for structural purposes if the code enforcement officer allows it and the mill guarantees that the lumber meets minimum (grade 2 or better) standards. The mill will be required to sign a form that will be provided by the local code officer and this form will need to accompany the building permit application. These provisions apply to residential construction not exceeding three stories in height, and all other buildings not exceeding 10,000 square feet in area or 35 feet in height.”

Over the past several years, three or four of our students at Earthwood Building School have reported difficulty in using their own lumber or locally sawn lumber in the construction of their own homes, the local code enforcement officer insisting in each case that the lumber be professionally graded. The cases I have heard about have occurred in Michigan and Ontario, but it could happen almost anywhere in North America now, so the owner-builder needs to be aware. The sidebar on page 10 tells the story of Mark Powers’ battle for a permit in Michigan. His experience is by no means singular, and the wisdom he has garnered — and shares with us — may be valuable to the next owner-builder facing a similar hurdle.

Timber Framing versus Standard Stud Construction

Most residential framing in North America today is done with stud construction — a light “stick frame” — often referred to as a platform frame, conventional frame or western frame. A “balloon frame,” popular about too years ago, is a special type in which the vertical members, now known as studs, were quite long, spanning from first story right through the second story. This is uncommon now, with most stories built independently using the ubiquitous eight-foot stud.

Conventional stick-frame construction is typically fabricated with framing lumber having a thickness of just 1V2 inches (3.8 centimeters). Vertical support studs are placed around the perimeter either 16 or 24 inches (40 or 61 centimeters) from the center of one stud to the center of the next one. Prior to 1924, frames were constructed with full “two-by” material. A two-by-four actually measured

two inches by four inches. Much of this material came from small local sawmills, and, in truth, the dimensions of a two-by could vary by up to a quarter inch. The local sawmills I work with today are almost always within an eighth of an inch of the true dimension, and, very often, they are spot on.

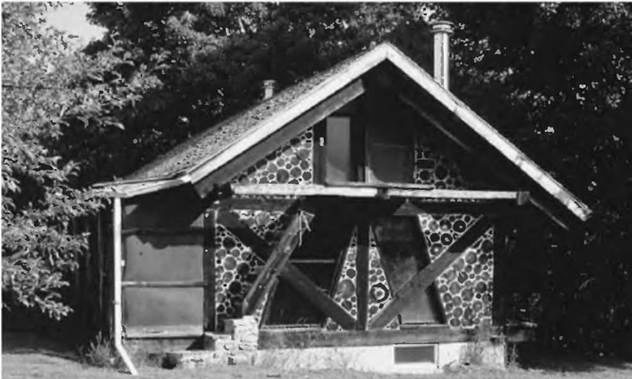
image4Подпись: Fig. 1.1: In 1975, the author, with his wife, jaki, built Log End Cottage, West Chazy, New York, using simple timber framing strategies "for the rest of us." Panels between posts are infilled with cordwood masonry.A nominal “two-by-four” today is actually 1V2 inches by 3У2 inches. All two-bys bought at large lumber suppliers such as Lowes and Home Depot are 1У2 inches thick. The actual depth of a two-by-four is fh inches (8.9 centimeters), and the depth of a two-by-six is 5У2 inches (14.0 centimeters). After that, the true depth is three-quarters inch (2 centimeters) less than the nominal dimension, so that a two-by-eight is jVa inches (18.4 centimeters) deep and a two-by-ten is 9lA inches (23.5 centimeters) deep. Sometimes, you can buy “heavy timbers” at large building suppliers, such as six-by-sixes, but these, too, lose one-half inch in the planer and have a true dimension of inches square. It is important to know the difference between “rough-cut” (full dimensional) timber and “finished” lumber, more commonly available.

This book does not discuss todays common stick-frame construction, because there are already a number of excellent manuals on the subject that I cannot improve upon. Some of these are listed in the Bibliography, but the list only scratches the surface of what is available. Also, there are building schools that teach this type of construction and they are noted in Appendix C. Many local trade schools and technical colleges also offer courses in conventional building.

Rather, Timber Framing for the Rest of Us is meant to complement natural building methods, in which the fabric of the building — cob, cordwood, straw bale, waddle-and-daub, etc. — is essentially infilling between the heavy timbers forming the buildings structural framework. Also, the methods described herein would be appropriate to storage sheds and barns where rough-cut lumber is to be used as siding. Unlike conventional stick framing, which is based upon the use of four – by eight-foot sheet goods, the center-to-center spacing of posts is typically

somewhere between six and ten feet (1.8 and 3 meters). This makes infilling much less tedious. Imagine trying to fill the narrow spaces in regular stud construction with cordwood masonry or straw bales.

People building heavy timber-frame structures do not normally buy much lumber at the large national lumber chain stores. Far more commonly, they will purchase their timbers from a local sawmill, make their own timbers with a chainsaw mill, or have a local sawyer visit their wooded property with a portable band saw, to have the standing trees converted to full-dimensional timbers. We’ll look at these options in Chapter 3.

If lumber dimensions were the only consideration, it could be fairly argued that a full-sized 2-by-8-inch floor joist or roof rafter (16 square inches or 103.2 square centimeters) would be 47.12 percent stronger on shear strength than its store-bought equivalent that measures 1.5 inches by 7.25 inches, or 10.875 square inches (70.16 square centimeters). That sounds pretty good, and is true as far as it goes, but there are other considerations that contribute to a timber’s strength.

About Timber Framing

A Little Background

T

HE BEGINNINGS OF QUALITY TIMBER FRAMING ARE LOST IN PRE-HISTORY, but a reasonable surmise is that simple frames could have been made by supporting beams on columns which had a natural fork at the top, the kind of thing that we boys of the 1950s saw in Boy Scout manuals or Straight Arrow cards stuffed as premiums in Shredded Wheat boxes. (Gee, I wish I still had those!) Once a horizontal timber is supported by the verticals, considerations such as stability and strength enter the equation. Early builders would have recognized the inherent strength of the triangle. The value of the pitched roof would have been recognized soon thereafter, and timber-frame structures were off and running. Refinements in both kind and degree would have evolved by trial and error, a kind of structural evolution, with failed tests being dropped by the wayside and successes passed on through the generations.

Early humankind did not have metal tools and fasteners, but they did have excellent stone tools, and quality timber framing could and would have evolved without metal. Archaeological evidence at Neolithic sites — post holes primarily, as little wood has survived — show the shapes of houses in Europe 5,000 years ago, and suggest the kind of rafter systems that would have been required to roof the structures. Some were quite magnificent, like the huge round wooden temple at Stanton Drew in Somerset, England, which predates the megalithic stone circle at the same site. This earlier structure, discovered by the use of magnetometers in the late 1990s, would have had a diameter of 312 feet (95 meters), and was composed of about 400 very large oak posts. Experts disagree as to whether or not it was ever roofed, but the radial location of posts strongly suggests a radial rafter system. A project of this scale, at that time of much lower population than today, was an infinitely more impressive feat than, say, the building of Londons Millennium Dome or a modem American indoor sports arena.

How long these buildings lasted we shall never know. We know now that longevity of a wooden structure is closely tied to the quality of the foundation and the roof. The primary cause of wood rot is the propagation of fungi, which require air, water, and nutrients. If a constant damp condition can be avoided, wooden buildings will last an awfully long time. You need “good shoes and a good hat,” said the old-time builders, referring to the foundation and roof. I would add, “and good ventilation.”

As a youth of 19, visiting the Alpine village of Wengen, Switzerland in 1967,1 was asked to guess the age of the large chalet where I stayed. The building looked new, but I dutifully guessed an age of twenty years. I was shocked to learn that the home was 500 years old. The alpine climate, the quality of construction, and Swiss maintenance combined to preserve the building in an “as-new” state.

An example of this craftsmanship is worth relating. Wood swells at humid times, and shrinks when the air is dry. There’s not a great deal we can do about it. Nailed-down hardwood floors can buckle when they take on moisture, for example. In some Swiss houses of centuries past, the floorboards were not nailed down. Rather the center plank (or more than one) in the floor were tapered, with their ends actually sticking out of the building, accessible to a wooden mallet. In the winter, when conditions were dry, driving the wedge-shaped boards in from one end tightened the floor. During humid times, the opposite ends of the boards could be struck with a mallet to slightly loosen the floor, thus preventing buckling. And just think of what an easy matter it would be to replace a board.

Timer Framing for the Rest of Us

r

imber Framing for the Rest of Us. Us implies Them, or They or Not Us. And who are these others? They are no less than the skilled timber-framers, using time-tested methods of creating beautiful, strong, and enduring buildings throughout the world. At its best, timber framing done by traditional methods of joinery yields a quality of construction that spans the range from craft to art.

The use of timber-framing joinery, such as scarf, mortise-and-tenon, and rabbet joints, evolved during a time before metal fasteners were available, and its traditional use continued when metal spikes would have been expensive. Quality wood-on-wood timber framing continues to this day, and is a joy to see. There are plenty of good books to show how the work is done, and building schools that will teach the owner-builder these skills. Books are listed in the Bibliography, and schools and other resources are listed in Appendix C.

I have the highest admiration for these traditional builders. A good friend, who died much too young, took great pride in restoring historic timber frame buildings in Northern New York, often working to 1/64-inch (0.39 millimeter) tolerance. But the reality is that most timber framing is not done in the old-fashioned “traditional” way with wooden pegs, mortise-and-tenon joints, and the like. With the advent of relatively inexpensive mechanical fasteners, most builders — contractors and owner-builders alike — rely on other methods of joining, using things such as truss plates, screws and bolts, pole-barn nails, and even gravity. The problem is that there is a shortage of information about joining heavy timbers by these methods. Most construction manuals are quite good about describing the joining of “two-by” lumber — usually 1V2 inches (3.81 centimeters) thick nowadays — and that’s the extent of it. Chapter 1 speaks about traditional timber framing… and the kind that this book is about.

However, many of the natural building methods which are becoming re­popularized today — such as cordwood masonry, straw bale construction, and cob building — benefit from heavy timber construction, primarily because these

methods involve thick walls. There is also a great practical advantage in erecting a timber frame first, getting the roof on as a protective umbrella, and then infilling the structure using one or more of these natural — and typically slow — building methods. Before starting, though, its good to have an understanding of the basic structural elements of timber framing, which is what Chapter 2 is all about. You’ll also need the timbers themselves. Where to get them is the subject of Chapter 3.

Yes, you can accomplish all this with “traditional” wood-on-wood joining methods. I have even met two or three who have done so and my hat is off to them. But to do it right, a great deal of time and study must be expended, and there are a few specialized tools which need to be purchased. The reality is that most farmers, contractors, and owner-builders use methods of heavy timber framing which they have simply picked up from colleagues, relatives, or neighbors. And they use common tools found around the homestead, such as chainsaws, hammers, and electric drills. For years, I have felt that there has been a void in the literature for owner-builders on this subject, and that is why I have undertaken this volume as a kind of “missing link.” Chapter 4 explains the basics of timber framing for the rest of us.

My qualifications are unpretentious. I’ve written about alternative building methods for almost thirty years and, with my wife Jaki, I’ve built four houses, a garage, and quite a few smaller outbuildings using the methods described herein. In fact, Jaki and I built a new addition to our Earthwood house in 2002, and the primary reason for it was to demonstrate and document some simple joining principles for this book. Chapter 5 takes you through this entire project from design to completion, step by logical step.

This book is not meant to document all of the methods and fasteners that are available. Rather, it demonstrates and describes the basic principles of building with heavy timbers by “non-traditional” methods (even though these non- traditional methods are certainly more common nowadays than the traditional ones.) It will show how to build very strong structures with a minimum of wood­joining skills.

Finally, to the expert timber framing craftsmen and teachers like Steve Chappell, Will Beemer, Jack Sobon, Tedd Benson, and so many others, I say that is not my intention to diminish your fine work in any way. Rather, I hope it will enhance appreciation of the craftsmanship that you practice and teach so generously, and, at the same time, offer a viable alternative. Those with time and

inclination may want to incorporate some traditional joints in their project, especially where they can be left exposed. I have done this once or twice and was rather proud of myself afterwards.