Category A HOUSE

Install the wall cabinets

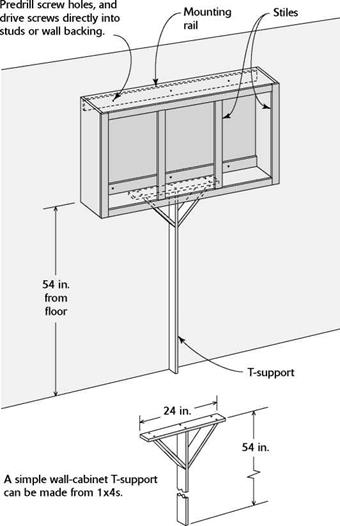
Wall cabinets are usually installed with their bottom edges 54 in. from the floor, or 18 in. above a countertop (see the illustration on the facing page). Mark a level line for the wall cabinets with a soft pencil, so that it can be erased or easily cov­ered with paint. If there is a kitchen soffit make sure the cabinets are secured to the walls, with their tops fitting snugly against the soffit.

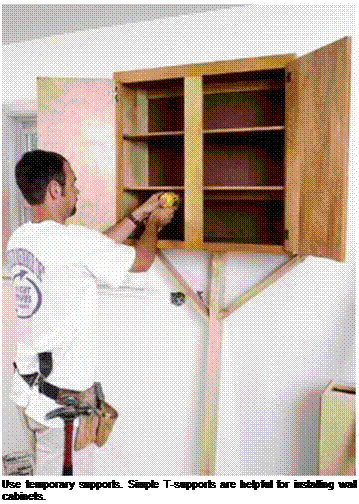
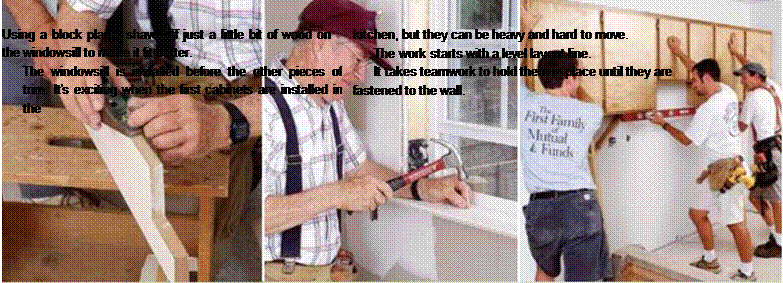
Before hanging wall cabinets, remove the doors and shelves to make the cabinets lighter. Just as with base cabinets, start in a corner and install every unit level and plumb. Use a T-support or something similar to hold a cabinet in place until it is attached to the wall (see the photo at left). Wall cabinets should be set directly above corresponding base cabinets. Drive screws at both the top and the bottom of wall cabinets and into the studs or backing blocks placed in the wall frame.

If there is no backing in the walls, make sure that the screws for the wall cabinets go directly into studs. Kitchen cabinets filled with dishes can be heavy. A friend called me recently and asked me to come by to see whether I could tell her why one of the kitchen cabinets in her new house was sagging. It turns out the installer missed the studs when screwing the cabinet to the wall. To make sure that doesn’t happen, find the location of studs, then transfer those loca­tions to the inside of each cabinet.

IIII III III II III III III II III III III II III III III II III III III II III III II III III III II III III III II III III III II III III III II III III II III III III II III III III II III III III II III III III II III I

Install the base cabinets in kitchens and baths

Cabinet installation details are the same, whether you’re working in the kitchen, the bathroom, or any room. Some people prefer to install wall cabinets first so they won’t have to reach over the base cabinets. Perhaps because I am tall, I gen­erally install base cabinets first. Either way, it’s best to begin in a corner. Corner cabinets tend to be large and are trickier to install because

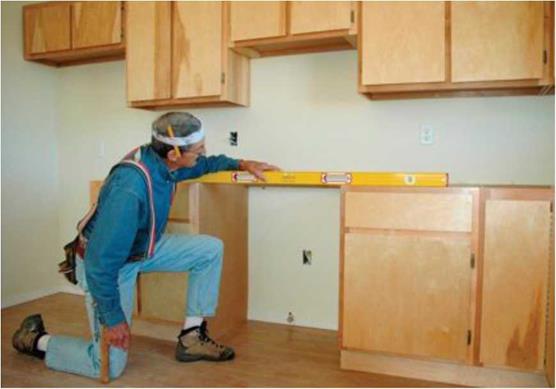
Kitchen cabinets are seen and used every day. It’s important that they be installed with care, leaving them plumb, level, and straight. [Photo by Don Charles Blom]


Install the base cabinets in kitchens and baths

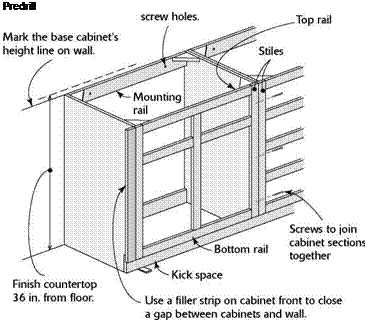
Подпись: їм їм їм їм їм и їм їм їм їм їм їм їм и їм їм їм їм їм їм їм и їм їм їм їм їм їм їм и їм їм їм їм їм їм и їм їм їм їм їм їм їм и їм їм їм їм їм їм їм и їм їм їм їм і INSTALLING A BASE CABINET Подпись: Predrill

they have to fit against two wall surfaces. But once you get a corner cabinet installed plumb and level, you’ll have an easier time with the rest of the job.

PLANNING AND PREPARATION ARE

IMPORTANT. Before you screw any cabinets to the wall, it’s a good idea to line them up and see whether they will fit into the allotted space. It’s not unheard of for one or more cabinets to be manufactured in the wrong size, so this test­fitting exercise is important. At this stage, and during the installation process, it’s important to allow adequate clearances between cabinets for the major appliances. For example, you should leave between 301/8 in. and ЗО1/ in. of space be­tween base cabinets to fit a standard 30-in.-wide range or stove. Your final prep step is to label all cabinet doors and drawers, then remove them until you’ve finished the installation process. START WITH A LEVEL LINE. Begin the in­stallation process by marking a level line on the wall, where the top edges of your base cabinets will fit. If you suspect that the floor surface isn’t exactly level where the cabinets will be installed,

Make sure base cabinets are level and set to a height line marked on the wall.

Подпись: Inexpensive sensors, both electronic and magnetic, are available to help locate studs behind drywall. As a sensor is moved along the drywall, it detects the location of the wall studs and indicates when it finds one.Подпись: INSTALLING WALL CABINETSInstall the base cabinets in kitchens and bathsПодпись:

use a level to find the highest spot on the floor, then measure up the wall near that spot. The standard height of base cabinets without a countertop is usually 341/2 in. or 3514 in., depend­ing on the manufacturer (see the illustration on

p. 255).

DRIVE INSTALLATION SCREWS INTO STUDS. Base cabinets are screwed into wall studs or the 2×4 backing described in Chapter 4. If stud locations were not marked on the floor, you can locate them by tapping lightly
on the drywall with a hammer and listening for a solid sound. To make sure you’ve found a stud, drive a nail through the drywall in a place where the cabinet will cover the holes. Once you locate one stud, other studs should be 16 in. or 24 in. o. c. Use 3-in. flat-head screws to install cabinets. Don’t use drywall screws, because they tend to be brittle and aren’t designed to support heavy loads.

GET CABINETS LEVEL. Make sure the top back edge of the cabinet sets directly to the wall line so it’s level. Predrill holes for the installa­tion screws through the mounting rail and into the studs. Then screw the cabinet to the wall. Now place a 2-ft. level across the top of the cabinet from the back edge to the front edge. As necessary, wedge shims under the cabinet to get the top of the cabinet level in all directions. You can glue the shims in place to make sure they don’t shift around. If any part of a shim proj­ects beyond the front or side of a cabinet, cut or chisel it flush. Use this leveling technique when installing all base cabinets.

JOIN CABINETS TOGETHER. Separate cabinets, both base and wall types, are joined together where their stiles meet. A stile is a ver­tical member in the rectangular face frame that forms the front of most cabinets. Horizontal frame members are called rails (see the illustra­tion on p. 255). With face-frame cabinets, the stiles of adjacent cabinets are clamped together, drilled, and screwed.

As you join and clamp one cabinet to another, make sure each cabinet is level and at the proper height. A pair of clamps should be sufficient to hold two stiles together until you screw them to each other. Drill countersunk pilot holes for two screws, one near the top hinge and one near the bottom hinge. A third screw can be driven near the center of the stile, if necessary. With a coun­tersunk pilot hole, the head of the screw should be just slightly below the wood surface.

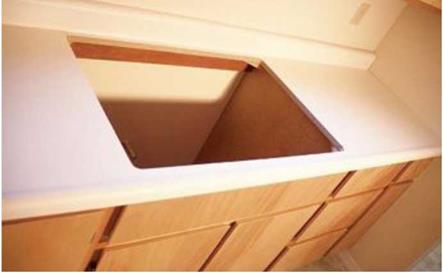
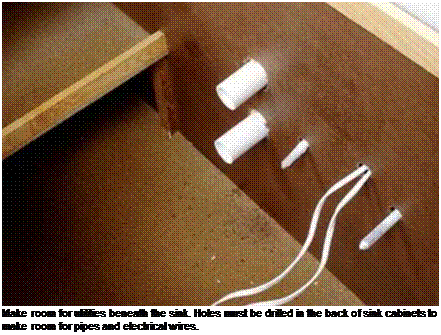
CUT HOLES IN SINK CABINETS. A base cabinet that will hold a sink needs to have holes drilled or cut at the back for water supply and waste lines. A kitchen sink base will also have

Подпись:Подпись:Install the base cabinets in kitchens and bathsan electrical line coming in, if a garbage disposal unit and/or a dishwasher will be installed (see the bottom photo on p. 254). Measure from the floor and the adjoining cabinet to locate the cen­ters of the access holes. You can use a jigsaw or a drill with a hole saw to cut the holes. Drill slowly and leave a neat-looking job. Seal any holes around pipes with expanding foam or caulk. FILL GAPS WITH STRIPS. At times you may need a vertical filler strip to close a gap between the edge of a cabinet and an adjoining wall. A filler strip is like a stile. It is cut to the width of the gap and then screwed to the cabi­net stile, as shown in the illustration p. 255. If the space allotted between walls is too small for the cabinets to fit in, the overhanging part of a stile can often be trimmed to make more room.

Nail the casing to the jambs

Nailing trim around doors and windows can be difficult when the wall extends past the jamb.

If drywall edges protrude just a little, they can usually be knocked back enough by hitting them gently with a hammer. Just make sure the casing will completely cover the flattened, compressed drywall.

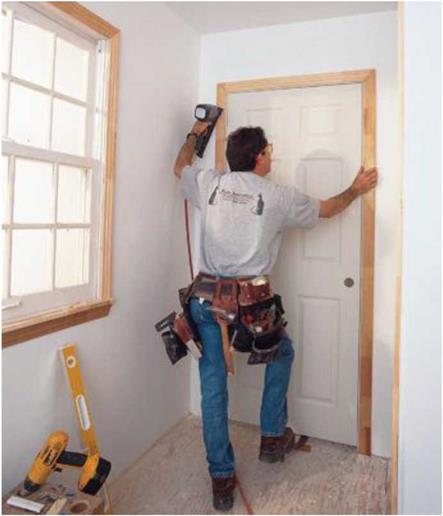
Sometimes, I start by installing door casing inside a closet, where people won’t readily notice mistakes. Think of it as a warm-up exercise. Begin by nailing a piece of side casing first, holding it to the reveal marks. (Other people start with the head casing first.) If you’re nailing
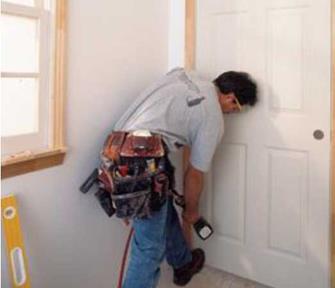
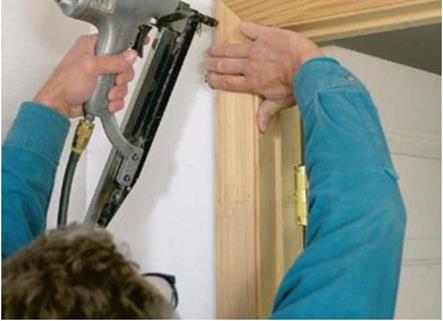
the casing by hand, drive a pair of nails at the top and then about every 16 in. down the casing. Drive 4d nails through the trim and into the jamb, and drive 6d nails through the thicker part of the trim and into the wall frame. A pneumatic finish nailer makes this job much easier, and you won’t have to use different size nails.

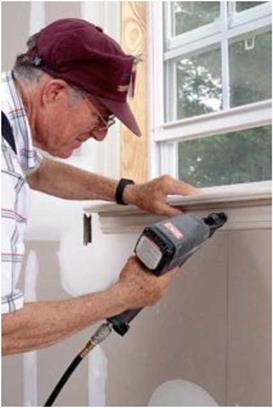
Next comes the head casing. Check the joint between the head and the side casing. If it looks good, add a bit of glue to the ends of the two pieces, then nail the head casing to the wall along the horizontal reveal line (see the photo above). If the joint is open a little, cut the miter again and fine-tune the angle of the chopsaw, if necessary, to get a better fit. If the joint is open more than a little, cut another headpiece; start a little long and make sure you have the angle right before cutting it to length. If all else fails, fill the joint with putty before painting. Repeat this process for the second piece of side casing.

Nail the casing to the jambsПодпись:Подпись:Nail the casing to the jambs

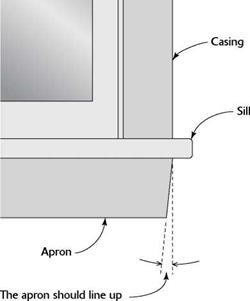
Подпись: Casing installed around an attic staircase or access hole can be cut and nailed in the same way. The only difference is that you’ll have miter joints at all four corners. Install the window aprons Just as you’d imagine, the piece of trim called an apron is installed beneath the windowsill. It covers the joint between the drywall and the sill and is usually cut from casing stock. Nail it in place with its wide edge up against the sill to support it. The apron does not run the full length of the sill. If the window sides are covered with drywall, cut the apron 2 in. longer than the window opening. For windows with wood jambs and casing, the apron should line up with the outside edges of the casing on both sides of the window. You can cut the apron square or give it a slight back-cut of about 6 degrees (see the illustration at right). Then nail the apron directly below the windowsill (see the photo below).
Подпись: INSTALLING A WINDOW APRON

STEP 4 INSTALL THE CABINETS I

Подпись:Nail the casing to the jambs
folks with special needs. A local woodworker in his small shop builds the cabinets we use in Habitat houses here on the Oregon coast. They are made from pine or birch and particleboard. Although simple in style, they’re also beautiful and, thankfully, rather inexpensive.

Kitchen and bath cabinets can be installed any time after painting. Base cabinets should be installed after the underlayment and the vinyl
floor are in place. That makes it much easier for the vinyl-floor installer. Just be careful not to mar the floor while installing the cabinets. Baseboard trim is installed after the cabinets because it butts into the base cabinets.

Today’s kitchens are filled with many appli­ances, such as a refrigerator, stove, microwave oven, garbage compactor, and dishwasher. Most appliance suppliers are more than happy to look at your house plans and help you design a kitchen in which every cabinet and appliance fits into its allotted space. Once you settle on a cabinet style, you can choose different sections—one for dishes, one for pans, one for utensils, and so on. After cabinets are delivered to the job site, they are installed one section at a time.

Measure and cut the casing

Often referred to as door and window trim, cas­ing hides the joint between the drywall and the door or window jamb. Spend some time at your local lumberyard and you’ll see all the styles and grades of casing, including the type that’s installed at the factory on many prehung doors. Solid wood casing can be used if you want to leave the wood natural. Paint-grade trim— made from MDF or from shorter pieces of wood that have been finger-jointed together—is also available and costs less. Some people prefer a plain, narrow, simple style, whereas others prefer wider, more complex profiles. Purchase 14-ft. lengths to minimize waste. Another option is to buy 7-ft.-long pieces that have a 45-degree miter precut on one end. These pieces are used to trim around doors.

PLAN FOR A REVEAL. When running casing, carpenters commonly leave what’s called a reveal, which simply means that one piece of wood is held back a bit so you can see the edge of the piece beneath it. The idea is to create a shadow line, which produces a sense of depth and adds visual interest. This is done even on simple trim in an affordable house. To mark the setback for the casing on the jamb, use an adjustable combination square. Set it at about 3/i6 in. to /4 in. in from the inside edge of the jamb—whether it is on a door, a window, or an attic access—and mark a pencil line in several places (see the illus­tration at right). With a little experience, you’ll be able to mark a setback by eye, without a square. The casing is cut and nailed to that line.

MARK AND CUT THE CASING. Now it’s time to cut the side and head casings to length. Cut and nail the casing with its thinner edge facing in, toward the door opening. The baseboard trim butts into the wide edge of the casing at the floor line. To find the length of a piece of side-jamb casing, measure from the floor to the horizontal reveal line at the top of the door or window. That measurement is the distance to the short point of the miter cut.

Another way to obtain this measurement is to hold a piece of casing alongside the door or
across the head jamb and mark the short end of the miter cut at the /4-in. reveal line (see the bottom left photo on p. 252). Make a diagonal mark on the casing to show which way to make the cut. Just make sure the mark will be cut off, so it won’t be visible once the casing is installed. Take the casing stock to the chopsaw and make the cut. Side casings are cut in pairs, one for the jamb on the right and one for the jamb on the left. Take your time. Work slowly. Make sure you are cutting in pairs.

The same technique can be used for win­dows with sills and jambs. Measure from the sill to the horizontal reveal on the head jamb (for side casings) and from one vertical reveal line to the other on the side jambs (for head casings). All these marks are made from heel to heel, or short point to short point, of the miter cut.

Подпись:In theory, once you know the length of one piece of casing, you should be able to set up

Hand-nail trim with care. When using a hammer to attach trim to the wall, leave the finish nail about [3]/8 in. proud of (higher than) the surface of the wood, then use a nail set to drive it about Уг in. below the sur­face. The hole will be filled with putty and sanded prior to painting. Take care not to miss the nail and leave a hammer track in the wood surface.

at the saw and cut every piece for doors and windows of the same size. This can eliminate repetitive measuring and lots of time spent walking back and forth to your saw. In practice, side casings may vary slightly in length. But small gaps at the floor line will be hidden by carpeting or cut to uniform distance to accom­modate wood or other finish flooring. Find out what carpenters are doing in your area.

STEP 3 INSTALL THE WINDOW AND DOOR CASINGS

If you’ve installed prehung doors with the cas­ing (trim) attached, then some of your trimwork has already been done. If not, then the time to trim the windows and doors is now. Remember: Accuracy is critical for good finish work. All joints between pieces of wood should be tight, with no space showing.

Doing a good job depends on having the right tools, measuring carefully, and using a few finish carpentry tricks. Make sure you have a
good chopsaw that is fitted with a finish­cutting blade. A pneumatic nailer is a tremen­dous time-saver when installing trim, and it ensures that installed pieces won’t be marred by hammer blows (see the photo above). However, you can still do the job the old-fashioned way if you have to—with a hammer, finish nails, and a nail set. If you cut a joint that doesn’t fit well, cut it again and make it right. Don’t rely on putty or caulk to fill any but the smallest of gaps. Caulk shrinks as it dries, so relying on it to hide shoddy work isn’t a good solution.

Install windowsills

When trimming around a window, it’s fine to cover the trimmers and header with drywall, as described in Chapter 9. But don’t use drywall for the sill; it won’t hold up. Besides, a wood sill adds a bit of warmth and style to a house. It looks even nicer when you surround the win­dow with a wood jamb and casing.

WOOD AND MDF SILLS HAVE DIFFERENT ADVANTAGES. Standard, 3/4-in.-thick stock works fine as a sill, but I

Подпись:Подпись:STEP 3 INSTALL THE WINDOW AND DOOR CASINGSthink thicker stock—1 in. or even 1/4 in.—looks better. If you want to see natural wood and your budget allows it, trim with oak, pine, or spruce, and seal it with clear finish. If you prefer a painted finish or your budget is very tight, choose medium-density fiberboard (MDF).

Like wood, MDF can be shaped into many styles of trim. It cuts much like wood does and, once painted, looks like solid wood but with­out an evident grain pattern. Just remember: MDF must be kept away from moisture, which can cause it to swell and come apart, so don’t use MDF in the bathroom or utility room, or around the kitchen sink area.

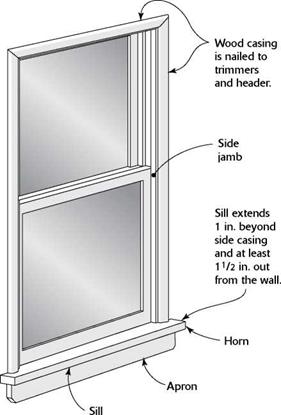
CUT THE SILL TO SIZE. When a window is trimmed on the sides with drywall, each end of the sill should extend about 1/4 in. beyond the drywall corner on the side of the window open­ing. When a window is trimmed with wood casing, take into account the width of the
window opening, plus the width of the wood casing on both sides, plus 2 in., then cut the sill to that length. That way, the side casings rest on the sill and the sill extends 1 in. beyond the casing on each side. A sill should be wide enough to cover the rough sill and extend at least 1/4 in. from the wall. You can vary the projec­tion distance to suit your needs. The sill I have by my writing desk extends 3/4 in. beyond the wall; it’s wide enough to hold a book or a vase. NOTCH THE SILL. Once the sill is cut to length, cut a notch in from each corner to leave what’s known as a horn for the casing to rest on (see the illustration below). For the depth of the notch, measure in from the edge of the drywall to the window frame and mark your cut lines on the sill. Or you can hold the sill at the window opening and mark the cut lines with a combination square. That will give you an accurate cut line, even if the jamb sides are not square.

Whether you make the cut with a handsaw or a jigsaw, clamp the workpiece securely to a sawhorse or workbench so that it will be easier to make exact cuts. Remember that this is finish work. Take your time and do it accurately. The sill should fit snugly against the window frame. If there are small gaps between the sill and the dry – wall on the sides, fill them with paintable caulk.

Don’t leave the front edges and corners of the sill sharp. Instead, use a block plane to make a bevel or chamfer on the edges, or round them over with a bit with sandpaper. This will improve the look and feel of the sill. It also makes the trim less hazardous to small children. Secure the finish sill to the rough sill with con­struction adhesive and drive two 6d or 8d nails at each end.

Once the sill is in place, cover the trimmers and header with /4-in.-thick stock, as shown in the illustration at left. The side (and head) jambs are cut flush with the plane of the wall, set on the wood sill, and nailed in place. The head jamb fits snugly between the two side jambs. Make sure all your cuts are square and fit tightly together. Nail them in place with 6d finish nails.

CROSS-SIGHTING A JAMB

CROSS-SIGHTING A JAMB

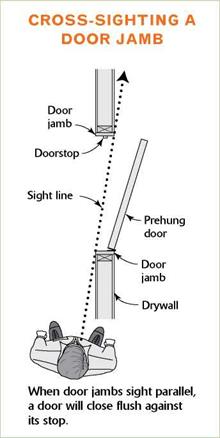
Once the jambs are installed, you need to cross-sight them—that is, check to see that they’re parallel or in the same vertical plane. Close the door and make sure it rests flat against the stops at both the top and the bottom. Sometimes the door hits the bottom of the stop, for exam­ple, but misses the top by 1/s in. or more. This may happen because the door is warped, but it can also occur when two jamb sides are out of parallel.

To check whether the two jambs are parallel, stretch two strings diagonally across the door frame to form an "X." If the strings just touch in the middle, the jambs are parallel. With experience, you can also learn to check for parallel jambs by eye.

Step back along the wall, about 3 ft. from the door opening, and sight across the jambs from one jamb to the other to see whether they’re parallel (see the illustration at near left).

CORRECTING SKEWED JAMBS.

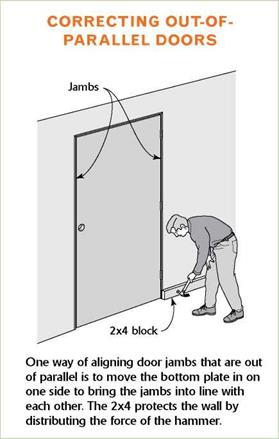
If the jambs are out of parallel, correct the problem by moving the bottom plate a bit. Sometimes the bottom plate is not nailed directly on the chalkline when the walls are framed, causing the jamb sides to be out of parallel. To fix it, place a 2x block on the floor against the bottom plate and use a big hammer to push it back on the line (see the illustration at far right).The method may sound a bit harsh, but it works.

If the door touches the stop on the strike side at the top of the jamb

but not at the bottom, the wall on the strike jamb needs to move in toward the door. If the door touches the stop on the strike side at the bottom of the jamb but not at the top, the wall on the hinge jamb needs to move a bit away from you. Normally, very little movement is needed, so even though you are using a hammer, be gentle.

As a last resort, you can use another, though less satis­factory, way to correct the problem. You can carefully pry off the doorstop trim on the lock jamb, close the door, and renail the trim snugly against the door.
CROSS-SIGHTING A JAMB

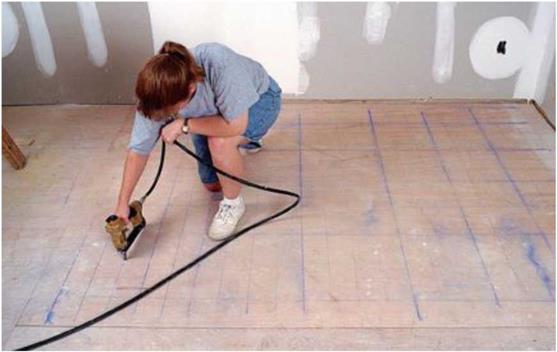
CROSS-SIGHTING A JAMBInstall underlayment with a nailer. The quickest and most efficient way to nail off vinyl-floor underlay­ment is with a pneumatic nailer. Chalklines snapped on the underlayment panels form a grid of 4-in. squares that indicate where to staple.

Подпись: Prehung doors are easy to install. Drive the first nail through the jamb and into the trimmer, near the top on the hinge side.

in an opening. Whichever style of prehung door you have, the installation process is basi­cally the same. If the floors will be carpeted, put a 7/i6 – in.-thick block of OSB or plywood (3/4 in. wide by 1 in. long) under each jamb side. The block will be hidden once the floor is carpeted. Otherwise, unless you have ordered shortened doors, you may have to trim the bot­tom of the door so it won’t drag on the carpet. The block, especially important when setting a heavy door, keeps the door assembly from set­tling and causing the door to stick.

Professional trim carpenters often order shortened doors from the supplier. That allows them to set the jambs right on the subfloor without having to raise them for carpeting. There is no need to buy shortened doors for thin vinyl floors. Check to see what other builders are doing in your area.

If a door is to work properly, its jamb needs to be set plumb, square, straight, and cross­sighted (both side jambs parallel to, or in plane with, each other), so pay attention to the steps in the sidebar on the facing page. Remove any nails or plugs installed at the factory to hold the jamb and door together. Set the prehung

Подпись: Leave enough operating clearance. Leave a 1/8-in. margin between the door and the jamb so the door can open and close freely. [Photo by Andy Engel, courtesy Fine Homebuilding magazine © The Taunton Press, Inc.] Подпись: Keep the jambs straight. A heavy door can bow a jamb inward at the top hinge. Straighten the jamb by lifting up the door on the lock side and then nailing the jamb securely in place. [Photo by Andy Engel, courtesy Fine Homebuilding magazine © The Taunton Press, Inc.]CROSS-SIGHTING A JAMBCROSS-SIGHTING A JAMB

CROSS-SIGHTING A JAMB

assembly in the opening and drive a 6d or an 8d finish nail through the jamb, about 3 in. or so from the top on the hinge side (see the bottom photo on p. 245).

With any luck, the trimmer on the hinge side will be plumb and you can nail the jamb directly to it without the use of shims. Use a 4-ft. level to check the hinge-side jamb for plumb and straight. Make sure the margin between the underside of the head jamb and the top of the door is at least ‘/8 in., about the thickness of a nickel, all the way across the top (see the photo below). If the margin at the top is too tight (less than ‘/8 in.) or too wide (more than XA in.), it can be corrected by raising a jamb side. The hinge side can be raised, even with a nail at the top, with a flat bar under the jamb.

Once the margin is correct, nail again near the bottom hinge. Remember to shim under every jamb that doesn’t rest directly on the subfloor.

When setting heavy doors, the weight on the top hinge can bow the jamb outward. If that happens, place a bar under the door and raise the strike (lock) side of the closed door until the hinge jamb is straight or even bowed back slightly. Then drive a nail through the jamb on the hinge side, both above and below the top hinge.

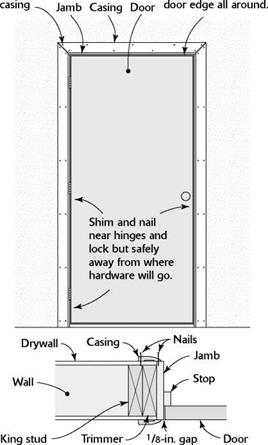
You don’t need to plumb the strike side of a prehung door. Just bring the jamb near the door so that the margin between the jamb and the door is consistent—and at least XA in.—all the way around the door. Once the margin is cor­rect, the strike-side jamb can be shimmed and nailed like the hinge side (see the illustration on the facing page). Keep all nails well above and below the lock area.

When jambs come with casing trim installed, drive 6d finish nails through the casing and into
Подпись:Подпись: їм їм їм їм їм и їм їм їм їм їм їм їм и їм їм їм їм їм їм їм и їм їм їм їм їм їм їм и їм їм їм їм їм їм и їм їм їм їм їм їм їм и їм їм їм їм їм їм їм и їм їм їм їм і SETTING A PREHUNG DOOR Подпись: Nails Maintain a 1/8-in. margin through between the jamb and CROSS-SIGHTING A JAMBПодпись: Take your time setting a prehung door. Make sure it opens and closes with ease. Shim and nail the jamb to the trimmers to hold it securely in place.the trimmer all the way around the door. Try not to drive nails into any grooves in the casing. This makes it hard to fill and sand nail holes.

Any space between the jamb and the trim­mer can be filled with a shim before you nail the jamb to the rough framing. I am not a fan of tapered shims, because unless you use a pair of them a jamb may not be installed flat and straight. I prefer using small pieces of plywood Є/8 in., 3/i6 in, /4 in., or thicker) for shims. I slide a 3-in.-sq. shim between the jamb and the trimmer to provide solid backing before nailing the jamb sides in place. If there is a wide gap between the jamb and the trimmer, don’t fill the space with a stack of tapered shims. Instead, use a single thick shim.

To strengthen the door assembly, remove a short screw from each hinge and drive an identical-looking but longer screw through the hinge and jamb and into the trimmer. This step helps anchor the hinges and hinge-side jamb to the wall framing.

Throughout the process, continually check the door to see that it opens and closes with ease and that the jamb sides cross-sight, as described
in the sidebar on p. 244. If a problem develops, it’s best to find out along the way, rather than after the last nail has been driven home. If you’re driving nails by hand, use a nail set to set them below the surface of the wood so they can be hidden with putty.

Install bifold and bypass doors

Bifold doors work well in small areas, such as closets and laundries. They are supported by top and bottom pivots or guided by an over­head track. I find bifold and bypass doors easy to install, but the less expensive versions are

Подпись:CROSS-SIGHTING A JAMBfor everyday use. But if it is installed properly and used carefully, a folding staircase works quite well.

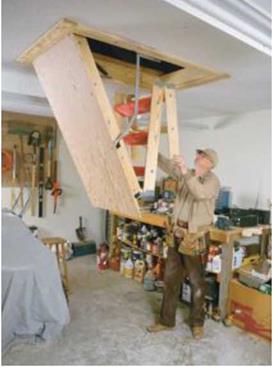
Most folding staircases consist of three ladder sections that are hinged together and attached to a ceiling-mounted trapdoor. The door is hinged and held flush to the ceiling with springs. You pull on a cord to open the door and pull down the stairs. As the door swings down, you can unfold the two bottom sections of the staircase (see the photo at left). The entire unit fits into a rough-framed attic-access hole between ceiling joists. The opening is typically 221/2 in. wide by 54 in. long. Simply follow the installation instruc­tions provided by the manufacturer.

CROSS-SIGHTING A JAMB

Подпись: Temporary ledgers simplify installation. A pair of boards can be screwed to ceiling framing, supporting the ends of the drop-down staircase until it's secured. [Photo by Jefferson Kolle, courtesy Fine Homebuilding magazine © The Press, Inc.]

not very durable. Many of the cheaper models have fittings that just can’t take serious use. Good hardware costs more up front but may save you from having to replace the entire unit prematurely.

Step-by-step installation instructions come in every bifold and bypass door package. Once the trimmers and header have been wrapped in drywall, the opening for a bifold should be the size of the doors. A 3/0 bifold door is installed in a 36-in.-wide opening. The opening for bypass doors should be 1 in. less than the size of the doors. For example, a 5/0 bypass door needs a 59-in.-wide opening.

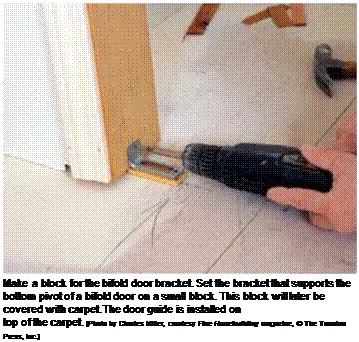
If the floor will be carpeted, nail a plywood block (usually about 1/2 in. or 3/4 in. thick) under the brackets that support the bottom pivot of bifold doors (see the photo on p. 247). If you are working on a slab, drill holes in the concrete and set sleeves in the holes. Then glue the block in place and screw it into the holes. The carpet will cover the block. A similar block needs to be placed in the center of bypass doors to hold the bottom door guide.

Install attic stairs

Some people like to install a folding staircase to give them access to attic space. A factory-made folding staircase doesn’t meet the code require­ments for a regular stairway, so it’s not designed

Подпись:Подпись: Practice using a chopsaw. For better results when cutting trim on a chopsaw, make some practice cuts in scrap material. Practice making the same miter, square, or beveled cuts you'll be making when installing trim. Test the results with a combination square to make sure your square and 45-degree cuts are accurate.CROSS-SIGHTING A JAMB

CROSS-SIGHTING A JAMB

The stair unit comes out of the box com­pletely assembled. When attaching it to the joist chords and header, use the screws that come in the package—not drywall screws. Drywall screws are relatively brittle, do not possess much shear strength, and can break under a heavy load. To support the unit during installa­tion, screw temporary ledgers (supports) to the ceiling joists that surround the opening. The ledgers should project about 1 in. into the rough opening. The ledgers hold the stair unit while you secure it in place.

The unit is installed much like a prehung door. You need to shim between the sides of the stair jambs and the supporting joists before driving the screws through predrilled holes. Once a few screws are in place, open and shut the door now and then to ensure that it opens easily and that the reveal, or space, between the door and the jambs is even all the way around.

The bottom section of the stairway must be cut to length, with the ends of the legs (or string­ers) cut at the correct angle so they rest solidly on the floor. To find the angle, swing the staircase down and unfold all but the last section. Extend a 1×4 board alongside an upper-section stair stringer so that the 1×4 reaches the floor. Place another board on the floor and against the 1×4, then mark the cutoff angle on the 1x 4. Once you cut that angle on the 1x 4, transfer it to measured cutoff lines on both bottom-section stringers and cut them to length.

MAKING A HOUSE BEAUTIFUL

MAKING A HOUSE BEAUTIFUL

Interior Trim, Cabinets, Countertops, and Closets

When I’m feeling nostalgic, I think about the fancy, well-crafted toolkit I carried from job to job before I switched to a 5-gal. plastic bucket. That kit had a place for all my finish tools—handsaws, levels, small hammers, razor – sharp chisels with their blades wrapped in soft cotton, and planes that left long curls of wood with each pass. My brother, Jim, still has his shiny, metal miter box with its long backsaw—that’s what we used to make perfect cuts in trim before chopsaws came along. Back in the late 1940s and early 1950s, those were the tools that master builders passed down to us “kids” as they taught us the craft.

Today, carpentry is different. Power tools dominate—from motorized miter saws (chopsaws) and pneumatic nailers to cordless drills, belt sanders, random – orbit sanders, and jigsaws. And many of the things we used to build at the job site, such as kitchen cabinets, bathroom vanities, and door and window jambs, are now factory-made products that arrive ready to install. Despite these changes, basic hand-tool and careful layout skills are still essential, especially at this stage of the game, when the rough frame of the house, with all its imperfections, has been covered by drywall and the walls have been painted. Now it’s time to prepare floors for vinyl and carpet; install interior doors, window casing, and interior trim; and secure cabinets and countertops. Do this work right, and the inside of your house will begin to look beautiful and much more livable.

STEP 1 INSTALL UNDERLAYMENT FOR VINYL FLOORING

Because vinyl flooring is quite thin, it is common to install sheets of underlay – ment over a subfloor to provide a smooth, level base for the vinyl. Typically just

Add character with salvaged doors. A new house gains some wonderful history when it has a few old doors. Interesting, beauti­fully made old doors can be found at architec­tural salvage yards and building-supply recyclers and at Habitat Re-stores (see Resources on p. 279).


и їм їм їм и їм їм їм їм їм їм їм їм їм їм їм їм їм їм и їм їм їм їм їм їм їм їм їм їм їм їм їм и їм їм їм їм їм їм їм їм їм їм їм їм їм їм и їм їм їм їм їм їм їм їм їм їм їм їм їм и їм їм їм їм їм їм їм їм і

INSTALLING UNDERLAYMENT FOR A VINYL FLOOR


4-ft. by 8-ft. sheets of

MAKING A HOUSE BEAUTIFUL


4 in.


£4 in.


Stapling or nailing pattern for underlayment


Staple or nail at 4 in. o. c. along the edges and in the middle of the sheet. Make sure all staples are driven flush with the surface.


MAKING A HOUSE BEAUTIFUL

MAKING A HOUSE BEAUTIFUL

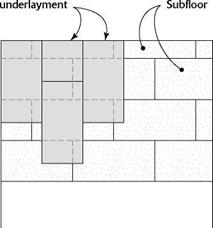
Install underlayment so the joints do not break, or land, on the subfloor joints below.

*/4 in. thick, 4×8 underlayment sheets can be made of particleboard (wood particles glued to­gether under pressure), MDF (medium-density fiberboard, a smoother version of particleboard), or plywood. I like to install underlayment in the kitchen and bathroom after the drywall is fin­ished but before the cabinets or prehung doors are installed.

Underlayment must be installed on a relatively clean floor. Remove all globs of joint compound from the subfloor throughout the house and give it a good vacuuming. I prefer vacuuming (with a rugged wet-dry vac, not a home model) to sweeping, because sweeping can create a dust storm. Some builders apply beads of construction adhesive before installing underlayment. A clean floor allows you to do this. Adhesive won’t adhere to a dirty floor.

Sheets of underlayment go down just like the subfloor. Lay them so the joints don’t break on the subfloor joints underneath (see the illustra­tion above). When you have to cut a panel to length, lay the cut end against the wall with the factory edges in the middle of the room. This will ensure a tight fit between sheets.

The best way to secure underlayment to the subfloor is with a pneumatic or heavy-duty elec­tric stapler. Drive one staple every 4 in. along the edges of each sheet and 4 in. o. c. in both direc­tions in the field. If necessary, snap chalklinesto make a grid of 4-in. squares. A lot of staples are needed to make sure the underlayment doesn’t bubble should it absorb moisture from the vinyl adhesive or other sources.

If you’re nailing by hand, drive Td-in. ring – shank nails in the same pattern as described above. The problem with nails is that they must be driven exactly flush with the surface of the underlayment. If they are left proud (protrud­ing above the surface), then you’ll be able to see them through the thin vinyl flooring. If they’re driven below the surface, they can be covered and hidden with a leveling compound—but that means more work.

After nailing the underlayment in the bath­room, fill the joint between the panel and the bathtub with silicone caulk. This helps prevent water from entering at that junction.

Подпись:
MAKING A HOUSE BEAUTIFUL

The standard interior door used in most affordable homes is 32 in. wide and has a flat, smooth plywood “skin" that covers a hollow core. But instead of settling for standard hollow-core doors, I recommend shopping around for some frame-and-panel doors made from solid wood. Doors can be a source of beauty in your house, and it may be worth the extra cost to have some well-crafted doors in your favorite doorways. Check with one or more local suppliers, and look at the array of doors that are available. Sometimes, styles are discontinued or doors are special-ordered but never claimed. When that happens, you can find a great door at a bargain price.

MAKING A HOUSE BEAUTIFUL

Most doors open into rooms rather than into a hallway.

They seldom open into closets. They can swing either to the right or to the left. The swing, or hand, of a door can be confusing. Make sure when you order doors that you and your supplier are both on the same page.

Most house plans show which way the doors swing, so it’s not a bad idea to take the plans with you when you order doors.

Different styles of pre­hung doors are used in dif­ferent parts of the country.

I like split-jamb, prehung doors, because they come

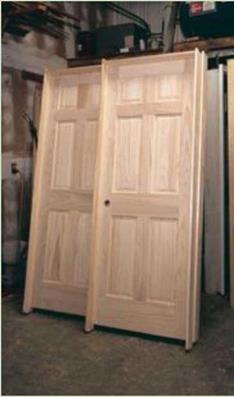
with the trim (casing) installed, and they adjust for uneven wall thicknesses (see the photo at left). Another type of pre­hung door has a knockdown jamb. It comes in three pieces and also has the casing installed. A third style of prehung door has just the jambs but no casing (see the photo above). After the jambs have been nailed in place, the casing must be cut and nailed around them.

Подпись: It is easier to put down underlayment and vinyl floor covering before cabinets are installed.

STEP 2 INSTALL THE INTERIOR DOORS

Once the underlayment is down, start installing the prehung doors. I have lived in older houses that required work on sticky doors, misaligned locks, and squeaky hinges. Quality doors open and close with ease even after years of use—if you take the time to install them with care. Remember that doors and jambs should last for

the life of the house. That won’t happen if you buy junk. Doors and trim are finish work and are seen and used on a daily basis, so try to buy units that are both attractive and durable (see the sidebar above).

The first step in setting prehung doors is to check the plans and see which way they open into a room. It’s helpful to set each door near its opening before nailing any of them in place. This should eliminate installing the wrong door

Do the prep work for exterior finishes

Exterior siding and trim must be painted on all sides, not just on the surfaces that will be
exposed to the weather. Back-prime the trim before installation. On doors and windows with wood casings, make sure you back-prime all casings before installing the unit.

Take the time to fill all nail holes with exterior-grade wood putty. Don’t caulk under the lap between siding boards. Always use a good-quality, long-lasting, paintable, exterior – grade caulk. Mask and cover any decks or railings to protect them from drips and spills. Cover the foundation or walkways to keep paint from staining the concrete. Take the time to do it right. There is no excuse for being sloppy with paint. Drops of paint on a wood deck or concrete foundation will look bad for years to come.

Подпись:Do the prep work for exterior finishes

Apply exterior paint

Much can be done with exterior paint to give a house a classy style. There is an old house in our neighborhood that has just been repainted lav­ender with light-violet trim. Now, this may not be your choice of colors, but it brightens up our neighborhood in a nice way. I like it better than the Coos Bay gray that makes so many buildings look like army barracks. A good choice of colors can make a home warm and inviting. Some paint dealers have a computer program that shows you what different color combinations will look like on your house. Give your house a virtual paint job to test out various color schemes.

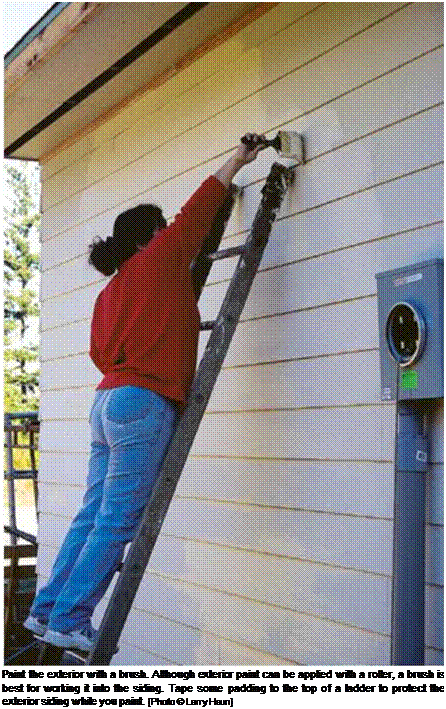
Once you have selected the color, try rolling paint on lap siding with a roller that matches the width of the laps. Once the paint has been rolled on, it must be brushed in to make sure ev­ery crack and crevice is covered properly. Take special care when painting the bottom edges of siding. These edges must be well coated because it is where moisture and ice gather.

Latex paint dries rapidly in hot weather, so don’t roll on too much paint before you go back over it with a brush. Remember, too, that most paints require a wall temperature of at least 50°F or so for good adhesion, so don’t paint if the weather is cooler than that.

Completely paint or stain the siding before you tackle the exterior trim, just as you did on the

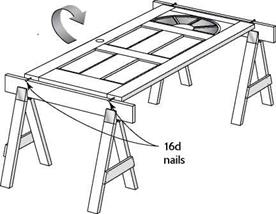
PAINTING DOORS

Drive 16d nails temporarily into the top and bottom of the door. Rest the nails on sawhorses and paint one side of the door, then the other.

interior. Use a good brush and a steady hand to leave a neat-looking job. Doors get a lot of use, so it’s best to give them at least a couple of coats on top of the primer. The metal-clad exterior doors that are often used on affordable houses come with a prime coat. You may want to use a higher – gloss paint on doors because it is easy to clean.

Instead of trying to paint doors in place, take them down and remove all the hardware. Put the hardware for each door in a small plastic bag, label the bag, and store it in a kitchen drawer. Label the door, too. The top edge is a good place to write the door’s location. Drive nails or screws into the top and bottom edges, then set the door across a pair of sawhorses (see the illustration below). After painting one side, flip over the door and paint the other side. Set the door aside, resting it on the nails, while you paint another door. Wait until the first coat is dry, then apply a second coat, brushing out any streaks or drips. When you’re done, remember to put a bit of caulk in the top nail holes so water can’t enter.

Door jambs are also easier to paint when there’s no door in the way. On some exterior en­tries, weatherstripping is installed on the door; on others, it’s installed on the jamb. Either way, it’s usually best to remove weatherstripping be­fore painting instead of trying to paint around it. Getting paint on weatherstripping can pre­vent it from sealing properly. If the weather­stripping is damaged or difficult to reinstall, just buy new material. It is generally inexpensive and is important for sealing the interior of the house from the elements.

Once you are finished painting, use a small piece of cardboard to scrape all unused paint into one can. Save some paint for later touch-up work. A contractor I know takes leftover cans of latex paint, stirs them together, and uses the mixture as back-primer for the next job. Some cities have a site where you can drop off paint for recycling. Otherwise, take unused paints, stains, and solvents to a hazardous-waste facility. Give the earth a break. Don’t dump toxic mate­rials on the ground or down the sink.

Do the prep work for exterior finishes

LEARNING FROM YOUR FELLOW VOLUNTEERS

When volunteers show up to build a Habitat house, they often find themselves assigned to jobs they’ve never done before. Still, with the proper training and supervision, they’re almost always capable of rising to the challenge and making a significant and meaningful contribution to providing another family a decent home. And sometimes in the pro­cess stereotypes are broken and we learn from one another.

On the second day of a six-day blitz in 1993, during which we built 20 houses, I was roofing with Bunny Church and her friend, Stuart Phillips.

It was a hot, steamy day, and we had just half a day to start and finish shingling a roof, so we set to the task energetically and with great focus.

After a couple of hours of hard labor up on that roof, the temperature rising all the while we were working, we were tired, dirty, and thirsty. Suddenly, Stuart stopped our roofing production line, sighing, “I’m sorry, but I just have to put on some lipstick. Lipstick always makes me feel better."

She excused herself, climbed down the ladder to the ground, pulled her lipstick out of her pocket, then went to the Porta Potti. A moment later, Stuart emerged, still dirty and dusty, but also smiling and

radiant, her lips perfectly covered with pink lip­stick. It did help!

Despite being something of a tomboy, I appreci­ated the lesson Stuart had unintentionally taught me—that it’s okay to assert your femininity on the job. And that’s one of the wonderful things about Habitat—everyone is welcome. How many roofers wear lipstick? If your heart is open, the diversity you encounter while working on a Habitat house just might enrich your life. And remember: Lipstick can make you feel better! —Anna G. Carter

llllllllllllllllllllllllllllllllllllllllllllllllllllllllllllllllllllllllllllllllllllllllllllllllllllllllllllllllllllllllllllllllllllllllllllllllllllllllllllllllllllllllllllllllllllllllllllllllllllllllllllllllllllllllllllllllllllllllllllllllllllllllllllllllllllllllllllllll

Do the prep work for exterior finishes

STEP 8 PAINT THE EXTERIOR SIDING AND TRIM

On our Charlotte house, we didn’t have a lot of exterior painting to do. We installed vinyl siding, soffits, and windows and covered fascia and rake boards with aluminum cladding. But we still needed to do a bit of exterior paint­ing (door casings and doors, for example). On houses with more exposed wood, you should know how to paint the exterior correctly. Here are some guidelines you can use to make sure your exterior finishing work will look good and hold up well.

Choose an exterior finish

Wood siding, such as shingles or clapboard, is often better off when finished with stain rather than with paint. Solid-color exterior stain gives wood a paintlike appearance, but it does not crack or peel the way paint can. To let more of the wood grain show through, use semitrans­parent stain, which is available in many wood tones and colors.

STEP 8 PAINT THE EXTERIOR SIDING AND TRIM

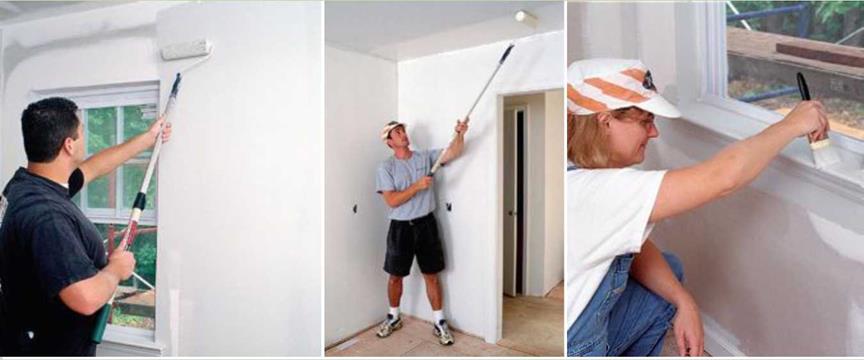
You can never have too many volunteers when it’s time to paint.

We use brushes and rollers of all different sizes.

Painting a new house is great because you don’t need to worry about getting paint on carpets and furniture.

People with rollers paint the walls and ceilings quickly, but it’s just as satisfying to work on trim with a brush.

Whether you choose paint or stain, make sure you buy a good-quality finish that is recommend­ed for the use you have in mind. For example, you don’t want to paint a deck with porch enamel or use interior trim paint on exterior wood. The pressure-treated lumber used on many decks needs a penetrating sealer or stain rather than paint. Upright pressure-treated porch posts can be painted or stained with a solid color once the wood is clean and dry. Find out which brands and formulations knowledgeable painters and paint suppliers in your area recommend.

Fill holes and gaps

Once the trim has been installed, the next step is to set all the nails, then fill and sand the nail holes. Any nails that are above the surface of the wood must be driven below the surface with a nail set (see the photo at left). If you plan to stain or polyurethane the trim, fill the holes with matching wood putty. For paint prep, you can use painter’s putty or ordinary Spackle® applied with a small putty knife or your finger.

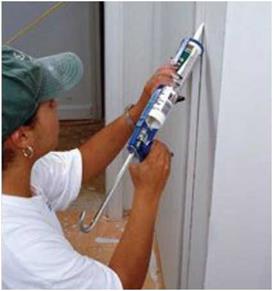
Подпись:Подпись: Fill any gaps with caulk. Before painting the trim, use latex caulk to fill any gaps between the trim and the wall. After applying the caulk with a caulking gun, use a damp rag to smooth the joint.Sometimes the miter joints (where the door and window trim meet) are not tight so you need to fill the gaps. There also may be slight gaps between the wall and sections of door and window casing or baseboard trim. In addition, check for gaps between shelving and walls and around cabinets and other built-ins. All these gaps can be filled with latex caulk, which is paintable and has enough elasticity to move as wood trim expands and contracts with changes in temperature (see the photo below). Wipe off any excess caulk with a damp cloth.
Fill holes and gaps

Подпись:Before painting any trim that has been nailed in place, take the time to remove all the doors and cover the cabinets with paper and painter’s masking tape. I like to use what is called painter’s tape, because it pulls off easily and doesn’t leave a glue residue. Cover fin­ished floors with a paint-absorbing drop cloth. Unscrew the hinges from the door jambs and store them in a box or plastic bag. Some people paint the trim with the same paint they use on the walls. In that case, there are no cutting – in problems between the wall and the trim. However, you may want to use semigloss paint on the trim and doors or semigloss on the trim

and gloss on the doors. Surfaces that are fin­ished with semigloss and gloss are more stain – resistant and easier to wipe clean than flat-finish surfaces. In addition, higher-gloss paint sets off the trim nicely.

Whichever kind of paint you choose, learn to trust yourself with a brush rather than masking between trim and wall surfaces. Masking a wall when painting the trim can be a disaster. When you remove the tape, you could also very easily remove new paint.

Instead of masking off, try using the dry­brush method when cutting in. Dip about one-third of the bristles in the paint, then wipe one side of the brush on the lip of the paint container. Place the dry side of the brush toward the surface that will not be painted and draw a straight “cut” line. Even if you get a little trim paint on the wall, all you have to do is touch up the wall. If a little bit of wall paint gets on the trim at that point, just repaint the trim.