Category A HOUSE

STEP 7 PREPARE AND PAINT THE INTERIOR TRIM

Подпись:One nice aspect of new construction is that you can paint all the walls and ceilings before installing the cabinets, shelving, doors, and interior trim. Even though you’ll have more wall surface to cover, the work can go quickly because you don’t need to worry about getting paint on all the other finished surfaces. In the next chapter, we’ll see how trim and cabinets are installed. Just ahead, we’ll cover what you need to know about applying finish paint or stain on interior trim.

Подпись:There are several finishing options for interior trim. Instead of paint, the wood can either be stained or finished with clear polyure­thane. Both options allow the grain of the wood to show. If you like the look of natural wood against painted walls and ceilings, plan to install solid stain-grade trim rather than less expensive finger-jointed, paint-grade stock. Wood doors can also be stained or coated with polyurethane or another clear finish. An application of wood stain is usually followed by a coat or two of clear finish to give the wood added protection and make it easy to clean. Tinted polyurethane finish provides the benefits of both stain and clear finish in a single application. For recom­mendations on stain and clear finish treatments for interior trim, consult a knowledgeable paint supplier.

With painted trim, it’s a good idea to prime – coat the pieces before installing them. You can apply paint quickly when the trim pieces are set
up on sawhorses. Brush primer on the back of the trim (known as back-priming) as well as on the front. It doesn’t take a lot of extra time, and this technique makes the trim more resistant to warping, swelling, and shrinking in response to moisture fluctuations.

Cut in around the edges

The two basic techniques for painting both ceilings and walls are cutting in and rolling. “Cutting in” means brushing paint onto areas that can’t be reached with a roller. Painters usually begin working from a ladder, cutting in the corners where the ceilings meet the walls. Use a 3-in. or 4-in. brush to make a cut-in band all around the ceilings and walls, as shown in the photo at left. This band will be overlapped when the large open spaces are painted with a roller. Professional painters prefer to use a brush for cutting in, but it can also be done with a paint pad, which is basically just an absorbent sponge on a handle.

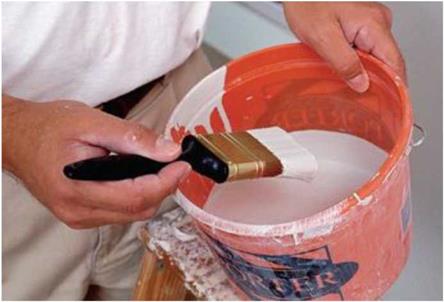
Take your time. Good brushes are easy to load with paint. Rather than painting with a full can of paint, painters like to use a bucket that’s about half full. This allows them to dip the bristles about halfway into the paint, then fill the inner part of the brush with a few gentle slaps of the brush against the inside of the can (see the photo below). Apply paint in relaxed, even, gentle strokes.

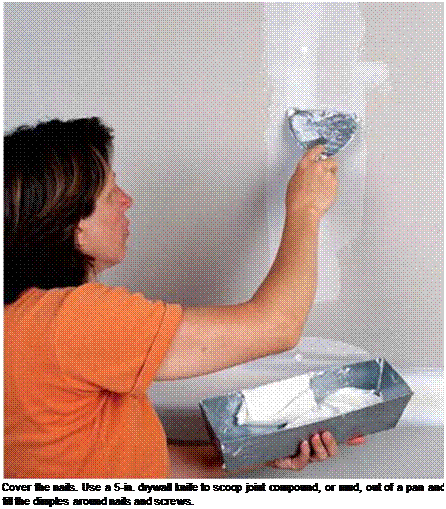
Подпись: Newer, light-weight spack- ling products make it easy to fill holes. These products spread easily, dry fast, and need little or no sanding.Use a roller to fill the field

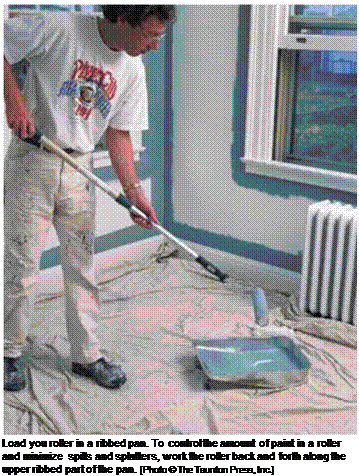
Once you’ve finished cutting in, switch to a roller to paint the rest of the ceilings and walls. Ask at the paint store which roller to use for your type of paint and wall surface. Many painters use a good-quality 9-in. roller frame fitted with a */2-т. synthetic-nap roller. An extension pole that attaches to the frame makes it easy to reach the ceiling. Paint can be loaded on a roller from either a paint pan or from a 5-gal. bucket with a roller screen hooked to the inside. Don’t overload either the pan or the bucket with paint. Dip the roller into the paint several times to saturate the nap. Then unload the excess paint on the pan or roller screen (see the photo below).

Rolling paint on ceilings and walls must be done slowly and methodically, using long strokes. It must be done slowly because push­ing a roller rapidly scatters paint far and wide.

It must be methodical so that every square foot of drywall receives full and equal coverage. Try painting in 3-ft. squares, running the roller back and forth in a tight “M” or “W” forma­tion, with each stroke overlapping the previous one by a few inches. Blend the main ceiling paint into the corners by overlapping the cut-in sections by an inch or so, but be careful not to touch the other side. In hot, dry climates, try to keep the working edge wet with paint. If you overlap a dried edge, you’ll often see a lap mark after the paint has dried.

When rolling paint on walls, you can reduce the splatter by painting on the upstroke. Watch out for paint ridges left at the ends of a roller. Try tipping the roller to the side to squeeze out the excess paint as you roll. Then go back over the ridge and even out the coat. Apply a uniform, thick coat, but not so thick that the paint begins to run. When painting near the floor, turn the bend in the roller frame toward the floor to keep the roller from picking up dust and dirt. With care, you should be able to cover the walls and ceilings with one coat on top of the primer, especially if you’re using good-quality paint. But don’t despair if one coat looks a little
thin. Paint is not all that expensive, so just roll on another coat, if necessary.

CHOOSING AND CARING FOR BRUSHES

CHOOSING AND CARING FOR BRUSHES

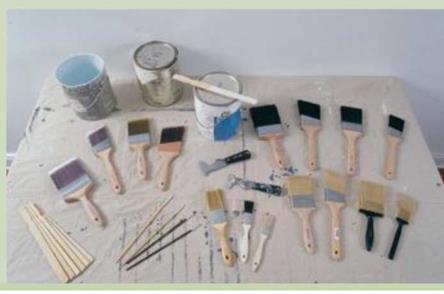
My hand likes the fit of a long-handled brush. But bristles, not handles, are what make a good brush. Brushes with natural bristles, usually hog’s hair, work best with oil-based products. Synthetic-bristle brushes work best with water – based paints. Soft nylon bristles are a good choice for finish work, whereas stiffer poly bristles are better for painting rough or textured surfaces, such as siding. A combination of nylon and poly bristles usually makes a good all-purpose brush. For painting large surfaces, a 3-in. or 4-in. brush with square-cut bristles is a good choice. A 1-in. or 2-in. brush with bristles cut at an angle gives you more control for cutting in trim.

A quality brush can last for years if you take good care of it. That means cleaning it thoroughly each time you use it. First, remove most of the paint from a brush by painting on some cardboard or newspaper. If you’re using oil-based paints, then you must wash the brush in paint thinner. Latex and acrylic paints can be washed in lukewarm soapy water. Once the brush is clean, you can either spin it dry with a

brush spinner (available at most home centers and hardware stores) or just let it dry naturally. A wire brush and a brush comb are good to have on hand for removing hardened paint and straightening the bristles. Finally, once the brush is dry, store it in its wrapper until you need it again.

CHOOSING AND CARING FOR BRUSHES

Подпись: Cut in with a paint brush. A roller can't reach corners and edges. A 3-in.- to 4-in.-wide brush is ideal for painting these areas. [Photo courtesy HFHI] Подпись: Avoid over-loading. Inexperienced painters often make the mistake of overloading brushes (and rollers) with paint. All this does is make a bigger mess, with paint splattering, dripping, and running down to your elbows. Подпись: Load your brush with paint. A good brush can hold plenty of paint. Using a half-full paint bucket allows you to dip and load your brush by tapping it gently against the inside of the bucket.CHOOSING AND CARING FOR BRUSHES

that have dried on the floor. Drywall mud left on the floor can work its way up through a car­pet. Then vacuum up all the dust. Cover the tub or shower with a protective sheet of inexpensive 1-mil plastic, often called painter’s poly, affixed with masking tape.

Apply the prime and finish coats

My advice for buying paint and brushes is the same as for buying any other tools and materials: Talk to contractors and knowledge­able folks working behind the counter where you buy your supplies. Then buy the best you can afford. A knowledgeable paint supplier will help you choose primer and finish paints that are compatible; you’ll also get advice on the best brushes and rollers to use with your paint. For some basic background information, see the sidebar on p. 231. A well-built house deserves a quality paint job. Spending more money on high-quality paint can actually save you money down the road, because good paint covers better and holds up well over time.

When using several gallons of a single color, mix them together in a 5-gal. bucket to ensure uniformity. Keep the pigment mixed by stirring well before painting and throughout the day.

TYPES OF PAINT

Years ago, painters who worked with oil-based paints, lacquers, and varnishes in poorly ventilated spaces didn’t last long in the trade. A serious whiff of the solvents in those products would spin your brain and stagger your feet. Fortunately, most of the paint sold in this country today is water based, which is a lot less hazardous to use and cleans up with soapy water. The best latex paint contains a large amount of acrylic resin. Vinyl acrylic is the second-best choice. Vinyl resin is the least durable option.

Oil-based paints are still around but are mainly used by profes­sional painters. Even among pros, alkyd paints containing synthetic resins have largely replaced oil-based paints. Alkyds are great when you want a glossy surface, but they are harder to apply than latex paints, take longer to dry, and are more work to clean up (requiring paint thinner).

Usually, there are three grades of paint: Good-quality paint has a 10-year warranty, better-quality paint offers 15 years, and best-quality paint offers 20 years. Flat-finish paint has more pig­ment than gloss paint, so it covers better than gloss but also wears faster. That said, when evaluating two similar products (different brands of flat-finish latex paint, for example), a higher content of solids indicates a better-quality product. However, don’t compare across categories, such as flat to gloss.

One problem with paint is that it contains solvents, which release volatile organic compounds (VOCs) into the air as they evaporate. These compounds can make some people sick. Latex paints contain far lower levels of solvents than alkyds, but they can still be bothersome to some people. If fumes are a problem for you, choose one of the low-VOC paints on the market (see Resources on p. 279).To minimize indoor fumes, keep the windows open and run a good fan to promote ventilation.

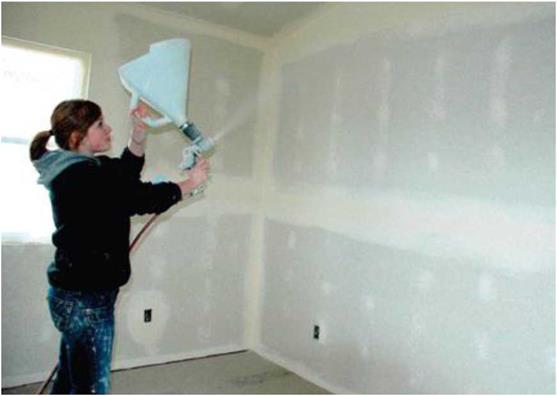
or the other or right in the center, as necessary. At this point, some folks like to apply another coat to give a texture to the walls before paint­ing. Texturing is common in the west and southwest. It is usually done by blowing a thin mixture of drywall mud onto the walls using an air compressor.

Подпись: Plastic wrap makes good short-term storage for brushes and rollers. When you stop painting to have lunch or simply take a break, there's no need to clean your brush or roller. Instead, just wrap it in plastic until you get back to work.

STEP 6 PAINT THE CEILINGS AND WALLS

Our prairie home seldom, if ever, had any paint on the exterior. The siding became as grained and leathery as the faces of the inhabitants. Indoors, we sometimes used a dry powder, called Kalsomine, that we mixed with wa­ter and used to paint the ceilings and walls. Kalsomine came in different colors, which added a bit to our rooms and to our lives.

After I left home, it seemed that the only interior paint color in existence was Navajo White. For years, the interior of every house we built was painted this off-white color. It was a breath of fresh air to see all the bright colors that exploded in the late 1960s and early 1970s. From bland to bright to subtle pastels and now back to Navajo White—so much for progress.

Paint prep is the key to a good paint job

Professional painters know from experience that the biggest part of a paint job is the preparation. You don’t just grab a bucket of paint and a roller and have at it. Take time to remove doors from their jambs before you start painting the walls and ceilings. Number or label the doors so you’ll know later where each one belongs.

Some drywall jobs create lots of dust that must be removed before you can paint. I use a vacuum cleaner to remove dust from the walls and ceilings, but a broom or a pole sander wrapped with a cotton cloth also works well. Take it easy, because topping compound is relatively soft and easily scratched. Pay special attention to dust in the corners. Remove any drywall mud or dust left in electrical outlets, and scrape up any globs of drywall compound

Apply the second and third coats

Drywall compound must be applied in sev­eral thin coats because thick applications tend to shrink and crack. Also, thin coats can be feathered or tapered very gradually so that they’re invisible (or nearly so) after the drywall surface is painted. Before applying the second coat, remove any lumps, high spots, or ridges of hardened compound left from the first coat. This can be done with a drywall knife or a pole sander. Be careful not to oversand, or you could damage the paper face of the drywall.

Apply topping compound over the dimples around the fasteners, just as you did with the first coat. Be even more careful as you level the compound, and use a 10-in. or 12-in. knife. Along seams, apply topping compound with a 5-in. knife, then use a 12-in. knife to remove the excess (see the top photo on p. 229). Again, take your time. The second coat should conceal the tape. Using a wider knife, feather the mud away from the center of the joints to make them harder to detect. This is especially important
at butt joints. It takes some practice to get this coat right. Go over the joints more than once, if necessary, pulling the knife with a steady, even pressure to leave a smooth surface.

The same can be done along inside corners, using a 5-in. knife to mud and smooth one side of the corner at a time. This takes some skill, because it’s difficult to keep the knife from marking the finished side as you mud the op­posite side. For this reason, some tapers like to use a different procedure. They apply mud on one edge at a time, smooth it, and then let it dry. Once one side of the corner is dry, they return and do the other side.

Before applying the third coat of compound, lightly sand the second coat. Hit the corners, dimples, and seams with a 120-grit screen on a sanding pole to remove any bumps, trowel marks, or ridges. The third coat should be little more than a light application of topping compound to hide any imperfections and feather the seams a bit wider. To make the topping compound easier to manipulate, thin it with a little water.

Apply the second and third coatsThe drywall in many houses, especially in the West and Southwest, is textured by using air to blow on a solution of drywall mud. [Photo by Don Charles Blom]

Do the prep work

Before you start taping and mudding, make sure that all fasteners are below the surface of the drywall. You can do this by running your hand or a wide drywall knife over the fasten­ers in the walls and ceiling. If any fasteners are proud of the surface, they will show when you apply the first coat of mud.

You may need to do a bit of repair work around electrical-outlet boxes. If the fit around these boxes is sloppy, use a fast-setting (as op­posed to a slow-drying) joint compound that’s available at supply stores. Mix a batch and fill the gaps with a small putty knife. Place small pieces of drywall tape over the mud and apply a smooth coat on top of the tape.

If the gaps are quite narrow, use latex caulk to seal around them.

COMPOUND AND TAPE. Part of your preparation work is making sure you have the right supplies on hand. Joint compound is normally used as the bed for tape. If you’re new to drywall work, you’re better off buying
premixed joint compound that is ready to apply. Topping compound is applied over joint compound; it has a finer, creamier consistency so that it can be smoothed out nicely. It’s available in premixed and powdered forms. You’ll also need enough tape to cover all the joints between panels, including the inside corners. Buy about 400 ft. of tape for every 1,000 sq. ft. of drywall.

Mud the joints and corners

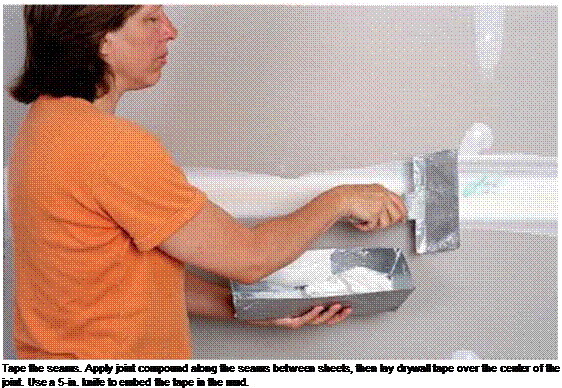
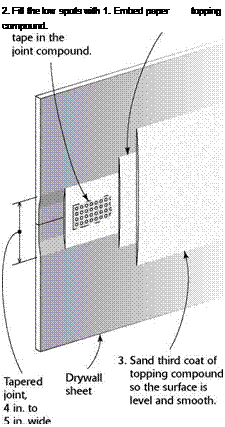
The long edges of drywall panels are tapered, allowing the seams between adjacent panels to be filled with joint compound and taped to cre­ate a level surface. Begin by using a 5-in. knife to apply mud about /4 in. thick along the entire seam. Roll out the tape from corner to corner, center it on the joint, press it lightly in place, and then pull it tight and straight.

Once the tape is in place, drag the knife over the top, applying enough pressure to embed the tape as you go (see the photo below). Make sure the tape is flat, wrinkle-free, and embedded in about /4 in. of mud. Be careful not to create

Подпись: Tape the seams. Apply joint compound along the seams between sheets, then lay drywall tape over the center of the joint. Use a 5-in. knife to embed the tape in the mud. Clean up as you IIP go. When left lying around, scrap pieces of drywall crumble eas­ily, making a paper and powder mess that can be tracked all over a job site. Avoid this by cleaning up drywall as you go. Stack usable pieces so they are easily accessible.

Подпись:

mud buildup in the corners. Clean any excess compound from along the edges of the tape with your knife.

Inside corners and wall-ceiling joints are taped a bit differently than flat joints in a ceiling or wall. Use a 4-in. or 5-in. knife to apply an l/S-in.- thick layer of joint compound on each edge of the corner. Next, fold the tape at the crease and press it into the corner, flattening it as you go. Working on one edge at a time, press the tape against the drywall and into the mud with the taping knife.

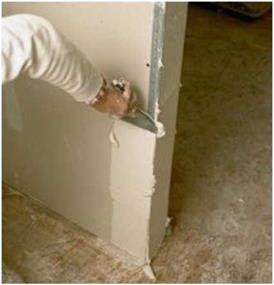
Outside corners covered with corner bead are easier to do (see the photo below). Using the same 4-in. or 5-in. knife, press mud along the length of the corner. The outside edge of the corner bead acts as a guide for your knife as you pull off excess mud.

The ends of a drywall sheet are not tapered like the edges are. For this reason, you should use less mud to cover the tape at the butt joints, where the ends of adjoining sheets meet. Otherwise, you can create an obvious bump in the wall. Cover the tape lightly with mud, and feather the edges away from the center of the joint so any bumps that result will be slight.

In hot, dry climates, joint-compound ap­plications dry rapidly. Mud that dries too fast may not bond well and can crack. Try mudding a couple of joints in a room and then applying

Do the prep work

tape right away, rather than mudding every joint first. You may need to close up the house to retain moisture and create a slower drying time. You can also use an easy-to-sand setting com­pound that hardens with little shrinkage and is basically unaffected by hot, dry conditions.

It’s a different story in cold and humid areas. Builders in those regions often have to close up the house, turn up the heat, and open the windows a bit to let out moisture. Portable propane heaters work well to help things dry, but they exhaust additional moisture into the air. If you’re using them, leave a window open so moist air can escape. Kerosene heaters also work well, but it may take a while for the smell to leave the house.

Mud the corner beads. Apply joint compound gen­erously along each side of a corner bead. To level off the compound, run the taping knife over the rounded outside edge of the bead. [Photo by Charles Miller, courtesy Fine Homebuilding magazine © The Taunton Press, Inc.]

AND FINISH THE DRYWALL

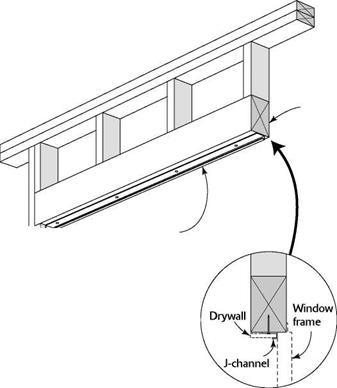
Подпись: HeaderПодпись:AND FINISH THE DRYWALLПодпись:Подпись: Using J-channel around a window makes a clean joint between the drywall and the window frame.Подпись: Dispose of waste drywall. Before you send waste drywall to a landfill, contact the Gypsum Association (see Resources on p. 279) to see whether there's a recycling facility in your area. Local builders may also know of recycling possibilities that can help reduce the amount of construction material sent to landfills.

straight, finished edge. Both metal and vinyl corner beads are designed to be nailed or stapled in place. Use tinsnips to cut floor-to-ceiling beads. Cut them at least V2 in. short, but hold them tightly against the ceiling. Starting at the top and working down, fasten the bead to the corner stud (below the top plates) with pairs of nails or screws opposite each other every 8 in. to 10 in. A pneumatic stapler also works well. Make sure all the beads are straight and lie flat against the wall.

Beads around windows and doors are at­tached just like those on corners. The header beads are cut square on both ends and then nailed in place. The side trimmer pieces are also cut square and butt into the top piece (see the photo at right).

I am not a professional drywall finisher, but I have taped enough wall and corner joints to know that this job is both an art and a skill. Some finishers can leave walls and ceilings as straight and smooth as glass. To the trained eye, my work looks more like antique, handmade glass—generally flat, but with some rippling and variations that give it character. The thing to remember, regardless of your skill level, is that taping drywall is finish work, so it needs to look good. Although your first efforts aren’t likely to be masterful, with patience and know­how you can learn to achieve good, solid work. This section will give you the basic know-how. The patience you’ll have to provide yourself.

AND FINISH THE DRYWALL

Install corner bead. This metal trim is nailed over drywall-covered outside corners. The flanges and nails will be covered by several coats of compound. Drive nails in both flanges every 8 in. to 10 in.

Подпись: ІІІІІІ1ШІІІІІІІІІІШІІІІІІІІІІІІІШІІШШШМІІІІІІІШІІШІІІІІ1ІІІІІІШІІ1ІІІІІІІІШІІІШШІШІІІШІШІІІІІІІІІІІШІІІШШШШІІІІІШІІІШІІІ TAPING AND MUDDING JOINTS Подпись: 2. Fill the low spots with 1. Embed paper topping compound. AND FINISH THE DRYWALL

Tool up for finishing drywall

Although professional drywall finishers rely on an assortment of equipment, including stilts to speed ceiling work, you can achieve very good results with just a few tools. You’ll find them at well-stocked hardware stores, home centers, and drywall-supply outlets.

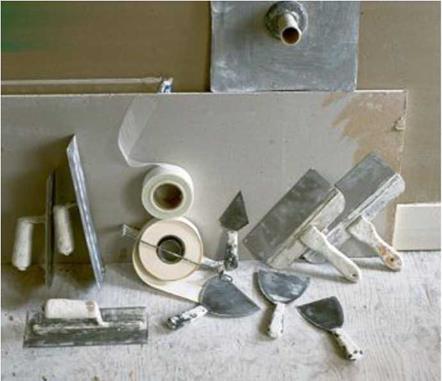
TAPING KNIVES. Mud applicators are called knives, even though they look more like overgrown spatulas. A 5-in.-wide knife is good for applying joint compound (referred to as mud). Wider knives are used to smooth and feather the edges of mud, tapering it so thin that it will be as undetectable as possible once the paint is applied. If you’re new to drywall work, start with 5-in., 8-in., and 12-in. knives for best results.

TROWELS AND HAWKS. These tools are simply flat pieces of metal with handles attached. Their main purpose is to hold a small batch of compound at the ready so that you can scoop it onto the wall with a taping knife. Trowels are rectangular, while hawks tend to be square. Which tool works best is a matter of personal preference. In the hands of an experienced worker, a trowel can be used to both hold and apply compound.

POLE SANDER. Sanding finish coats of compound is often necessary to smooth uneven areas. A pole sander consists of a sanding block attached to a pole. To sand the first two coats, cover the block with 120-grit sanding screens. When one side is dull, turn over the screen and use the other side. For the final sanding, switch to a 150-grit screen.

PORTABLE LIGHTS. With one or more bright, halogen-type work lights, you’ll have a much easier time finding flaws in the top coat. DUST MASK AND GOGGLES. Don’t begin to sand drywall compound without donning safety gear.

Use tape and knives for their respective tasks.

Tape—either paper or plastic—is used to cover the joints. Different-size knives are used to apply and level drywall compound. [Photo by Charles Miller, cour­tesy Fine Homebuilding magazine © The Taunton Press, Inc.]

Tape and drywall compound hide the joints and make them strong.

Подпись: Reuse joint- compound buckets. These rugged, plastic buckets are great for storing tools and materials. Wash out any remaining joint compound with water.

MAKING A DRYWALL-PANEL LIFTER

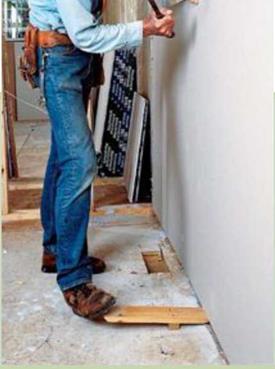
MAKING A DRYWALL-PANEL LIFTERThis small lever comes in handy when you’re installing the bottom course of drywall panels. By wedging the beveled edge of the tool un­der a bottom panel and stepping on the outboard end, you can lever the bottom panel against the bottom edge of the top panel and hold it there until you drive a few fasteners. Although you can buy a panel lifter, it’s easy to make one. Cut a piece of 1×4 about 16 in. long, then cut a taper on the flat face at one end. If the drywall must be lifted more than 3/i in., add a piece of 1 x2 to the bottom of the lifter.

Подпись: TYPICAL FASTENING SCHEDULES FOR DRYWALLMAKING A DRYWALL-PANEL LIFTER

Install J-bead

Window trimmers and headers are often wrapped in drywall. The same is true of trim­mers and headers in closets where bifold or bypass doors will be installed. In these loca­tions, drywall can replace the wood jamb as the finished surface. This is a good place to use up some of the scrap you’ve created. I try to select straight factory edges to go against the window frame. But other builders install vinyl J-bead trim where the drywall meets the window frame (see the illustration on p. 226). Nail the J-bead to the trimmer, then slip the drywall into the J-channel. This is an easy way to obtain a clean, straight, durable drywall edge.

I also install drywall about 2 in. up the attic access hole and cap it with J-bead. This leaves a trim surface on which the lid can rest. The lid can be made from a piece of drywall with several layers of rigid-foam board glued to the back for insulation.

STEP 4 INSTALL THE CORNER BEAD

Once all the drywall is in place, metal or vinyl corner bead is installed on all outside corners, including wall corners, window wraps, closet doorways, and the attic access hole. This bead protects corners from impact and forms a

Check for covered wall outlets. When installing drywall, it’s easy to overlook electrical outlets and fasten a panel right over these small boxes. As you’re installing panels, look in the usual places to make sure the outlets haven’t been covered. Check for receptacles ev­ery 6 ft. or so along walls near the floor and above kitchen countertops. Alsocheckforlightswitches near doorways.

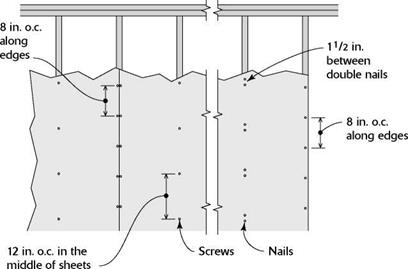
When using nails instead of screws, you may be required to double-nail.

Fasten according to code

Hold screws or nails back about 5/s in. from the edges of the panel, and drive them in straight so you don’t break the paper. Follow the fastening schedule for drywall that applies in your area. When ceiling joists are 24 in. o. c., nails or screws are usually driven every 8 in. along the edge of the panel and every 12 in. in the middle.

Some builders use drywall panel adhesive when attaching sheets of drywall. The adhesive is applied with a caulking gun, just like caulk or sealant. With panel adhesive, the need for screws
or nails is greatly reduced. Don’t use adhesive over a poly vapor barrier or kraft paper-faced insulation; it’s designed to affix drywall to a wood surface. Follow the application and instal­lation instructions on the label.

Corner details

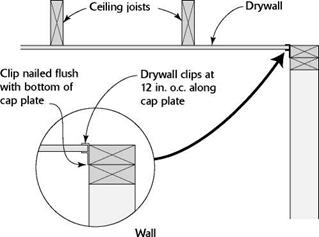
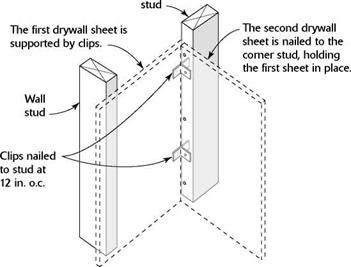
If you provided backing or deadwood while building interior walls (see Chapter 4) and installing roof trusses (see Chapter 5), you’ll be able to drive nails or screws along the walls to fasten drywall panels. But if solid backing mate­rial for drywall was not nailed to the tops of parallel walls or in the corners where walls in­tersect, metal drywall clips can be used instead. See the illustration on p. 223 for instructions on using these clips. Unlike a drywall corner secured with nails or screws, a corner secured with clips can be more resistant to cracking when the framing material moves in response to temperature fluctuations.
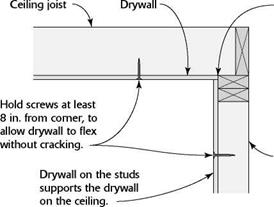
Подпись:Another strategy is to let the corner “float,” eliminating nails where a ceiling panel meets the wall. The top edges of wall panels are
Подпись:

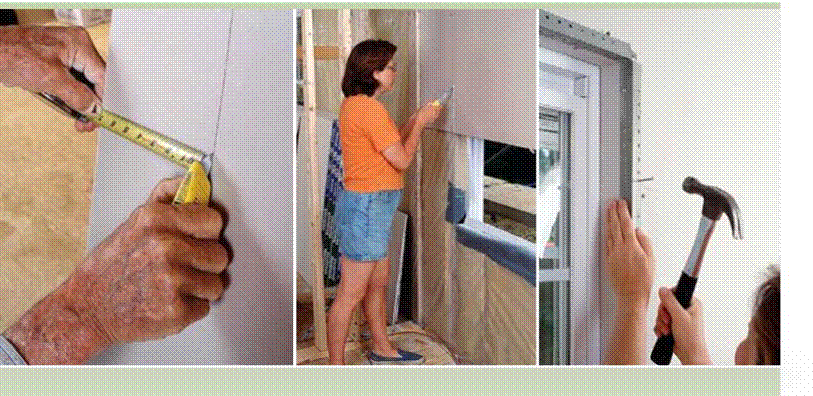
Подпись: Cutting drywall isn't difficult, once you learn how to score through the paper covering with a utility knife. The panels have a gypsum core that makes them heavy and delicate.They create a lot of dust, too, especially when making cuts with a saw. Fasten according to code

then pushed snugly against the ceiling panels, holding them in place (see the top illustration on p. 224). Again, this can help prevent corner cracks at the ceiling-wall juncture due to wood shrinkage or truss uplift. If you’re uncertain about how to handle drywall corners, check with experienced builders in your area.

Once all the ceiling panels are in place, run a bead of caulk where the ceiling panels butt the exterior walls to reduce air infiltration (see the top illustration on p. 224). I finish the ceil­ing by marking the location of wall studs with a small pencil mark on the ceiling drywall. These marks help when nailing drywall to the walls. Don’t use a keel on drywall (unless it is covered with drywall tape) because it can bleed through paint.

STEP 3 INSTALL THE WALL PANELS

Hanging drywall on the walls is easier than hanging it on the ceiling. You have to work around window and door openings, and there are more electrical outlet openings to mark and cut, but you don’t have to work overhead. It’s important to know that some electrical wires (for the thermostat, doorbell, range hood, and so on) will not be enclosed in a box. Electricians often wrap those wires around a nail to locate their position. All you need to do is make a small hole in the drywall and pull the wires through.

Plan panel installation

It’s smart to plan an installation sequence when there are a number of walls to finish with

Подпись: USING DRYWALL CLIPS TO SECURE THE ENDS OF DRYWALL SHEETS Fasten according to codeFasten according to codeПодпись: Drywall clips eliminate the need for backing at intersecting walls and on cap plates.drywall. Determining which walls to cover first, and how panel layout will work, saves time and aggravation. Here are some tips to help you plan the installation sequence for walls:

HANG PANELS HORIZONTALLY. By installing 12-ft. panels horizontally, you greatly reduce the number of joints in a wall. The top panels should be hung first. Don’t worry if the bottom panel doesn’t extend all the way to the subfloor; this small gap will be covered by the baseboard trim. For rooms with 9-ft.-high walls, use 54-in.-wide drywall panels instead of the standard 48-in.-wide panels.

START ON CLOSETS FIRST. Check to see whether there are any closets that must be drywalled before working on long walls. Sometimes it’s easier to get large drywall pieces into a closet through a wall rather than through the closet door. Don’t bother cutting and installing small pieces of drywall to completely cover a closet. You can do that later with scrap pieces cut from the long sheets. At this stage, you just want to have an easier time getting big pieces into the closets.

WORK FROM THE OUTSIDE IN. I like to drywall exterior walls before interior walls. Leaving the interior wall framing open when you start gives you greater freedom to maneuver the panels. To maximize this freedom, drywall the interior hallways last.

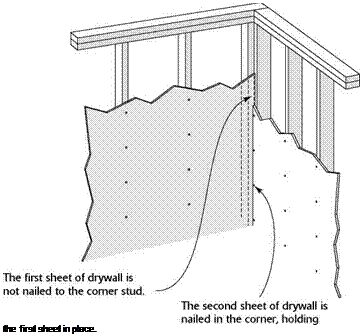
PAY ATTENTION TO BACKING AT WALL INTERSECTIONS. As shown in the bottom right illustration on p. 224, backing can sometimes determine which wall should be covered with drywall first. When 2 x6s have been used for backing where 2×4 walls intersect, there will be only a l-in.-wide nailing surface for attaching drywall. In this situation, always install the intersecting wall’s drywall after the other wall has been covered. Butt the intersecting wall’s panel tightly against the adjoining wall panel to make a solid corner.

Install the panels

As mentioned earlier, the top panels should be installed first. It’s important to butt the top edge

of each wall panel snugly against the ceiling drywall. To make installation easier, you can start a few nails near the top of a sheet before you raise the panel into position.

Although I drive a few nails just to hold a panel in place, I like to use screws in the rest of the sheet on both ceilings and walls. Screws hold better, resist popping when framing lum­ber shrinks, and can be installed quickly once you get into the rhythm of using a screw gun.

Подпись: On exterior walls, prevent air infiltration with a bead of caulk at the corner before installing the drywall.Подпись:Fasten according to codeПодпись:Подпись:Подпись:

If you use nails in the middle of a panel, code may require that the panels be double-nailed (see the illustration on the facing page).

When fastening a panel, work from the center to the outside edges. If you do use nails, drive the first set, then go back later and drive the second set, making sure the drywall is tight against the wall framing. When driving nails, it’s always advisable to push the panel tightly against the wall.

When hanging the bottom row of drywall,
stagger the end or butt joints, just as you did on the ceiling. The bottom panels can be placed against the wall, then raised and held in place against the top sheet with a drywall lifter, al­lowing you to concentrate on fastening the sheet (see the sidebar on the facing page). Long sheets can be raised with a drywall lifter at each end.

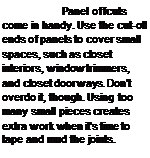
Try to keep butt joints away from the center of the wall so that the joints will be less obvious. Also, have a sheet break over a door or window rather than right at the edge of a king stud or trimmer. A joint at the edge of a door or window increases the likelihood of a crack in the drywall as the wood dries. Run panels all the way across doors and windows when you can, then cut them out later with a saw or router. You can also run a panel past an outside corner, then cut it flush with a utility knife after the panel has been fastened in place. This eliminates the need to measure and mark the panel.

PROPER DRYWALL INSTALLATION
ON 2×4 INTERSECTING WALLS
USING 2×6 BACKING

Fasten according to code

1/2 in.

1 in.

2×6

backing

WRONG

You’ll only have a 1/2-in.-wide nailing surface if you install drywall on the intersecting wall first.

Intersecting wall
Dimples are essential

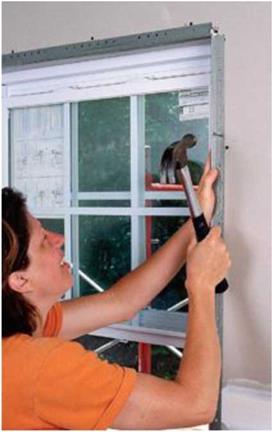
Before you install the first panel on the ceil­ing, it’s important to understand how to fasten drywall to the joists, studs, and other framing members. Whether you’re using nails, screws, or both, you must leave a dimple in the panel with every fastener you drive. This small recess will later be filled with drywall compound as the wall surface is filled and finished. Screw guns can be set to pull the drywall panel tightly against the framing members and drive the screw just below the surface without breaking the face paper. If you’re driving nails instead of screws, your last hammer blow should push
the drywall tightly against the wood and set the head of the nail in a shallow dimple without breaking the paper surface (see the photo above).

Dead men are useful

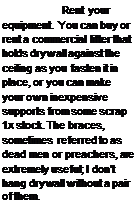
Whether you have one helper or several, you’ll find it useful to have a couple of drywall T-supports (also called preachers or dead men) to brace each panel against the framing while you drive enough screws to secure it. If pos­sible, always start by installing a full-size sheet against one corner of the ceiling. Lift one end of the sheet into position, then raise the other end against the joists while holding the edge against the wall. Wedge the T-supports underneath the panel, then nudge the panel into its final posi­tion. Set up short ladders or sawhorses to stand on as you drive the fasteners (see the photos on the facing page).