MAKING A HOUSE BEAUTIFUL
|
|
Interior Trim, Cabinets, Countertops, and Closets
When I’m feeling nostalgic, I think about the fancy, well-crafted toolkit I carried from job to job before I switched to a 5-gal. plastic bucket. That kit had a place for all my finish tools—handsaws, levels, small hammers, razor – sharp chisels with their blades wrapped in soft cotton, and planes that left long curls of wood with each pass. My brother, Jim, still has his shiny, metal miter box with its long backsaw—that’s what we used to make perfect cuts in trim before chopsaws came along. Back in the late 1940s and early 1950s, those were the tools that master builders passed down to us “kids” as they taught us the craft.
Today, carpentry is different. Power tools dominate—from motorized miter saws (chopsaws) and pneumatic nailers to cordless drills, belt sanders, random – orbit sanders, and jigsaws. And many of the things we used to build at the job site, such as kitchen cabinets, bathroom vanities, and door and window jambs, are now factory-made products that arrive ready to install. Despite these changes, basic hand-tool and careful layout skills are still essential, especially at this stage of the game, when the rough frame of the house, with all its imperfections, has been covered by drywall and the walls have been painted. Now it’s time to prepare floors for vinyl and carpet; install interior doors, window casing, and interior trim; and secure cabinets and countertops. Do this work right, and the inside of your house will begin to look beautiful and much more livable.
STEP 1 INSTALL UNDERLAYMENT FOR VINYL FLOORING
|
|
||
|
|||
|
|||
|
|||
|
|||
|
|||


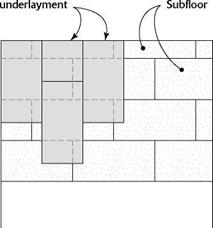
Install underlayment so the joints do not break, or land, on the subfloor joints below.
*/4 in. thick, 4×8 underlayment sheets can be made of particleboard (wood particles glued together under pressure), MDF (medium-density fiberboard, a smoother version of particleboard), or plywood. I like to install underlayment in the kitchen and bathroom after the drywall is finished but before the cabinets or prehung doors are installed.
Underlayment must be installed on a relatively clean floor. Remove all globs of joint compound from the subfloor throughout the house and give it a good vacuuming. I prefer vacuuming (with a rugged wet-dry vac, not a home model) to sweeping, because sweeping can create a dust storm. Some builders apply beads of construction adhesive before installing underlayment. A clean floor allows you to do this. Adhesive won’t adhere to a dirty floor.
Sheets of underlayment go down just like the subfloor. Lay them so the joints don’t break on the subfloor joints underneath (see the illustration above). When you have to cut a panel to length, lay the cut end against the wall with the factory edges in the middle of the room. This will ensure a tight fit between sheets.
The best way to secure underlayment to the subfloor is with a pneumatic or heavy-duty electric stapler. Drive one staple every 4 in. along the edges of each sheet and 4 in. o. c. in both directions in the field. If necessary, snap chalklinesto make a grid of 4-in. squares. A lot of staples are needed to make sure the underlayment doesn’t bubble should it absorb moisture from the vinyl adhesive or other sources.
If you’re nailing by hand, drive Td-in. ring – shank nails in the same pattern as described above. The problem with nails is that they must be driven exactly flush with the surface of the underlayment. If they are left proud (protruding above the surface), then you’ll be able to see them through the thin vinyl flooring. If they’re driven below the surface, they can be covered and hidden with a leveling compound—but that means more work.
After nailing the underlayment in the bathroom, fill the joint between the panel and the bathtub with silicone caulk. This helps prevent water from entering at that junction.


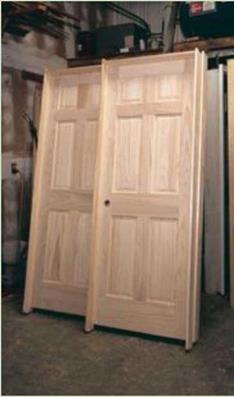
The standard interior door used in most affordable homes is 32 in. wide and has a flat, smooth plywood “skin" that covers a hollow core. But instead of settling for standard hollow-core doors, I recommend shopping around for some frame-and-panel doors made from solid wood. Doors can be a source of beauty in your house, and it may be worth the extra cost to have some well-crafted doors in your favorite doorways. Check with one or more local suppliers, and look at the array of doors that are available. Sometimes, styles are discontinued or doors are special-ordered but never claimed. When that happens, you can find a great door at a bargain price.
|
|
Most doors open into rooms rather than into a hallway.
They seldom open into closets. They can swing either to the right or to the left. The swing, or hand, of a door can be confusing. Make sure when you order doors that you and your supplier are both on the same page.
Most house plans show which way the doors swing, so it’s not a bad idea to take the plans with you when you order doors.
Different styles of prehung doors are used in different parts of the country.
I like split-jamb, prehung doors, because they come
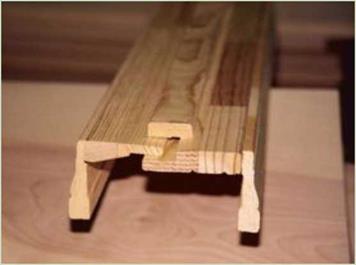
with the trim (casing) installed, and they adjust for uneven wall thicknesses (see the photo at left). Another type of prehung door has a knockdown jamb. It comes in three pieces and also has the casing installed. A third style of prehung door has just the jambs but no casing (see the photo above). After the jambs have been nailed in place, the casing must be cut and nailed around them.

STEP 2 INSTALL THE INTERIOR DOORS
the life of the house. That won’t happen if you buy junk. Doors and trim are finish work and are seen and used on a daily basis, so try to buy units that are both attractive and durable (see the sidebar above).
The first step in setting prehung doors is to check the plans and see which way they open into a room. It’s helpful to set each door near its opening before nailing any of them in place. This should eliminate installing the wrong door


Leave a reply