STEP 3 INSTALL THE WINDOW AND DOOR CASINGS
If you’ve installed prehung doors with the casing (trim) attached, then some of your trimwork has already been done. If not, then the time to trim the windows and doors is now. Remember: Accuracy is critical for good finish work. All joints between pieces of wood should be tight, with no space showing.
Doing a good job depends on having the right tools, measuring carefully, and using a few finish carpentry tricks. Make sure you have a
good chopsaw that is fitted with a finishcutting blade. A pneumatic nailer is a tremendous time-saver when installing trim, and it ensures that installed pieces won’t be marred by hammer blows (see the photo above). However, you can still do the job the old-fashioned way if you have to—with a hammer, finish nails, and a nail set. If you cut a joint that doesn’t fit well, cut it again and make it right. Don’t rely on putty or caulk to fill any but the smallest of gaps. Caulk shrinks as it dries, so relying on it to hide shoddy work isn’t a good solution.
When trimming around a window, it’s fine to cover the trimmers and header with drywall, as described in Chapter 9. But don’t use drywall for the sill; it won’t hold up. Besides, a wood sill adds a bit of warmth and style to a house. It looks even nicer when you surround the window with a wood jamb and casing.
WOOD AND MDF SILLS HAVE DIFFERENT ADVANTAGES. Standard, 3/4-in.-thick stock works fine as a sill, but I

![]()
 think thicker stock—1 in. or even 1/4 in.—looks better. If you want to see natural wood and your budget allows it, trim with oak, pine, or spruce, and seal it with clear finish. If you prefer a painted finish or your budget is very tight, choose medium-density fiberboard (MDF).
Like wood, MDF can be shaped into many styles of trim. It cuts much like wood does and, once painted, looks like solid wood but without an evident grain pattern. Just remember: MDF must be kept away from moisture, which can cause it to swell and come apart, so don’t use MDF in the bathroom or utility room, or around the kitchen sink area.
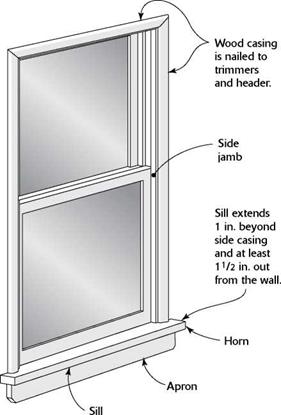
CUT THE SILL TO SIZE. When a window is trimmed on the sides with drywall, each end of the sill should extend about 1/4 in. beyond the drywall corner on the side of the window opening. When a window is trimmed with wood casing, take into account the width of the
window opening, plus the width of the wood casing on both sides, plus 2 in., then cut the sill to that length. That way, the side casings rest on the sill and the sill extends 1 in. beyond the casing on each side. A sill should be wide enough to cover the rough sill and extend at least 1/4 in. from the wall. You can vary the projection distance to suit your needs. The sill I have by my writing desk extends 3/4 in. beyond the wall; it’s wide enough to hold a book or a vase. NOTCH THE SILL. Once the sill is cut to length, cut a notch in from each corner to leave what’s known as a horn for the casing to rest on (see the illustration below). For the depth of the notch, measure in from the edge of the drywall to the window frame and mark your cut lines on the sill. Or you can hold the sill at the window opening and mark the cut lines with a combination square. That will give you an accurate cut line, even if the jamb sides are not square.
Whether you make the cut with a handsaw or a jigsaw, clamp the workpiece securely to a sawhorse or workbench so that it will be easier to make exact cuts. Remember that this is finish work. Take your time and do it accurately. The sill should fit snugly against the window frame. If there are small gaps between the sill and the dry – wall on the sides, fill them with paintable caulk.
Don’t leave the front edges and corners of the sill sharp. Instead, use a block plane to make a bevel or chamfer on the edges, or round them over with a bit with sandpaper. This will improve the look and feel of the sill. It also makes the trim less hazardous to small children. Secure the finish sill to the rough sill with construction adhesive and drive two 6d or 8d nails at each end.
Once the sill is in place, cover the trimmers and header with /4-in.-thick stock, as shown in the illustration at left. The side (and head) jambs are cut flush with the plane of the wall, set on the wood sill, and nailed in place. The head jamb fits snugly between the two side jambs. Make sure all your cuts are square and fit tightly together. Nail them in place with 6d finish nails.


Leave a reply