Category A Healthy. House

Moist Soil in Crawl Space Causes Ceiling Damage

A 15-year-old single-family residence was pur­chased for year-round occupancy in a popular ski area of Idaho. During the first spring in the home, thefamily noted water dripping from the ceiling of the kitchen. The dripping continued fora couple of days, and then the condition appeared to resolve itself. The family forgot about the problem until it recurred during the spring of the second year. This time they noted a strong, musty odor developing inside the kitchen cabinets. Once again the drip­ping soon stopped, but a few days later mold be­came visible on the kitchen ceiling and inside the upper and lower cabinetry.

Investigation revealed that the soil in the

crawlspace under the kitchen was damp. Be­cause the moisture vapor content of the soil under the home was high, moisture was coming into the home as a soil gas. It was traveling through the ceiling, condensing on the cold underside of the kitchen roof, and freezing. During the spring, the ice block melted into the ceiling space above the kitchen, soaking the gypsum board and insulation. The wet insulation acted like a sponge, holding excess moisture long enough to cause mold growth.

The owner was advised to install a vapor re­tarder on the soil surface of the crawl space. At this point, he admitted with embarrassment that

• Icynene Insulation System:* A low – density, sprayed-in-place modified ure­thane foam insulation that is free of form­aldehyde, fibers, CFCs, and HCFCs and according to the manufacturer has no de­tectable emissions after 30 days. It performs as an air barrier and is vapor-permeable, with an R-value of 3.6 per inch.

• Ultra Touch: A formaldehyde-free natural fiber insulation made mostly of recycled content, with thermal and acoustic per­formance superior to fiberglass batt. No warning labels and no respirator or protec­tive gear necessary for installation. Comes unbacked in 5 A-inch R-i9battsor3y2-inch R-13 batts.

(*Wet-applied insulation must be thoroughly dry prior to application of an air barrier in or­der to avoid trapping excess moisture in the wall cavity.)

Insulation Over Exposed Beam Ceilings

Where structural members of the ceiling are exposed, the air space between the structural members is not available to receive insulation. In flat roof construction, various tapered in­sulation systems are designed to go over the exposed ceiling decking and create a sufficient slope for proper drainage. The less toxic alter­natives tend to be expensive. It may be more cost effective to build cavity area over the ex­isting exposed ceiling and insulate with one of the above-mentioned products.

Insulation Around Doors and Windows

Regardless of the type of construction, the juncture where windows and doors meet the structure is a potential source of unwanted air infiltration and condensation. The industry standard for sealing this gap is to use an ex­pandable urethane foam product.

there had been a layer of plastic on the soil when they had purchased the home. He had noticed damp under the plastic, so he had removed the plastic to allow the soil underneath to dry. Unfor­tunately, the release of the extra soil gas moisture was sufficient to cause water damage and mold growth. Had the owner left the soil gas barrier in place, he could have prevented the mold prob­lems from developing.

Discussion

Mold infiltration in this home originated with ex­cess moisture in the soil, the cumulative effect of several mistakes and building inadequacies.

Better crawl space ventilation would have helped to remove some of the excess moisture. How­ever, because of the extreme cold in Idaho, large amounts of natural ventilation can freeze pipes. Mechanical ventilation would have been a better solution. The roof also lacked sufficient ventila­tion. Well-built homes have multiple controls. In this case the vapor barrier worked well enough to prevent noticeable moisture problems for 15 years. The removal of the barrier by the owner was the straw that broke the camel’s back.

Foam Insulation

The foam may contain toxic chemicals that will outgas in the wet stage but are believed to cure completely after a short time. These foams may also contain hydrochlorofluoro – carbons (HCFCs). Because HCFCs play a role in depleting the ozone layer, the United States is phasing out their consumption by first lim­iting and then ending their production and import in a stepwise fashion, with the even­tual phaseout scheduled for 2030.3

Because polyurethane foams do an excel­lent job of sealing and insulating these gaps, their efficacy must be weighed against their environmental impact. A look at any of the product MSDS sheets will reveal several pet­rochemical-based ingredients that are consid­ered to be toxic. It is possible to lessen the en­vironmental impact by specifying HCFC-free foam. Where the small amount of outgassing from the dried foam is a concern, the foam can be covered, once it has fully cured, with an air barrier material such as aluminum tape. Polyken Tape 337 is an aluminum tape that has been used successfully by some chemi­cally sensitive individuals for this purpose. Since the tape is moisture impermeable, care must be taken not to trap moisture.

The following widely distributed polyure­thane foams do not contain formaldehyde:

• Great Stuff

• Tiger Foam

Alternatives to Foam Insulation

Recently several natural alternatives to poly­urethane foam have become available. Those wishing to avoid synthetic foams may con­sider the following options:

• Custom Woolen Mills: Wool products for home insulation.

• Eco Wool: Wool batting products.

• Florapan: Hempwool insulation, although not available in this country, is used in Eu­rope for this purpose and can be imported.

• Log Home Wool: Sheep wool insulation in batts or rope configuration can be used for sealing around doors and windows.

Air Barriers

Impervious sheeting, applied to the inside face of stud walls behind the finish surface, is often used to block air movement and is mandated by building departments in some localities. In a home built with standard frame con­struction, such a material is also a means of blocking the fumes generated by undesirable building materials in the wall cavity from en­tering the living space. The barrier itself must also be free of noxious odors and emissions. (See the list of suitable air barriers below.)

This method is not intended for use in hot, humid climates, especially where air condi­tioning is used. Because moisture vapor mi­grates from warm to cold, condensation can occur on the insulation side of the barrier, causing hidden water damage and microbial growth. This type of barrier is often used by chemically sensitive individuals as a tempo­rary measure to block fumes emanating from walls, floors, and ceilings in an existing build­ing. A safer method is to create an air barrier that still allows for the transpiration of mois­ture through the wall. This can be achieved by applying the gypsum board in an airtight manner. Refer to Division 9, “Creating an Air Barrier with Gypsum Board,” for the specifics of this application. When a sheet-type air bar­rier is to be applied, use only unbacked insu­lation to avoid creating a double barrier in the wall cavity.

Given the complexities of construction and the number of materials that must be mechan­ically fastened together, it is almost impossible to avoid punctures in air barrier sheeting. The ultimate success of the barrier will depend on the quality control that is exercised during in­stallation and before all finish surfaces are ap­plied.

Air Barrier Installation

The following instructions can be included in specifications for the proper installation of sheet-type air barriers:

• An air barrier shall be applied on the in­side face of studs, joists, or rafters just prior to the application of the interior fac­ing. After applying the acceptable air bar­rier (see list below), seal with 100 percent silicone caulk or foil tape. Staple the bar­rier in pieces that are as large as possible over the insulation and attach them to the window and doorjambs with staples and approved caulk to form a complete seal. Caulk all wall openings such as plumb­ing and electrical boxes. Tape or caulk all seams and joints. Caulk all electrical boxes at the hole where the wire comes through, or purchase gasketed boxes (refer to Division 16 for product infor­mation). Note: This type of installation is not recommended in air conditioned climates.

• Cross Tuff: Cross-laminated polyethyl­ene sheeting. If you specify “for a healthy house,” the manufacturer will incorporate additional processes.

• Dennyfoil:* Virgin kraft paper laminated with foil containing sodium silicate adhe­sive on both sides.

• Reflectix: Foil-faced and – backed over plastic bubbles, especially designed to re­flect heat,

• rFOIL: Reflective foil insulation product with two layers of plastic bubbles with foil in the middle.

• Super R and Tempshield: Radiant barri­ers and reflective insulation.

• Tu-Tuf4 orXF: High-density, cross-lami­nated polyethylene sheeting.

• Tyvek HomeWrap: Housewrap is gener­ally used for exterior applications and is somewhat vapor permeable while highly resistant to air movement. It can be used to create a suitable air barrier for interior use if it is necessary to block wall, floor, or gen­erated fumes in an existing structure.

(*Not suitable for areas that may get wet.)

Fiberglass Insulation

Ninety percent of the homes in the United States are insulated with fiberglass insulation. There has been much debate as to whether or not fiberglass is a human carcinogen, and for a period of time fiberglass insulation was labeled with the warning “probable human carcinogen.” Although the material did not change in any way, the labeling was dropped. Whatever the case may be, fiberglass is by no means a healthful substance. Fiberglass insu­lation can release both particulate matter and gaseous contaminants into the air from form­aldehyde binders in the fibers and asphalt in the backing. There are numerous reports link­ing fiberglass to pulmonary disease in pro­duction workers and installers.1,2 Although healthier alternatives exist, they are gener­ally more expensive and may not be as readily available. However, since the cost of insulation comprises a very small percentage of the over­all building cost, even doubling this figure will not constitute a large increase in the cost per

with a moisture meter. If you find a damp spot you will have found a place with the potential for mold growth. The longer it has been wet, the greater the risk that mold has grown. Suspect areas can be tested for mold.

Even if a moisture meter does not detect a damp area, that does not mean there is no mold. Often things get wet, mold grows, things dry out, and mold sticks around waiting forthem to get wet again. Just because the building is dry now does not mean the mold is gone. Sometimes when you are looking for mold you just have to start testing the areas that are suspected to have been damp at one time. Since a good percentage of mold prob­lems are due to plumbing leaks, the first places to look are under bathroom and kitchen sinks, inside utility closets, next to hot water heaters, and be­hind the washing machine.

How do you remove mold? If you are clean­ing it from a hard, nonporous surface such as bathtub grout, use a nontoxic detergent and re­move the stains with a hydrogen peroxide-based cleaner. Contrary to popular belief, bleach does not kill mold that has grown in your wall cavities or other porous materials. And even if bleach did kill mold, it would not be recommended since dead mold spores are still allergenic. The properties of toxigenic molds are not neutralized by bleach or disinfectants. Mold needs to be removed. If it is removed, there will be nothing left to kill or sanitize.

If mold is present on porous materials or in inaccessible places such as wall cavities, remedi­ation by a qualified professional is strongly recom­mended. If you are mold sensitive, don’t even think about doing it yourself! Effective remediation square foot of your home. Formaldehyde-free fiberglass insulation is now being produced by major insulation companies and is becoming readily available.

One of the more reasonably priced alter­natives to fiberglass is cellulose spray-in or loose-fill insulation. This product has an re­value of ±3.5 per inch. It can contain corro­sive or toxic fire retardants, but many brands are available with more benign borate-based treatment that also protects against mold and insect infestation. Recycled newsprint is often used as a major component of cellulose insu­lation, which may introduce harmful dioxins into the mix. This type of insulation should not be exposed to the ambient air. Some manufac­turers provide virgin or cardboard content instead (refer to the list of alternative insula­tions below). The printing industry has shifted

to predominant use of soy-based inks making dioxin exposure less of an issue.

Choosing one of the alternate building systems discussed in Division 4 is another op­tion. In most of these systems, the more mas­sive walls themselves provide the insulation.

Fiberglass Batt Products The following brands of fiberglass batt contain fewer harmful chemicals or are encased, thus providing safer installations:

• CertainTeed: Manufactures undyed, un­backed fiberglass batt insulation.

• ComfortTherm: Fiberglassbatts that come prewrapped in polyethylene bags. These have limited application, however, since the bags must be cut open and trimmed wherever spacing is irregular.

• Johns Manville: A line of formaldehyde-

requires specialized equipment, containment, and protective clothing.

To effectively remove mold, porous mate­rials such as wallboard, plaster, insulation, and carpeting need to be cut out and thrown away. Wood may be sanded or wire brushed clean. Even if only a small amount of visible mold is present, there may be hidden mold, When cutting into the walls, using containment and other safety precau­tions may be necessary. At this level the remedia­tion goes beyond the scope of most homeowners. When selecting a professional mold remediation company, consider one that specializes in mold and water damage restoration. Mold grows only where there is or has been water, so the two go together.

Why not try to prevent mold so you don’t have to worry about all this in the first place? Sudden floods from plumbing leaks are responsible for a large number of mold problems. If you have a sud­den flood or a plumbing or roof leak, don’t merely try to dry things out yourself. If things are not dry within 48 hours you may end up with mold. The first 24 hours are critical. Look in the phone book underwater Damage Restoration. Insurance com­panies usually pay for sudden and accidental water damage (not floods from outdoor sources), but they frequently don’t pay for mold, or they place a low cap on what they will pay. Call your insurance company immediately but don’t let a water dam­age problem become a mold problem by waiting for their approval or for an adjuster to visit your house. Have the emergency water damage taken care of immediately. Once it’s dry, you can spend time negotiating with the insurance carrier about the repairs. If mold grows because you did not call

free fiberglass insulation products. Fibers are bonded with a formaldehyde-free ther­mosetting resin.

• Knauf Fiber Glass: Fiberglass insulation products certified by GreenGuard.

Fiberglass Blown-In Blanket System (BIBS)

Loose-fill fiberglass insulation is blown be­hind netting or sheeting. Noncombustible fiberglass fibers contain no chemicals or bind­ers and are inert. The products average R-4 in­sulation value per inch. They include Climate Pro by Johns Manville and InsulSafe 4 Pre­mium Blowing Wool and Optima by Cer – tainTeed.

Alternatives to Fiberglass Insulation

The following alternative insulation systems
can be cost effective if suppliers and applica­tors are located in your vicinity:

• Air Krete:* A cementitious magnesium oxide insulation that is foamed in place.

• BioBased 1701: GreenGuard certified soybean-based polyurethane water-based closed-cell spray-applied foam with an R­value of 5.5 per inch.

• Celbar: Cellulose insulation treated with a borate compound for fire resistance, avail­able in loose-fill or spray-in application. The loose-fill can be ordered without recy­cled newspaper content.

• Florapan: Hempwool insulation, although not available in this country, is used in Eu­rope and can be imported.

• Good Shepherd Wool Insulation: Wool batt and wool rope (for log buildings) in­sulation imported from Canada.

Л


a water damage restoration company immedi­ately, your insurance company may even hold you responsible.

Professional drying companies will bring in in­dustrial-strength fans and dehumidifiers that will dry the building quickly. They may drill holes in the walls and in the kick plates of bathroom and kitchen cabinets. The insides of walls are usually the last place to dry out and the first place mold is going to grow. Drilling or cutting holes in the walls is frequently necessary to allow air to circulate into the wall cavities.

What else can you do to prevent mold growth? Mold can’t grow without water, so prevent excess moisture in your home. Check for slow plumbing leaks under bath and kitchen sinks and in utility closets. Caulk or grout any cracks in shower tile and cracks or gaps behind and around kitchen sinks.

Maintain the roof. Caulk around exterior doors and windows twice a year. Keep water away from the house. If water collects next to the house when it’s raining, install gutters and change the landscap­ing to drain water away. Keep things dry and mold can’t grow. It’s that simple.

Dan Stih, BSE, CMC, CIEC, is an aerospace engineer, Certified Microbial Consultant, Certified Indoor Environmental Consultant, and Building Biolo­gist. He is the author of Healthy Living Spaces: Top 70 Hazards Affecting your Hea/t/i. Visit healthy living spaces. com for more information about mold.

CASE STUDY 7.3

Remedying a Mold Problem

Remedying a Mold Problem

if you think you have a mold problem or if you are sick in your home and suspect mold is to blame, I recommend contacting a reputable professional to do an investigation. The self-test kits found at local hardware stores are not accurate. They may tell you there is a problem when there is not and they are not good at detecting Stachybotrys, one of many problematic types of mold. Stachybotrys has frequently been referred to as "black mold," but there are many types of mold that are black. You can’t judge a mold by its color; there are some types of edible mold that are black and other molds that aren’t black but are probably every bit as bad as if not worse than Stachybotrys. So get­ting a competent diagnosis is important.

Several states have licensing requirements for mold inspectors. By itself, having a license does not make one competent. Ever had a bad hair­
cut from a licensed cosmetologist? A bad roof in­stalled by a licensed roofer? One helpful screening tool is checking to see if the inspector has Errors and Omissions (E & O) insurance. Another is ask­ing for references. See if the consultant has been in the business for awhile, if they have complaints on file with the Better Business Bureau, and if they are in good standing with professional or trade organizations. It also makes sense to hire a mold inspector who has experience in other areas of in­door environmental quality, building science, and Building Biology.

A mold inspection should really be called a mold investigation. Unless you see mold there won’t be any inspecting, and at least half the time mold is hiding. One way to look for mold is look for damp spots. The inspector should spend time checking the moisture levels of walls and ceilings
control procedures more complicated and re­quires site – and climate-specific design strate­gies beyond the scope of this book. Guides that distinguish and explain these design strategies for climate-based moisture control are avail­able through The Energy & Environmental Building Association (EEBA). We highly rec­ommend them. (See Further Reading at the end of this chapter.)

Insulation Products

Thermal Protection

Moisture Problems Associated with Building Insulation

The addition of thermal insulation into wall cavities has had a major impact on moisture control in buildings. As buildings have become tighter and better insulated, the opportunity for water vapor to dry out from wall and roof

assemblies has been reduced. Trapped water leads to wall assembly failures.

Buildings in cold winter climates will tend to dry to the outside since moisture flows from the warm interior towards the cold exterior. Under these conditions, water vapor passing through insulated building assemblies will reach a temperature where it will begin to condense. If this condensation occurs before the vapor reaches the exterior of the building, the insulation will become wet. Most insula­tion acts like a sponge, collecting moisture that is unable to escape. If an adverse moisture condition persists, mold and rot will affect the structure even when inorganic fiberglass in­sulation has been used.

In hot, humid conditions the situation is
reversed but equally problematic. When hot, moist air is allowed to enter the wall from the outside, it may condense in the insulation as it approaches the colder, air-conditioned space.

The insulation alone does not create the problem, but because of its absorbent nature it will often augment the problem. The type of vapor retardant barrier and its position in re­lation to the insulation are critical in prevent­ing mold and rot from developing. The general principle is to install the vapor retardant bar­rier so that it prevents the travel of moisture into the insulated cavity without impeding the ability of the moisture to escape. The dilemma is that climatic conditions may vary widely on a daily and seasonal basis, creating mixed con­ditions. This makes insulation and moisture

A Radon-Control Retrofit

John Banta was called to evaluate a home for radon. The owner had received a do-it-yourself radon test kit as a gift from relatives. When he fi­nally got around to performing the test, he could not believe the laboratory results. His daughter’s room registered 24 picocuries, six times higher than the EPA’s recommended action level. John’s electronic radon equipment confirmed the test results.

John proposed a radon reduction technique called subslab suction. It involved sucking radon from under the slab and ventilating it to the out­side. Holes would be drilled in the downstairs slab so that pipes could be inserted and connected to an exhaust fan, a method frequently used in unfinished basements. Since the owner had just finished installing an expensive marble floor downstairs, he was not willing to accept this pro­posal.

After some thought, John suggested that the subslab suction technique be modified so that the drilling would take place horizontally under the slab through the outside of the hill on which the first floor rested. A company that drills horizon­tal wells was contracted for the job. The site was surveyed and the drill set to bore just under the foundation. Six evenly spaced holes were bored horizontally all the way under the house. After the drill was withdrawn from each hole, a perforated pipe was inserted to provide a pathway for gas from radon-contaminated soil to be sucked from under the home. The owner finished the job by

aggregate through the center of the envelope. The pipe is connected to an unperforated riser tube that vents to the outside. The vent tube acts as a passive radon removal outlet.

If radon levels are still unacceptable once the building is completed, a fan can be attached to the vent pipe to actively suction out the gas.

Method 2: In place of aggregate and per­forated pipe, Soil Gas Collector Matting can be laid on the finished grade prior to pour­ing concrete. The matting, which is covered in filter fabric, is laid around the inside pe­rimeter of the foundation in a swath about one foot wide, and the concrete is poured di­rectly on top. The matting is connected to a vertical riser vent that extends through the roof. The natural chimney effect will draw the soil gas upward. If deemed necessary, the system can be adapted for active suction with the addition of a fan once the building is enclosed. In areas with high water tables, consult a geotechnical engineer about proper drainage prior to installing any soil gas re­moval system.

Products for Soil Gas Control

The following low-emission products may be used to block entry of radon from the ground into the living space:

• AFM Safecoat DynoSeal: Water-, vapor-, and moisture-proof membrane sealer

• Cross Tuff: Specify radon-control grade

• Tu-Tuf4: Crosslinked polyethylene sheet­ing

Water Management at Doors and Windows

Door and window openings that are improp – joining all the perforated pipes together with solid pipe. At a short distance from the home he con­nected an exhaust fan to the pipe to suck radon to the outside, where it dissipated. The pipes were then covered with soil and the area landscaped. The radon in the home was reduced to an accept­able level of approximately one picocurie. If the fan is shut off, however, the radon level will begin to climb. More radon testing was carried out on other buildings located on the property and in the general neighborhood. No other elevated radon levels were found.

Discussion

Radon can exist in isolated spots, depending on underlying geological formations. Some parts of

erly detailed are a common source of water intrusion in homes. Often these leaks go un­detected until they have caused severe damage when water finds a path directly into the wall cavity without ever revealing damp surfaces visible from within the home.

Until recently, all products for door and window flashing were asphalt-based. The fol­lowing flexible flashing products do not con­tain asphalt:

• Tyvek Flex Wrap: Self-sealing, 70-mil elas – ticized polyethylene film laminate with a synthetic rubber adhesive for windowsills, round top and custom shaped windows, 3D sill projections, and wall interruptions

• Tyvek StraightFlash: Self-sealing, 30-mil polyethylene film laminate with a syn­thetic rubber adhesive for jambs and heads of rectangular shaped windows

the US are known to have higher radon levels than others. Homes with basements, cellars, or other subterranean structures are the most susceptible to radon accumulation. Yet even homes with slab foundations and ventilated crawl spaces can have elevated levels. The only way to be certain is through radon testing. In John’s experience, radon can almost always be reduced to accept­able levels. When building your home, use appro­priate techniques to avoid the possibility of radon accumulation if radon is known to be present in your area.

• VaproFlashing: Non-self-sealing bonded polypropylene fabric flashing, requiring the use of VaproAdhesive to adhere to most building materials (refer to Vapro- Shield)

• WindowWrap-Butyl: Self-sealing 20-mil laminated polyethylene film with butyl rubber adhesive for flashing window and door openings and building joints

Water Vapor Infiltration

The infiltration of water vapor as a soil gas is a common problem that may be due to several conditions, including high water tables, un­derground springs, or hardpan soils that cause excess water to remain at the surface. Certain soils hold moisture so that, instead of perco­lating through the soil, water vapor evaporates and travels upwards. Even with proper perim­eter drainage around the building, which will take care of flowing water, this residual water vapor maybe sufficient to cause damage.

Soil Gas Mitigation and Prevention

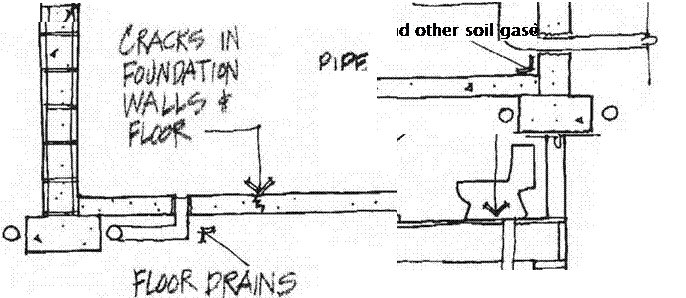
Foundation detailing and design affect the amount of soil gases that will accumulate in a building if they are present in the soil. The basement is the most vulnerable to radon and other soil gas seepage because it has the larg­est surface area in contact with the soil. Crawl spaces under buildings, especially unvented ones, can concentrate these gases. The gas is easily transferred to the living space if there is not an effective air barrier separating the liv­ing space from the soil under the crawl space. A slab-on-grade can form an effective bar­rier against soil gas, but any cracks, joints, or penetrations in the slab will create routes for soil gas to enter. Where elevated soil gas lev­els are suspected, clay-based and other types of permeable floor systems that come into di­rect contact with the ground are not recom­mended without supplementary controls.

Methods of Soil Gas Mitigation

The EPA conducts radon mitigation train­ing programs for contractors. State offices can provide you with the names of contrac­tors who have been trained and qualified un­der the EPAs Radon Contractor Proficiency

Program. Contractors who understand radon mitigation will have a basis for understanding any type of soil gas mitigation. A good strat­egy for soil gas mitigation consists of the fol­lowing three components:

• Blockage of all potential entry routes: Concrete slabs and basement walls must be properly reinforced to minimize crack­ing. (Refer to Division з for information on concrete reinforcement.) Cracking in concrete floors is a common occurrence. Cold joints and expansion joints help con­trol where cracking will occur so it can be more easily and reliably sealed. Plumbing penetrations must be sealed with a flexible caulk. (Refer to recommended caulking materials in this chapter.) Special barrier sheeting placed under the slab or over the soil in the crawl space will further block soil gas from entering. Basement walls must be thoroughly parged. Concrete floor slabs and block or poured concrete walls can by coated with AFM Safecoat DynoSeal or another low-emissions flexible membrane to further seal cracks and joints.

• Prevention of negative pressurization of the building envelope: A home that has lower air pressure than the surround­ing outside environment will be negatively pressurized. This creates a vacuum that will suck air and soil gases into the build­ing wherever there happens to be a route of entry, including tiny cracks in the slab, crawl space soil barrier, or basement walls. To prevent negative pressurization, it is important to provide sources for the con­trolled supply of outside air into the home to replace the air lost through the operation of various appliances such as exhaust fans and clothes dryers. Creating a condition

гттмтт

4 J cjNT* "ЧЬ

.fto*2v

-*•*, eot,*

і!£*?

Water Vapor Infiltration

where there is a slight positive pressuriza­tion can be an effective means of reducing levels of radon and other soil gases. Strat­egies for providing proper pressurization are discussed in Division 15.

• Collection of soil gas from under the building envelope and redirection away from the building: There are several methods for accomplishing this task. Pro­fessional Discount Supply is a company that specializes in radon mitigation sup­
plies. Many of these same materials are ap­plicable to all soil gas mitigation.

You may want to include the following col­lection methods in your specifications, along with instructions for proper installation of barriers and sealants:

Method 1: A 4-inch layer of aggregate is placed under the building envelope. A 4-inch-diameter perforated pipe is laid in the

Soil Gas Management

A variety of natural and human-caused soil gases can infiltrate structures and lead to in­door air quality problems. Soil gases can be sucked into basements, crawl spaces, and floor slabs if negative pressurization exists within or under a structure. You can prevent this prob­lem by creating a physical barrier between the soil and the home and by controlling the air pressure conditions under and within the home.

Harmful human-source soil gases include

trie company sent a team of specialists to his house to investigate. The readings on the Geiger counter showed levels 700 times higher than the maximum considered safe for human exposure. Researchers concluded that the culprit was radon, a naturally occurring radioactive gas derived from underground uranium.

Discussion

At that time, very little was known about radon and its health effects. The Watras house was used as a laboratory for radon researchers who wanted to learn how radon gets into a house and how to get it out. Low-grade uranium ore was discovered beneath the basement of the structure, in direct contact with the house. The foundation of the house was removed, along with the soil under­neath, to a depth of four feet. Ventilation fans were installed to pull radon-laden air out from under the house. Watras and his family were eventually able to move back into their home.

pesticides, herbicides, and gases from nearby landfills or industrial sites. In new construc­tion, most of these problems can be avoided through careful site selection and through home and yard maintenance that is free of toxic chemicals.

Water vapor and radon gas are two natu­rally occurring soil gases that may infiltrate a structure and result in health problems. The intrusion of water vapor into the home may cause structural damage and mold prob­lems. These gases are both easily dissipated or blocked from entry by installing appropriate controls during the construction process.

Radon Gas Infiltration

Radon is a clear, odorless gaseous byproduct of the natural breakdown of uranium in soil, rock, and water. While radon gas dissipates in open spaces, it tends to cling to particu­late matter and accumulates when enclosed. When inhaled, radioactive particles become lodged in the mucous membranes of the re­spiratory system. The Surgeon General has stated that radon exposure is second only to tobacco smoke as a cause of lung cancer.

It has been estimated that as many as one in 15 homes in the United States contains ele­vated radon levels. The EPA recommends mit­igation at levels higher than 4.0 picocuries per liter of air. Even at 4.0 picocuries per liter, there is an increased risk of lung cancer. Therefore, reducing radon to between 1.0 and 1.5 pico­curies per liter is a prudent target, ensuring a margin of safety.

Radon mitigation is most effective and least costly when incorporated into the con­struction of the home. If you are building a new home and there is reason to suspect a ra­don problem, a soil test is advisable. Although the test will not tell you definitively what the radon levels will ultimately be in the finished home, it will help you decide whether to in­clude mitigation measures in your construc­tion plans. For more information about this test, refer to Division 13.

How Radon First Came to the Attention of the US Public

Stanley Watras had worked as an engineer for 11 years at a nuclear power plant in Pennsylvania. At the end of each workday, he and other plant em­ployees were checked by a monitor that measured radiation levels. This procedure ensured that they had not been contaminated by unsafe levels of radioactivity while at work.

In December 1984, Watras suddenly began setting off the buzzers on the radiation monitors as he walked by the machine on his way out of the building. The readings showed high levels of con­tamination over his entire body. For several days this scenario was repeated, with Watras subjected to a lengthy decontamination ordeal. Where was Watras picking up this radioactivity and why was it affecting only him?

The mystery was solved when Watras de­cided one morning to go through the monitors at the exit door as he entered the workplace. When the alarms went off, Watras immediately realized that the radiation was coming from somewhere outside the nuclear power plant. The local elec-

plugs the pores and capillary tracts of con­crete. Xypex Concentrate can be used as a single-coat dampproofing membrane or in a two-coat system with Xypex Modified. Xypex Modified can be used alone where dampproofing is required.

Fluid-Applied Dampproofing

• AFM Safecoat DynoFlex: A topcoat for use over DynoSeal

• AFM Safecoat DynoSeal: A flexible vaporproof barrier

• Rub-R-Wall: Asphalt-free moisture resis­tant membrane products for various foun­dation applications

Bentonite Dampproofing

• Volclay: A self-healing bentonite-based moisture resistant panel

Creating a Capillary Break

Under some conditions, water will move up­ward through the soil by capillary action. This type of moisture invasion can be controlled by creating a capillary break. Half-inch mini­mum gravel, free of smaller fines, placed under a slab will stop capillary action. A dampproof­ing coating or membrane should also be ap­plied between the footing and the stem wall or the stem wall and the framing to stop any moisture from being carried up through the concrete and entering the framing.

Dampproofing for Foundation Walls

The use of asphaltic and bituminous tar mix­tures for dampproofing is standard practice. These petrochemical-based materials are known carcinogens. There are several other readily available products made for this pur­pose that are more healthful choices. The fol­
lowing products may be specified for damp­proofing foundation walls or other walls adjacent to soil:

Cementitious Dampproofing

• Thoroseal Foundation Coating: A ce­mentitious dampproofing for concrete and concrete masonry unit (CMU) surfaces.

• Xypex: A nontoxic (according to man­ufacturer), zero-VOC chemical treat­ment for dampproofing and protection of poured concrete, it creates a nonsoluable crystalline structure that permanently

Thermal and Moisture Control

Foundation Water Management

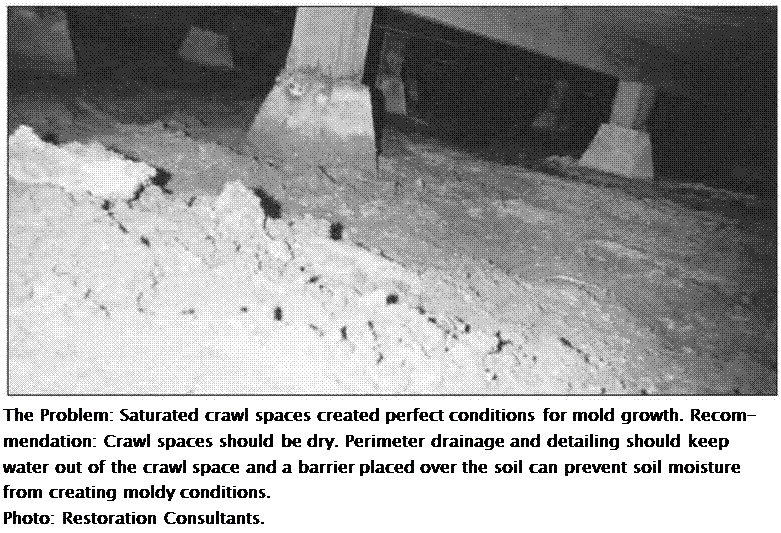
Dampproofing is used to form a water – resistant barrier on the outside of stem walls where they come into contact with the earth. This treatment is especially important wher­ever there is a crawl space or basement be­low grade. Along with proper grading and perimeter drainage, dampproofing is used as protection against the migration of moisture through the wall. Water migration can result in a damp environment under or inside the home, which can lead to structural deterio­ration of the building. This is a frequent and serious cause of mold infestation throughout the country.

Dampproofing of stem walls is only one component of the creation of an effective water barrier. Proper drainage backfilling and final grading are also essential in order to drain unwanted water away from the wall and relieve hydrostatic pressure that, if pres­ent, will drive water through any imperfection in the dampproof barrier and the stem wall.

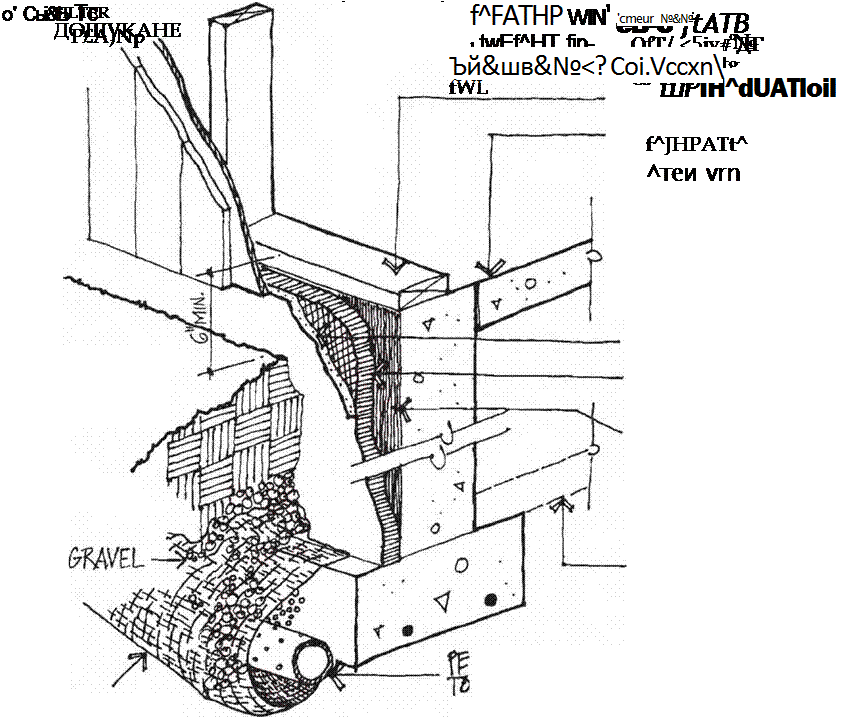
Conscientious and thorough workmanship are of the utmost importance. The following sample specifications describe the proper in­stallation of perimeter drainage.

Installation of Perimeter Drainage [10] [11]


Подпись: The Problem: Saturated crawl spaces created perfect conditions for mold growth. Recom-mendation: Crawl spaces should be dry. Perimeter drainage and detailing should keep water out of the crawl space and a barrier placed over the soil can prevent soil moisture from creating moldy conditions. Photo: Restoration Consultants.

A free-draining backfill of %-inch mini­mum crushed stone or gravel that is free of smaller particles shall be used to line and fill the excavation for all below-grade walls.

• An engineered drainage system may be substituted for a free-draining backfill. These systems frequently incorporate perimeter insulation with the drainage. The engineered drainage system must be installed in strict compliance with manu­facturers’ specifications.

• A french drain shall be installed so that all perforated pipes are located below the level of the bottom surface of the footing. French drain perforated pipes shall be in­stalled with the holes down to allow water to rise into the pipe. If holes are present in more than one side of the pipe, at least one set of holes shall face downward.

French drains shall be sloped down-

ward a minimum Ы inch per foot of run and be connected to daylight. If a french drain cannot be connected to daylight, it may have to be connected to an under­ground engineered collection pool, a sump pump, or a storm sewer system. The architect or engineer should then provide drawings that explain the exact require­ments. This situation is not ideal because sump pumps can fail and storm sewers can back up. If these problems are not quickly corrected, water damage may re­sult. If the storm sewer is connected to the sanitary sewer •— a situation that is usu­ally not permitted in new construction — any backup may also result in sewage on the exterior side of underground walls.

• The perforated pipe shall be surrounded and set in a minimum 2-inch depth bed consisting of a minimum 34-inch size of crushed stone free of smaller particles.

Thermal and Moisture Control

• The perforated pipe and crushed stone shall be surrounded by a filter membrane to prevent adjacent soil from washing into and clogging the french drain system.