Blog Archives

Raise exterior through walls first

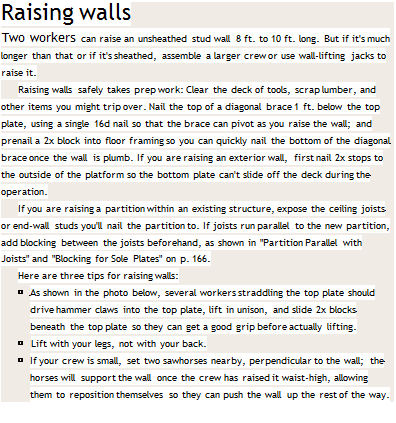
Start with one of the exterior through walls. Make sure there is no debris beneath the plates before raising the walls upright. If the wall is flat on the deck, stick the claw of a hammer into the double top plate, lift the wall up a bit, and put a 2x block under the wall. This way you can get your fingers under the wall to lift it. Keeping your back straight, use your legs to lift the wall to your waist, then take it overhead using your arms and upper body. Continue to raise the wall by pushing on the studs until it is fully upright. Once the wall is upright, hold

Remember that diagonal braces are important. Both exterior through walls are up; diagonal braces hold them securely while the other walls are raised. Use these temporary braces liberally where needed.
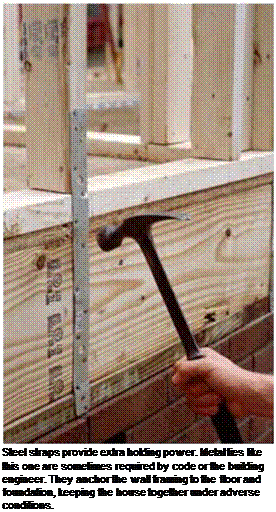
Подпись: Steel straps provide extra holding power. Metal ties like this one are sometimes required by code or the building engineer. They anchor the wall framing to the floor and foundation, keeping the house together under adverse conditions. Подпись:

Raise exterior through walls first

it steady—especi...

read more

CONCRETE BRIDGE DECK PROTECTION

Concrete bridge decks designed by the current AASHTO method described above have large amounts of reinforcing steel. (Some say it is enough to drive on, and that the concrete is provided just to make the ride smoother!) In the past, in areas where deicing salts are used, corrosion of the top steel caused extensive spalling that led to premature repair or replacement of many decks. In some coastal areas, saltwater spray on the bottom of deck slabs has caused similar corrosion of the bot­tom reinforcing steel.

For the foreseeable future, concrete bridge decks will continue to be reinforced with steel bars, even though revised design procedures may be adopted that permit lesser amounts. Therefore, it will continue to be necessary to protect those bars against corrosion...

read more

Sources and Fate of Water Contaminants in Roads

Lennart Folkeson[12], Torleif Bskken*, Mihael Brencic, Andrew Dawson, Denis Francois, Petra Kunmska, Teresa Leitao, Roman Licbinsky and Martin Vojtesek

Abstract This chapter gives an overview of sources, transport pathways and targets of road and traffic contaminants. Pollution sources include traffic and cargo, pave­ment and embankment materials, road equipment, maintenance and operation, and external sources. Heavy metals, hydrocarbons, nutrients, particulates and de-icing salt are among the contaminants having received the greatest attention. Runoff, splash/spray and seepage through the road construction and the soil are major trans­port routes of pollutants from the road to the environment...

read more

Designing a wall system

Once the stud size and spacing and the framing system have been selected, it is time to consider how to brace the building to resist the forces of wind, earthquakes, and eccentric loading. Will diagonal bracing be ade­quate, or should the building be braced with structural sheathing and/or shear walls? This question is best answered in the context of the design of the building as a whole, considering the other materials that complete the wall system. How is the wall to be insulated? Where are the openings in the wall for doors and windows? Will there be an air-infiltration barrier? What material will be used for the exterior finish? The details relating to these issues are addressed in this chapter, along with some suggestions for their appropriate use...

read more

ALTERNATIVE FRAMING METHODS

In renovation, it’s not always possible to assem­ble a wall on the deck and tilt it up. There may not be enough room, shoring may be in the way, or sloping floors may frustrate attempts to cut studs accurately in advance. In those cases, it may be easier to build the wall in place, piece by piece.

Building a partition in place. Start by position­ing the plates and tack nailing them to joists (or blocking) above or below. Although it’s most common to snap a chalkline on the floor and plumb up to the top plate, it doesn’t really matter which plate you attach first, unless there’s a com­pelling structural or design reason. If you’re erecting a bearing wall, for example, center its sole plate over the appropriate girders or bearing walls below...

read more

Practical Guidelines for Design

7.4.2.1 SMA Constituents

Coarse aggregates of 2/6 mm are not permitted in an SMA mixture with a grada­tion of 0/11 mm just to guarantee a gap gradation. The sand fraction has to consist of a minimum of 50% crushed stone, whereas the content of air voids according to Rigden and the bituminous number* should form the basis for selection of the filler. As in many other countries, the amount of stabilizer is based on draindown testing.

The road binder 70/100,* and in special cases modified binder, should be used in SMA. No Reclaimed Asphalt Pavement (RAP) is allowed in SMA in the Netherlands.

7.4.2.2 Designing an Asphalt Mixture

Reading the recommended fixed binder content in SMA from the standard marks the beginning of design...

read more

Binder and Stabilizer (Drainage Inhibitor)

A constant, fixed binder content, exclusively dependent on the size of the maximum particle, D, in an aggregate mix is the most unusual feature of the Dutch method. When designing SMA, the binder content for a given gradation should be taken from the regulations; for example, an SMA 0/11 for heavy-duty traffic should have a binder content of 6.5% (m/m). The quantity of binder remains unaltered; it is to be matched with a proper gradation of the aggregate mix. In other words, in the Dutch method, for a specified SMA 0/11, one has to design an aggregate mix so that it will contain 6.5% of binder with air voids at the level of 5.0% (v/v)[40] [41].

In many countries in the practice of designing asphalt mixtures it used to be said that the optimal amount of binder has been matched with a given ...

read more

. PLUMBING AND SECURING THE WALL

Once the wall is up, nail the bottom of the brace so the wall will stay upright as you fine-tune its position. Use a sledgehammer to tap the sole plate till it aligns with your chalkline on the floor. As you adjust, continuously check for plumb, using a 6-ft. level. If you unnail the brace to plumb the wall, have workers support the wall until you’ve renailed it.

Once the bottom plate lines up with the chalk­line, drive two or three 20d nails through the plate, into the joists or blocking below, so the wall can’t drift. Methods for securing the top of the wall vary. If you’re framing an addition and have wide-open space, typically two walls inter­secting at right angles are raised, plumbed, and braced, and then tied together by overlapping top plates.

Подпись: Raising walls Two workers can raise an unsheathed stud wall 8 ft. to 10 ft. long. But if it's much longer than that or if it's sheathed, assemble a larger crew or use wall-lifting jacks to raise it. Raising walls safely takes prep work: Clear the deck of tools, scrap lumber, and other items you might trip over. Nail the top of a diagonal brace 1 ft. below the top plate, using a single 16d nail so that the brace can pivot as you raise the wall; and prenail a 2x block into floor framing so you can quickly nail the bottom of the diagonal brace once the wall is plumb. If you are raising an exterior wall, first nail 2x stops to the outside of the platform so the bottom plate can't slide off the deck during the operation. If you are raising a partition within an existing structure, expose the ceiling joists or end-wall studs you'll nail the partition to. If joists run parallel to the new partition, add blocking between the joists beforehand, as shown in "Partition Parallel with Joists" and "Blocking for Sole Plates" on p. 166. Here are three tips for raising walls: ► As shown in the photo below, several workers straddling the top plate should drive hammer claws into the top plate, lift in unison, and slide 2x blocks beneath the top plate so they can get a good grip before actually lifting. ► Lift with your legs, not with your back. ► If your crew is small, set two sawhorses nearby, perpendicular to the wall; the horses will support the wall once the crew has raised it waist-high, allowing them to reposition themselves so they can push the wall up the rest of the way. image336But if you’re raising a partition in...

read more

Porous Asphalt

In countries that suffer from large amounts of rainfall, the asphaltic wearing sur­faces are often constructed of open graded asphaltic mixtures. The high perme­ability of these wearing surfaces ensures a fast drainage of the water away from

Porous Asphalt

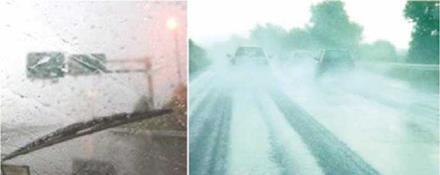
Fig. 5.15 (a) bad road visibility conditions (b) hydroplaning and ‘splash and spray’ (Erkens, 2005). Reproduced by permission of N. Kringos

the surface, avoiding hydroplaning and bad visibility conditions due to ‘splash and spray’, Fig. 5.15, and thus improving the overall road safety.

Porous asphalt uses aggregate with a moderate to coarse median particle size and a very steep grading curve – i. e. the majority of the stones in the mixture are of a similar size...

read more

Adjustment for the Run

For every 12" of common rafter run, there is 16.97" (17" approx.) of run for hip and valley rafters. Multiply the run in feet of the common rafter by 16.97" (17" is commonly used) to get the run of the hip or valley rafter.

Adjustments for the Top and Bottom Cuts

The cut mark will be made similar to the common rafter cut mark, except that the hip-val scale on the speed square will be used instead of the common scale to mark the line to cut. (See “Rafter Cut Length" and “Angle Cuts" earlier in this chapter)

If a framing square is used, apply the same procedure shown previously, except use 17" instead of 12" along the blade of the framing square.

These procedures assume a hip or valley corner of 90 degrees.

Bottom Adjustment

Hip Rafter Length (HRL) = Hip rafter length before adjustments ...

read more