Some More About Doorframes and Posts
With a lot of natural building being done these days, cordwood, cob, or straw bale walls of 16 to 24 inches thick are not uncommon. Doorframes will have to be equally wide. Earth woods cordwood walls are all 16 inches (40.6 centimeters) thick, so I make my doorframes from two four-by-eight timbers, with their 4-inch
(ioi millimeter) dimensions butted together, forming, effectively, a 4-by-i6-inch door post. These vertical timbers can be fastened together with metal straps, as shown in Fig. 4.54.
Fastening such a doorframe to a concrete floor requires two pins, one for each of the four-by-eights, to stop the doorframe from rotating. Alternatively, a 12- to 16-inch-long piece of angle iron can fasten the frame to the floor as discussed above, and the angle iron is hidden from view in the cordwood wall.
With single posts, such as eight-by-eights, two pins instead of one will stop the post from rotating, and I have mentioned this to students for years. In point of fact, we only used one pin for each of the posts at both Log End Cave and Earthwood, and I have seen no sign of any post rotating. The heavy concentrated load on these posts imparts tremendous friction at each post end, and rotation would be highly unlikely, especially after girders and floors above the posts tie everything together. One pin is enough with heavy structures.
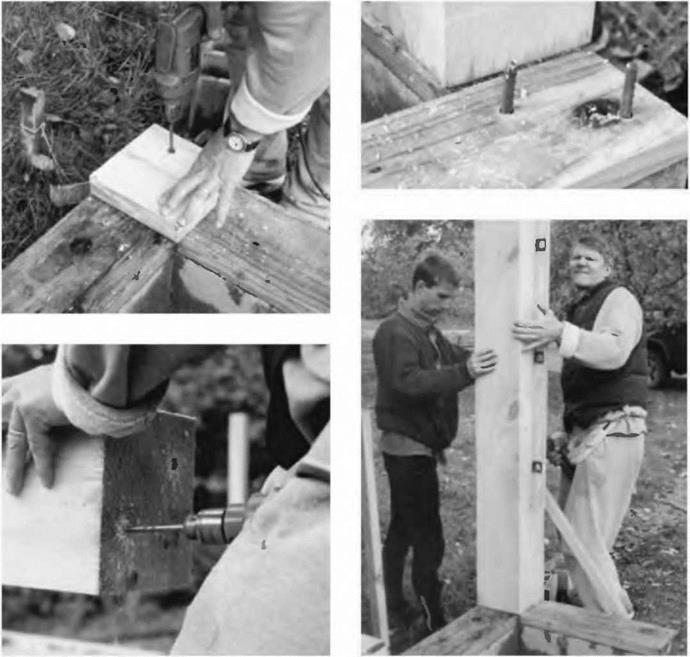
Chris Ryan, like any good builder, likes to use patterns to make jobs easier. My son Rohan helped him set up a corner post at his garage while I took the following sequence of photos:
Fig. 4.8: Chris made a pattern from an eight inch piece of two-by-eight, held it firmly on the corner of his garage footing, and drilled two holes straight down into the plate, already fastened to a course of blocks as described above.
Fig – 4-9: Next, Chris installed a couple of positioning pins into the two-by – eight pressure-treated plate. The pins are made from scrap half-inch (1.2 centimeter) #4 reinforcing bar, or “rebar.”
Fig. 4.10: Chris used the pattern to transpose the pin locations to the underside of his eight-by-eight corner posts. In this photo, Chris completes the holes, deep enough so that the post will sit firmly on the sill plate. Rohan and Chris will put the heavy eight-by-eight post in place over the pins seen in Fig. 4.9.
Fig. 4.11: Here, Rohan adjusts the post while Chris checks the plumb bubble of his four-foot level. When the post is plumb, he screws the short brace diagonal into place. The post is plumbed and braced in both directions. One down, about 15 more to go (including four-by-eight doorframe posts.)


 In areas of high winds, positioning pins alone may not satisfy local code, and you will probably have to use a code-approved metal fastener for the purpose. But, before we look at these, we should discuss metal fasteners and connectors in a general way.
|
|


Leave a reply