Roof Systems
There are basically two different roof-support systems that are appropriate for use with timber framing. Most timber framers continue on with additional timber framing, and I have done this, as well, at Log End Cottage, Log End Cave, and Earthwood, by using methods described in this book. The other support system that should be considered carefully is the truss-supported roof, like the garage at Earthwood and the one that Chris built.
Is one system better than the other? Not necessarily. There are pros and cons for each.
i. Engineering. Trusses are normally designed and built by professionals.
I’m not saying that owner-builders have never done it, and successfully, but, like mixing one’s own concrete, it is hardly worth the effort for the money saved. Engineering is crucial. You would need to use a standard truss design that happens to suit the dimensions and purpose of your building, or have the trusses professionally engineered. Then you’d need to create a large template, such as on a barn floor, to actually fasten the various chords together with truss plates. Purchased trusses are not that
|
|
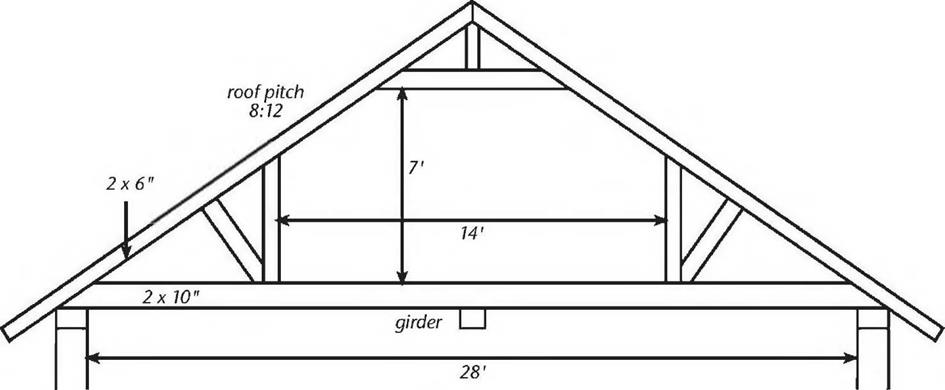
expensive, and the manufacturers know how to design a truss for your Fig. 4.38: Richard Flatau’s attic
application. trusses looked something like this.
The engineering of a timber-framed roof is a bit more basic, and timber frame designs tend to be on the over-built side, anyway. With a rafter system, you can consult span tables to find appropriate timber size.
Still, unless you are following a tried and proven plan, you should have your entire timber-frame plan checked by a structural engineer. And strong jointing, both at the top and the bottom of the rafter, is critical.
2. Upstairs space. With timber framing, it is, perhaps, a little easier to create useful space under the roof, although there is a truss design, called “attic trusses” which can afford some space upstairs, usually a little less than half of the entire area of the ceiling below. Richard Flatau used attic trusses with his post-and-beam cordwood home in Merrill, Wisconsin. The company that engineered, built, and delivered the trusses also put them up onto the girts. Their delivery truck has a boom built onto it for the purpose. Richard hired a contractor friend experienced in truss work and enlisted a couple of other friends as “grunts,” and the 20 heavy trusses were installed in just two hours. Richard says that the trusses enclose 560 square feet (52 square meters) of extra living space upstairs, including two bedrooms, a play area, ample storage, and a half bath. See Fig. 4.38.
3. Ease of construction. By the time the girts are in place, timber-framing the roof structure will be an extension of using many of the same
techniques with which the builder is already familiar, although there will be a few new ones. Trusses are an entirely different kettle of fish, but installing trusses is not that difficult, particularly if you follow Richard Flatau’s example and hire one person with experience to tell you and your other helpers what to do.
Trusses can be installed with or without the use of a crane. Chris Ryan simply had his garage trusses delivered to site, and he and two friends were able to hang them upside down between the parallel sidewalls by themselves. (Fig. 4.46 on page 97). Later, with a man at the top of each side wall, a third person with a long pole would “flip” a truss upright, and then, from a ladder, help the team space and brace the truss into position. It is really important that the trusses be square on the girt system, parallel to each other, and exactly at the planned regular spacing, usually 16 or 24 inches on center.
Using a framing square, you should mark the top of each girt, showing each edge of each truss. Make sure the spacing comes out right on both sides. Spacing is critical if you are planning to nail plywood on top, or sheetrock ceilings to the underside of the trusses. Squareness and plumb are both part of the all-important build quality.
On balance, and assuming that you find someone with experience to help, I’d say that trusses are probably quicker and easier than timber framing.
Incidentally, traditional timber framers often create what can be described as timber-framed trusses, which they raise like bents on the day of the timber raising, as we saw back in Fig. 2.17. Conventional timber framers — the rest of us — usually install each member individually.
4. Cost. Richard Flatau says that his attic trusses actually cost $800 less (1979 prices) than the cost of a conventional “stick-built” roof. The total cost of his 20 trusses, delivered and placed on the girts, was $1,400 in 1979. These were large, heavy trusses, suitable to support floor loads upstairs. I think it is safe to just about triple the cost of those trusses today. Our garage trusses span 24 feet and have two-foot overhangs each side, and cost us $58 each in 1998. But Richard’s trusses were made from two-by-sixes and two – by-tens, while all parts of our trusses are two-by-fours. It is difficult to compare truss cost to timber-frame cost, as the cost of the timbers themselves varies so widely from one project to another, depending on
how the timbers were procured. While trusses may be cheaper than conventional stick-frame construction (when labor is factored in), they are certainly more expensive than framing with homegrown timbers.


Leave a reply