Stop the Air Leaks, Stop Losing Heat
Air leaks can account for 30% of a home’s energy loss, so it pays to seek out and seal every penetration between the living (conditioned) space and the attic (unconditioned) space before adding insulation. Don’t leave any batt unturned when hunting down air leaks. Dust deposits in leaking air stain insulation brown or black, so you can start by looking for discoloration in the insulation.
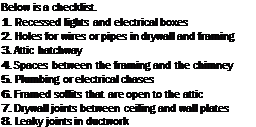
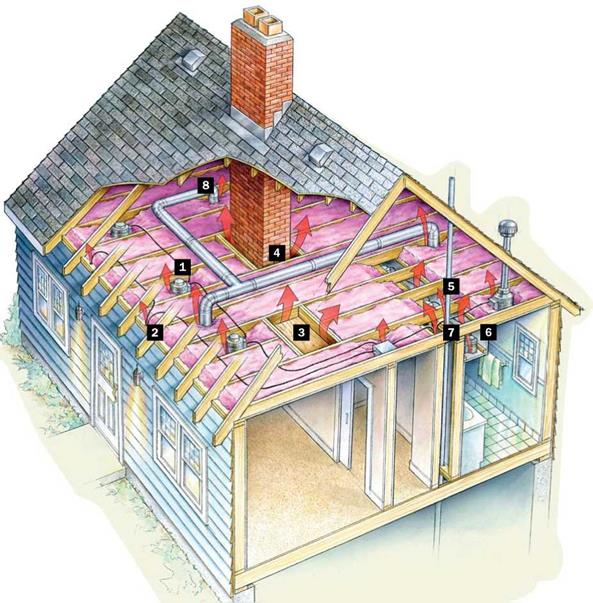
I treat the drywall ceiling as the air barrier and seal all penetrations, joints, and holes. The open framing for soffits and chases is a highway for air leaks from wall cavities into the attic. Another gaping hole is the attic – stair bulkhead (see the sidebar on p. 53).
I install an insulated and gasketed cover for the attic access panel or pull-down stairway. You can buy a ready-made access cover or make your own. The cover can be fit within the riser or on top of it. When the cover sits on top of the riser, apply the gasket material (usually adhesive-backed foam tape) to the cover (not the floor) so that it’s not damaged when someone accesses the attic.
Next, I seal recessed-light cans and ceiling-mounted light-fixture boxes. Both are often overlooked, but when combined are one of the biggest sources of air leaks. The holes and the perimeter of ceiling-mounted
electrical boxes should be sealed to the dry – wall with a fire-resistant sealant or foam (see the sidebar on p. 49). Gaps around ducts, wires, and pipes that penetrate into the attic must be located and closed, too. Most inexpensive and old bathroom exhaust – fan boxes have open seams and holes that should be covered with mastic or ductsealing tape. The fan-box perimeter should be sealed to the drywall with caulk or foam.
Another typical area to block off and seal is the 2-in.-wide space between framing and masonry chimneys. Combustible materials aren’t allowed to contact the masonry, so it’s best to use sheet metal to block the space.
I also seal the joint between the drywall and the wall plates. The thin joints between
 |
 |
 Potential Air Leaks in the Attic
A word of caution: Air-sealing a house can lead to backdrafting of natural draft combustion appliances like water heaters, furnaces, or boilers. To avoid creating a carbon-monoxide hazard, have a combustion-safety assessment done before tightening a house, and add a fresh-air intake duct to each burner.
Because old knob-and-tube wiring can’t be buried under new insulation, have an electrician replace any old wires in the attic before adding insulation. Ideally, all junction boxes should be raised above the level of the insulation. When elevating the junction boxes isn’t an option, you should install clearly marked permanent tags that can be seen above the insulation level.
While I am working in the attic, I like to install two electrical conduits (one line voltage and one telecom/low voltage) between the attic and the basement or the crawlspace to make any future wiring upgrades easier to accomplish.


Leave a reply