Water, Insects, Rot, and Mold
Whether structural damage is caused by insects or rot fungi, excess water is usually the heart of the problem. Thus, before treating the specific agent causing the deterioration, reduce excess water by maintaining gutters, improving drainage, grading the soil away from the building, eliminating wood-soil contact, improving ventilation, and so on.
The fungi that rot wood reproduce by airborne spores, so they’re virtually everywhere. But they can’t establish colonies on wood with a moisture content (MC) less than 28 percent; and they go dormant if the MC drops below 20 percent or the air temperature drops below 40°F. Household molds, also caused by fungi, thrive in a similar moisture and temperature range. So if moisture-meter readings in your basement or crawl space are too high, reducing excess moisture may solve both wood rot and mold problems.
How you reduce moisture, however, is something experts can’t agree on (see Chapter 14 for more on mitigating moisture and mold). Many building codes recommend covering dirt floors in crawl spaces or basements with sheet plastic and installing screened vents to circulate air and disperse moisture: 1 sq. ft. of vent per 100 sq. ft. of floor space is the standard formula. Whereas another group of builders argues that it makes more sense—especially in the humid South—to close vents, insulate crawl space or basement walls, seal air leaks, and install a dehumidifier. That, they argue, will stop mold from colonizing and migrating to living spaces. Best bet: See which approach builders in your region favor.

![]()


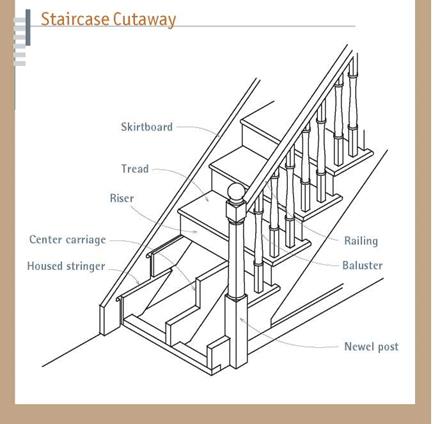
Stairs are complicated to build, and problems can be tricky to diagnose. For example, it may be possible to repair squeaky stairs with glue and a few screws. But if squeaking is widespread, stairs tilt to one side, and there’s a gap along a stairwell wall, the diagonal supports beneath the staircase may be failing. In that case, you’ll probably need to expose those supports to find out.
If the underside of your staircase is covered and you have only a few squeaks, try fixing them without tearing out finish materials. Many people mistakenly attempt to fix squeaks by nailing down offending treads with finish nails, but nails alone won’t work. The nails may split the nosing, and they’ll almost certainly pull loose. It’s far better to predrill and countersink Torx screws
through the tread into a riser or center carriage beneath.
If stairs can be painted or carpeted over, caulk the squeaky joint with subflooring adhesive. This doesn’t bind the pieces together as well as screws do, but the adhesive cushions them, in effect. Keep people off the stairs until the compound has cured. If that doesn’t eliminate squeaking, expose the underside of the staircase to examine its underpinnings.
What you do next depends on the construction of the stairs. If there are blocks glued along the riser-tread joint, it’s likely the glue has failed. First, eliminate tread movement by nailing through the back side of risers into treads: predrill, and use two or three 6d finish nails per tread. Then reglue errant blocks with white glue or, better yet, with construction adhesive.
Broken balusters can usually be doweled, glued, and filled. But if you’re disappointed with the repair, see if your lumberyard can order a replacement in the same pattern. Stair parts have been mass-produced for a century or more, so there are catalogs full of stock balusters. Custom mills can create new balusters to match old ones, but the process is labor intensive and costly.
Thus, if you have many damaged or missing balusters and can’t find stock replacements, consider replacing all with another pattern.
|
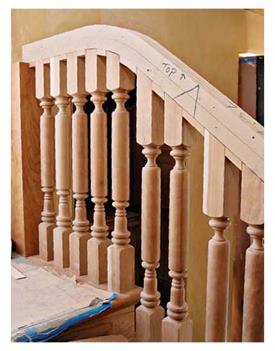
The rough cap atop this baluster section of a custom – built staircase will be covered by a three-piece railing assembly. The short fillet strips between the baluster tops can be removed, should balusters need replacing later. |
If balusters are intact but shaky, remove and reglue them; simply nailing them won’t do much good. To get at balusters, pry free the return molding at the end of the tread by inserting a putty knife or small chisel into the nosing seam. Once you start prying, you’ll see small finish nails holding the nosing in place; remove these nails. Then gently tap out the bottom of the baluster, which is usually joined to the tread by a dovetail joint or a dowel. The top of the baluster is held in place by fillet strips that fit tightly between baluster tops and are toenailed with tiny finish nails to the plow (routed channel) in the underside of the railing. Pry out the fillets first, shown in the photo on the facing page.
To fit the baluster back in place tightly, lightly coat both ends with white glue and replace the tenoned or doweled end first. Replace fillets to evenly space the tops of the balusters. Replace the return molding and wipe off the excess glue. To prevent marring during this operation, cushion blows with a rubber mallet or scrap wood.


Leave a reply